00. 目录
@
参考博客:https://blog.csdn.net/dengjin20104042056/article/details/95091506
01. 环境介绍
Navicat版本: Navicat Premium12
数据库版本: MySQL5.7和Oracle 11g
02. Navicat安装
请参考详细安装教程:【Tools】Navicat Premium12安装和破解教程
03. MySQL开启远程登录权限
方法一:
step1: 登录MySQL数据库
[root@localhost ~]# mysql -uroot -p
Enter password:
Welcome to the MySQL monitor.  Commands end with ; or g.
Your MySQL connection id is 78
Server version: 5.7.23 MySQL Community Server (GPL)

Copyright (c) 2000, 2018, Oracle and/or its affiliates. All rights reserved.

Oracle is a registered trademark of Oracle Corporation and/or its
affiliates. Other names may be trademarks of their respective
owners.

Type 'help;' or 'h' for help. Type 'c' to clear the current input statement.

mysql>
step2: 修改权限
第一个root是用户名,后面一个root是数据库密钥, %表示所有主机都可以访问。
mysql> GRANT ALL PRIVILEGES ON *.* TO 'root'@'%' IDENTIFIED BY 'root' WITH GRANT OPTION;
step3: 刷新权限
mysql> flush privileges;
Query OK, 0 rows affected (0.22 sec)

mysql>
step4: 查看权限
mysql> use mysql
Reading table information for completion of table and column names
You can turn off this feature to get a quicker startup with -A

sDatabase changed
mysql> select user, host from user;
+---------------+-----------+
| user          | host      |
+---------------+-----------+
| root          | %         |
| mysql.session | localhost |
| mysql.sys     | localhost |
| root          | localhost |
+---------------+-----------+
4 rows in set (0.09 sec)

mysql>
方法二:
step1: 修改表user
mysql> use mysql;
mysql> update user set host = ‘%’ where user = ‘root’;
step2: 刷新权限
mysql> flush privileges;
Query OK, 0 rows affected (0.22 sec)

mysql>
到此远程权限开启成功。
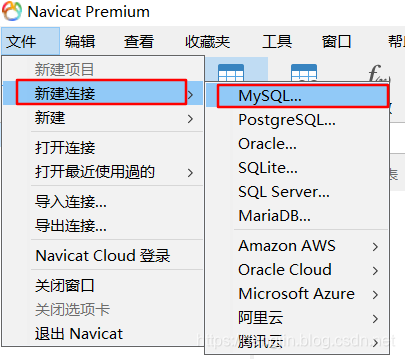
04. Navicat连接MySQL
step1: 新建连接,选择MySQL
step2: 填写连接信息
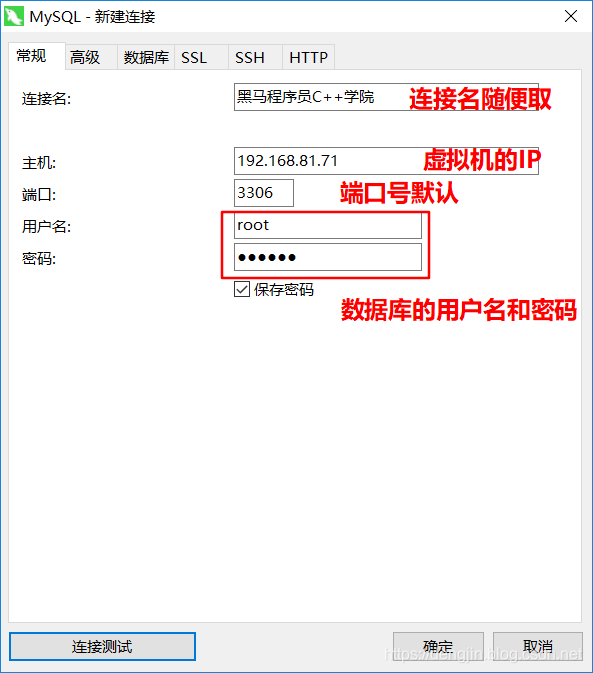
step3: 测试
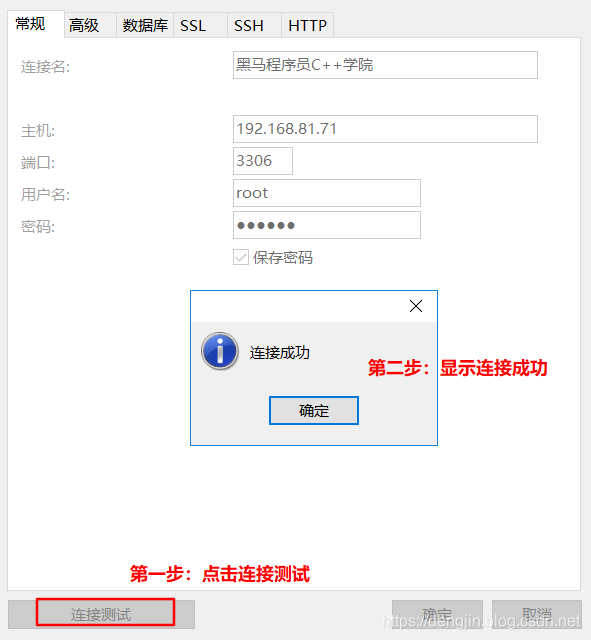
step4: 连接结果
到这一步我们基本上连接好了MySQL数据库
软件和破解文件下载:
链接:https://pan.baidu.com/s/1REong-Zcc0axvWtMXjL4pg
提取码:3b4p