初识LinkedHashMap
上两篇文章讲了HashMap和HashMap在多线程下引发的问题,说明了,HashMap是一种非常常见、非常有用的集合,并且在多线程情况下使用不当会有线程安全问题。
大多数情况下,只要不涉及线程安全问题,Map基本都可以使用HashMap,不过HashMap有一个问题,就是迭代HashMap的顺序并不是HashMap放置的顺序,也就是无序。HashMap的这一缺点往往会带来困扰,因为有些场景,我们期待一个有序的Map。
这个时候,LinkedHashMap就闪亮登场了,它虽然增加了时间和空间上的开销,但是通过维护一个运行于所有条目的双向链表,LinkedHashMap保证了元素迭代的顺序。
四个关注点在LinkedHashMap上的答案
| 关 注 点 | 结 论 |
| LinkedHashMap是否允许空 | Key和Value都允许空 |
| LinkedHashMap是否允许重复数据 | Key重复会覆盖、Value允许重复 |
| LinkedHashMap是否有序 | 有序 |
| LinkedHashMap是否线程安全 | 非线程安全 |
LinkedHashMap基本结构
关于LinkedHashMap,先提两点:
1、LinkedHashMap可以认为是HashMap+LinkedList,即它既使用HashMap操作数据结构,又使用LinkedList维护插入元素的先后顺序
2、LinkedHashMap的基本实现思想就是----多态。可以说,理解多态,再去理解LinkedHashMap原理会事半功倍;反之也是,对于LinkedHashMap原理的学习,也可以促进和加深对于多态的理解。
为什么可以这么说,首先看一下,LinkedHashMap的定义:
public class LinkedHashMap<K,V>
    extends HashMap<K,V>
    implements Map<K,V>
{
    ...
}
看到,LinkedHashMap是HashMap的子类,自然LinkedHashMap也就继承了HashMap中所有非private的方法。再看一下LinkedHashMap中本身的方法:
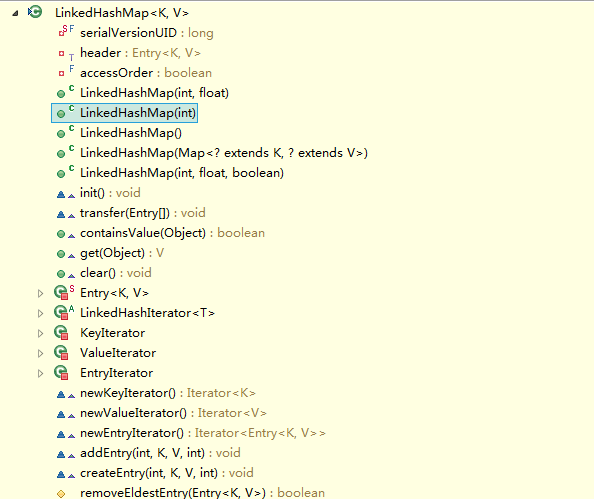
看到LinkedHashMap中并没有什么操作数据结构的方法,也就是说LinkedHashMap操作数据结构(比如put一个数据),和HashMap操作数据的方法完全一样,无非就是细节上有一些的不同罢了。
LinkedHashMap和HashMap的区别在于它们的基本数据结构上,看一下LinkedHashMap的基本数据结构,也就是Entry:

private static class Entry<K,V> extends HashMap.Entry<K,V> {
    // These fields comprise the doubly linked list used for iteration.
    Entry<K,V> before, after;

Entry(int hash, K key, V value, HashMap.Entry<K,V> next) {
        super(hash, key, value, next);
    }
    ...
}
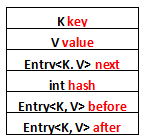
列一下Entry里面有的一些属性吧:
1、K key
2、V value
3、Entry<K, V> next
4、int hash
5、Entry<K, V> before
6、Entry<K, V> after
其中前面四个,也就是红色部分是从HashMap.Entry中继承过来的;后面两个,也就是蓝色部分是LinkedHashMap独有的。不要搞错了next和before、After,next是用于维护HashMap指定table位置上连接的Entry的顺序的,before、After是用于维护Entry插入的先后顺序的。
还是用图表示一下,列一下属性而已:
初始化LinkedHashMap
假如有这么一段代码:
1 public static void main(String[] args)
2 {
3     LinkedHashMap<String, String> linkedHashMap =
4             new LinkedHashMap<String, String>();
5     linkedHashMap.put("111", "111");
6     linkedHashMap.put("222", "222");
7 }
首先是第3行~第4行,new一个LinkedHashMap出来,看一下做了什么:
 1 public LinkedHashMap() {
 2 super();
 3     accessOrder = false;
 4 }
1 public HashMap() {
2     this.loadFactor = DEFAULT_LOAD_FACTOR;
3     threshold = (int)(DEFAULT_INITIAL_CAPACITY * DEFAULT_LOAD_FACTOR);
4     table = new Entry[DEFAULT_INITIAL_CAPACITY];
5     init();
6 }
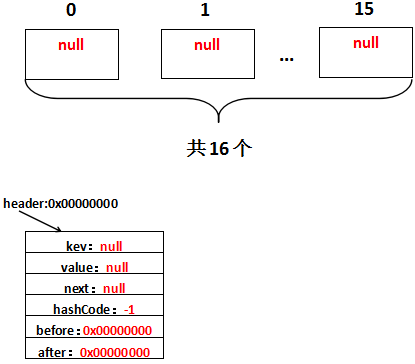
 1 void init() {
 2     header = new Entry<K,V>(-1, null, null, null);
 3     header.before = header.after = header;
 4 }
/**
 * The head of the doubly linked list.
 */
private transient Entry<K,V> header;
这里出现了第一个多态:init()方法。尽管init()方法定义在HashMap中,但是由于:
1、LinkedHashMap重写了init方法
2、实例化出来的是LinkedHashMap
因此实际调用的init方法是LinkedHashMap重写的init方法。假设header的地址是0x00000000,那么初始化完毕,实际上是这样的:
LinkedHashMap添加元素
继续看LinkedHashMap添加元素,也就是put("111","111")做了什么,首先当然是调用HashMap的put方法:
 1 public V put(K key, V value) {
 2     if (key == null)
 3         return putForNullKey(value);
 4     int hash = hash(key.hashCode());
 5     int i = indexFor(hash, table.length);
 6     for (Entry<K,V> e = table[i]; e != null; e = e.next) {
 7         Object k;
 8         if (e.hash == hash && ((k = e.key) == key || key.equals(k))) {
 9             V oldValue = e.value;
10             e.value = value;
11             e.recordAccess(this);
12             return oldValue;
13         }
14     }
15
16     modCount++;
17     addEntry(hash, key, value, i);
18     return null;
19 }
第17行又是一个多态,因为LinkedHashMap重写了addEntry方法,因此addEntry调用的是LinkedHashMap重写了的方法:
 1 void addEntry(int hash, K key, V value, int bucketIndex) {
 2     createEntry(hash, key, value, bucketIndex);
 3
 4     // Remove eldest entry if instructed, else grow capacity if appropriate
 5     Entry<K,V> eldest = header.after;
 6     if (removeEldestEntry(eldest)) {
 7         removeEntryForKey(eldest.key);
 8     } else {
 9         if (size >= threshold)
10             resize(2 * table.length);
11     }
12 }
因为LinkedHashMap由于其本身维护了插入的先后顺序,因此LinkedHashMap可以用来做缓存,第5行~第7行是用来支持FIFO算法的,这里暂时不用去关心它。看一下createEntry方法:
1 void createEntry(int hash, K key, V value, int bucketIndex) {
2     HashMap.Entry<K,V> old = table[bucketIndex];
3     Entry<K,V> e = new Entry<K,V>(hash, key, value, old);
4     table[bucketIndex] = e;
5     e.addBefore(header);
6     size++;
7 }
private void addBefore(Entry<K,V> existingEntry) {
    after  = existingEntry;
    before = existingEntry.before;
    before.after = this;
    after.before = this;
}
第2行~第4行的代码和HashMap没有什么不同,新添加的元素放在table[i]上,差别在于LinkedHashMap还做了addBefore操作,这四行代码的意思就是让新的Entry和原链表生成一个双向链表。假设字符串111放在位置table[1]上,生成的Entry地址为0x00000001,那么用图表示是这样的:

如果熟悉LinkedList的源码应该不难理解,还是解释一下,注意下existingEntry表示的是header:
1、after=existingEntry,即新增的Entry的after=header地址,即after=0x00000000
2、before=existingEntry.before,即新增的Entry的before是header的before的地址,header的before此时是0x00000000,因此新增的Entry的before=0x00000000
3、before.after=this,新增的Entry的before此时为0x00000000即header,header的after=this,即header的after=0x00000001
4、after.before=this,新增的Entry的after此时为0x00000000即header,header的before=this,即header的before=0x00000001
这样,header与新增的Entry的一个双向链表就形成了。再看,新增了字符串222之后是什么样的,假设新增的Entry的地址为0x00000002,生成到table[2]上,用图表示是这样的:

就不细解释了,只要before、after清除地知道代表的是哪个Entry的就不会有什么问题。
总得来看,再说明一遍,LinkedHashMap的实现就是HashMap+LinkedList的实现方式,以HashMap维护数据结构,以LinkList的方式维护数据插入顺序。
利用LinkedHashMap实现LRU算法缓存
前面讲了LinkedHashMap添加元素,删除、修改元素就不说了,比较简单,和HashMap+LinkedList的删除、修改元素大同小异,下面讲一个新的内容。
LinkedHashMap可以用来作缓存,比方说LRUCache,看一下这个类的代码,很简单,就十几行而已:
public class LRUCache extends LinkedHashMap
{
    public LRUCache(int maxSize)
    {
        super(maxSize, 0.75F, true);
        maxElements = maxSize;
    }

    protected boolean removeEldestEntry(java.util.Map.Entry eldest)
    {
        return size() > maxElements;
    }

    private static final long serialVersionUID = 1L;
    protected int maxElements;
}
顾名思义,LRUCache就是基于LRU算法的Cache(缓存),这个类继承自LinkedHashMap,而类中看到没有什么特别的方法,这说明LRUCache实现缓存LRU功能都是源自LinkedHashMap的。LinkedHashMap可以实现LRU算法的缓存基于两点:
1、LinkedList首先它是一个Map,Map是基于K-V的,和缓存一致
2、LinkedList提供了一个boolean值可以让用户指定是否实现LRU
那么,首先我们了解一下什么是LRU:LRU即Least Recently Used,最近最少使用,也就是说,当缓存满了,会优先淘汰那些最近最不常访问的数据。比方说数据a,1天前访问了;数据b,2天前访问了,缓存满了,优先会淘汰数据b。
我们看一下LinkedList带boolean型参数的构造方法:
public LinkedHashMap(int initialCapacity,
         float loadFactor,
                     boolean accessOrder) {
    super(initialCapacity, loadFactor);
    this.accessOrder = accessOrder;
}
就是这个accessOrder,它表示:
(1)false,所有的Entry按照插入的顺序排列
(2)true,所有的Entry按照访问的顺序排列
第二点的意思就是,如果有1 2 3这3个Entry,那么访问了1,就把1移到尾部去,即2 3 1。每次访问都把访问的那个数据移到双向队列的尾部去,那么每次要淘汰数据的时候,双向队列最头的那个数据不就是最不常访问的那个数据了吗?换句话说,双向链表最头的那个数据就是要淘汰的数据。
"访问",这个词有两层意思:
1、根据Key拿到Value,也就是get方法
2、修改Key对应的Value,也就是put方法
首先看一下get方法,它在LinkedHashMap中被重写:
public V get(Object key) {
    Entry<K,V> e = (Entry<K,V>)getEntry(key);
    if (e == null)
        return null;
    e.recordAccess(this);
    return e.value;
}
然后是put方法,沿用父类HashMap的:
 1 public V put(K key, V value) {
 2     if (key == null)
 3         return putForNullKey(value);
 4     int hash = hash(key.hashCode());
 5     int i = indexFor(hash, table.length);
 6     for (Entry<K,V> e = table[i]; e != null; e = e.next) {
 7         Object k;
 8         if (e.hash == hash && ((k = e.key) == key || key.equals(k))) {
 9             V oldValue = e.value;
10             e.value = value;
11             e.recordAccess(this);
12             return oldValue;
13         }
14     }
15
16     modCount++;
17     addEntry(hash, key, value, i);
18     return null;
19 }
修改数据也就是第6行~第14行的代码。看到两端代码都有一个共同点:都调用了recordAccess方法,且这个方法是Entry中的方法,也就是说每次的recordAccess操作的都是某一个固定的Entry。
recordAccess,顾名思义,记录访问,也就是说你这次访问了双向链表,我就把你记录下来,怎么记录?把你访问的Entry移到尾部去。这个方法在HashMap中是一个空方法,就是用来给子类记录访问用的,看一下LinkedHashMap中的实现:
void recordAccess(HashMap<K,V> m) {
    LinkedHashMap<K,V> lm = (LinkedHashMap<K,V>)m;
    if (lm.accessOrder) {
        lm.modCount++;
        remove();
        addBefore(lm.header);
    }
}
private void remove() {
    before.after = after;
    after.before = before;
}
private void addBefore(Entry<K,V> existingEntry) {
    after  = existingEntry;
    before = existingEntry.before;
    before.after = this;
    after.before = this;
}
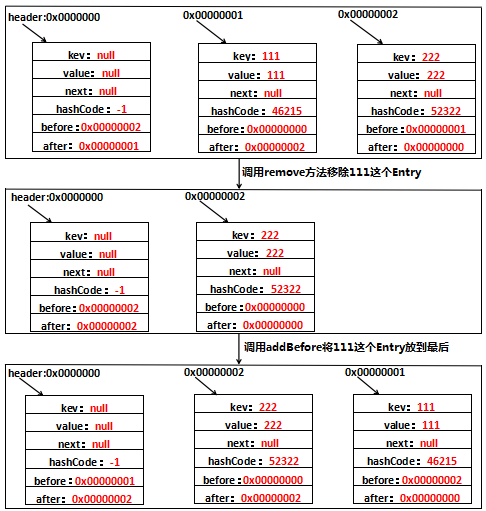
看到每次recordAccess的时候做了两件事情:
1、把待移动的Entry的前后Entry相连
2、把待移动的Entry移动到尾部
当然,这一切都是基于accessOrder=true的情况下。最后用一张图表示一下整个recordAccess的过程吧:
代码演示LinkedHashMap按照访问顺序排序的效果
最后代码演示一下LinkedList按照访问顺序排序的效果,验证一下上一部分LinkedHashMap的LRU功能:
public static void main(String[] args)
{
    LinkedHashMap<String, String> linkedHashMap =
            new LinkedHashMap<String, String>(16, 0.75f, true);
    linkedHashMap.put("111", "111");
    linkedHashMap.put("222", "222");
    linkedHashMap.put("333", "333");
    linkedHashMap.put("444", "444");
    loopLinkedHashMap(linkedHashMap);
    linkedHashMap.get("111");
    loopLinkedHashMap(linkedHashMap);
    linkedHashMap.put("222", "2222");
    loopLinkedHashMap(linkedHashMap);
}

public static void loopLinkedHashMap(LinkedHashMap<String, String> linkedHashMap)
{
    Set<Map.Entry<String, String>> set = inkedHashMap.entrySet();
    Iterator<Map.Entry<String, String>> iterator = set.iterator();

    while (iterator.hasNext())
    {
        System.out.print(iterator.next() + "	");
    }
    System.out.println();
}
注意这里的构造方法要用三个参数那个且最后的要传入true,这样才表示按照访问顺序排序。看一下代码运行结果:
111=111    222=222    333=333    444=444
222=222    333=333    444=444    111=111
333=333    444=444    111=111    222=2222
代码运行结果证明了两点:
1、LinkedList是有序的
2、每次访问一个元素(get或put),被访问的元素都被提到最后面去了