作用:用于读取来自网上(服务器上)的数据
基本方法:urllib.request.urlopen(url,data=None,[]timeout]*,cafile=None,cadefault=False,context=None)
- url:需要打开的网址
- data:Post提交的数据
- timeout:设置网站的访问超时时间
示例1:获取页面
    import urllib.request
    response = urllib.request.urlopen("http://www.fishc.com")#是一个HTTP响应类型
    html =response.read()#读取响应内容,为bytes类型
    # print(type(html),html) #输出的为一串<class 'bytes'>
    html = html.decode('utf-8')#bytes类型解码为str类型
    print(html)
示例2:抓一只猫
import urllib.request
response = urllib.request.urlopen("http://placekitten.com/g/400/400")
cat_img = response.read()
with open('cat_400_400.jpg','wb')as f:
  f.write(cat_img)
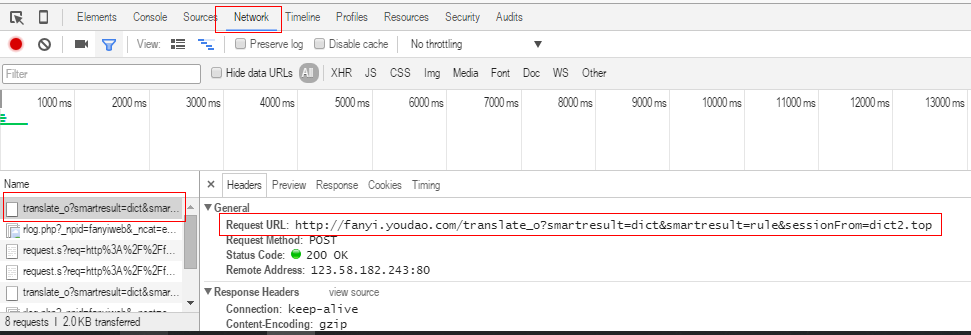
示例3:翻译器
右击浏览器,选择检查或审查元素,再点击网络,找到post的 Name,复制RequestURL
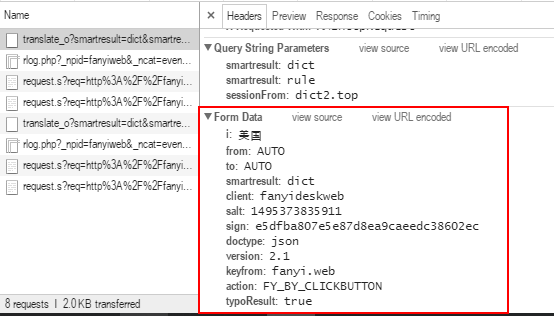
在headers中找到Form Data,复制表单中内容
import urllib.request
import urllib.parse
import json
import time
while True:
    content = input("请输入需要翻译的内容《输入q!退出程序》:")
    if content == 'q!':
        break
    url = "http://fanyi.youdao.com/translate?smartresult=dict&smartresult=rule&smartresult=ugc&sessionFrom=http://www.youdao.com/"    #即RequestURL中的链接
    data = {}
    #Form Data中的内容,适当删除无用信息
    data['i'] = content
    data['smartresult'] = 'dict'
    data['client'] = 'fanyideskweb'
    data['doctype'] = 'json'
    data['version'] = '2.1'
    data['keyfrom'] = 'fanyi.web'
    data['action'] = 'FY_BY_CLICKBUTTON'
    data['typoResult'] = 'true'
    data = urllib.parse.urlencode(data).encode('utf-8')
    #打开网址并提交表单
    response = urllib.request.urlopen(url, data)
    html = response.read().decode('utf-8')
    target = json.loads(html)
    print("翻译结果:%s" % (target['translateResult'][0][0]['tgt']))
    time.sleep(2)
隐藏和代理
隐藏:1.通过request的headers参数修改
2.通过Request.add_header()方法修改
代理:1.proxy_support = urllib.request.ProxyHandler({}) #参数是一个字典{'类型':'代理IP:端口号'}
2.opener = urllib.request.build_opener(proxy_support) #定制、创建一个opener
3.urllib.request.install_opener(opener) #安装opener
opener.open(url) #调用opener
代理
示例5:代理
    import urllib.request
    import random
    url ='http://www.whatismyip.com.tw/'
    iplist =['61.191.41.130:80','115.46.97.122:8123',]

    #参数是一个字典{'类型':'代理IP:端口号'}
    proxy_support = urllib.request.ProxyHandler({'http':random.choice(iplist)})
    #定制、创建一个opener
    opener = urllib.request.build_opener(proxy_support)
    #通过addheaders修改User-Agent
    opener.addheaders =[('User-Agent','Mozilla/5.0 (Windows NT 10.0; WOW64) AppleWebKit/537.36 (KHTML, like Gecko) Chrome/48.0.2564.97 Safari/537.36')]
    #安装opener
    urllib.request.install_opener(opener)
    response = urllib.request.urlopen(url)
    html = response.read().decode('utf-8')
    print(html)
示例6:简单爬取贴吧图片
    import urllib.request
    import re
    def open_url(url):
        #打开URL并修改header,将URL内容读取
        req = urllib.request.Request(url)
        #通过add_header修改User-Agent
        req.add_header('User-Agent','Mozilla/5.0 (Windows NT 10.0; WOW64) AppleWebKit/537.36 (KHTML, like Gecko) Chrome/48.0.2564.97 Safari/537.36')
        page = urllib.request.urlopen(req)
        html = page.read().decode('utf-8')
        return html

    def get_img(html):
        p = r'<img class="BDE_Image" src="([^"]+.jpg)'
        imglist = re.findall(p,html)#寻找到图片的链接
        for each in imglist:
          filename = each.split("/")[-1]
          urllib.request.urlretrieve(each,filename,None)#保存图片

  if __name__ =='__main__':
        url ="https://tieba.baidu.com/p/5090206152"
        get_img(open_url(url))