我们知道在屏幕后处理里面通过 Graphics.Blit 函数可以通过材质处理屏幕图片, 当我们想要处理一般图片的时候, 直接调用GL函数就行了, 按照习惯自己封装一个 Blit 方法 :
    public static void Blit(Texture source, Material material, RenderTexture destination, int materialPass = 0)
    {
        if(material.SetPass(materialPass))
        {
            material.mainTexture = source;
            Graphics.SetRenderTarget(destination);

            GL.PushMatrix();
            GL.LoadOrtho();

            GL.Begin(GL.QUADS);
            {
                Vector3 coords = new Vector3(0, 0, 0);
                GL.TexCoord(coords);
                GL.Vertex(coords);

                coords = new Vector3(1, 0, 0);
                GL.TexCoord(coords);
                GL.Vertex(coords);

                coords = new Vector3(1, 1, 0);
                GL.TexCoord(coords);
                GL.Vertex(coords);

                coords = new Vector3(0, 1, 0);
                GL.TexCoord(coords);
                GL.Vertex(coords);
            }
            GL.End();

            GL.PopMatrix();
        }
    }

不需要这么麻烦, 直接Graphics.Blit(...)就行了
因为 Graphics.SetRenderTarget 方法传入的是 RenderTexture, 渲染出来的 RenderTexture 不能直接当成 Texture2D 或 Cubemap 或 Texture3D 等来使用, 一般需要进行二次转换. 就拿 Texture2D 来作为例子, 转换方法貌似有那么几种, 下来看看 :
0. 各个变量
    public Material material;
    public Texture2D input;

    public Texture2D outPutTex2D;
    public RenderTexture renderTexture;
1. 使用指针的方式, 一般来说如果 RenderTexture 的内存跟 Texture2D 一样的话, 用 Texture2D 直接指向 RenderTexture 的相关地址应该就可以了, 因为官方没有文档直接就测试代码 :
    private void Start()
    {
        if(renderTexture == false)
        {
            renderTexture = RenderTexture.GetTemporary(Screen.width, Screen.height, 0, RenderTextureFormat.ARGB32, RenderTextureReadWrite.Linear);
        }
        renderTexture.hideFlags = HideFlags.DontSave;
        outPutTex2D = Texture2D.CreateExternalTexture(Screen.width, Screen.height, TextureFormat.ARGB32, false, true, renderTexture.GetNativeTexturePtr());
        // ArgumentException: nativeTex can not be null
    }
在渲染 RenderTexture 之前获取它的 GetNativeTexturePtr 是不行的, 报错. 改一下, 在渲染完之后再获取的话 :
    private void Start()
    {
        if(renderTexture == false)
        {
            renderTexture = RenderTexture.GetTemporary(Screen.width, Screen.height, 0, RenderTextureFormat.ARGB32, RenderTextureReadWrite.Linear);
        }
        renderTexture.hideFlags = HideFlags.DontSave;
        Blit(input, material, renderTexture);
        var nativeTexturePtr = renderTexture.GetNativeTexturePtr();
        if(nativeTexturePtr != System.IntPtr.Zero)
        {
            outPutTex2D = Texture2D.CreateExternalTexture(Screen.width, Screen.height, TextureFormat.ARGB32, false, true, nativeTexturePtr);
        }
    }
直接就崩了, 虽然断点看到它的 nativeTexturePtr 确实能获取到, 不过想到 RenderTexture 在创建的时候没有指定是哪种内存, 直接用指针来创建 Texture2D 应该就是会崩的吧.

因为官方文档啥也没写, 估计这条路走不通...
PS : 补充一下, 就算设定了 RenderTexture 的类型也是会崩溃的.
    renderTexture = new RenderTexture(W, H, 0, RenderTextureFormat.ARGB32, RenderTextureReadWrite.Linear);
    renderTexture.dimension = UnityEngine.Rendering.TextureDimension.Tex2D;
    renderTexture.enableRandomWrite = true;
    renderTexture.wrapMode = TextureWrapMode.Clamp;
    renderTexture.Create();
    outPutTex2D = Texture2D.CreateExternalTexture(W, H, TextureFormat.ARGB32, false, true, renderTexture.GetNativeDepthBufferPtr());    // 崩溃
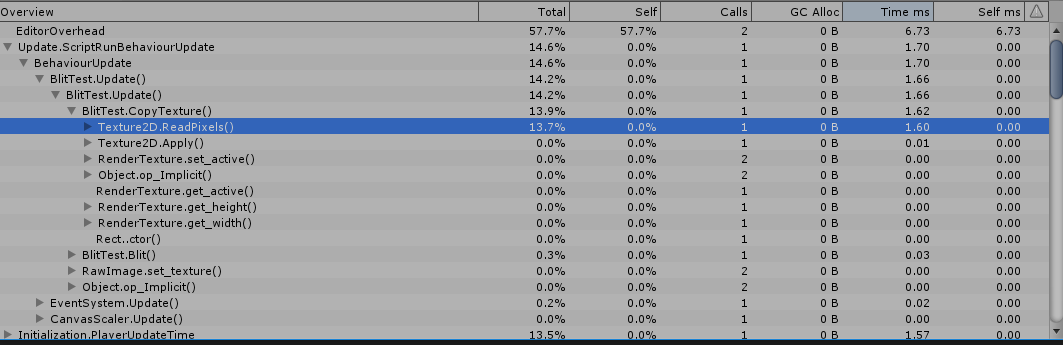
2. 使用 Texture2D.ReadPixels 方法, 这个是最常见的方法 :
    private void Start()
    {
        int W = (int)Screen.width;
        int H = (int)Screen.height;
        if(renderTexture == false)
        {
            renderTexture = RenderTexture.GetTemporary(W, H, 0, RenderTextureFormat.ARGB32, RenderTextureReadWrite.Linear);
        }
        renderTexture.hideFlags = HideFlags.DontSave;
        outPutTex2D = new Texture2D(W, H, TextureFormat.ARGB32, false, true);

        Blit(input, material, renderTexture);

        var current = RenderTexture.active;
        RenderTexture.active = renderTexture;
        outPutTex2D.ReadPixels(new Rect(0, 0, renderTexture.width, renderTexture.height), 0, 0);
        outPutTex2D.Apply();
        RenderTexture.active = current;
    }
这个最常用, 结果也是正确的没什么好说的, 只是效率堪忧
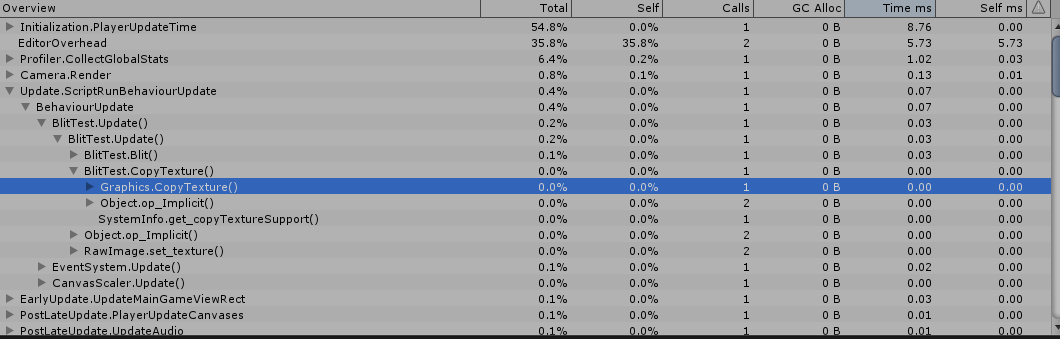
3. 调用 Graphics.CopyTexture 复制图片 :
    private void Start()
    {
        int W = (int)Screen.width;
        int H = (int)Screen.height;
        if(renderTexture == false)
        {
            renderTexture = RenderTexture.GetTemporary(W, H, 0, RenderTextureFormat.ARGB32, RenderTextureReadWrite.Linear);
        }
        renderTexture.hideFlags = HideFlags.DontSave;
        outPutTex2D = new Texture2D(W, H, TextureFormat.ARGB32, false, true);

        Blit(input, material, renderTexture);

        if((SystemInfo.copyTextureSupport & UnityEngine.Rendering.CopyTextureSupport.RTToTexture) != 0)
        {
            Graphics.CopyTexture(renderTexture, outPutTex2D);
        }
    }
这个应该就是上面的使用指针地址进行复制的封装, 效率杠杠的. 而且也不需要对应类型.
把这些功能封装一下, 由于它的使用条件比较严格, 并且性能差距巨大, 这种就需要每个人都注意才行 :
    public static void CopyTexture(RenderTexture from, Texture2D to)
    {
        if(from && to)
        {
            if((SystemInfo.copyTextureSupport & UnityEngine.Rendering.CopyTextureSupport.RTToTexture) != 0
                && (from.width == to.width && from.height == to.height))
            {
                Graphics.CopyTexture(from, to);
            }
            else
            {
                var current = RenderTexture.active;
                RenderTexture.active = from;
                to.ReadPixels(new Rect(0, 0, Mathf.Min(from.width, to.width), Mathf.Min(from.height, to.height)), 0, 0);
                to.Apply();
                RenderTexture.active = current;
            }
        }
    }
Graphics.CopyTexture
PS : 在官方文档里面看见一句话
Compressed texture formats add some restrictions to the CopyTexture with a region variant. For example, PVRTC formats are not supported since they are not block-based (for these formats you can only copy whole texture or whole mip level). For block-based formats (e.g. DXT, ETC), the region size and coordinates must be a multiple of compression block size (4 pixels for DXT).
If both source and destination textures are marked as "readable" (i.e. copy of data exists in system memory for reading/writing on the CPU), these functions copy it as well.
第一句是废话, 不是对应的大小引擎都不让你压缩, 第二句话括号里的意思是说打开了 reading/writing 的图片, 会在系统内存里面存在副本, 那么就是双倍的内存占用了么? 赶紧测试一下...
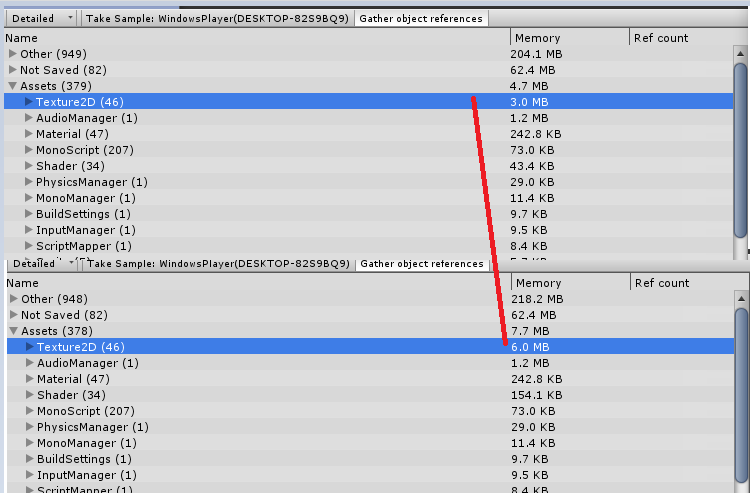
没错, 正是如此......虽然图片导入设置自动就是不打开Read/Write的, 以后还是注意一下的好...
(2019.12.10)
补充 : 说到 Read/Write 的问题, 顺便就说到图片是否可读的问题了, 当我们使用 Graphics.CopyTexture 的时候, 逻辑是内存指针的修改, 所以速度贼快, 可是一般来说系统 RenderTexture 的内存是不可读的, 相当于关闭了 Read/Write 的功能了, 这在哪些地方会出问题呢?
1. 保存图片, 如果要保存图片到硬盘, 使用 Texture2D.EncodeToJPG(); 方法的话, 得到的就是一片灰色, 至于为什么不是白色或者黑色, 之后再研究, 反正得不到在运行时看到的图片就是了.
2. 获取 / 设置 图片片元颜色, Texture2D.GetPixel(...) 报错.
补充 : 用 RenderTexture 作为 Camera.targetTexture 使用的时候, 在相机打开了深度图渲染时一定要用带深度的 RenderTexture, 不然会渲染出奇怪的东西...
(2020.04.28)
当我们的图片是压缩格式的时候, 对图片进行GetPixel或者Copy等操作都是不可能的, 因为操作在CPU层面进行, 而压缩图片是在GPU进行解压的, 如下所示:
    public static Texture2D BlitUnreadableTextureToTexture2D(Texture2D from)
    {
        var readableTexture = new Texture2D(from.width, from.height, TextureFormat.ARGB32, false, true);
        readableTexture.alphaIsTransparency = from.alphaIsTransparency;
        Graphics.CopyTexture(from, readableTexture);    // 报错
        return readableTexture;
    }
    public static void BlitUnreadableTextureToTexture2D(Texture2D from)
    {
        from.GetPixel(0, 0);  // 报错
    }
必须通过GPU进行获取, 没错就是使用Blit RenderTexture的方式来获取解压像素:
        public static Texture2D BlitUnreadableTextureToTexture2D(Texture2D from)
        {
            var readableTexture = new Texture2D(from.width, from.height, TextureFormat.ARGB32, false, true);
            readableTexture.alphaIsTransparency = from.alphaIsTransparency;

            var renderTexture = RenderTexture.GetTemporary(from.width, from.height, 0, RenderTextureFormat.ARGB32, RenderTextureReadWrite.Linear);
            renderTexture.hideFlags = HideFlags.DontSave;

            var blitMaterial = new Material(AssetDatabase.LoadAssetAtPath<Shader>("Assets/Editor/EditorResources/SimpleBlitShader.shader"));

            Graphics.Blit(from, renderTexture, blitMaterial, 0);    // 仍然不可读

            var current = RenderTexture.active;
            RenderTexture.active = renderTexture;
            readableTexture.ReadPixels(new Rect(0, 0, renderTexture.width, renderTexture.height), 0, 0);
            readableTexture.Apply();
            RenderTexture.active = current;
            RenderTexture.ReleaseTemporary(renderTexture);

            return readableTexture;
        }
这里经过Blit之后的RenderTexture仍然是非可读的, 必须经过低效率的ReadPixels方式读入readableTexture......