前几天看到了有人在android5.0上实现了如下图一样的效果,我自己就去搜了下。参考了国外一篇文章和国内的一篇文章,最终实现了想要的效果。具体参考的网址我已经贴到文章末尾,大家可以去英文的那个网站看看,讲解的很傻瓜化。
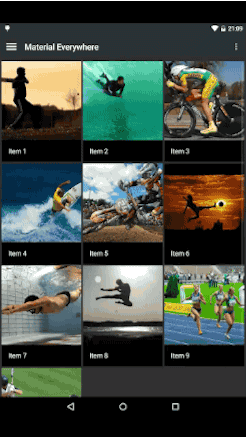
好,下面我们来看看如何实现如上面右图一样的效果。
1.原理分析
(1)我们是否需要在点击后开启一个新的Activity呢?我参考了很多有类似功能的相册应用,发现大家都是在一个Activity中就完成了这个功能。所以我们仅仅需要一个布局文件。
(2)在同一个布局文件中我们可以放两个层次,一个是显示小图的GridView控件,一个是用于展示大图的viewPager控件。
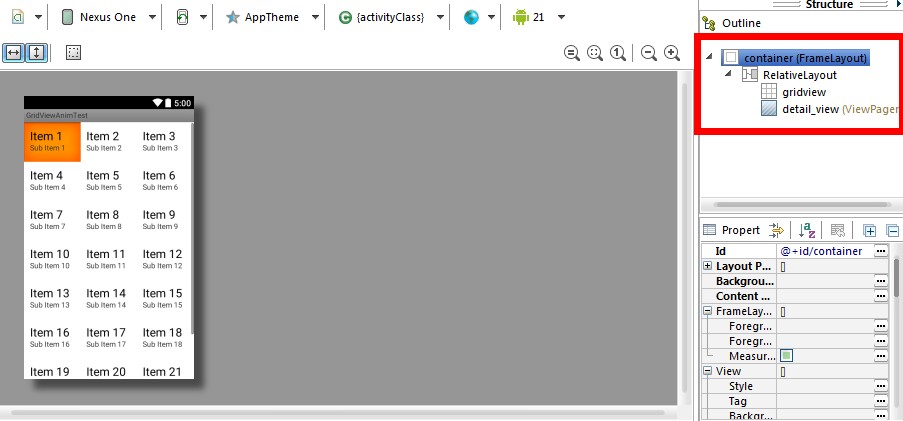
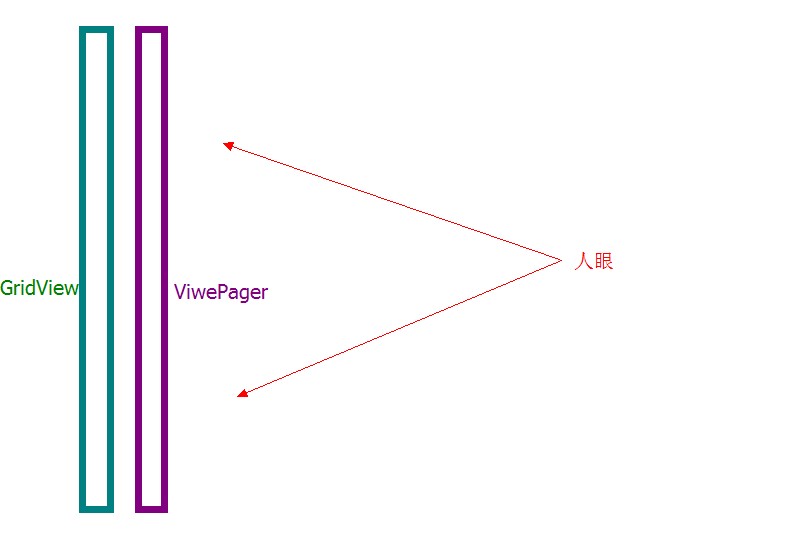
我们只需要刚开始隐藏viewpager,点击后用viewpager覆盖后面的gridview即可。这样就造成了用户认为的新界面。

(3)我们让图片动画放大到屏幕上,那么就需要一个动画将其连贯起来,我们就需要得到小图片的位置才能构造出动画效果。所以要通过点击的小图片计算出它的位置
(4)如果为了兼容,那么就需要用一个动画兼容包来兼容2.x版本
(5)上面覆盖的viewpager需要根据点击的图片来加载不同的图片,并且可以在点击后释放自己的资源,并回到透明状态。
(6)如果viewpager滑动了好几张图片,当前显示的大图在后面的gridview中找不到位置,那么久应该直接渐变消失。而不做动画效果处理。
2.编码实现
2.1 建立布局文件
<?xml version="1.0" encoding="utf-8"?>
<FrameLayout xmlns:android="http://schemas.android.com/apk/res/android"
    android:id="@+id/container"
    android:layout_width="match_parent"
    android:layout_height="match_parent" >

    <RelativeLayout
        android:layout_width="match_parent"
        android:layout_height="match_parent" >

        <GridView
            android:id="@+id/gridview"
            android:layout_width="fill_parent"
            android:layout_height="fill_parent"
            android:columnWidth="90dp"
            android:gravity="center"
            android:horizontalSpacing="10dp"
            android:numColumns="auto_fit"
            android:stretchMode="columnWidth"
            android:verticalSpacing="10dp" />

        <android.support.v4.view.ViewPager
            android:id="@+id/detail_view"
            android:layout_width="match_parent"
            android:layout_height="match_parent"
            android:background="#eeeeee"
            android:visibility="invisible"
            android:contentDescription="用来展示图片的viewpager"/>


    </RelativeLayout>

</FrameLayout>
一个很简单的布局文件,两个视图重叠在一起。刚开始时请将viewpager设置为invisible。保证不会干扰点击事件的传递。
2.2 写一个Activity来加载这个布局
package com.kale.gridviewanimtest;

import android.app.Activity;
import android.os.Bundle;
import android.widget.GridView;


/**
 * @from:
 * http://blog.csdn.net/huluhong/article/details/40379767
 * https://github.com/ywenblocker/Android-Photo-Zoom
 */
/**
 * @author:Jack Tony
 * @tips :
 * @date :2014-11-11
 */
public class MainActivity extends Activity {
    GridView gridview;
    // References to our images in res > drawable
    public static int[] thumbPicIds = { R.drawable.sample_0, R.drawable.sample_1,
            R.drawable.sample_2, R.drawable.sample_3, R.drawable.sample_4,
            R.drawable.sample_5, R.drawable.sample_6, R.drawable.sample_7,
            R.drawable.sample_8, R.drawable.sample_9, R.drawable.sample_10,
            R.drawable.sample_11, R.drawable.sample_12, R.drawable.sample_13,
            R.drawable.sample_14, R.drawable.sample_0, R.drawable.sample_1,
            R.drawable.sample_2, R.drawable.sample_3, R.drawable.sample_4,
            R.drawable.sample_5, R.drawable.sample_6, R.drawable.sample_7,
            R.drawable.sample_8, R.drawable.sample_9, R.drawable.sample_10,
            R.drawable.sample_11, R.drawable.sample_12, R.drawable.sample_13,
            R.drawable.sample_14 };

    //大图片的的id,这里为了简单弄成和小图一样的
    public static int[] largePicIds = thumbPicIds;

    @Override
    protected void onCreate(Bundle savedInstanceState) {
        super.onCreate(savedInstanceState);
        setContentView(R.layout.activity_main);


        gridview = (GridView) findViewById(R.id.gridview);
        gridview.setAdapter(new GridViewAdapter(this, thumbPicIds));


    }
}
这个Activity十分简单,就是给gridview添加适配器。添加的时候传入了图片数组,下面讲到的GridView的Adapter才是重点。
2.3 GridView的适配器——GridViewAdapter
这个适配器其实也很普通,只不过给ImageView添加了点击事件,在这个点击事件中我们就开始做我们想要做的事情了。
package com.kale.gridviewanimtest;

import com.kale.gridviewanimtest.ZoomTutorial.OnZoomListener;

import android.app.Activity;
import android.content.Context;
import android.support.v4.view.ViewPager;
import android.view.View;
import android.view.View.OnClickListener;
import android.view.ViewGroup;
import android.widget.BaseAdapter;
import android.widget.FrameLayout;
import android.widget.ImageView;

public class GridViewAdapter extends BaseAdapter {

    private Context mContext;
    // 要展示的小图片的id数组
    private int[] mThumbIds;

    public GridViewAdapter(Context c, int[] thumbIds) {
        mContext = c;
        mThumbIds = thumbIds;
    }

    /**
     * 要显示的图片的数目,thumbIds是小图片的resource Id
     */
    public int getCount() {
        return mThumbIds.length;
    }

    public Object getItem(int position) {
        return mThumbIds[position];
    }

    public long getItemId(int position) {
        return position;
    }

    /**
     * 创建每个item的视图
     */
    public View getView(final int position, View convertView, ViewGroup parent) {
        final ImageView imageView;
        if (convertView == null) {
            imageView = new ImageView(mContext);
            // 这里的scaleType是CENTER_CROP
            imageView.setScaleType(ImageView.ScaleType.CENTER_CROP);
        } else {
            imageView = (ImageView) convertView;
        }

        imageView.setImageResource(mThumbIds[position]);
        imageView.setTag(mThumbIds[position]);
        imageView.setOnClickListener(new OnClickListener() {

            @Override
            public void onClick(View v) {
                //当前drawable的res的id
                int id = (Integer) v.getTag();
                setViewPagerAndZoom(imageView, position);
            }
        });

        return imageView;
    }

    public void setViewPagerAndZoom(View v ,int position) {
        //得到要放大展示的视图界面
        ViewPager expandedView = (ViewPager)((Activity)mContext).findViewById(R.id.detail_view);
        //最外层的容器,用来计算
        View containerView = (FrameLayout)((Activity)mContext).findViewById(R.id.container);
        //实现放大缩小类,传入当前的容器和要放大展示的对象
        ZoomTutorial mZoomTutorial = new ZoomTutorial(containerView, expandedView);

        ViewPagerAdapter adapter = new ViewPagerAdapter(mContext,
                MainActivity.largePicIds,mZoomTutorial);
        expandedView.setAdapter(adapter);
        expandedView.setCurrentItem(position);

        // 通过传入Id来从小图片扩展到大图,开始执行动画
        mZoomTutorial.zoomImageFromThumb(v);
        mZoomTutorial.setOnZoomListener(new OnZoomListener() {

            @Override
            public void onThumbed() {
                // TODO 自动生成的方法存根
                System.out.println("现在是-------------------> 小图状态");
            }

            @Override
            public void onExpanded() {
                // TODO 自动生成的方法存根
                System.out.println("现在是-------------------> 大图状态");
            }
        });
    }


}
点击事件中触发的方法——setViewPagerAndZoom(…)
    public void setViewPagerAndZoom(View v ,int position) {
        //得到要放大展示的视图界面
        ViewPager expandedView = (ViewPager)((Activity)mContext).findViewById(R.id.detail_view);
        //最外层的容器,用来计算
        View containerView = (FrameLayout)((Activity)mContext).findViewById(R.id.container);
        //实现放大缩小类,传入当前的容器和要放大展示的对象
        ZoomTutorial mZoomTutorial = new ZoomTutorial(containerView, expandedView);

        ViewPagerAdapter adapter = new ViewPagerAdapter(mContext,
                MainActivity.largePicIds,mZoomTutorial);
        expandedView.setAdapter(adapter);
        expandedView.setCurrentItem(position);

        // 通过传入Id来从小图片扩展到大图,开始执行动画
        mZoomTutorial.zoomImageFromThumb(v);
        mZoomTutorial.setOnZoomListener(new OnZoomListener() {

            @Override
            public void onThumbed() {
                // TODO 自动生成的方法存根
                System.out.println("现在是-------------------> 小图状态");
            }

            @Override
            public void onExpanded() {
                // TODO 自动生成的方法存根
                System.out.println("现在是-------------------> 大图状态");
            }
        });
    }
* 在这个方法中我们发现了这么一个类,这个类就是产生动画的主要类。这个类的构造方法是要传入一个容器的视图还有一个是要展示放大图片的视图。这个容器就是布局文件中最外层的container,展示的视图就是viewpager。
//得到要放大展示的视图界面
ViewPager expandedView = (ViewPager)((Activity)mContext).findViewById(R.id.detail_view);
//最外层的容器,用来计算
View containerView = (FrameLayout)((Activity)mContext).findViewById(R.id.container);
//实现放大缩小类,传入当前的容器和要放大展示的对象
ZoomTutorial mZoomTutorial = new ZoomTutorial(containerView, expandedView);
* 传入容器的作用是来计算当前小图片在容器中的位置,为动画做准备。传入viewpager的目的是小图片点击后需要通过动画来慢慢放大出一个Viewpager。
* 这个方法就是执行点击后将小图的操作,这里传入的是小图片的视图,用来确定小图片现在在屏幕上的详细位置。
// 通过传入Id来从小图片扩展到大图,开始执行动画
mZoomTutorial.zoomImageFromThumb(v);
* 这个监听器就是来判断当前是展示的是小图界面还是大图界面。
mZoomTutorial.setOnZoomListener(new OnZoomListener() {
@Override
public void onThumbed() {
System.out.println("现在是-------------------> 小图状态");
}
@Override
public void onExpanded() {
System.out.println("现在是-------------------> 大图状态");
}
});
* 这个是根据当前大图的position来进行将viewpager动态缩放到小图的操作,在viewpager的适配器中使用。
// 执行结束动画的操作
mZoomTutorial.closeZoomAnim(position);
2.4 viewpager的适配器
这个适配器很简单,就是滑动时展示下图片。点击图片后执行缩放动画。注意一下,这里传入的图片应该是大图!
package com.kale.gridviewanimtest;

import android.content.Context;
import android.support.v4.view.PagerAdapter;
import android.support.v4.view.ViewPager.LayoutParams;
import android.view.View;
import android.view.ViewGroup;
import android.view.View.OnClickListener;
import android.widget.ImageView;

/**
 * @author:Jack Tony
 * @tips :viewpager的适配器
 * @date :2014-11-12
 */
public class ViewPagerAdapter extends PagerAdapter {

    private int[] sDrawables;
    private Context mContext;
    private ZoomTutorial mZoomTutorial;

    public ViewPagerAdapter( Context context ,int[] imgIds,ZoomTutorial zoomTutorial) {
        this.sDrawables = imgIds;
        this.mContext = context;
        this.mZoomTutorial = zoomTutorial;
    }

    @Override
    public int getCount() {
        return sDrawables.length;
    }

    @Override
    public View instantiateItem(ViewGroup container, final int position) {

        final ImageView imageView = new ImageView(mContext);
        imageView.setImageResource(sDrawables[position]);
        container.addView(imageView, LayoutParams.MATCH_PARENT, LayoutParams.MATCH_PARENT);

        imageView.setOnClickListener(new OnClickListener() {

            @Override
            public void onClick(View view) {
                mZoomTutorial.closeZoomAnim(position);
            }
        });
        return imageView;
    }

    @Override
    public void destroyItem(ViewGroup container, int position, Object object) {
        container.removeView((View) object);
    }

    @Override
    public boolean isViewFromObject(View view, Object object) {
        return view == object;
    }

}
2.5 ZoomTutorial类
这个类是核心类,是我自己从参考文献的代码中进行修改和完善出来的。大大降低了程序中的依赖性,方便调用。下面我们来详细说说这个类里面的各种方法。
(1)构造函数
    final private int mAnimationDuration = 300;// 动画持续的时间,300比较合适
    private Animator mCurrentAnimator;//当前的动画对象

    private View mContainView;//当前屏幕中视图最外层的容器
    private ViewGroup mThumbViewParent;//小图片的视图
    private View mExpandedView;//大图片所在的视图

    private Rect startBounds;//开始动画的区域范围
    private float startScale;//开始的比率
    private float startScaleFinal;//结束时的比率

    public ZoomTutorial(View containerView,View expandedView) {
        mContainView = containerView;
        mExpandedView = expandedView;
    }
构造函数中传入了容器对象和要展示大图的对象,都是来用于计算的。变量中定义了动画等对象。
(2)zoomImageFromThumb
这个方法十分重要,就是用来执行动画的。
 1     /**
 2      * 十分重要的一个方法,用于展示大的图片
 3      *
 4      * @param thumbView
 5      * @param imageResId
 6      */
 7     public void zoomImageFromThumb(final View thumbView) {
 8         mThumbViewParent = (ViewGroup) thumbView.getParent();
 9         // If there's an animation in progress, cancel it immediately and
10         // proceed with this one.
11         if (mCurrentAnimator != null) {
12             mCurrentAnimator.cancel();
13         }
14
15         // Calculate the starting and ending bounds for the zoomed-in image.
16         // This step involves lots of math. Yay, math.
17         // 计算开始和结束的边界+偏移量
18         startBounds = new Rect();
19         final Rect finalBounds = new Rect();// 结束的边界
20         final Point globalOffset = new Point();// 现在view对其父控件的偏移量
21
22         // The start bounds are the global visible rectangle of the thumbnail,
23         // 开始的边界是小图整体可见部分的范围
24         // and the final bounds are the global visible rectangle of the container view.
25         // 结束的边界是容器的边界
26         // Also set the container view's offset as the origin for the bounds,
27         // since that's the origin for the positioning animation properties (X, Y).
28         thumbView.getGlobalVisibleRect(startBounds);
29         // 这里的id,container是整个布局最外层的容器
30         mContainView.getGlobalVisibleRect(finalBounds, globalOffset);
31
32         // 开始设置偏移量,这样就可以知道现在图片距离边界的位置
33         startBounds.offset(-globalOffset.x, -globalOffset.y);
34         finalBounds.offset(-globalOffset.x, -globalOffset.y);
35
36         //设置缩放的比例和位置
37         set_Center_crop(finalBounds);
38
39         mExpandedView.setVisibility(View.VISIBLE);
40
41         // Set the pivot point for SCALE_X and SCALE_Y transformations to the
42         // top-left corner of
43         // the zoomed-in view (the default is the center of the view).
44         AnimatorSet animSet = new AnimatorSet();
45         animSet.setDuration(1);
46         animSet.play(ObjectAnimator.ofFloat(mExpandedView, "pivotX", 0f))
47         .with(ObjectAnimator.ofFloat(mExpandedView, "pivotY", 0f))
48         .with(ObjectAnimator.ofFloat(mExpandedView, "alpha", 1.0f));
49         animSet.start();
50
51         startZoomAnim(mExpandedView, startBounds, finalBounds, startScale);
52          // Upon clicking the zoomed-in image, it should zoom back down to the
53         // original bounds and show the thumbnail instead of the expanded image.
54         startScaleFinal = startScale;
55     }
8行:得到小图的父控件,其实就是我们的GridView。这个之后会用到。
18行:开始初始化用来存放小图区域的对象。Rect其实就是一个矩形范围,Rect类主要用于表示坐标系中的一块矩形区域,并可以对其做一些简单操作。关于Rect的奇葩之处可以参考这篇文章:http://www.cnblogs.com/hrlnw/archive/2013/07/14/3189755.html
28行:传入一个startBounds,得到小图的范围。然后startBounds就是小图的范围了。getGlobalVisibleRect , 获取全局坐标系的一个视图区域, 返回一个填充的Rect对象,该Rect是基于总整个屏幕的。
30行:通过getGlobalVisibleRect()方法得到当前屏幕容器的范围和偏移坐标。
37行:开始执行拉伸比率的计算,这里的finalBounds就是屏幕容器的区域,我们点击小图放大到的就是屏幕容器的区域。
    /**
     * 通过结束的边界计算开始拉伸的比例
     *
     * Adjust the start bounds to be the same aspect ratio as the final bounds
     * using the "center crop" technique. 通过 center
     * crop算法来调整开始边界,让它和的结束边界保持同一个纵横比例,也就是长宽比 This prevents undesirable
     * stretching during the animation.//在动画执行时保证不让图片拉伸 Also calculate the start
     * scaling factor (the end scaling factor is always 1.0).
     * 我们也需要计算开始的比率因子,结束比例一直是1.0.因为是将图片从小放到自己的大小。
     */
    private void set_Center_crop(Rect finalBounds) {
        if ((float) finalBounds.width() / finalBounds.height() > (float)
                startBounds.width() / startBounds.height()) {
            // Extend start bounds horizontally
            startScale = (float) startBounds.height() / finalBounds.height();
            float startWidth = startScale * finalBounds.width();
            float deltaWidth = (startWidth - startBounds.width()) / 2;
            startBounds.left -= deltaWidth;
            startBounds.right += deltaWidth;
        } else {
            // Extend start bounds vertically
            startScale = (float) startBounds.width() / finalBounds.width();
            float startHeight = startScale * finalBounds.height();
            float deltaHeight = (startHeight - startBounds.height()) / 2;
            startBounds.top -= deltaHeight;
            startBounds.bottom += deltaHeight;
        }
    }
好了,在计算时我们就已经设置了startScale和startBounds的值,startScale是拉伸比率。现在是通过这个比例拉伸的,那么我们要缩小的时候,就还是按照这个比率进行缩小。startBounds就是小图的坐标位置。
39行:设置大图view可见,为接下来动画做准备。
46-47行:设置渐变动画是从自己的左上角(0,0)开始的
44行:设定大图慢慢渐变出来,这个方法必须存在。这样用户体验会很好。
51行:开始真正执行动画
54行:结束时动画缩放的比率也应该等于开始缩放的比率。
(3)startZoomAnim
通过刚刚计算好的小图的位置和拉伸的比率来执行动画。为了不失真,这里是保持长宽比进行放大的。
    /**
     * @param v  执行动画的view
     * @param startBounds  开始的边界
     * @param finalBounds  结束时的边界
     * @param startScale  开始的拉伸比率
     */
    public void startZoomAnim(View v, Rect startBounds, Rect finalBounds, float startScale) {
        // Construct and run the parallel animation of the four translation and
        // scale properties (X, Y, SCALE_X, and SCALE_Y).
        AnimatorSet set = new AnimatorSet();
        set.play(
            ObjectAnimator.ofFloat(v, "x", startBounds.left, finalBounds.left))
            .with(ObjectAnimator.ofFloat(v, "y", startBounds.top, finalBounds.top))
            .with(ObjectAnimator.ofFloat(v, "scaleX", startScale, 1f))
            .with(ObjectAnimator.ofFloat(v, "scaleY", startScale, 1f));

        set.setDuration(mAnimationDuration);
        set.setInterpolator(new DecelerateInterpolator());
        set.addListener(new AnimatorListenerAdapter() {
            @Override
            public void onAnimationEnd(Animator animation) {
                mCurrentAnimator = null;
                if (listener != null) {
                    listener.onExpanded();
                }
            }

            @Override
            public void onAnimationCancel(Animator animation) {
                mCurrentAnimator = null;
                if (listener != null) {
                    listener.onExpanded();
                }
            }
        });
        set.start();
        mCurrentAnimator = set;
    }
(4)closeZoomAnim
放到后我们还得提供缩小的方法,这个方法因为viewpager的存在而变得不简单,如果viewpager滑动显示的图片不在当前的gridview中呢?因此我们就需要判断下当前viewpager展示的图片在不在gridview中。下面就是判断方法,如果在返回true,应该执行的是缩小动画,如果返回false则表示不再屏幕中,那么就应该渐变消失。很多相册应用,在这里都有或大或小的bug,大家可以自行寻找。
    /**
     * 在GridView中,使用getChildAt(index)的取值,只能是当前可见区域(列表可滚动)的子项!
     * 因为子项会进行复用。这里强制转换了下,变成了GridView,实际使用中需要进行修改
     * 【参考】
     * http://xie2010.blog.163.com/blog/static/211317365201402395944633/
     * http://blog.csdn.net/you_and_me12/article/details/7271006
     *
     * @param position
     * @return 判断这个position的view是否现在显示在屏幕上,如果没有显示就返回false
     */
    public boolean getScaleFinalBounds(int position) {
        //得到显示区域中第一个子视图的序号
        int firstPosition = ((AdapterView<?>)mThumbViewParent).getFirstVisiblePosition();
        View childView = mThumbViewParent.getChildAt(position - firstPosition);

        startBounds = new Rect();
        final Rect finalBounds = new Rect();
        final Point globalOffset = new Point();

        try {
            //通过这个计算startBounds,得到当前view的位置,从而设定偏移值
            childView.getGlobalVisibleRect(startBounds);
        } catch (Exception e) {
            return false;
        }
        mContainView.findViewById(R.id.container).getGlobalVisibleRect(finalBounds, globalOffset);
        startBounds.offset(-globalOffset.x, -globalOffset.y);
        finalBounds.offset(-globalOffset.x, -globalOffset.y);
        //设置比率
        set_Center_crop(finalBounds);

        startScaleFinal = startScale;
        return true;
    }
上面的方法是通过viewpager的position得到Gridview中相应position的子视图。这里的前提是viewpager和Gridview必须拥有相应数目的图片和图片position都是从0开始的。我们还需要注意需要将position减去当前屏幕中第一个子视图的position。因为position是绝对数目,从0开始计数。getChildAt(int index)传入的index是一个相对屏幕的内容的数目,因此我们就需要将绝对数目变为相对数目。这里需要尤为注意。
这里在判断的时候,还会根据自视图计算子视图的应该处于的位置,这样便于缩放。说了这么多还没到动画结束的操作,其实动画结束的方法很简单,下面就贴出来。
    /**
     * 根据position执行动画,如果这个图片在当前屏幕显示范围内,那就执行缩小。否则直接渐变
     * @param position
     */
    public void closeZoomAnim(int position) {
        if (mCurrentAnimator != null) {
            mCurrentAnimator.cancel();
        }
        // Animate the four positioning/sizing properties in parallel,back to their original values.
        AnimatorSet set = new AnimatorSet();
        /**
         * 因为展开图可能是在viewpager中,所以现在显示的图片,或许并不是第一次打开的图片,这里应该考虑两点
         * 1.改变图片缩小后回到的位置
         * 2.如果图片缩小后回到的位置不在屏幕中,直接渐变消失
         */
        boolean isInBound = getScaleFinalBounds(position);
        if (isInBound) {
            set.play(ObjectAnimator.ofFloat(mExpandedView, "x", startBounds.left))
                .with(ObjectAnimator.ofFloat(mExpandedView, "y", startBounds.top))
                .with(ObjectAnimator.ofFloat(mExpandedView, "scaleX", startScaleFinal))
                .with(ObjectAnimator.ofFloat(mExpandedView, "scaleY", startScaleFinal));
        } else {
            // 如果当前显示的图片不在gridview当前显示的图片中,等于越界了。这时我们就不执行缩放操作,直接渐变消失即可。
            ObjectAnimator alphaAnimator = ObjectAnimator.ofFloat(mExpandedView, "alpha", 0.1f);
            set.play(alphaAnimator);
        }
        set.setDuration(mAnimationDuration);
        set.setInterpolator(new DecelerateInterpolator());
        set.addListener(new AnimatorListenerAdapter() {
            @Override
            public void onAnimationEnd(Animator animation) {
                mExpandedView.clearAnimation();
                mExpandedView.setVisibility(View.GONE);
                mCurrentAnimator = null;
                if (listener != null) {
                    listener.onThumbed();
                }
            }

            @Override
            public void onAnimationCancel(Animator animation) {
                mExpandedView.clearAnimation();
                mExpandedView.setVisibility(View.GONE);
                mCurrentAnimator = null;
                if (listener != null) {
                    listener.onThumbed();
                }
            }
        });
        set.start();
        mCurrentAnimator = set;
    }
(5)监听器
这里为了判断当前的状态写了一个简单的监听器,大家可以根据需要进行扩展和优化。这个监听器作用于动画执行结束时,在上面的代码中它已经有所出现了。
    private OnZoomListener listener;

    public void setOnZoomListener(OnZoomListener l) {
        listener = l;
    }

    public interface OnZoomListener {
        public void onExpanded();//点击后展示大图成功后调用
        public void onThumbed();//点击后缩小回小图时调用
    }
这个类的全部代码:
package com.kale.gridviewanimtest;


import android.graphics.Point;
import android.graphics.Rect;
import android.view.View;
import android.view.ViewGroup;
import android.view.animation.DecelerateInterpolator;
import android.widget.AdapterView;

import com.nineoldandroids.animation.Animator;
import com.nineoldandroids.animation.AnimatorListenerAdapter;
import com.nineoldandroids.animation.AnimatorSet;
import com.nineoldandroids.animation.ObjectAnimator;

public class ZoomTutorial {

    final private int mAnimationDuration = 300;// 动画持续的时间,300比较合适
    private Animator mCurrentAnimator;//当前的动画对象

    private View mContainView;//当前屏幕中视图最外层的容器
    private ViewGroup mThumbViewParent;//小图片的视图
    private View mExpandedView;//大图片所在的视图

    private Rect startBounds;//开始动画的区域范围
    private float startScale;//开始的比率
    private float startScaleFinal;//结束时的比率

    public ZoomTutorial(View containerView,View expandedView) {
        mContainView = containerView;
        mExpandedView = expandedView;
    }

    /**
     * 十分重要的一个方法,用于展示大的图片
     *
     * @param thumbView
     * @param imageResId
     */
    public void zoomImageFromThumb(final View thumbView) {
        mThumbViewParent = (ViewGroup) thumbView.getParent();
        // If there's an animation in progress, cancel it immediately and
        // proceed with this one.
        if (mCurrentAnimator != null) {
            mCurrentAnimator.cancel();
        }

        // Calculate the starting and ending bounds for the zoomed-in image.
        // This step involves lots of math. Yay, math.
        // 计算开始和结束的边界+偏移量
        startBounds = new Rect();
        final Rect finalBounds = new Rect();// 结束的边界
        final Point globalOffset = new Point();// 目标偏移量

        // The start bounds are the global visible rectangle of the thumbnail,
        // 开始的边界是小图整体可见部分的范围
        // and the final bounds are the global visible rectangle of the container view.
        // 结束的边界是容器的边界
        // Also set the container view's offset as the origin for the bounds,
        // since that's the origin for the positioning animation properties (X, Y).
        thumbView.getGlobalVisibleRect(startBounds);
        // 这里的id,container是整个布局最外层的容器
        mContainView.getGlobalVisibleRect(finalBounds, globalOffset);

        // 开始设置偏移量
        startBounds.offset(-globalOffset.x, -globalOffset.y);
        finalBounds.offset(-globalOffset.x, -globalOffset.y);

        //设置缩放的比例和位置
        set_Center_crop(finalBounds);

        mExpandedView.setVisibility(View.VISIBLE);

        // Set the pivot point for SCALE_X and SCALE_Y transformations to the
        // top-left corner of
        // the zoomed-in view (the default is the center of the view).
        AnimatorSet animSet = new AnimatorSet();
        animSet.setDuration(1);
        animSet.play(ObjectAnimator.ofFloat(mExpandedView, "pivotX", 0f))
        .with(ObjectAnimator.ofFloat(mExpandedView, "pivotY", 0f))
        .with(ObjectAnimator.ofFloat(mExpandedView, "alpha", 1.0f));
        animSet.start();

        startZoomAnim(mExpandedView, startBounds, finalBounds, startScale);
         // Upon clicking the zoomed-in image, it should zoom back down to the
        // original bounds and show the thumbnail instead of the expanded image.
        startScaleFinal = startScale;
    }

    /**
     * 通过结束的边界计算开始拉伸的比例
     *
     * Adjust the start bounds to be the same aspect ratio as the final bounds
     * using the "center crop" technique. 通过 center
     * crop算法来调整开始边界,让它和的结束边界保持同一个纵横比例,也就是长宽比 This prevents undesirable
     * stretching during the animation.//在动画执行时保证不让图片拉伸 Also calculate the start
     * scaling factor (the end scaling factor is always 1.0).
     * 我们也需要计算开始的比率因子,结束比例一直是1.0.因为是将图片从小放到自己的大小。
     */
    private void set_Center_crop(Rect finalBounds) {
        if ((float) finalBounds.width() / finalBounds.height() > (float)
                startBounds.width() / startBounds.height()) {
            // Extend start bounds horizontally
            startScale = (float) startBounds.height() / finalBounds.height();
            float startWidth = startScale * finalBounds.width();
            float deltaWidth = (startWidth - startBounds.width()) / 2;
            startBounds.left -= deltaWidth;
            startBounds.right += deltaWidth;
        } else {
            // Extend start bounds vertically
            startScale = (float) startBounds.width() / finalBounds.width();
            float startHeight = startScale * finalBounds.height();
            float deltaHeight = (startHeight - startBounds.height()) / 2;
            startBounds.top -= deltaHeight;
            startBounds.bottom += deltaHeight;
        }
    }

    /**
     * @param v  执行动画的view
     * @param startBounds  开始的边界
     * @param finalBounds  结束时的边界
     * @param startScale  开始的拉伸比率
     */
    public void startZoomAnim(View v, Rect startBounds, Rect finalBounds, float startScale) {
        // Construct and run the parallel animation of the four translation and
        // scale properties (X, Y, SCALE_X, and SCALE_Y).
        AnimatorSet set = new AnimatorSet();
        set.play(
            ObjectAnimator.ofFloat(v, "x", startBounds.left, finalBounds.left))
            .with(ObjectAnimator.ofFloat(v, "y", startBounds.top, finalBounds.top))
            .with(ObjectAnimator.ofFloat(v, "scaleX", startScale, 1f))
            .with(ObjectAnimator.ofFloat(v, "scaleY", startScale, 1f));

        set.setDuration(mAnimationDuration);
        set.setInterpolator(new DecelerateInterpolator());
        set.addListener(new AnimatorListenerAdapter() {
            @Override
            public void onAnimationEnd(Animator animation) {
                mCurrentAnimator = null;
                if (listener != null) {
                    listener.onExpanded();
                }
            }

            @Override
            public void onAnimationCancel(Animator animation) {
                mCurrentAnimator = null;
                if (listener != null) {
                    listener.onExpanded();
                }
            }
        });
        set.start();
        mCurrentAnimator = set;
    }

    /**
     * 在GridView中,使用getChildAt(index)的取值,只能是当前可见区域(列表可滚动)的子项!
     * 因为子项会进行复用。这里强制转换了下,变成了GridView,实际使用中需要进行修改
     * 【参考】
     * http://xie2010.blog.163.com/blog/static/211317365201402395944633/
     * http://blog.csdn.net/you_and_me12/article/details/7271006
     *
     * @param position
     * @return 判断这个position的view是否现在显示在屏幕上,如果没有显示就返回false
     */
    public boolean getScaleFinalBounds(int position) {
        //得到显示区域中第一个子视图的序号
        int firstPosition = ((AdapterView<?>)mThumbViewParent).getFirstVisiblePosition();
        View childView = mThumbViewParent.getChildAt(position - firstPosition);

        startBounds = new Rect();
        final Rect finalBounds = new Rect();
        final Point globalOffset = new Point();

        try {
            //通过这个计算startBounds,得到当前view的位置,从而设定偏移值
            childView.getGlobalVisibleRect(startBounds);
        } catch (Exception e) {
            return false;
        }
        mContainView.findViewById(R.id.container).getGlobalVisibleRect(finalBounds, globalOffset);
        startBounds.offset(-globalOffset.x, -globalOffset.y);
        finalBounds.offset(-globalOffset.x, -globalOffset.y);
        //设置比率
        set_Center_crop(finalBounds);

        startScaleFinal = startScale;
        return true;
    }

    /**
     * 根据position执行动画,如果这个图片在当前屏幕显示范围内,那就执行缩小。否则直接渐变
     * @param position
     */
    public void closeZoomAnim(int position) {
        if (mCurrentAnimator != null) {
            mCurrentAnimator.cancel();
        }
        // Animate the four positioning/sizing properties in parallel,back to their original values.
        AnimatorSet set = new AnimatorSet();
        /**
         * 因为展开图可能是在viewpager中,所以现在显示的图片,或许并不是第一次打开的图片,这里应该考虑两点
         * 1.改变图片缩小后回到的位置
         * 2.如果图片缩小后回到的位置不在屏幕中,直接渐变消失
         */
        boolean isInBound = getScaleFinalBounds(position);
        if (isInBound) {
            set.play(ObjectAnimator.ofFloat(mExpandedView, "x", startBounds.left))
                .with(ObjectAnimator.ofFloat(mExpandedView, "y", startBounds.top))
                .with(ObjectAnimator.ofFloat(mExpandedView, "scaleX", startScaleFinal))
                .with(ObjectAnimator.ofFloat(mExpandedView, "scaleY", startScaleFinal));
        } else {
            // 如果当前显示的图片不在gridview当前显示的图片中,等于越界了。这时我们就不执行缩放操作,直接渐变消失即可。
            ObjectAnimator alphaAnimator = ObjectAnimator.ofFloat(mExpandedView, "alpha", 0.1f);
            set.play(alphaAnimator);
        }
        set.setDuration(mAnimationDuration);
        set.setInterpolator(new DecelerateInterpolator());
        set.addListener(new AnimatorListenerAdapter() {
            @Override
            public void onAnimationEnd(Animator animation) {
                mExpandedView.clearAnimation();
                mExpandedView.setVisibility(View.GONE);
                mCurrentAnimator = null;
                if (listener != null) {
                    listener.onThumbed();
                }
            }

            @Override
            public void onAnimationCancel(Animator animation) {
                mExpandedView.clearAnimation();
                mExpandedView.setVisibility(View.GONE);
                mCurrentAnimator = null;
                if (listener != null) {
                    listener.onThumbed();
                }
            }
        });
        set.start();
        mCurrentAnimator = set;
    }

    private OnZoomListener listener;

    public void setOnZoomListener(OnZoomListener l) {
        listener = l;
    }

    public interface OnZoomListener {
        public void onExpanded();//点击后展示大图成功后调用
        public void onThumbed();//点击后缩小回小图时调用
    }

}
终于搞定!现在我们就讲解完了所有的代码。应该十分详细,如果大家有更好的点子也可以提供给我~
源码下载:http://download.csdn.net/detail/shark0017/8155169
参考自:
http://www.androidbegin.com/tutorial/android-gridview-zoom-images-animation-tutorial/
http://blog.csdn.net/huluhong/article/details/40379767
https://github.com/ywenblocker/Android-Photo-Zoom