一、初始化请求队列并运行
我们用Volley时,最先开始的就是初始化请求队列,一种常见的写法如下:
public class MyApplication extends Application {

    public static RequestQueue requestQueue;

    @Override
    public void onCreate() {
        super.onCreate();
        // 不必为每一次HTTP请求都创建一个RequestQueue对象,推荐在application中初始化
        requestQueue = Volley.newRequestQueue(this);
    }
}
我们来看看这个newRequestQueue中到底做了什么。
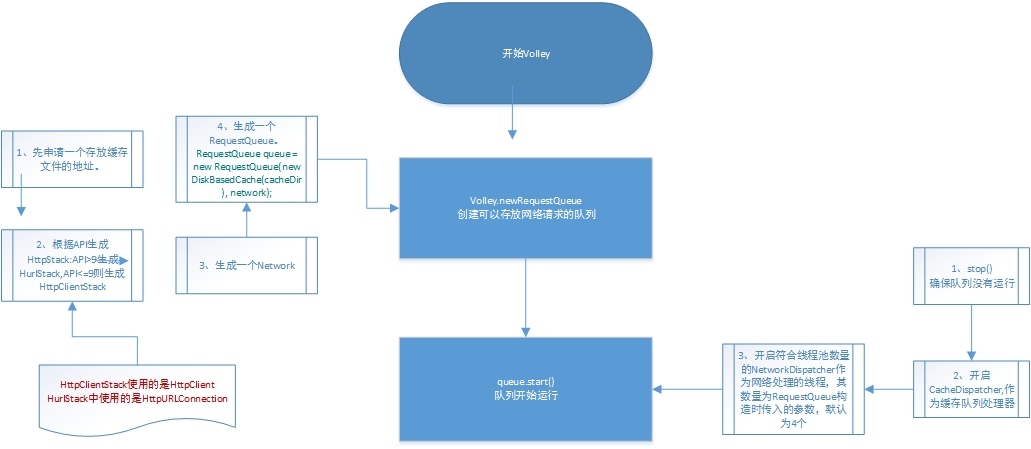
这个流程图分析了Volley的源码,我的建议是先自己耐心的从编译器中看看代码,慢慢通过F3跳转,然后在看文章的解释会比较好,在博客中贴代码感觉不是很适合阅读。我为了方便大家阅读,在源码中加上了注释,看完这段代码再看上面的流程图就很清晰了。
左边部分:
package com.android.volley.toolbox;public class Volley {

    /** Default on-disk cache directory. */
    private static final String DEFAULT_CACHE_DIR = "volley";

    /**
     * Creates a default instance of the worker pool and calls {@link RequestQueue#start()} on it.
     *
     * @param context A {@link Context} to use for creating the cache dir.
     * @param stack An {@link HttpStack} to use for the network, or null for default.
     * @return A started {@link RequestQueue} instance.
     */
    public static RequestQueue newRequestQueue(Context context, HttpStack stack) {
        File cacheDir = new File(context.getCacheDir(), DEFAULT_CACHE_DIR);

        // 通过应用程序的包名和版本信息等来完善userAgent字符串
        String userAgent = "volley/0";
        try {
            String packageName = context.getPackageName();
            PackageInfo info = context.getPackageManager().getPackageInfo(packageName, 0);
            userAgent = packageName + "/" + info.versionCode;
        } catch (NameNotFoundException e) {
        }

        // 如果stack为空,就开始建立一个默认的HttpStack对象
        if (stack == null) {
            if (Build.VERSION.SDK_INT >= 9) {
                // 如果大于9,那么就建立一个HurlStack,其内部用了HttpURLConnection
                stack = new HurlStack();
            } else {
                // 如果在api9之前,HttpUrlConnection是不可靠的,这里用了HttpClient
                // 如果你的目标系统是API9之后的,你完全可以删除一些代码来进软件瘦身
                // Prior to Gingerbread, HttpUrlConnection was unreliable.
                // See: http://android-developers.blogspot.com/2011/09/androids-http-clients.html
                stack = new HttpClientStack(AndroidHttpClient.newInstance(userAgent));
            }
        }

        // 通过stack来建立一个NetWork对象,Network执行网络请求
        Network network = new BasicNetwork(stack);

        // RequestQueue是分发请求队列的调度员,
        // 这里传入了一个Cache对象,用来做磁盘缓存,如果你不用可以进行替换
        RequestQueue queue = new RequestQueue(new DiskBasedCache(cacheDir), network);
        queue.start(); // 开始请求队列

        return queue;
    }

    /**
     * Creates a default instance of the worker pool and calls {@link RequestQueue#start()} on it.
     * 我们之前就是用这个方法进行初始化requestQueue的,这掉用了上面的初始化方法,
     * 在stack对象的位置传入了null,表示由代码自动产生一个合适的stack对象
   *
     * @param context A {@link Context} to use for creating the cache dir.
     * @return A started {@link RequestQueue} instance.
     */
    public static RequestQueue newRequestQueue(Context context) {
        return newRequestQueue(context, null);
    }
}
说明:在Gingerbread以及以后的版本中,HttpURLConnection是最好的选择,它简单的api以及轻量级非常适合Android。压缩和缓存机制降低了网路使用,提高了速度、节省了电量。新的应用应该选择使用HttpURLConnection,我们也将做持续的改进。
现在我们知道了,这段代码最终生成了一个RequestQueue,说明它才是重点啊,下面我们就来分析下上图右边部分的流程。
右边部分:
    /**
     * Creates the worker pool. Processing will not begin until {@link #start()} is called.
     * 真正的初始化方法,初始化了network,dispatchers,delivery,cache对象,这里的cache是磁盘缓存的对象
     * @param cache A Cache to use for persisting responses to disk
     * @param network A Network interface for performing HTTP requests
     * @param threadPoolSize Number of network dispatcher threads to create
     * @param delivery A ResponseDelivery interface for posting responses and errors
     */
    public RequestQueue(Cache cache, Network network, int threadPoolSize,
            ResponseDelivery delivery) {
        mCache = cache;
        mNetwork = network;
        mDispatchers = new NetworkDispatcher[threadPoolSize];
        mDelivery = delivery;
    }

    /**
     * Creates the worker pool. Processing will not begin until {@link #start()} is called.
     *
     * @param cache A Cache to use for persisting responses to disk
     * @param network A Network interface for performing HTTP requests
     * @param threadPoolSize Number of network dispatcher threads to create
     */
    public RequestQueue(Cache cache, Network network, int threadPoolSize) {
        this(cache, network, threadPoolSize,
                new ExecutorDelivery(new Handler(Looper.getMainLooper())));
    }

    /**
     * Creates the worker pool. Processing will not begin until {@link #start()} is called.
     * Volley类中调用的构造函数,传入了默认的网络线程数,DEFAULT_NETWORK_THREAD_POOL_SIZE = 4(默认是4个线程)
     * @param cache A Cache to use for persisting responses to disk
     * @param network A Network interface for performing HTTP requests
     */
    public RequestQueue(Cache cache, Network network) {
        this(cache, network, DEFAULT_NETWORK_THREAD_POOL_SIZE);
    }

    /**
     * Starts the dispatchers in this queue.
     * 初始化完毕后,会马上调用start()方法
     */
    public void start() {
        // 先确保当前正在运行的发送对象(Dispatcher)被停止
        // 建立一个cahce dispatch对象,并且开启它
        stop();  // Make sure any currently running dispatchers are stopped.
        // Create the cache dispatcher and start it.
        mCacheDispatcher = new CacheDispatcher(mCacheQueue, mNetworkQueue, mCache, mDelivery);
        mCacheDispatcher.start();

        // Create network dispatchers (and corresponding threads) up to the pool size.
        // 建立多个访问网络的线程对象,并且运行它们
        for (int i = 0; i < mDispatchers.length; i++) {
            NetworkDispatcher networkDispatcher = new NetworkDispatcher(mNetworkQueue, mNetwork,
                    mCache, mDelivery);
            mDispatchers[i] = networkDispatcher;
            networkDispatcher.start();
        }
    }
现在我们就知道Volley类中最后的这两行到底做了什么事情了
     RequestQueue queue = new RequestQueue(new DiskBasedCache(cacheDir), network);
        queue.start();
现在我们就能理解上面流程图所示的东西了。
二、添加到Request
我们建立好各种Request对象后,最终都会把它add到RequestQueue中,然后它就能自动进行网络处理了。这里的重点就是RequestQueue的add()方法,所以我们就来看看这是怎样的一个过程。
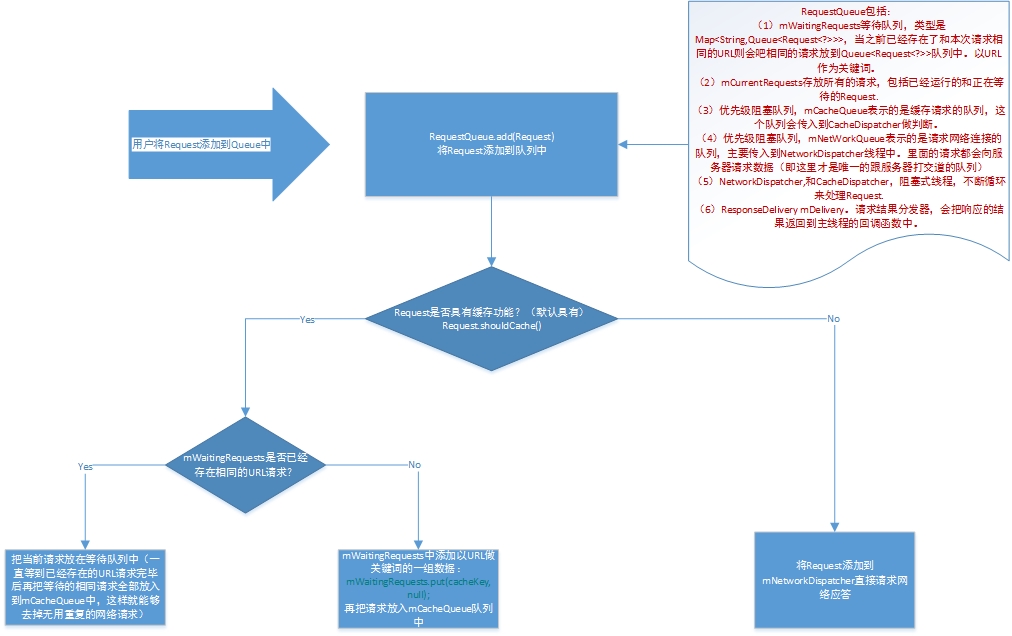
- mWaitingRequests等待队列,当之前已经存在了与本次请求相同的请求时,会把相同的请求放在队列中,以URL为关键字(key)
- mCurrentRequests存放所有请求,包括已经运行的和正在等待的请求(Request)。
- mCacheQueue表示目前缓存的请求队列,这个队列会被传入到CacheDispatcher做判断。
- mNetworkQueue表示请求网络连接的队列,里面的请求都会向服务器进行请求(这才是唯一和服务器打交道的队列)。
- NetworkDispatcher、CacheDispatcher,阻塞式线程,不断循环处理Request。
- ResonseDelivery(mDelivery)请求结果分发器,会把响应得到的结果发送到主线程的回调方法中,最终传递给监听器。
关键代码就是这个add()方法,其余的方法很简单,就不做说明了。
    /**
     * Adds a Request to the dispatch queue.
     * @param request The request to service
     * @return The passed-in request
     */
    public <T> Request<T> add(Request<T> request) {
        // Tag the request as belonging to this queue and add it to the set of current requests.
        // request对象先给自己内部的mRequestQueue对象进行初始化,存入当前的队列对象
        request.setRequestQueue(this);
        synchronized (mCurrentRequests) {
            // mCurrentRequests会存放所有的请求,无论是不是重复的请求都会被放在这里面,所以一上来就add进来
            mCurrentRequests.add(request);
        }

        // Process requests in the order they are added.
        // 设置request自身的序列数
        request.setSequence(getSequenceNumber());
        // 设置request当前的真正进行的事件,现在是被添加到队列中了,所以做了如下标记
        request.addMarker("add-to-queue");

        // If the request is uncacheable, skip the cache queue and go straight to the network.
        // 判断是否允许缓存,这里是磁盘的缓存,
        // 如果不允许缓存,直接把request添加到networkQueue中,然后去请求网络
        if (!request.shouldCache()) {
            mNetworkQueue.add(request); // 添加到mNetworkQueue中,才能进行真正的网络交互
            return request; // 如果不允许缓存,添加到networkQueue中后直接返回
        }

        // Insert request into stage if there's already a request with the same cache key in flight.
        // 看看现在有没有缓存的数据,这里加了个同步锁
        synchronized (mWaitingRequests) {
            String cacheKey = request.getCacheKey();
            // 判断等待队列中是否已经有这个request,如果有了就需要过滤重复请求
            if (mWaitingRequests.containsKey(cacheKey)) {
                // There is already a request in flight. Queue up.
                // 现在等待队列中已经有相同的request对象了,直接等待之前的request执行请求完毕,
                // 然后把结果放入这个request中,这样就过滤了重复的请求了
                // 现在知道了之前已经有一个相同的请求,就初始化一个stagedRequests(请求队列)
                Queue<Request<?>> stagedRequests = mWaitingRequests.get(cacheKey);
                if (stagedRequests == null) {
                    stagedRequests = new LinkedList<Request<?>>();
                }
                stagedRequests.add(request);
                mWaitingRequests.put(cacheKey, stagedRequests);
                if (VolleyLog.DEBUG) {
                    VolleyLog.v("Request for cacheKey=%s is in flight, putting on hold.", cacheKey);
                }
            } else {
                // Insert 'null' queue for this cacheKey, indicating there is now a request in
                // flight.
                // 在等待队列中添加以cacheKey作为关键字的一组数据,然后放入缓存队列
                mWaitingRequests.put(cacheKey, null);
                mCacheQueue.add(request);
            }
            return request;
        }
    }
最关键的就是这个add()方法,其余的方法很简单,就不做说明了。
三、缓存队列处理
第一部分讲了RequestQueue初始化后,立即执行了其内部的start()方法
    /**
     * Starts the dispatchers in this queue.
     */
    public void start() {
        stop();  // Make sure any currently running dispatchers are stopped.
        // Create the cache dispatcher and start it.
        mCacheDispatcher = new CacheDispatcher(mCacheQueue, mNetworkQueue, mCache, mDelivery);
        mCacheDispatcher.start();

        // Create network dispatchers (and corresponding threads) up to the pool size.
        for (int i = 0; i < mDispatchers.length; i++) {
            NetworkDispatcher networkDispatcher = new NetworkDispatcher(mNetworkQueue, mNetwork,
                    mCache, mDelivery);
            mDispatchers[i] = networkDispatcher;
            networkDispatcher.start();
        }
    }
这个方法中首先start了CacheDispatcher,它接收了mCacheQueue, mNetworkQueue, mCache, mDelivery这些参数,它到底是什么东西呢?其实啊,它就是一个线程,继承自Thread,那个start()方法就没啥奇特的了,就是Thread的start()方法。重要的东西就是线程体了,来看看是什么流程。
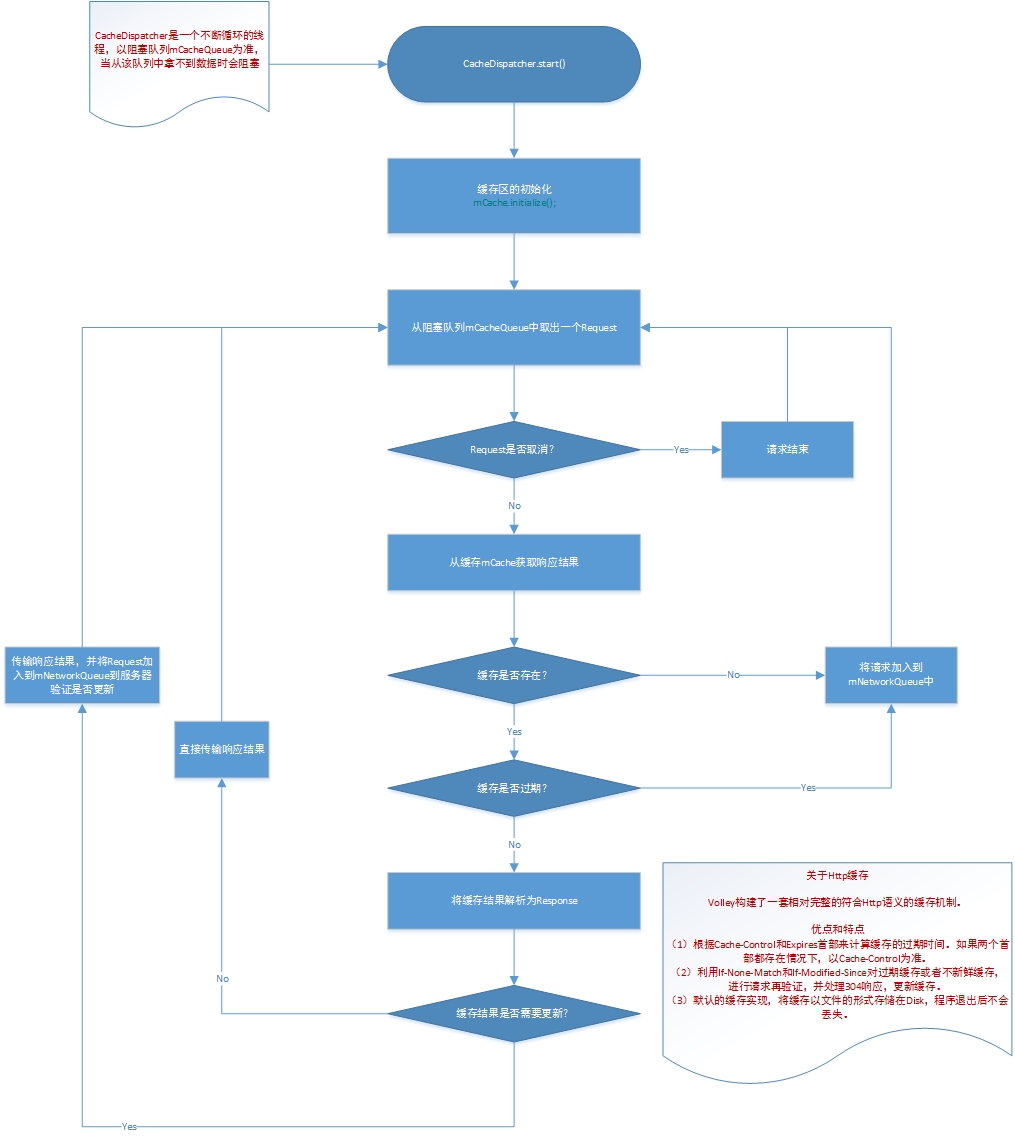
  @Override
    public void run() {
        if (DEBUG) VolleyLog.v("start new dispatcher");
        Process.setThreadPriority(Process.THREAD_PRIORITY_BACKGROUND);

        // Make a blocking call to initialize the cache.
        // 初始化缓存区
        mCache.initialize();

        while (true) {
            try {
                // Get a request from the cache triage queue, blocking until
                // at least one is available.
                // 从cache队列中取出一个request对象,执行阻塞
                final Request<?> request = mCacheQueue.take();
                request.addMarker("cache-queue-take"); // 设置当前事件名称

                // If the request has been canceled, don't bother dispatching it.
                // 如果这个request已经被取消了,就直接finish掉,再去cache队列中取一个新的
                if (request.isCanceled()) {
                    request.finish("cache-discard-canceled");
                    continue;
                }

                // Attempt to retrieve this item from cache.
                // 根据缓存的key得到一个entry(响应结果)对象
                Cache.Entry entry = mCache.get(request.getCacheKey());
                // 判断是否存在
                if (entry == null) {
                    request.addMarker("cache-miss");
                    // Cache miss; send off to the network dispatcher.
                    // 发现丢失了,放入networkQueue重新请求服务器
                    mNetworkQueue.put(request);
                    continue;
                }

                // If it is completely expired(过期,期满), just send it to the network.
                // 如果它已经完全过期了,也让它重新访问网络
                if (entry.isExpired()) {
                    request.addMarker("cache-hit-expired");
                    request.setCacheEntry(entry);
                    mNetworkQueue.put(request);
                    continue;
                }

                // We have a cache hit; parse its data for delivery back to the request.
                // 命中到一个缓存
                request.addMarker("cache-hit");
                Response<?> response = request.parseNetworkResponse(
                        new NetworkResponse(entry.data, entry.responseHeaders));
                request.addMarker("cache-hit-parsed");

                // 判断是否需要刷新
                if (!entry.refreshNeeded()) {
                    // Completely unexpired cache hit. Just deliver the response.
                    // 如果根本没有过期,就发送到response中
                    mDelivery.postResponse(request, response);
                } else {
                    // Soft-expired cache hit. We can deliver the cached response,
                    // but we need to also send the request to the network for
                    // refreshing.
                    // 如果需要重新刷新,那么就发送给network进行刷新
                    request.addMarker("cache-hit-refresh-needed");
                    request.setCacheEntry(entry);

                    // Mark the response as intermediate.
                    response.intermediate = true;

                    // Post the intermediate response back to the user and have
                    // the delivery then forward the request along to the network.
                    mDelivery.postResponse(request, response, new Runnable() {
                        @Override
                        public void run() {
                            try {
                                mNetworkQueue.put(request);
                            } catch (InterruptedException e) {
                                // Not much we can do about this.
                            }
                        }
                    });
                }

            } catch (InterruptedException e) {
                // We may have been interrupted because it was time to quit.
                if (mQuit) {
                    return;
                }
                continue;
            }
        }
    }
四、网络请求处理
讲解完RequestQueue中的cacheDispatcher的start()后,我们来看看NetworkDispatcher.
    /**
     * Starts the dispatchers in this queue.
     */
    public void start() {
        stop();  // Make sure any currently running dispatchers are stopped.
        // Create the cache dispatcher and start it.
        mCacheDispatcher = new CacheDispatcher(mCacheQueue, mNetworkQueue, mCache, mDelivery);
        mCacheDispatcher.start();

        // Create network dispatchers (and corresponding threads) up to the pool size.
        for (int i = 0; i < mDispatchers.length; i++) {
            NetworkDispatcher networkDispatcher = new NetworkDispatcher(mNetworkQueue, mNetwork,
                    mCache, mDelivery);
            mDispatchers[i] = networkDispatcher;
            networkDispatcher.start();
        }
    }
在RequestQueuestart()时,直接循环创建了多个NetworkDispatcher对象,并且让其star().通过上面的分析,我们有理由猜测NetworkDispatcher也是一个Thread对象,那么就来看看它的流程。
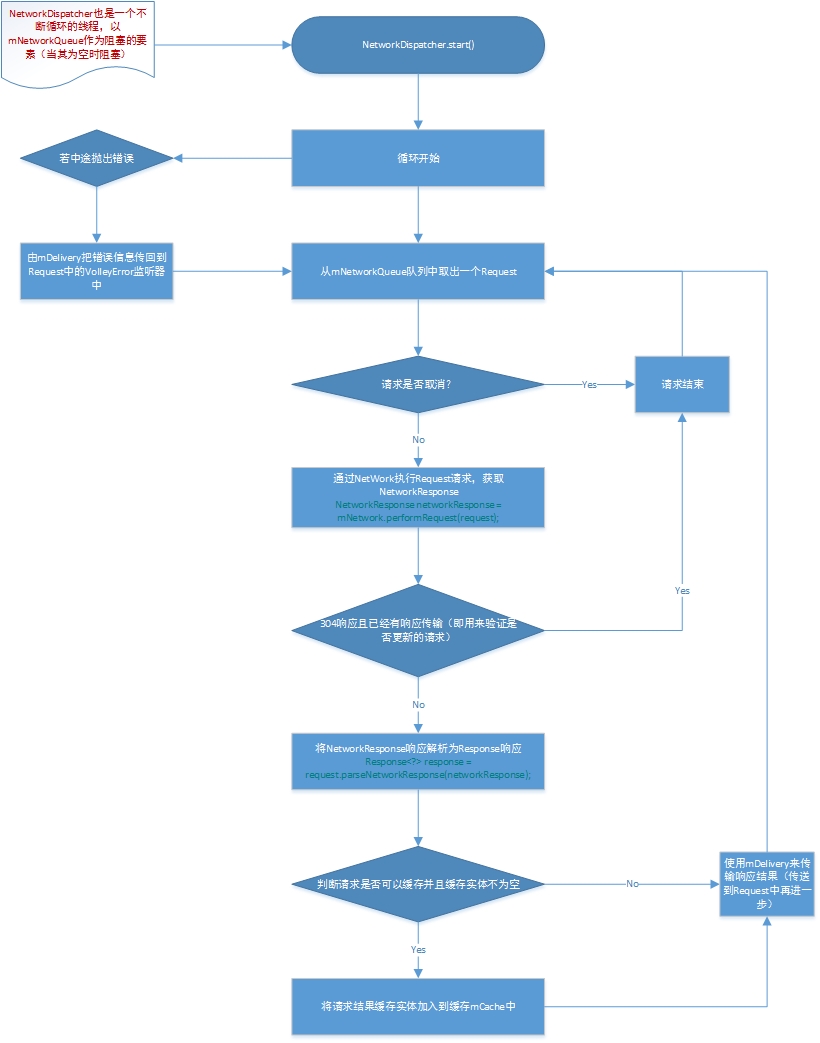
    @Override
    public void run() {
        Process.setThreadPriority(Process.THREAD_PRIORITY_BACKGROUND);
        while (true) {
            long startTimeMs = SystemClock.elapsedRealtime();
            Request<?> request;
            try {
                // Take a request from the queue.
                // 从queue中取出一个request对象
                request = mQueue.take();
            } catch (InterruptedException e) {
                // We may have been interrupted because it was time to quit.
                if (mQuit) {
                    return;
                }
                continue;
            }

            try {
                // 记录当前事务信息
                request.addMarker("network-queue-take");

                // If the request was cancelled already, do not perform the
                // network request.
                // 如果这个request已经被取消了,那么就不再执行网络请求
                if (request.isCanceled()) {
                    request.finish("network-discard-cancelled");
                    continue;
                }

                addTrafficStatsTag(request);

                // Perform the network request.
                // 完成网络请求
                NetworkResponse networkResponse = mNetwork.performRequest(request);
                request.addMarker("network-http-complete"); // 记录当前事务信息

                // If the server returned 304 AND we delivered a response already,
                // 如果返回304,并且我们已经分发了响应的结果
                // we're done -- don't deliver a second identical response.
                // 验证当前是否有更新请求(304是标志)
                if (networkResponse.notModified && request.hasHadResponseDelivered()) {
                    request.finish("not-modified");
                    continue;
                }

                // Parse the response here on the worker thread.
                Response<?> response = request.parseNetworkResponse(networkResponse);
                request.addMarker("network-parse-complete");

                // 如果可用,就放入缓存中,这里要检查是否允许缓存(磁盘缓存)
                // Write to cache if applicable.
                // TODO: Only update cache metadata instead of entire record for 304s.
                if (request.shouldCache() && response.cacheEntry != null) {
                    mCache.put(request.getCacheKey(), response.cacheEntry);
                    request.addMarker("network-cache-written");
                }

                // Post the response back.
                request.markDelivered();
                mDelivery.postResponse(request, response);
            } catch (VolleyError volleyError) {
                volleyError.setNetworkTimeMs(SystemClock.elapsedRealtime() - startTimeMs);
                parseAndDeliverNetworkError(request, volleyError);
            } catch (Exception e) {
                VolleyLog.e(e, "Unhandled exception %s", e.toString());
                VolleyError volleyError = new VolleyError(e);
                volleyError.setNetworkTimeMs(SystemClock.elapsedRealtime() - startTimeMs);
                mDelivery.postError(request, volleyError);
            }
        }
    }
阅读完源码后发现:networkDispatcher做的是一个网络处理,而mCacheDispatcher做的是缓存处理。
networkDispatcher判断当前返回的结果是否需要更新,是否需要再次请求网络;mCacheDispatcher做的是判断当前是否有缓存,缓存的信息是否可用,不可用时就去请求网络。二者的行为类似,整体构成了RequestQueue的start()方法。我们可以理解为RequestQueue主要做的就是开启了多个不同功能的线程,并进行管理。
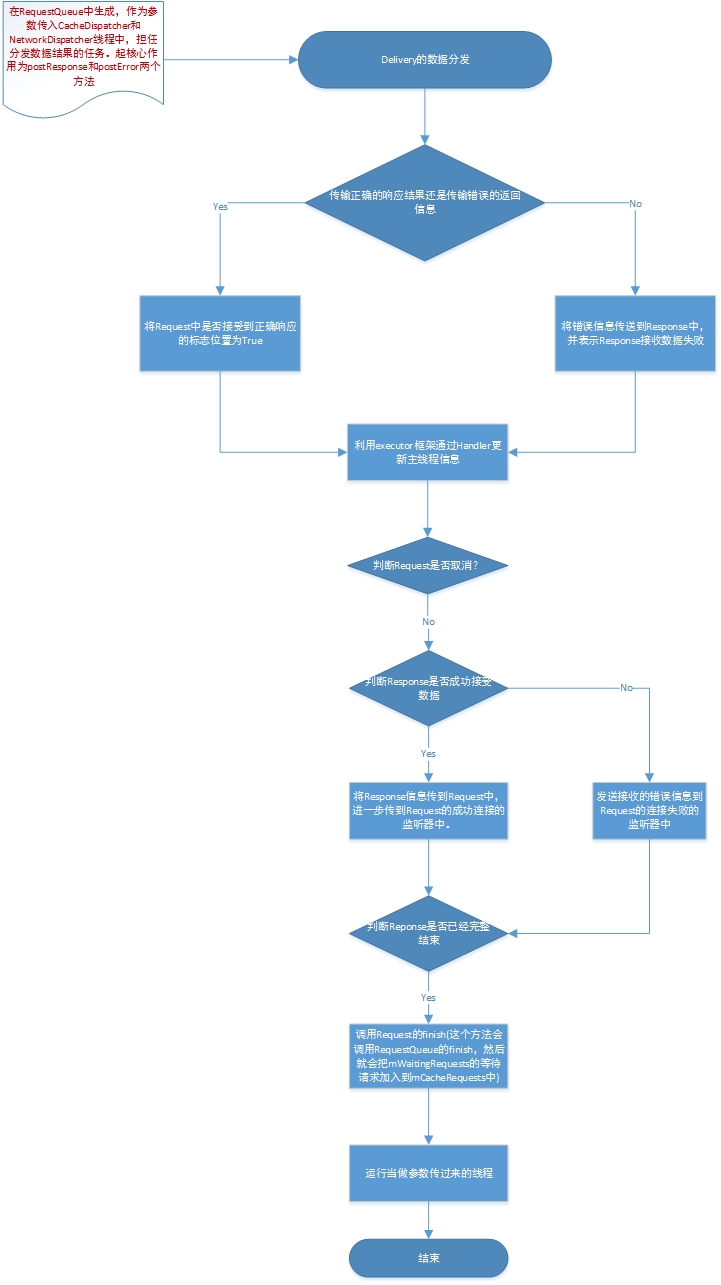
五、数据分发器
很抱歉的是,我又把上面的那个start()代码拿过来了,这回讲解的是mDelivery对象。这个对象被当作参数放入了CacheDispatcher、NetworkDispatcher中,它做的就是数据的分发工作。
    /**
     * Starts the dispatchers in this queue.
     */
    public void start() {
        stop();  // Make sure any currently running dispatchers are stopped.
        // Create the cache dispatcher and start it.
        mCacheDispatcher = new CacheDispatcher(mCacheQueue, mNetworkQueue, mCache, mDelivery);
        mCacheDispatcher.start();

        // Create network dispatchers (and corresponding threads) up to the pool size.
        for (int i = 0; i < mDispatchers.length; i++) {
            NetworkDispatcher networkDispatcher = new NetworkDispatcher(mNetworkQueue, mNetwork,
                    mCache, mDelivery);
            mDispatchers[i] = networkDispatcher;
            networkDispatcher.start();
        }
    }
ResponseDelivery是一个接口,ExecutorDelivery实现了它。这个接口的代码如下:
package com.android.volley;

public interface ResponseDelivery {
    /**
     * Parses a response from the network or cache and delivers it.
     */
    public void postResponse(Request<?> request, Response<?> response);

    /**
     * Parses a response from the network or cache and delivers it. The provided
     * Runnable will be executed after delivery.
     */
    public void postResponse(Request<?> request, Response<?> response, Runnable runnable);

    /**
     * Posts an error for the given request.
     */
    public void postError(Request<?> request, VolleyError error);
}
内部有重要的分发方法,发送正确结果信息,发送响应失败的信息。
    /**
     * A Runnable used for delivering network responses to a listener on the
     * main thread.
     * 用于分发网络的响应结果到主线程的一个runnable
     */
    @SuppressWarnings("rawtypes")
    private class ResponseDeliveryRunnable implements Runnable {
        private final Request mRequest;
        private final Response mResponse;
        private final Runnable mRunnable;

        public ResponseDeliveryRunnable(Request request, Response response, Runnable runnable) {
            mRequest = request;
            mResponse = response;
            mRunnable = runnable;
        }

        @SuppressWarnings("unchecked")
        @Override
        public void run() {
            // If this request has canceled, finish it and don't deliver.
            // 看看是否已经被取消了,如果被取消了,结束它,不做分发处理
            if (mRequest.isCanceled()) {
                mRequest.finish("canceled-at-delivery");
                return;
            }

            // Deliver a normal response or error, depending.
            // 分发一个普通的响应结果,可能是出错响应
            if (mResponse.isSuccess()) {
                mRequest.deliverResponse(mResponse.result);
            } else {
                mRequest.deliverError(mResponse.error);
            }

            // If this is an intermediate response, add a marker, otherwise we're done
            // and the request can be finished.
            if (mResponse.intermediate) {
                mRequest.addMarker("intermediate-response");
            } else {
                mRequest.finish("done");
            }

            // If we have been provided a post-delivery runnable, run it.
            if (mRunnable != null) {
                mRunnable.run();
            }
       }
    }
六、总结

整体流程总结:
其中蓝色部分代表主线程,绿色部分代表缓存线程,橙色部分代表网络线程。我们在主线程中调用RequestQueue的add()方法来添加一条网络请求,这条请求会先被加入到缓存队列当中,如果发现可以找到相应的缓存结果就直接读取缓存并解析,然后回调给主线程。如果在缓存中没有找到结果,则将这条请求加入到网络请求队列中,然后处理发送HTTP请求,解析响应结果,写入缓存,并回调主线程。
详细总结:
1. 当一个RequestQueue被成功申请后会开启一个CacheDispatcher(缓存调度器)和4个(默认)NetworkDispatcher(网络请求调度器);
2. CacheDispatcher缓存调度器最为第一层缓冲,开始工作后阻塞的从缓存序列mCacheQueue中取得请求:
a. 对于已经取消了的请求,直接标记为跳过并结束这个请求
b. 全新或过期的请求,直接丢入mNetworkQueue中交由N个NetworkDispatcher进行处理
c. 已获得缓存信息(网络应答)却没有过期的请求,交由Request的parseNetworkResponse进行解析,从而确定此应答是否成功。然后将请求和应答交由Delivery分发者进行处理,如果需要更新缓存那么该请求还会被放入mNetworkQueue中
3. 用户将请求Request add到RequestQueue之后:
a. 对于不需要缓存的请求(需要额外设置,默认是需要缓存)直接丢入mNetworkQueue交由N个NetworkDispatcher处理;
b. 对于需要缓存的,全新的请求加入到mCacheQueue中给CacheDispatcher处理
c. 需要缓存,但是缓存列表中已经存在了相同URL的请求,放在mWaitingQueue中做暂时雪藏,待之前的请求完毕后,再重新添加到mCacheQueue中;
4. 网络请求调度器NetworkDispatcher作为网络请求真实发生的地方,对消息交给BasicNetwork进行处理,同样的,请求和结果都交由Delivery分发者进行处理;
5. Delivery分发者实际上已经是对网络请求处理的最后一层了,在Delivery对请求处理之前,Request已经对网络应答进行过解析,此时应答成功与否已经设定。而后Delivery根据请求所获得的应答情况做不同处理:
a. 若应答成功,则触发deliverResponse方法,最终会触发开发者为Request设定的Listener
b. 若应答失败,则触发deliverError方法,最终会触发开发者为Request设定的ErrorListener
处理完后,一个Request的生命周期就结束了,Delivery会调用Request的finish操作,将其从mRequestQueue中移除,与此同时,如果等待列表中存在相同URL的请求,则会将剩余的层级请求全部丢入mCacheQueue交由CacheDispatcher进行处理。
一个Request的生命周期:
1. 通过add加入mRequestQueue中,等待请求被执行;
2. 请求执行后,调用自身的parseNetworkResponse对网络应答进行处理,并判断这个应答是否成功;
3. 若成功,则最终会触发自身被开发者设定的Listener;若失败,最终会触发自身被开发者设定的ErrorListener。
更多volley的源码分析:
http://blog.csdn.net/guolin_blog/article/details/17656437
http://blog.csdn.net/airk000/article/details/39003587
http://blog.csdn.net/ttdevs/article/details/17764351
流程图来自:
http://www.cnblogs.com/cpacm/p/4211719.html
其他参考文献:
http://blog.csdn.net/t12x3456/article/details/9221611