一、thymeleaf模板
1、在pom.xml中导入依赖
 <!-- 添加thymeleaf模版的依赖 -->
        <dependency>
            <groupId>org.springframework.boot</groupId>
            <artifactId>spring-boot-starter-thymeleaf</artifactId>
        </dependency>

        <dependency>
            <groupId>org.springframework.boot</groupId>
            <artifactId>spring-boot-starter-web</artifactId>
        </dependency>
2、配置application.yml文件
###配置thymeleaf
spring:
   thymeleaf:
      cache: false
3、在resources目录下添加templates包,并在此包下创建index.html页面
<!DOCTYPE html>
<html lang="en" xmlns:th="http://www.w3.org/1999/xhtml">
<head>
    <meta charset="UTF-8">
    <title>thymeleaf模板页面</title>
</head>
<body>
    <ul th:each="stu:${stuList}">
        <li>
            <span th:text="${stu.stu_id}"></span>
            <span th:text="${stu.stu_name}"></span>
        </li>
    </ul>
</body>
</html>
4、创建启动类
package com.boot;

import org.springframework.boot.SpringApplication;
import org.springframework.boot.autoconfigure.SpringBootApplication;

@SpringBootApplication
public class StartSpringBoot {
    public static void main(String[] args){
        SpringApplication.run(StartSpringBoot.class,args);
    }
}
5、创建实体类student
package com.boot.entity;

public class student {
    private Integer stu_id;
    private String stu_name;

    public Integer getStu_id() {
        return stu_id;
    }

    public void setStu_id(Integer stu_id) {
        this.stu_id = stu_id;
    }

    public String getStu_name() {
        return stu_name;
    }

    public void setStu_name(String stu_name) {
        this.stu_name = stu_name;
    }

    public student(Integer stu_id, String stu_name) {
        this.stu_id = stu_id;
        this.stu_name = stu_name;
    }
}
6、创建Controller类
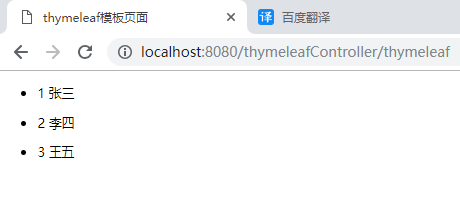
package com.boot.controller;

import com.boot.entity.student;
import org.springframework.stereotype.Controller;
import org.springframework.ui.Model;
import org.springframework.web.bind.annotation.RequestMapping;

import java.util.ArrayList;
import java.util.List;

@Controller
@RequestMapping("/thymeleafController")
public class thymeleafController {

    @RequestMapping("/thymeleaf")
    public String thymeleaf(Model model){
        List<student> list=new ArrayList<>();
        student stu1=new student(1,"张三");
        student stu2=new student(2,"李四");
        student stu3=new student(3,"王五");
        list.add(stu1);
        list.add(stu2);
        list.add(stu3);
        model.addAttribute("stuList",list);
        return "index";
    }
}
7、页面效果如下
二、SpringBoot中使用jsp
1、创建一个jsp页面
<%@ page contentType="text/html;charset=UTF-8" language="java" %>
<html>
<head>
    <title>jsp页面</title>
</head>
<body>
    欢迎:${name}123123
</body>
</html>
2、创建启动类
package com.boot;

import org.springframework.boot.SpringApplication;
import org.springframework.boot.autoconfigure.SpringBootApplication;

@SpringBootApplication
public class StartSpringBoot {
    public static void main(String[] args){
        SpringApplication.run(StartSpringBoot.class,args);
    }
}
3、创建Controller类
package com.boot.Controller;

import org.springframework.stereotype.Controller;
import org.springframework.ui.Model;
import org.springframework.web.bind.annotation.RequestMapping;

@Controller
@RequestMapping("/restJspController")
public class restJspController {
    @RequestMapping("/restJsp")
    public String restJsp(Model model){
        System.out.println("进入控制层");
        model.addAttribute("name","王五");
        return "index";
    }
}
4、配置application.yml文件
###配置页面前缀后缀
spring:
             mvc:
               view:
                 suffix: .jsp
                 prefix: /jsp/
             http:
               encoding:
                 charset: UTF-8
                 force: true
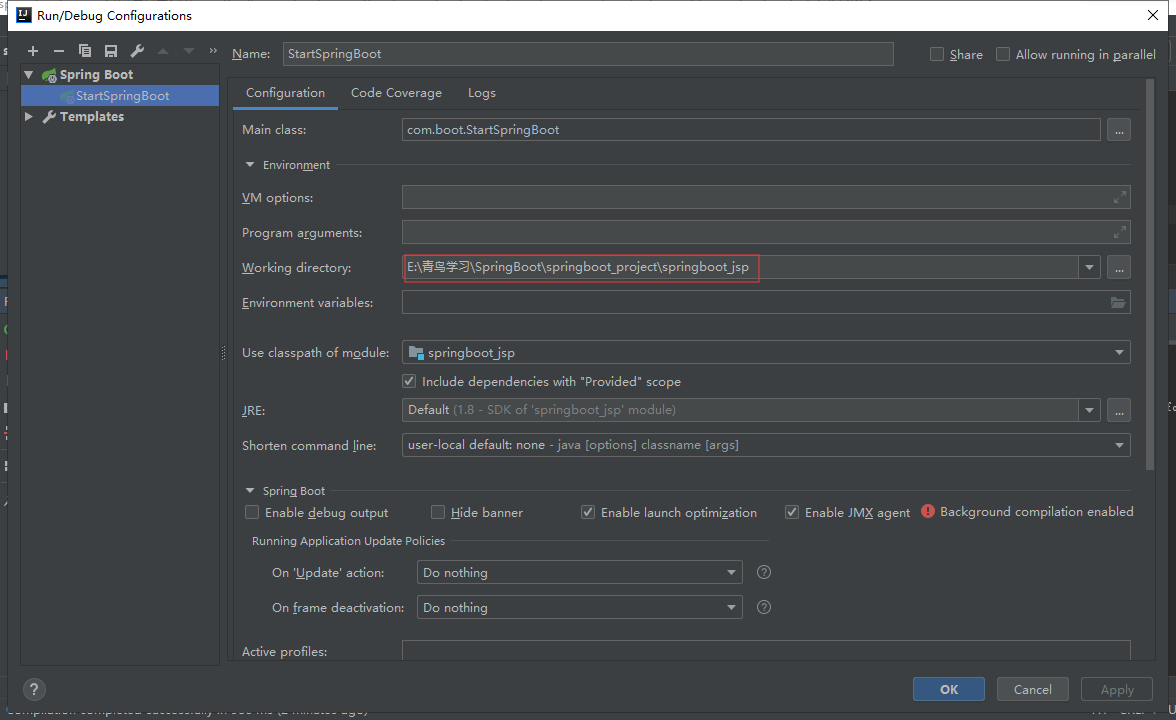
5、设置启动
6、页面实现效果如下

三、设置热部署
1、导入热部署依赖
 <!--热部署-->
        <dependency>
            <groupId>org.springframework.boot</groupId>
            <artifactId>spring-boot-devtools</artifactId>
            <optional>true</optional>
        </dependency>
        <plugin>
              <groupId>org.springframework.boot</groupId>
                   <artifactId>spring-boot-maven-plugin</artifactId>
                    <configuration>
                        <fork>true</fork>
                    </configuration>
         </plugin>
2、在pom.xml中输入Shift+Ctrl+Alt+/

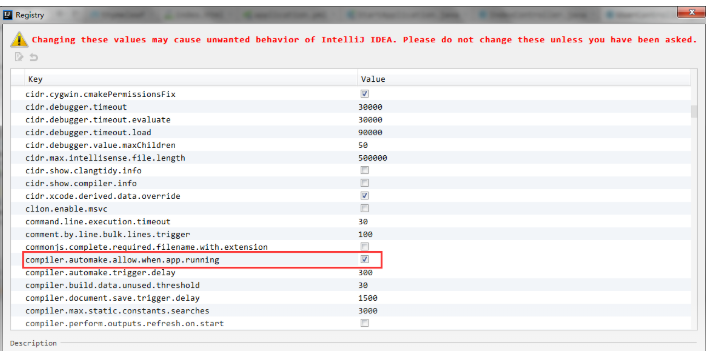
3、勾选如下选项
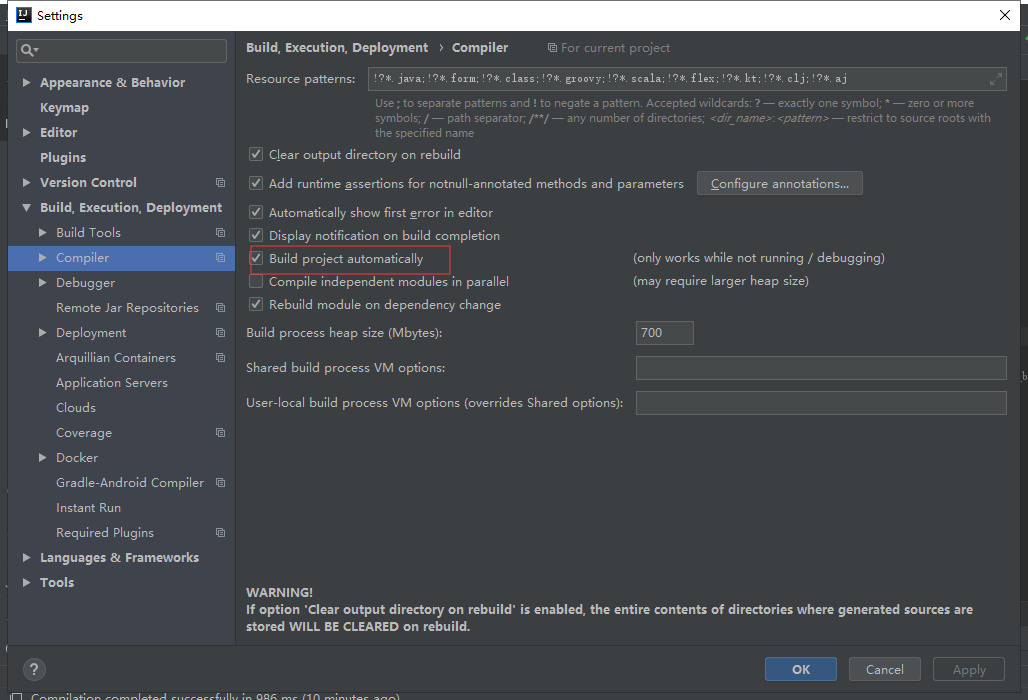
4、在Settings中配置
四、SpringBoot-JPA
1、导入依赖
        <dependency>
            <groupId>mysql</groupId>
            <artifactId>mysql-connector-java</artifactId>
            <scope>runtime</scope>
        </dependency>

        <dependency>
            <groupId>mysql</groupId>
            <artifactId>mysql-connector-java</artifactId>
            <version>5.1.32</version>
        </dependency>

        <dependency>
            <groupId>org.springframework.boot</groupId>
            <artifactId>spring-boot-starter-data-jpa</artifactId>
        </dependency>

        <dependency>
            <groupId>org.springframework.boot</groupId>
            <artifactId>spring-boot-starter-web</artifactId>
        </dependency>
2、创建实体类
package com.boot.entity;

import javax.persistence.*;

@Entity
public class Grade {

    //代表Id为主键并自增
    @Id @GeneratedValue(strategy = GenerationType.AUTO)
    @Column(name = "GradeID")
   private Integer gradeId;
    @Column(name = "GradeName")
    private String gradeName;

    public Integer getGradeId() {
        return gradeId;
    }

    public void setGradeId(Integer gradeId) {
        this.gradeId = gradeId;
    }

    public String getGradeName() {
        return gradeName;
    }

    public void setGradeName(String gradeName) {
        this.gradeName = gradeName;
    }
}
3、创建Dao层
package com.boot.dao;

import com.boot.entity.Grade;
import org.springframework.data.repository.CrudRepository;
import org.springframework.stereotype.Repository;

/**
 * CrudRepository <实体类型,实体主键类型>
 */
@Repository
public interface IGradeMapper extends CrudRepository <Grade,Integer>{

}
4、创建Service层
package com.boot.service;

import com.boot.entity.Grade;

import java.util.List;

public interface IGradeService {
    //添加的方法
    public Grade insertGrade(Grade grade);

    //修改的方法
    public Grade updataGrade(Grade grade);

    //删除的方法
    public void deleteGrade(Integer id);

    //查询所有的方法
    public Iterable<Grade> getAll();
}
5、创建ServiceImpl层
package com.boot.service.impl;

import com.boot.dao.IGradeMapper;
import com.boot.entity.Grade;
import com.boot.service.IGradeService;
import org.springframework.stereotype.Service;

import javax.annotation.Resource;

@Service
public class IGradeServiceImpl implements IGradeService {
    @Resource
    IGradeMapper iGradeMapper;
    @Override
    public Grade insertGrade(Grade grade) {
        return iGradeMapper.save(grade);
    }

    @Override
    public Grade updataGrade(Grade grade) {
        return iGradeMapper.save(grade);
    }

    @Override
    public void deleteGrade(Integer id) {
        iGradeMapper.deleteById(id);
    }

    @Override
    public Iterable<Grade> getAll() {
        return iGradeMapper.findAll();
    }
}
6、创建Controller类
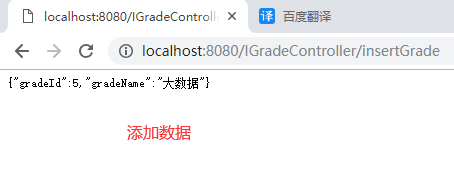
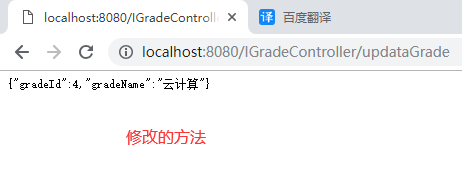
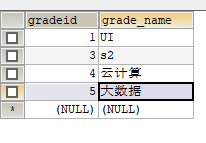
package com.boot.Controller;

import com.boot.entity.Grade;
import com.boot.service.IGradeService;
import org.springframework.web.bind.annotation.RequestMapping;
import org.springframework.web.bind.annotation.RestController;

import javax.annotation.Resource;

@RestController
@RequestMapping("/IGradeController")
public class IGradeController {
    @Resource
    IGradeService iGradeService;

    //新增数据
    @RequestMapping("/insertGrade")
    public Grade insertGrade(){
        Grade grade=new Grade();
        grade.setGradeId(6);
        grade.setGradeName("UI");
        return iGradeService.insertGrade(grade);
    }

    //修改数据
    @RequestMapping("/updataGrade")
    public Grade updataGrade(){
        Grade grade=new Grade();
        grade.setGradeId(1);
        grade.setGradeName("accp");
        return iGradeService.updataGrade(grade);
    }

    //删除数据
    @RequestMapping("/deleteGrade")
    public void deleteGrade(){
        iGradeService.deleteGrade(2);
    }

    //查询数据
    @RequestMapping("/getAllGrade")
    public  Iterable<Grade> getAllGrade(){
        return iGradeService.getAll();
    }
}
7、实现效果如下