 1 android的XML文件(包括layout下的和values下的)注释一般采用 <!--注释内容 -->的方式进行,也就是说,采用//是行不通的,不信你可以试试看。


   2 在XML中,形如    <Button           />      的表示方式,其中“/>”的含义表示这个XML中没有内文,他是一个最小组成单元,也就是说他的中间不能包含其他任何< >的代码,所以在<Button />中间注释会出现错误
dp:密度无关像素(dip) 无论屏幕的分辨率如何,总能显示相同的大小,一般使用dp作为控件与布局的宽高单位。
sp:可伸缩像素。在设置字体大小时使用。
 1 <?xml version="1.0" encoding="utf-8"?>
 2 <RelativeLayout xmlns:android="http://schemas.android.com/apk/res/android"
 3     xmlns:tools="http://schemas.android.com/tools"
 4     android:layout_width="match_parent"
 5     android:layout_height="match_parent"
 6     tools:context = "com.example.helloworld.relativelayout.MainActivity">
 7     <!-- context  要写文档对应目录下的 -->
 8     <!-- android:layout_toRightOf 后面的@+id/button要和第一个Button  一致,包括空格
 9     不然或出错  ,没写android:layout_below 会让布局混乱  -->
10     <Button
11         android:id = "@+id/button"
12         android:layout_width="wrap_content"
13         android:layout_height="wrap_content"
14         android:layout_alignParentTop = "true"
15         android:layout_marginTop = "100dp"
16         android:layout_marginLeft = "50dp"
17         android:text = "Button1"/>
18      <Button
19          android:id = "@+id/button2"
20          android:layout_width="wrap_content"
21          android:layout_height="wrap_content"
22          android:layout_toRightOf = "@+id/button"
23          android:layout_below = "@+id/button"
24          android:layout_marginTop = "15dp"
25          android:text = "Button2"/>
26 </RelativeLayout>
package com.example.helloworld;
import android.support.v7.app.AppCompatActivity;
import android.os.Bundle;
public class MainActivity extends AppCompatActivity {
    @Override
    protected void onCreate(Bundle savedInstanceState) {
        super.onCreate(savedInstanceState);
        setContentView(R.layout.layout1); 要改成layout1才可以
    }
}
<?xml version="1.0" encoding="utf-8"?>
<manifest xmlns:android="http://schemas.android.com/apk/res/android"
    package="com.example.helloworld">
 <!--  android:label 后的内容是可以改的  -->
    <application
        android:allowBackup="true"
        android:icon="@mipmap/ic_launcher"

      android:label="布局管理器"
        android:roundIcon="@mipmap/ic_launcher_round"
        android:supportsRtl="true"
        android:theme="@style/AppTheme">
        <activity android:name=".MainActivity">
            <intent-filter>
                <action android:name="android.intent.action.MAIN" />
                <category android:name="android.intent.category.LAUNCHER" />
            </intent-filter>
        </activity>
    </application>

</manifest>
<!-- 网格布局  实现计算器  -->

<!--  要>=6列  -->
<?xml version="1.0" encoding="utf-8"?>
<GridLayout xmlns:android="http://schemas.android.com/apk/res/android"
    android:layout_width="match_parent"
    android:layout_height="match_parent"
    android:layout_gravity="center"
    android:columnCount="4"
    android:rowCount = "6"
    android:orientation="horizontal">
    <Button  android:text = "/"
        android:layout_column="3"/>
    <Button  android:text = "1"/>
    <Button  android:text = "2"/>
    <Button  android:text = "3"/>
    <Button  android:text = "*"/>
    <Button  android:text = "4"/>
    <Button  android:text = "5"/>
    <Button  android:text = "6"/>
    <Button  android:text = "-"/>
    <Button  android:text = "7"/>
    <Button  android:text = "8"/>
    <Button  android:text = "9"/>
    <Button  android:text = "+"
         android:layout_gravity = "fill_vertical"
         android:layout_rowSpan="2"/>
    <Button  android:text = "0"/>
    <Button  android:text = "="
        android:layout_gravity = "fill_horizontal"
        android:layout_columnSpan="2"/>
</GridLayout>
1 1)fill_parent
2 设置一个构件的布局为fill_parent将强制性地使构件扩展,以填充布局单元内尽可能多的空间。这跟Windows控件的dockstyle属性大体一致。设置一个顶部布局或控件为fill_parent将强制性让它布满整个屏幕。
3 2) wrap_content
4 设置一个视图的尺寸为wrap_content将强制性地使视图扩展以显示全部内容。以TextView和ImageView控件为例,设置为wrap_content将完整显示其内部的文本和图像。布局元素将根据内容更改大小。设置一个视图的尺寸为wrap_content大体等同于设置Windows控件的Autosize属性为True。
5 3)match_parent
6 Android2.2中match_parent和fill_parent是一个意思 .两个参数意思一样,match_parent更贴切,于是从2.2开始两个词都可以用。那么如果考虑低版本的使用情况你就需要用fill_pa
 1 <?xml version="1.0" encoding="utf-8"?>
 2 <LinearLayout xmlns:android="http://schemas.android.com/apk/res/android"
 3     android:layout_width="match_parent"
 4     android:layout_height="match_parent">
 5     android:orientation = "vertical">
 6     <!-- 单选按钮  必须写明id,不然都可选择 -->
 7     <RadioGroup
 8         android:layout_width = "match_parent"
 9         android:layout_height = "wrap_content">
10         <RadioButton
11              android:id = "@+id/radiobutton1"
12             android:layout_width="wrap_content"
13             android:layout_height="wrap_content"
14             android:checked = "true"
15             android:text = "男"
16             />
17         <RadioButton
18             android:id = "@+id/radiobutton2"
19             android:layout_width="wrap_content"
20             android:layout_height="wrap_content"
21
22             android:text = "女"
23             />
24     </RadioGroup>
25
26 </LinearLayout>
我们可以发现这三个button并没有将整个屏幕占据,而是根据内容适配大小。
我们在button2里面添加一个属性 android:layout_weight="1" ,发现布局变成这样了:
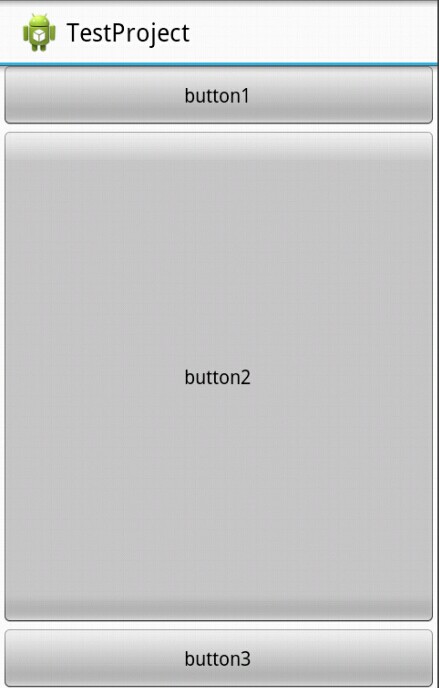
我们发现这次屏幕被三个button占据了,而且第一个和第三个button还是保持与内容适配大小,而第二个button而占据了剩余屏幕空间。
我们对上面的情况进行讲解:
1、我们只有在button2使用了layout_weight属性,并赋值为1;但是button1和button2并没有使用这个属性,根据API可以知道,他们的layout_weight属性等于0。
2、LinearLayout如果显式包含layout_weight属性时,会measure两次;第一次将正常计算三个button的宽高,第二次将结合layout_weight的值分配剩余的空间。
通俗点来总结:Android系统先按照你设置的3个Button高度Layout_height=wrap_content,给你分配好他们3个的高度,然后会把剩下来的屏幕空间全部赋给Button2,因为只有他的权重值是1,这也是为什么Button2占了那么大的一块空间。