一、Spring Boot整合第三方组件(Redis为例)
1、加依赖
<!--redis-->
<dependency>
      <groupId>org.springframework.boot</groupId>
      <artifactId>spring-boot-starter-data-redis</artifactId>
</dependency>
2、加配置
spring.redis.host=127.0.0.1
spring.redis.password=
spring.redis.port=6379
spring.redis.jedis.pool.max-idle=200
spring.redis.jedis.pool.max-active=1024
spring.redis.jedis.pool.max-wait=1000
3、加注解(看各自的组件需要,比如整合Mybatis就需要,Redis不需要)
二、Spring Boot自动装配组件原理
1、@SpringBootApplication注解

2、AutoConfigurationImportSelector分析
① selectImports方法:
@Override
    public String[] selectImports(AnnotationMetadata annotationMetadata) {
        if (!isEnabled(annotationMetadata)) {
            return NO_IMPORTS;
        }
        AutoConfigurationMetadata autoConfigurationMetadata = AutoConfigurationMetadataLoader
                .loadMetadata(this.beanClassLoader);
     //获取自动装配的入口
        AutoConfigurationEntry autoConfigurationEntry = getAutoConfigurationEntry(autoConfigurationMetadata,
                annotationMetadata);
        return StringUtils.toStringArray(autoConfigurationEntry.getConfigurations());
    }
② getAutoConfigurationEntry(autoConfigurationMetadata,annotationMetadata)方法:
protected AutoConfigurationEntry getAutoConfigurationEntry(AutoConfigurationMetadata autoConfigurationMetadata,
                                                               AnnotationMetadata annotationMetadata) {
        if (!isEnabled(annotationMetadata)) {
            return EMPTY_ENTRY;
        }
        AnnotationAttributes attributes = getAttributes(annotationMetadata);
    /**
         * 获取候选的配置类,主要是到classpath下面的META-INFspring.factories中,
         * 取key为org.springframework.boot.autoconfigure.EnableAutoConfiguration的配置类
         */
        List<String> configurations = getCandidateConfigurations(annotationMetadata, attributes);
        /**去除重复的配置类,若我们自己写的starter 可能存主重复的*/
        configurations = removeDuplicates(configurations);
        Set<String> exclusions = getExclusions(annotationMetadata, attributes);
        checkExcludedClasses(configurations, exclusions);
        configurations.removeAll(exclusions);
        /**根据maven依赖导入的启动器过滤出需要导入的配置类*/
        configurations = filter(configurations, autoConfigurationMetadata);
        fireAutoConfigurationImportEvents(configurations, exclusions);
        return new AutoConfigurationEntry(configurations, exclusions);
    }
③ getCandidateConfigurations(annotationMetadata, attributes)方法:
/**
     * Return the auto-configuration class names that should be considered. By default
     * this method will load candidates using {@link SpringFactoriesLoader} with
     * {@link #getSpringFactoriesLoaderFactoryClass()}.
     * @param metadata the source metadata
     * @param attributes the {@link #getAttributes(AnnotationMetadata) annotation
     * attributes}
     * @return a list of candidate configurations
     */
    protected List<String> getCandidateConfigurations(AnnotationMetadata metadata, AnnotationAttributes attributes) {
        //去spring.factories中去查询EnableAutoConfiguration类
        List<String> configurations = SpringFactoriesLoader.loadFactoryNames(getSpringFactoriesLoaderFactoryClass(),
                getBeanClassLoader());
        Assert.notEmpty(configurations, "No auto configuration classes found in META-INF/spring.factories. If you "
                + "are using a custom packaging, make sure that file is correct.");
        return configurations;
    }
④ SpringFactoriesLoader.loadFactoryNames方法:
/**
     * Load the fully qualified class names of factory implementations of the
     * given type from {@value #FACTORIES_RESOURCE_LOCATION}, using the given
     * class loader.
     * @param factoryClass the interface or abstract class representing the factory
     * @param classLoader the ClassLoader to use for loading resources; can be
     * {@code null} to use the default
     * @throws IllegalArgumentException if an error occurs while loading factory names
     * @see #loadFactories
     */
    public static List<String> loadFactoryNames(Class<?> factoryClass, @Nullable ClassLoader classLoader) {
        String factoryClassName = factoryClass.getName();
        //去spring.factories 中去查询EnableAutoConfiguration类
        return loadSpringFactories(classLoader).getOrDefault(factoryClassName, Collections.emptyList());
    }
⑤ loadSpringFactories(classLoader)方法:
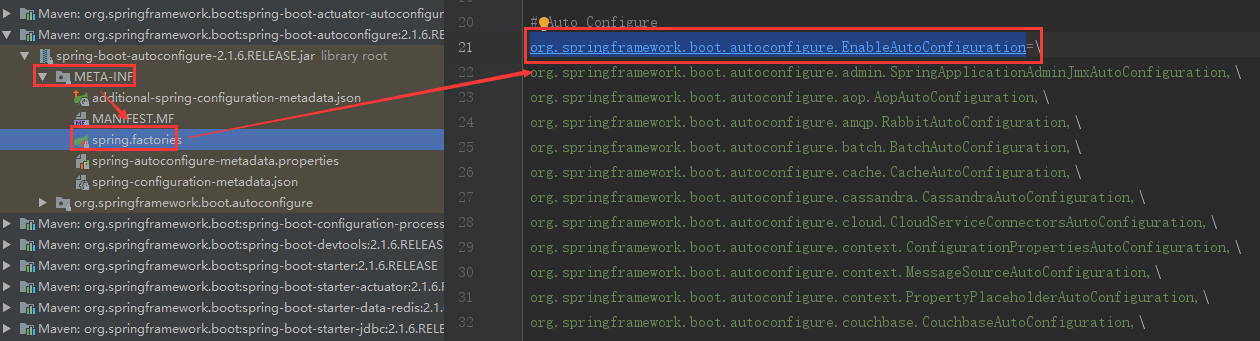
private static Map<String, List<String>> loadSpringFactories(@Nullable ClassLoader classLoader) {
        MultiValueMap<String, String> result = cache.get(classLoader);
        if (result != null) {
            return result;
        }

        try {
            /**
             * The location to look for factories. Can be present in multiple JAR files.
             * FACTORIES_RESOURCE_LOCATION = "META-INF/spring.factories";
             */
            Enumeration<URL> urls = (classLoader != null ?
                    classLoader.getResources(FACTORIES_RESOURCE_LOCATION) :
                    ClassLoader.getSystemResources(FACTORIES_RESOURCE_LOCATION));
            result = new LinkedMultiValueMap<>();
            while (urls.hasMoreElements()) {
                URL url = urls.nextElement();
                UrlResource resource = new UrlResource(url);
                Properties properties = PropertiesLoaderUtils.loadProperties(resource);
                for (Map.Entry<?, ?> entry : properties.entrySet()) {
                    String factoryClassName = ((String) entry.getKey()).trim();
                    for (String factoryName : StringUtils.commaDelimitedListToStringArray((String) entry.getValue())) {
                        result.add(factoryClassName, factoryName.trim());
                    }
                }
            }
            cache.put(classLoader, result);
            return result;
        }
        catch (IOException ex) {
            throw new IllegalArgumentException("Unable to load factories from location [" +
                    FACTORIES_RESOURCE_LOCATION + "]", ex);
        }
    }
spring.factories如下:
3、RedisAutoConfiguration分析
导入了三个组件:RedisTemplate,StringRedisTemplate,JedisConnectionConfiguration

① RedisTemplate组件(默认采用java序列化,所以一般要自定义该组件):
@Bean
    //当没有Spring容器中没有redisTemplate的Bean的时候才加载
    @ConditionalOnMissingBean(name = "redisTemplate")
    public RedisTemplate<Object, Object> redisTemplate(RedisConnectionFactory redisConnectionFactory)
            throws UnknownHostException {
        RedisTemplate<Object, Object> template = new RedisTemplate<>();
        template.setConnectionFactory(redisConnectionFactory);
        return template;
    }
自定义RedisTemplate组件,主要修改序列化方式,如下:
@Bean
    public RedisTemplate<Object, Object> redisTemplate(RedisConnectionFactory redisConnectionFactory)  {
        RedisTemplate<Object, Object> template = new RedisTemplate<>();
        template.setDefaultSerializer(new Jackson2JsonRedisSerializer<>(Object.class));
        template.setConnectionFactory(redisConnectionFactory);
        return template;
    }
② StringRedisTemplate(默认采用java序列化,所以一般要自定义该组件):
@Bean
    //当没有Spring容器中没有StringRedisTemplate类型的Bean的时候才加载
    @ConditionalOnMissingBean
    public StringRedisTemplate stringRedisTemplate(RedisConnectionFactory redisConnectionFactory)
            throws UnknownHostException {
        StringRedisTemplate template = new StringRedisTemplate();
        template.setConnectionFactory(redisConnectionFactory);
        return template;
    }
③ JedisConnectionConfiguration组件:
/**
 * Redis connection configuration using Jedis.
 */
@Configuration
@ConditionalOnClass({ GenericObjectPool.class, JedisConnection.class, Jedis.class })
class JedisConnectionConfiguration extends RedisConnectionConfiguration {

    /**
     * redis配置
     */
    private final RedisProperties properties;

    private final ObjectProvider<JedisClientConfigurationBuilderCustomizer> builderCustomizers;

    JedisConnectionConfiguration(RedisProperties properties,
                                 ObjectProvider<RedisSentinelConfiguration> sentinelConfiguration,
                                 ObjectProvider<RedisClusterConfiguration> clusterConfiguration,
                                 ObjectProvider<JedisClientConfigurationBuilderCustomizer> builderCustomizers) {
        super(properties, sentinelConfiguration, clusterConfiguration);
        this.properties = properties;
        this.builderCustomizers = builderCustomizers;
    }

    /**
     * Jedis连接工厂
     * @return
     * @throws UnknownHostException
     */
    @Bean
    @ConditionalOnMissingBean(RedisConnectionFactory.class)
    public JedisConnectionFactory redisConnectionFactory() throws UnknownHostException {
        return createJedisConnectionFactory();
    }

    /**
     * Jedis连接工厂
     * @return
     */
    private JedisConnectionFactory createJedisConnectionFactory() {
        JedisClientConfiguration clientConfiguration = getJedisClientConfiguration();
        if (getSentinelConfig() != null) {
            return new JedisConnectionFactory(getSentinelConfig(), clientConfiguration);
        }
        if (getClusterConfiguration() != null) {
            return new JedisConnectionFactory(getClusterConfiguration(), clientConfiguration);
        }
        return new JedisConnectionFactory(getStandaloneConfig(), clientConfiguration);
    }

    ......
redis对应的属性配置类:
@ConfigurationProperties(prefix = "spring.redis")
public class RedisProperties {

    /**
     * Database index used by the connection factory.
     */
    private int database = 0;

    /**
     * Connection URL. Overrides host, port, and password. User is ignored. Example:
     * redis://user:password@example.com:6379
     */
    private String url;

    /**
     * Redis server host.
     */
    private String host = "localhost";

    /**
     * Login password of the redis server.
     */
    private String password;

    /**
     * Redis server port.
     */
    private int port = 6379;

    ......

}
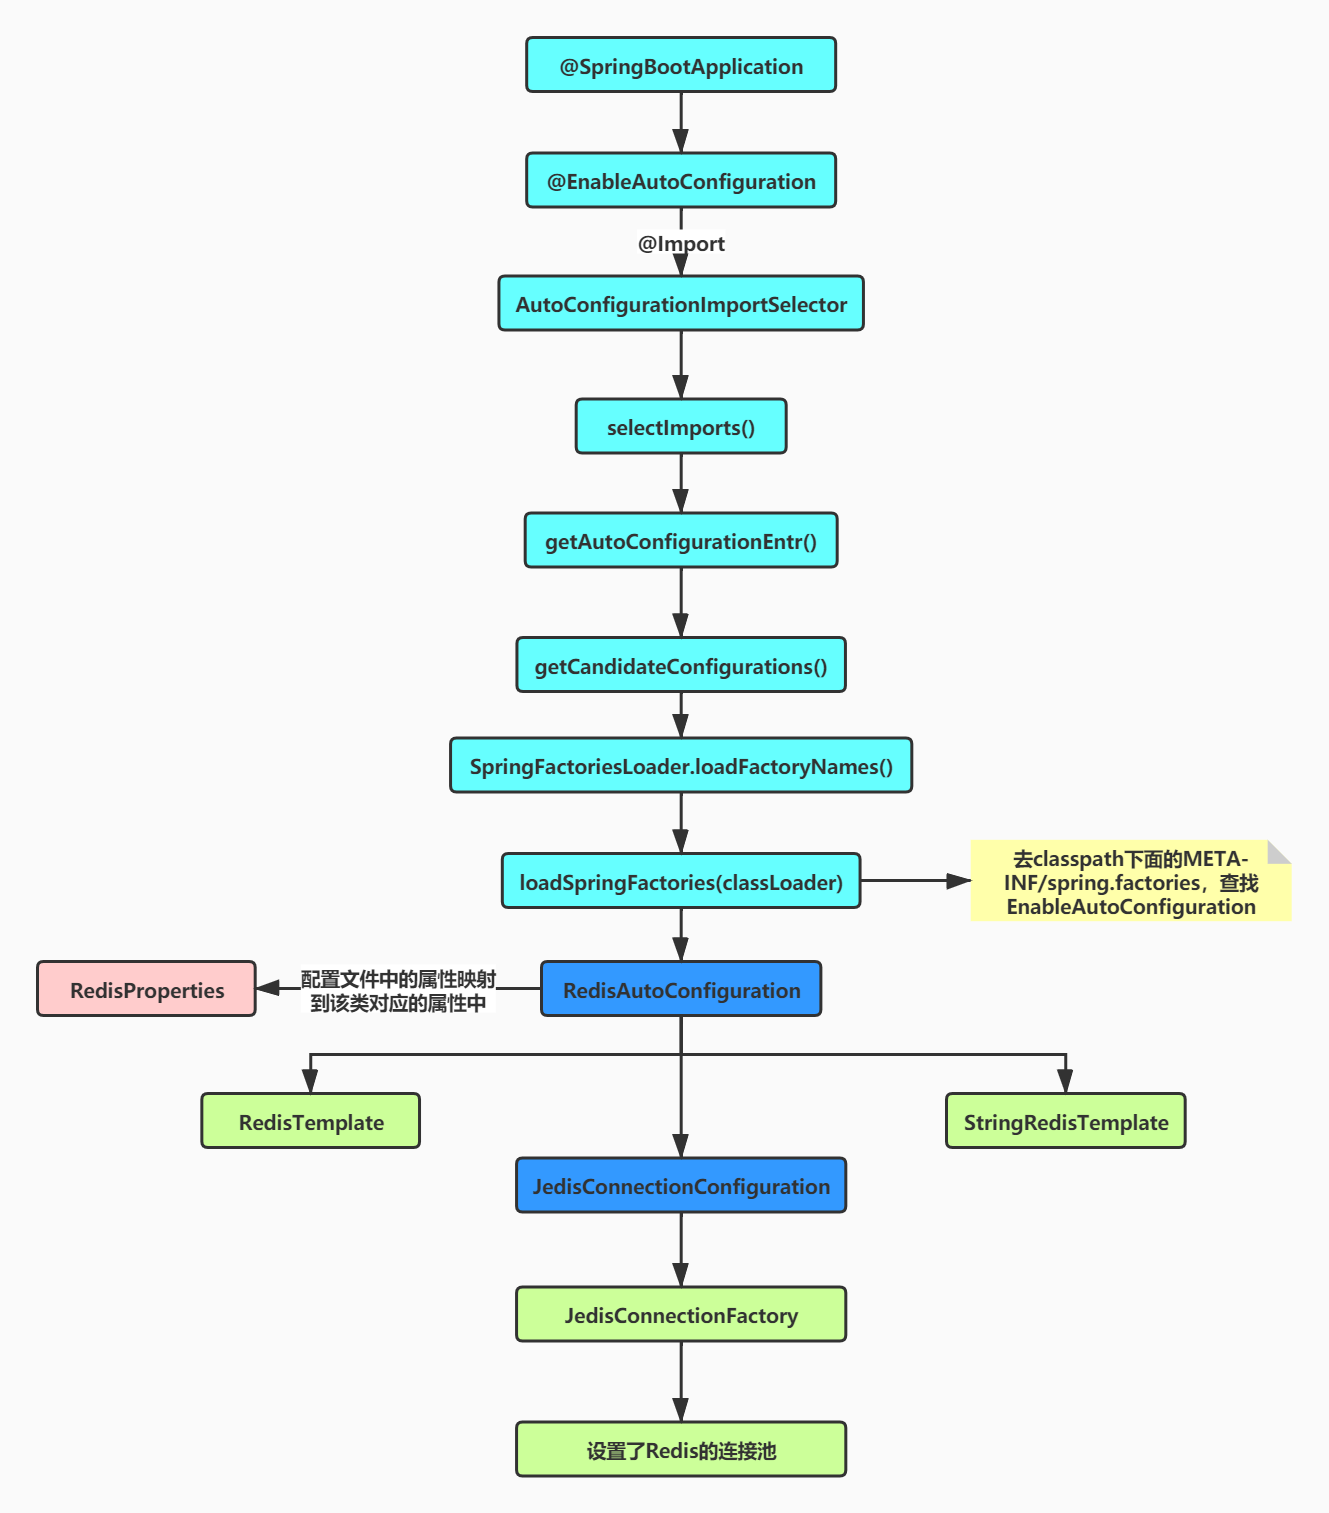
三、Spring Boot自动装配流程图
四、自定义starter启动器
1、创建一个工程toby-spring-boot-autoconfigure,用来编写启动器的核心逻辑
① 在工程的pom.xml中添加依赖:
<dependencies>
        <dependency>
            <groupId>org.springframework.boot</groupId>
            <artifactId>spring-boot-autoconfigure</artifactId>
        </dependency>
        <dependency>
            <groupId>org.springframework.boot</groupId>
            <artifactId>spring-boot-autoconfigure-processor</artifactId>
            <optional>true</optional>
        </dependency>
    </dependencies>
② 创建一个业务相关类:
/**
 * @desc: 具体业务bean
 * @author: toby
 */
public class TobyBean {

    /**
     * 是否开启
     */
    private Boolean enabled;

    public TobyBean(Boolean enabled){
        this.enabled = enabled;
    }

    /**
     * 检测是否开启toby功能
     * @return
     */
    public String checkTobyFunction(){
        if(enabled){
            return "open toby function";
        }
        return "not open toby function";
    }
}
③ 创建一个Toby的属性类:
/**
 * @desc: Configuration properties for Toby.
 * @author: toby
 */
@ConfigurationProperties(prefix = TobyProperties.TOBY_PREFIX)
@Data
public class TobyProperties {
    public static final String TOBY_PREFIX = "toby";

    /**
     * 是否开启
     */
    private Boolean enabled = true;
}
④ 创建一个Toby自动装配类:
/**
 * @desc: Toby自动装配
 * @author: toby
 */
@Configuration
@EnableConfigurationProperties(TobyProperties.class)
public class TobyAutoConfiguration implements InitializingBean {

    private final TobyProperties properties;

    public TobyAutoConfiguration(TobyProperties properties){
        this.properties = properties;
    }

    @Bean
    public TobyBean tobyBean(){
        TobyBean tobyBean = new TobyBean(properties.getEnabled());
        return tobyBean;
    }

    @Override
    public void afterPropertiesSet() throws Exception {
        //TODO 初始化工作
    }
}
⑤在resources/META-INF下面新建一个spring.factories:
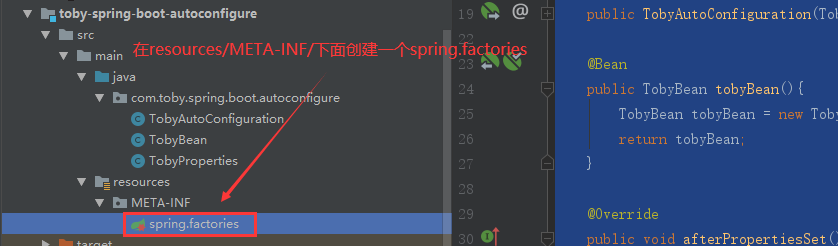
⑥ spring.factories内容如下:
# Auto Configure
org.springframework.boot.autoconfigure.EnableAutoConfiguration=
com.toby.spring.boot.autoconfigure.TobyAutoConfiguration
2、创建一个工程toby-spring-boot-starter,里面没有逻辑,就依赖上面的toby-spring-boot-autoconfigure

3、测试自定义的starter启动器
① 在需要用到该starter的工程的pom.xml中引入该starter依赖:
<!--自定义starter-->
        <dependency>
            <groupId>com.toby</groupId>
            <artifactId>toby-spring-boot-starter</artifactId>
            <version>1.0-SNAPSHOT</version>
        </dependency>
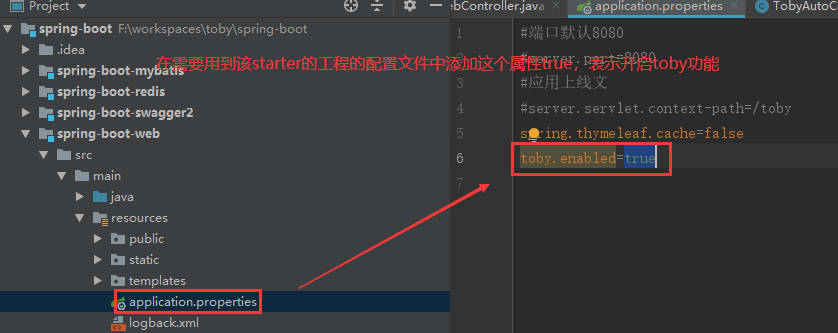
② 需要用到该starter的工程的配置文件中,根据需要设置开启属性值:
③ 使用该starter的业务bean(TobyBean):
@RestController
public class WebController {

    @Autowired
    private TobyBean tobyBean;

    /**
     * 测试toby
     * @return
     */
    @RequestMapping("/toby")
    public String toby() {
        return tobyBean.checkTobyFunction();
    }

    /**
     * 测试web
     * @return
     */
    @RequestMapping("/web")
    public String web() {
        return "this is spring boot web";
    }
}
④ 启动工程,访问http://localhost:8080/toby,显示如下:

自此自定义Spring Boot Starter启动器完成!!!
五、总结
本文以Spring Boot整合Redis为例,把Spring Boot整合第三方组件的自动装配原理进行了解析,对应其他的第三方组件,比如整合Mybatis,套路是一样的,根据自动装配原理自定义了一个Spring Boot Starter启动器。