第一步:npm install ng2-file-upload --save 安装 ng2-file-upload

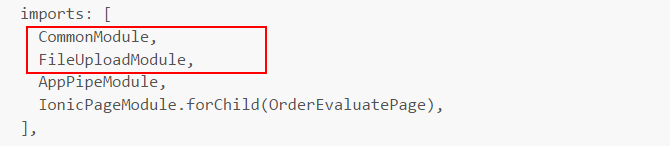
第二步:在需要使用该插件的页面的对应module文件的imports中引入CommonModule 和 FileUploadModule

第三步:在对应的组件文件中引入并声明;


2017-08-07补充:

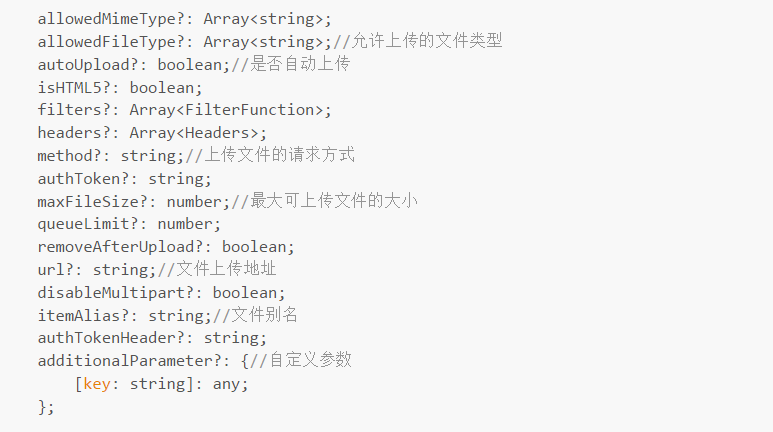
以下是new FileUploader()需要传入的参数列表,?号表示可选:
第四步:在组件.ts对应的html文件中添加input标签;如下:

multiple表示多选;
第五步:在组件.ts文件中创建selectedFileOnChanged()方法,进行图片选择之后的操作,例如本地预览(将selectedImgUrl中的数据绑定到html)等。
第六步:上传文件
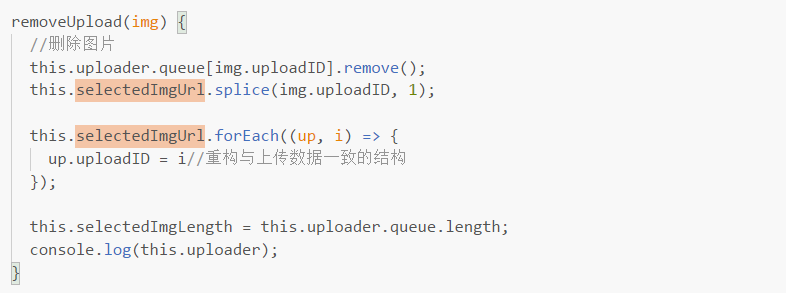
2017-08-07附加删除图片的逻辑处理:
大家可以参考一下选择的图片在uploader:FileUploader中的存储规则
第七步:完成图例:

后记:2017-07-21 10:44
如果出现下图的错误,肯能是因为没有导入第二步中的相关文件,也有可能是因为在第四步的input元素设置中缺少了ng2FileSelect

2017-08-07 17:00补充逻辑处理的代码:
import { Component } from '@angular/core';
import { IonicPage, NavController, NavParams } from 'ionic-angular';
import { FileUploader } from 'ng2-file-upload';
@IonicPage({
name: 'orderEvaluate',
segment: 'orderEvaluate'
})
@Component({
selector: 'page-order-evaluate',
templateUrl: 'order-evaluate.html',
})
export class OrderEvaluatePage {
public uploader: FileUploader = new FileUploader({ url: '图片上传地址' });
selectedImgUrl: any[] = [];//存储已经选择的图片
selectedImgLength = 0;
constructor(
public navCtrl: NavController,
public navParams: NavParams) {
}
removeUpload(img) {
//删除图片
this.uploader.queue[img.uploadID].remove();
this.selectedImgUrl.splice(img.uploadID, 1);
this.selectedImgUrl.forEach((up, i) => {
up.uploadID = i//重构与上传数据一致的结构
});
this.selectedImgLength = this.uploader.queue.length;
console.log(this.uploader);
}
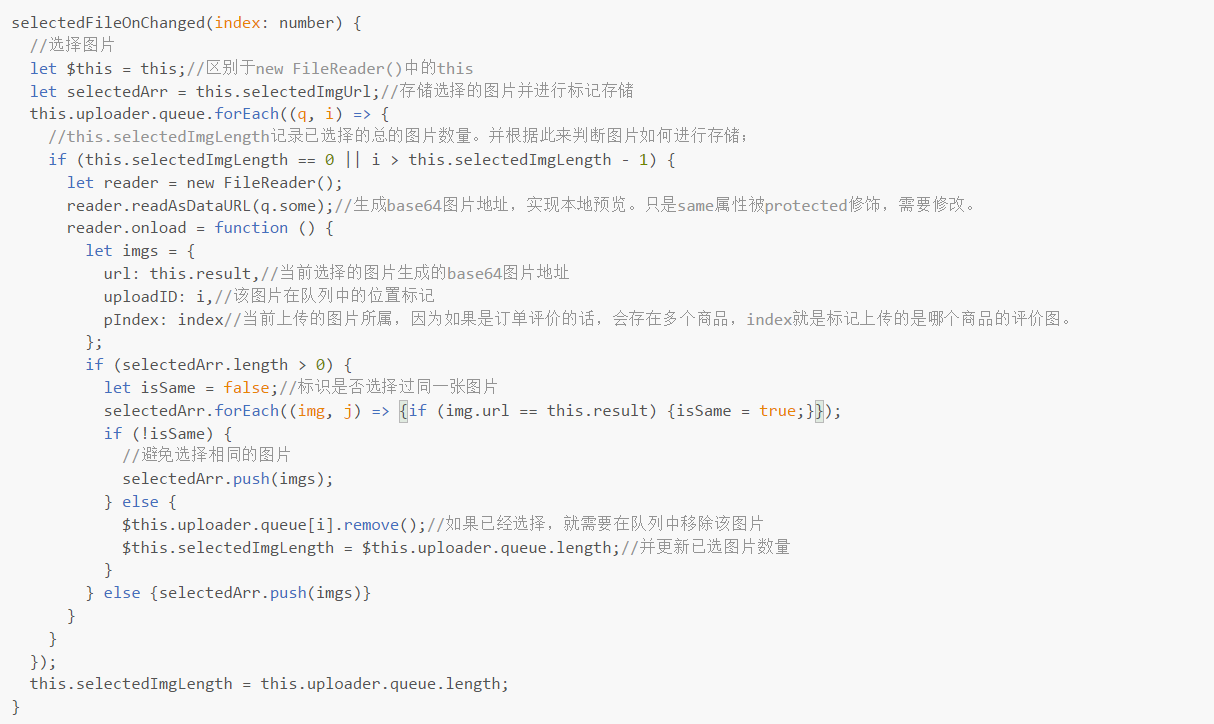
selectedFileOnChanged(index: number) {
//选择图片
let $this = this;//区别于new FileReader()中的this
let selectedArr = this.selectedImgUrl;//存储选择的图片并进行标记存储
this.uploader.queue.forEach((q, i) => {
//this.selectedImgLength记录已选择的总的图片数量。并根据此来判断图片如何进行存储;
if (this.selectedImgLength == 0 || i > this.selectedImgLength - 1) {
let reader = new FileReader();
reader.readAsDataURL(q.some);//生成base64图片地址,实现本地预览。只是same属性被protected修饰,需要修改。
reader.onload = function () {
let imgs = {
url: this.result,//当前选择的图片生成的base64图片地址
uploadID: i,//该图片在队列中的位置标记
pIndex: index//当前上传的图片所属,因为如果是订单评价的话,会存在多个商品,index就是标记上传的是哪个商品的评价图。
};
if (selectedArr.length > 0) {
let isSame = false;//标识是否选择过同一张图片
selectedArr.forEach((img, j) => { if (img.url == this.result) { isSame = true; } });
if (!isSame) {
//避免选择相同的图片
selectedArr.push(imgs);
} else {
$this.uploader.queue[i].remove();//如果已经选择,就需要在队列中移除该图片
$this.selectedImgLength = $this.uploader.queue.length;//并更新已选图片数量
}
} else { selectedArr.push(imgs) }
}
}
});
this.selectedImgLength = this.uploader.queue.length;
}
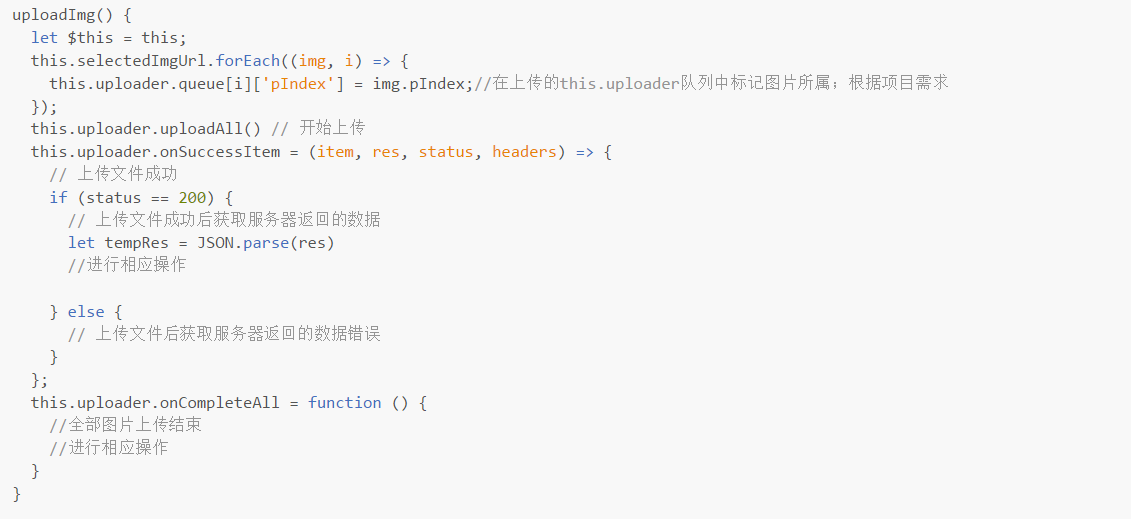
uploadImg() {
let $this = this;
this.selectedImgUrl.forEach((img, i) => {
//在上传的this.uploader队列中标记图片所属;根据项目需求
//如果同时对多个商品进行评价并上传图片,所有商品选择的图片是存储在同一个数组中,
//所以上传之前需要标识属于哪个商品,上传成功之后返回的数据同样会带有标识
this.uploader.queue[i]['pIndex'] = img.pIndex;
});
this.uploader.uploadAll() // 开始上传
this.uploader.onSuccessItem = (item, res, status, headers) => {
// 单张图片上传文件成功
//上传多张图片的话会执行多次
if (status == 200) {
// 上传文件成功后获取服务器返回的数据
//根据项目需求处理返回来的数据;
} else {
// 上传文件后获取服务器返回的数据错误
}
};
this.uploader.onCompleteAll = function () {
//uploader: FileUploader服务是单张上传图片,
//onCompleteAll可以检测到图片全部上传完成
//全部图片上传结束
//一般上传图片和上传其他评价的信息接口都是分开的,可以在此方法中构建需要上传的数据模型并调取相关接口
//over
}
}
}