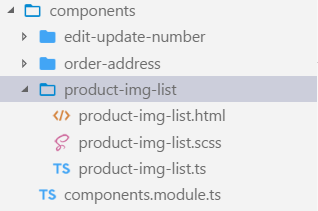
第一步,新建组件:
ionic g component product-img-list
命令执行成功之后项目中生成的文件:

第二步:生成文件解析:
①product-img-list.ts
import { Component, Input } from '@angular/core';

@Component({
  selector: 'product-img-list',
  templateUrl: 'product-img-list.html'
})
export class ProductImgListComponent {
  //传入的参数
  @Input() infos;
  @Input() showView;
  constructor() {
    console.log(this.infos);
  }
}
②product-img-list.html
<ion-grid [ngClass]="{'product-img': showView=='img','product-list':showView=='list'}">
    <ion-row>
        <ion-col col-6 col-sm-4 col-md-3 col-lg-3 col-xl-3 *ngFor="let p of infos">
            <div class="p-des">
                <img src={{p.images[0].url}} />
                <p class="name">{{p.productName}}</p>
                <p class="price">
                    <ion-icon name="aperture"></ion-icon>{{p.integral}}+{{p.vipPrice|PRICE}}</p>
            </div>
        </ion-col>
    </ion-row>
</ion-grid>
③components.module.ts
import { NgModule } from '@angular/core';
import { EditUpdateNumberComponent } from './edit-update-number/edit-update-number';
import { ProductImgListComponent } from './product-img-list/product-img-list';
import { OrderAddressComponent } from './order-address/order-address';

@NgModule({
    declarations: [
        EditUpdateNumberComponent,
        ProductImgListComponent,
        OrderAddressComponent,
        OrderAddressComponent],
    imports: [],
    exports: [
        EditUpdateNumberComponent,
        ProductImgListComponent,
        OrderAddressComponent,
    OrderAddressComponent]
})
第三步,在需要使用组件的页面添加一下代码:
<ion-content>
    <!-- 传入组件需要的数据infos /  showView 与组件中标明传入的属性一致 -->
     <product-img-list [infos]="infos" [showView]="viewStyle"></product-img-list>
    <ion-infinite-scroll [enabled]="isShouldEnable" (ionInfinite)="doInfinite($event)">
        <ion-infinite-scroll-content></ion-infinite-scroll-content>
    </ion-infinite-scroll>
</ion-content>
第四步,在需要使用该组件的页面的module.ts 文件的declarations中导入ProductImgListComponent ;
至此,运行正常,组件使用完成;
but
如果一个页面需要使用多个组件的时候,就需要在declarations中导入多个组件(EditUpdateNumberComponent、ProductImgListComponent……),无形中增加了代码量与后期维护成本。
So,不在declarations中单个导入组件,我们选择在需要使用该组件的页面的module.ts 文件的imports中导入ComponentsModule。运行报错!

这个报错的元素跟我们在组件中使用的元素有关,因为我在组件的html文件中国使用了ion-col标签元素。因此,我们需要导入相应的模块IonicModule,修改components.module.ts文件如下:
import { NgModule } from '@angular/core';
import { IonicModule } from 'ionic-angular';
import { EditUpdateNumberComponent } from './edit-update-number/edit-update-number';
import { ProductImgListComponent } from './product-img-list/product-img-list';
import { OrderAddressComponent } from './order-address/order-address';

@NgModule({
    declarations: [
        EditUpdateNumberComponent,
        ProductImgListComponent,
        OrderAddressComponent],
    imports: [IonicModule,AppPipeModule],
    exports: [
        EditUpdateNumberComponent,
        ProductImgListComponent,
       OrderAddressComponent]
})
export class ComponentsModule { }
根据组件需要导入相应的依赖即可。例如我在组件中使用了管道PRICE,需要导入再导入AppPipeModule
最后,在需要使用组件的页面的module.ts文件的imports中导入ComponentsModule即可。