a)拷⻉并配置vim /etc/sysconfig/network-scripts/ifcfg-bond0配置⽂件(会自动创建文件)
DEVICE=bond0
TYPE=Ethernet
ONBOOT=yes
BOOTPROTO=static
IPADDR=xxx.xxx.xxx.xxx
NETMASK=xxx.xxx.xxx.xxx
GATEWAY=xxx.xxx.xxx.xxx
USERCTL=no
b)编辑em1,em2/eth0、eth1⽂件
vim /etc/sysconfig/network-scripts/ifcfg-em1
DEVICE=em1
TYPE=Ethernet
ONBOOT=yes
BOOTPROTO=none
MASTER=bond0
SLAVE=yes
USERCTL=no
vim /etc/sysconfig/network-scripts/ifcfg-em2
DEVICE=em2
TYPE=Ethernet
ONBOOT=yes
BOOTPROTO=none
MASTER=bond0
SLAVE=yes
USERCTL=no
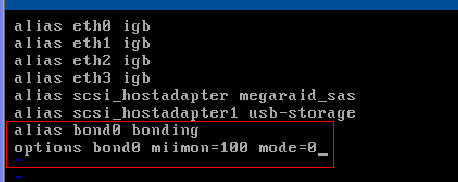
c)配置vim /etc/modprobe.d/bonding.conf (CentOS 6.4)
vim /etc/modprobe.conf (CentOS 5.9)
vi /etc/modprobe.conf/dis.conf (CentOS 6.5)
添加:
alias bond0 bonding
options bond0 miimon=100 mode=0
d)重启网络即可
service network restart