缓冲区 存放要读取的数据
缓冲区 和 通道 配合使用
一个用于特定基本数据类行的容器。有java.nio包定义的,所有缓冲区都是抽象类Buffer的子类。
Java NIO中的Buffer主要用于与NIO通道进行交互,数据是从通道读入到缓冲区,从缓冲区写入通道中的。
Buffer就像一个数组,可以保存多个相同类型的数据。根据类型不同(boolean除外),有以下Buffer常用子类:(没有boolean的哈)
ByteBuffer (用的最多 )
CharBuffer
ShortBuffer
IntBuffer
LongBuffer
FloatBuffer
DoubleBuffer
Buffer的概述
参数:
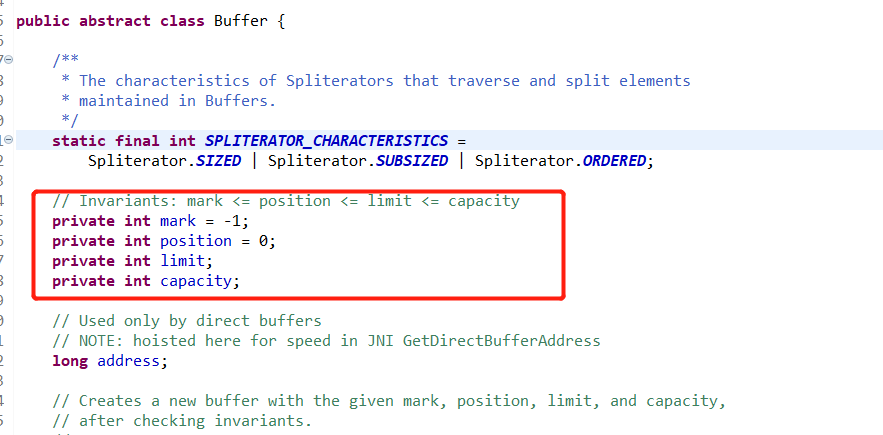
1)容量(capacity):表示Buffer最大数据容量,缓冲区容量不能为负,并且建立后不能修改。一旦声明 不能改变
2)限制(limit):第一个不应该读取或者写入的数据的索引,即位于limit后的数据不可以读写。缓冲区的限制不能为负,并且不能大于其容量(capacity)。 缓冲区可用大小
3)位置(position):下一个要读取或写入的数据的索引。缓冲区的位置不能为负,并且不能大于其限制(limit)。 缓冲区正在操作的位置 默认从0开始
4)标记(mark)与重置(reset):标记是一个索引,通过Buffer中的mark()方法指定Buffer中一个特定的position,之后可以通过调用reset()方法恢复到这个position。
方法:
put( ) 往buffer存放数据
get () 获取数据
看源码中的四个核心参数:

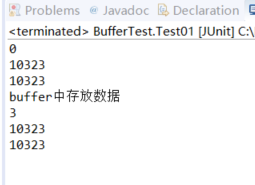
    @Test
    public void Test01() {
        //初始化 byteBuffer的大小
      ByteBuffer byteBuffer = ByteBuffer.allocate(10323);
        System.out.println(byteBuffer.position());   //默认0
        System.out.println(byteBuffer.limit());
        System.out.println(byteBuffer.capacity());
        System.out.println("buffer中存放数据");
        byteBuffer.put("add".getBytes());
        System.out.println(byteBuffer.position());   //默认0
        System.out.println(byteBuffer.limit());
        System.out.println(byteBuffer.capacity());

    }

limit 表示 现在limit 里面
@Test
    public void Test01() {
        //初始化 byteBuffer的大小
      ByteBuffer byteBuffer = ByteBuffer.allocate(10323);
        System.out.println(byteBuffer.position());   //默认0
        System.out.println(byteBuffer.limit());
        System.out.println(byteBuffer.capacity());
        System.out.println("buffer中存放数据");
        byteBuffer.put("add".getBytes());
        System.out.println(byteBuffer.position());   //默认0
        System.out.println(byteBuffer.limit());
        System.out.println(byteBuffer.capacity());
        System.out.println("读取buffer值");
        //开启读取模式   讲position设为0   不开启就从当前 position位置开始读取,会报错
        byteBuffer.flip();
        byte[] bytes = new byte[byteBuffer.limit()];
        byteBuffer.get(bytes);
        System.out.println(new String(bytes,0,bytes.length));
    }
解决重复读取:
@Test
    public void Test01() {
        //初始化 byteBuffer的大小
      ByteBuffer byteBuffer = ByteBuffer.allocate(10323);
        System.out.println(byteBuffer.position());   //默认0
        System.out.println(byteBuffer.limit());
        System.out.println(byteBuffer.capacity());
        System.out.println("buffer中存放数据");
        byteBuffer.put("add".getBytes());
        //开启读取模式   讲position设为0   不开启就从当前 position位置开始读取,会报错 。 读取完毕时候 position会还原
        System.out.println("开启读取。。。。");
        byteBuffer.flip();
        System.out.println(byteBuffer.position());   //默认0
        System.out.println(byteBuffer.limit());
        System.out.println(byteBuffer.capacity());
        System.out.println("读取buffer值");
        byte[] bytes = new byte[byteBuffer.limit()];
        byteBuffer.get(bytes);
        System.out.println(new String(bytes,0,bytes.length));
        System.out.println("重复读取");
        byteBuffer.rewind();
        System.out.println(byteBuffer.position());   //默认0
        System.out.println(byteBuffer.limit());
        System.out.println(byteBuffer.capacity());
        System.out.println("读取buffer值");
        byte[] bytes1 = new byte[byteBuffer.limit()];
        byteBuffer.get(bytes1);
        System.out.println(new String(bytes1,0,bytes1.length));


    }
清空:
    @Test
    public void Test01() {
        //初始化 byteBuffer的大小
      ByteBuffer byteBuffer = ByteBuffer.allocate(10323);
        System.out.println(byteBuffer.position());   //默认0
        System.out.println(byteBuffer.limit());
        System.out.println(byteBuffer.capacity());
        System.out.println("buffer中存放数据");
        byteBuffer.put("add".getBytes());
        //开启读取模式   讲position设为0   不开启就从当前 position位置开始读取,会报错 。 读取完毕时候 position会还原
        System.out.println("开启读取。。。。");
        byteBuffer.flip();
        System.out.println(byteBuffer.position());   //默认0
        System.out.println(byteBuffer.limit());
        System.out.println(byteBuffer.capacity());
        System.out.println("读取buffer值");
        byte[] bytes = new byte[byteBuffer.limit()];
        byteBuffer.get(bytes);
        System.out.println(new String(bytes,0,bytes.length));
        System.out.println("重复读取");
        byteBuffer.rewind();
        System.out.println(byteBuffer.position());   //默认0
        System.out.println(byteBuffer.limit());
        System.out.println(byteBuffer.capacity());
        System.out.println("读取buffer值");
        byte[] bytes1 = new byte[byteBuffer.limit()];
        byteBuffer.get(bytes1);
        System.out.println(new String(bytes1,0,bytes1.length));
        System.out.println("清空缓存区");
        byteBuffer.clear();
        System.out.println(byteBuffer.position());   //默认0
        System.out.println(byteBuffer.limit());
        System.out.println(byteBuffer.capacity());
        System.out.println("读取buffer值");
        byte[] bytes11 = new byte[byteBuffer.limit()];
        byteBuffer.get(bytes11);
        System.out.println(new String(bytes11,0,bytes11.length));


    }
清空缓冲区,名义上其实是把 下标修改了 但是值还是存在的 数值遗忘
看看最终版本:
@Test
    public void Test01() {
        //初始化 byteBuffer的大小
      ByteBuffer byteBuffer = ByteBuffer.allocate(1024);
        System.out.println(byteBuffer.position());   //默认0
        System.out.println(byteBuffer.limit());
        System.out.println(byteBuffer.capacity());
        System.out.println("buffer中存放数据");
        byteBuffer.put("addNew".getBytes());
        //开启读取模式   讲position设为0   不开启就从当前 position位置开始读取,会报错 。 读取完毕时候 position会还原
        System.out.println("开启读取。。。。");
        byteBuffer.flip();
        System.out.println("读取buffer值");
        System.out.println(byteBuffer.position());   //默认0
        System.out.println(byteBuffer.limit());
        System.out.println(byteBuffer.capacity());
        byte[] bytes = new byte[byteBuffer.limit()];
        byteBuffer.get(bytes);
        System.out.println(new String(bytes,0,bytes.length));
        System.out.println("重复读取");
        byteBuffer.rewind();
        System.out.println(byteBuffer.position());   //默认0
        System.out.println(byteBuffer.limit());
        System.out.println(byteBuffer.capacity());
        System.out.println("读取buffer值");
        byte[] bytes1 = new byte[byteBuffer.limit()];
        byteBuffer.get(bytes1);
        System.out.println(new String(bytes1,0,bytes1.length));
        System.out.println("清空缓存区");
        byteBuffer.clear();
        System.out.println(byteBuffer.position());   //默认0
        System.out.println(byteBuffer.limit());
        System.out.println(byteBuffer.capacity());
        System.out.println("读取buffer值");
        byte[] bytes11 = new byte[byteBuffer.limit()];
        byteBuffer.get(bytes11);
        System.out.println(new String(bytes11,0,bytes11.length));


    }

上述缓冲区管理的方式几乎
* 通过allocate()获取缓冲区
* 二、缓冲区核心的方法 put 存入数据到缓冲区 get <br>获取缓冲区数据 flip 开启读模式
* 三、缓冲区四个核心属性
* capacity:缓冲区最大容量,一旦声明不能改变。 limit:界面(缓冲区可以操作的数据大小) limit后面的数据不能读写。
* position:缓冲区正在操作的位置
1)容量(capacity):表示Buffer最大数据容量,缓冲区容量不能为负,并且建立后不能修改。
2)限制(limit):第一个不应该读取或者写入的数据的索引,即位于limit后的数据不可以读写。缓冲区的限制不能为负,并且不能大于其容量(capacity)。
3)位置(position):下一个要读取或写入的数据的索引。缓冲区的位置不能为负,并且不能大于其限制(limit)。
4)标记(mark)与重置(reset):标记是一个索引,通过Buffer中的mark()方法指定Buffer中一个特定的position,之后可以通过调用reset()方法恢复到这个position。