Swagger2 方式,一定会让你有不一样的开发体验:功能丰富 :支持多种注解,自动生成接口文档界面,支持在界面测试API接口功能;及时更新 :开发过程中花一点写注释的时间,就可以及时的更新API文档,省心省力;整合简单 :通过添加pom依赖和简单配置,内嵌于应用中就可同时发布API接口文档界面,不需要部署独立服务。
v添加pom依赖
        <dependency>
            <groupId>io.springfox</groupId>
            <artifactId>springfox-swagger2</artifactId>
            <version>2.7.0</version>
        </dependency>
        <dependency>
            <groupId>io.springfox</groupId>
            <artifactId>springfox-swagger-ui</artifactId>
            <version>2.7.0</version>
        </dependency>
v配置swagger-ui
spring-boot有自己的一套web端拦截机制,若需要看到swagger发布的api文档界面,需要做一些特殊的配置,将springfox-swagger-ui包中的ui界面暴露给spring-boot资源环境。
package com.demo.filter;

import org.springframework.context.annotation.Configuration;
import org.springframework.web.servlet.config.annotation.InterceptorRegistry;
import org.springframework.web.servlet.config.annotation.ResourceHandlerRegistry;
import org.springframework.web.servlet.config.annotation.WebMvcConfigurer;

import javax.annotation.Resource;

/**
* Created by toutou on 2018/12/30.
*/
@Configuration
public class WebConfig implements WebMvcConfigurer {
    @Resource
    private MyTestInterceptor myTestInterceptor;

    @Override
    public void addResourceHandlers(ResourceHandlerRegistry registry) {
        registry.addResourceHandler("/js/**").addResourceLocations("classpath:/js/");
        registry.addResourceHandler("swagger-ui.html")
                .addResourceLocations("classpath:/META-INF/resources/");
        registry.addResourceHandler("/webjars/**")
                .addResourceLocations("classpath:/META-INF/resources/webjars/");
    }
}
v配置API文档
spring-boot 和 swagger 整合时,可以通过注解注入相关配置。通过这些配置可以指定在spring-boot启动时扫描哪些controller层的文件夹,另外可以指定API文档页的标题和描述信息等内容。
package com.demo.common;

import org.springframework.context.annotation.Bean;
import org.springframework.context.annotation.Configuration;
import springfox.documentation.builders.ApiInfoBuilder;
import springfox.documentation.builders.PathSelectors;
import springfox.documentation.builders.RequestHandlerSelectors;
import springfox.documentation.service.ApiInfo;
import springfox.documentation.spi.DocumentationType;
import springfox.documentation.spring.web.plugins.Docket;
import springfox.documentation.swagger2.annotations.EnableSwagger2;

/**
 * Created by toutou on 2018/12/30.
 */
@Configuration
@EnableSwagger2
public class Swagger2 {


    @Bean
    public Docket createRestApi() {
        return new Docket(DocumentationType.SWAGGER_2)
                .apiInfo(apiInfo())
                .select()
                .apis(RequestHandlerSelectors.basePackage("com.demo.controller"))
                .paths(PathSelectors.any())
                .build();
    }

    private ApiInfo apiInfo() {
        return new ApiInfoBuilder()
                .title("测试项目 RESTful APIs")
                .description("测试项目后台api接口文档")
                .version("1.0.0")
                .build();
    }

}
注意把com.demo.controller更换成Controller的包名
vAPI文档编写示例
我们一般在Controller层,将详尽的API接口输入输出在代码中通过注解进行相关描述,下面给出一个接口描写示例,具体的写法可以参考其api文档的实例:
package com.demo.controller;

import com.demo.pojo.UserDetails;
import io.swagger.annotations.Api;
import io.swagger.annotations.ApiImplicitParam;
import io.swagger.annotations.ApiImplicitParams;
import io.swagger.annotations.ApiOperation;
import org.springframework.stereotype.Controller;
import org.springframework.ui.ModelMap;
import org.springframework.web.bind.annotation.RequestMapping;
import org.springframework.web.bind.annotation.RequestMethod;
import org.springframework.web.bind.annotation.ResponseBody;

import javax.servlet.http.HttpServletRequest;

/**
 * Created by toutou on 2018/12/30.
 */
@Api(value = "PageController", description = "用户登录登出接口")
@Controller
@RequestMapping("/")
public class PageController {

    @ApiOperation(value="用户登录", notes="用户登录接口")
    @ApiImplicitParams({
            @ApiImplicitParam(name = "username", value = "用户名", required = true ,dataType = "string"),
            @ApiImplicitParam(name = "passwd", value = "密码", required = true ,dataType = "string")
    })
    @RequestMapping(value = "/login",method = {RequestMethod.POST,RequestMethod.GET})
    @ResponseBody
    public ModelMap login(UserDetails data, HttpServletRequest request){
        // todo 实现
        return null;
    }

}
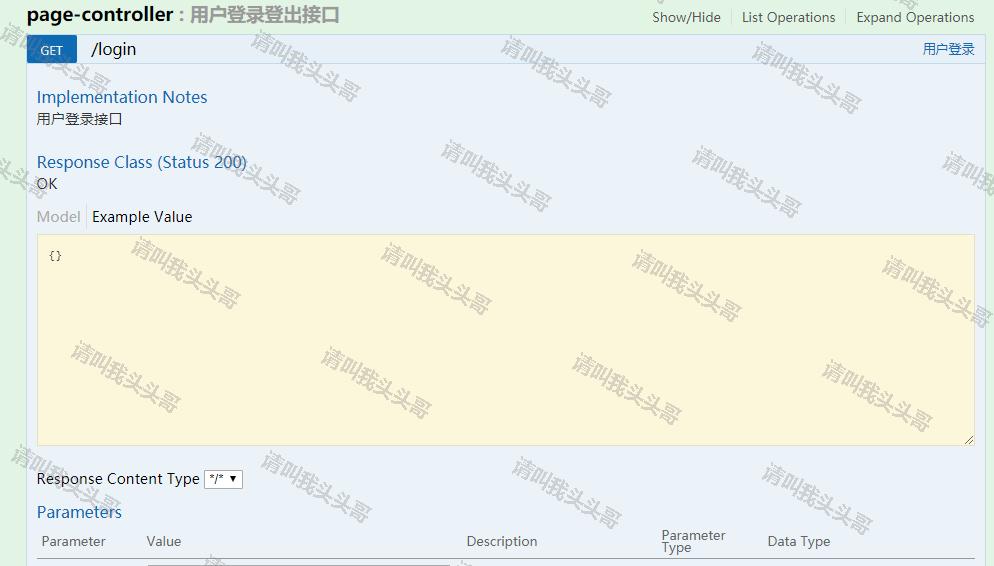
v效果
完成API文档的编写工作之后,正常启动spring-boot,假如后台端口为8080,那么访问http://localhost:8081/swagger-ui.html,可以访问到如下界面:
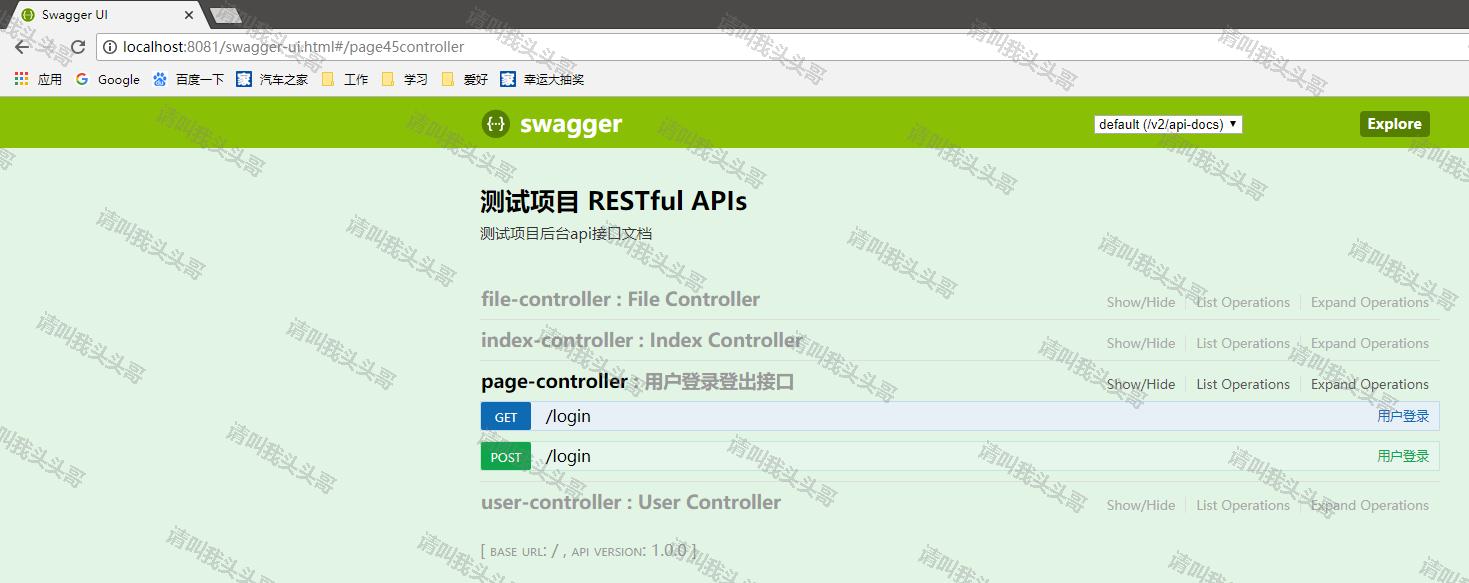
通过该界面,不仅可以看到自动生成的所有API文档信息,还可以对任意接口进行在线测试,非常方便,仿佛可以卸载Postman似的。〔^.べ〕:
v源码地址
https://github.com/toutouge/javademosecond/tree/master/hellospringboot
作 者:请叫我头头哥
出 处:http://www.cnblogs.com/toutou/
关于作者:专注于基础平台的项目开发。如有问题或建议,请多多赐教!
版权声明:本文版权归作者和博客园共有,欢迎转载,但未经作者同意必须保留此段声明,且在文章页面明显位置给出原文链接。
特此声明:所有评论和私信都会在第一时间回复。也欢迎园子的大大们指正错误,共同进步。或者直接私信我
声援博主:如果您觉得文章对您有帮助,可以点击文章右下角【推荐】一下。您的鼓励是作者坚持原创和持续写作的最大动力!