Codis github上的介绍安装,里面很全,而且也有中/英文的,只不过按照github的步骤安装,会有一些坑,所以有了这么一篇文章。
在上一篇文章《Redis实用监控工具一览》中,介绍了Redis常用的监控工具,codis是带有图形化的面板和管理工具的。于是才有了这么一篇文章。桌面系统:Centos7。
v简介
Codis 是一个分布式 Redis 解决方案, 对于上层的应用来说, 连接到 Codis Proxy 和连接原生的 Redis Server 没有明显的区别 (不支持的命令列表), 上层应用可以像使用单机的 Redis 一样使用, Codis 底层会处理请求的转发, 不停机的数据迁移等工作, 所有后边的一切事情, 对于前面的客户端来说是透明的, 可以简单的认为后边连接的是一个内存无限大的 Redis 服务.
- Codis Proxy (codis-proxy)
- Codis Manager (codis-config)
- Codis Redis (codis-server)
- ZooKeeper
codis-proxy 是客户端连接的 Redis 代理服务, codis-proxy 本身实现了 Redis 协议, 表现得和一个原生的 Redis 没什么区别 (就像 Twemproxy), 对于一个业务来说, 可以部署多个 codis-proxy, codis-proxy 本身是无状态的.
codis-config 是 Codis 的管理工具, 支持包括, 添加/删除 Redis 节点, 添加/删除 Proxy 节点, 发起数据迁移等操作. codis-config 本身还自带了一个 http server, 会启动一个 dashboard, 用户可以直接在浏览器上观察 Codis 集群的运行状态.
codis-server 是 Codis 项目维护的一个 Redis 分支, 基于 2.8.13 开发, 加入了 slot 的支持和原子的数据迁移指令. Codis 上层的 codis-proxy 和 codis-config 只能和这个版本的 Redis 交互才能正常运行.
Codis 依赖 ZooKeeper 来存放数据路由表和 codis-proxy 节点的元信息, codis-config 发起的命令都会通过 ZooKeeper 同步到各个存活的 codis-proxy.
Codis 支持按照 Namespace 区分不同的产品, 拥有不同的 product name 的产品, 各项配置都不会冲突.
Codis架构图
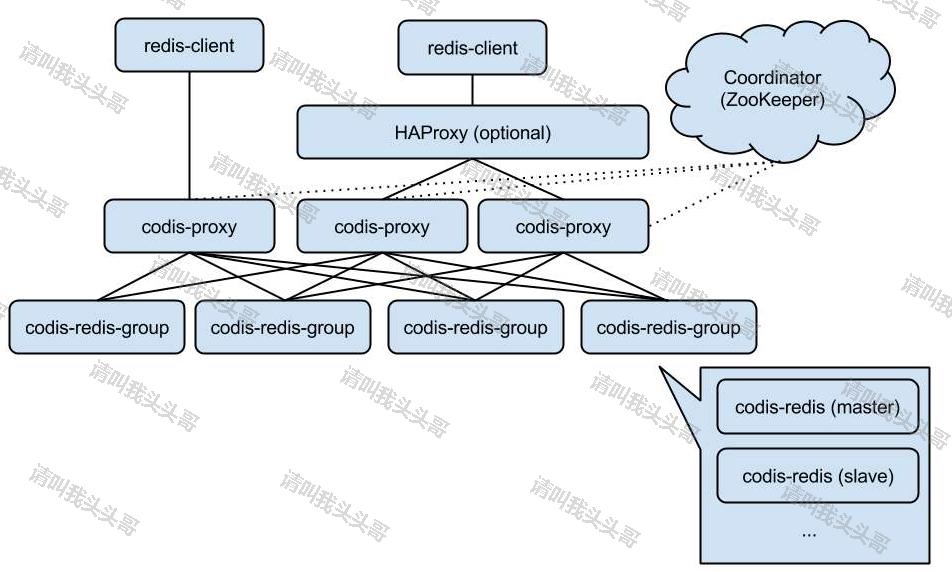
图片来源于网络,侵删。
v特性
- 自动平衡
- 使用非常简单
- 图形化的面板和管理工具
- 支持绝大多数 Redis 命令,完全兼容twemproxy
- 支持 Redis 原生客户端
- 安全而且透明的数据移植,可根据需要轻松添加和删除节点
- 提供命令行接口
- RESTful APIs
注意,为了避免重复造轮子。以上“简介”部分来自百度百科的摘录。
v安装步骤
1.1 安装Go
1.1.1 下载Go压缩包
习惯系在最新的环境,目前最新版的go是1.12.5的,这里我们就用最新版的。最新版更新可以在这里看。https://golang.org/dl/
wget https://storage.googleapis.com/golang/go1.12.5.linux-amd64.tar.gz
1.1.2 解压Go压缩包
tar -zxvf go1.12.5.linux-amd64.tar.gz
1.1.3 设置环境变量

如图,go的安装目录是 /usr/local
vim /etc/profile

export GOROOT=/usr/local/go   #设置为go安装的路径
export GOPATH=/usr/local/gopath  #默认安装包的路径
export PATH=$PATH:$GOROOT/bin:$GOPATH/bin
更新/etc/profile, wq 保存,使用 source /etc/profile 命令可以使新建立的环境变量立刻生效而不用重新启动系统。

1.1.4 helloword go go go
新建一个go文件,然后运行。

package main
    import "fmt"

    func main(){
        fmt.Printf("hello,world
")
 }
1.2 安装JDK
没有安装Java JDK的朋友可以直接看这里。《CentOS安装Java JDK》
1.3 安装ZooKeeper
1.3.1 下载ZooKeeper压缩包
wget http://mirrors.hust.edu.cn/apache/zookeeper/zookeeper-3.4.13/zookeeper-3.4.13.tar.gz
1.3.2 解压ZooKeeper压缩包
tar -zxvf zookeeper-3.4.13.tar.gz
1.3.3 删除ZooKeeper压缩包
rm -f zookeeper-3.4.13.tar.gz
1.3.4 拷贝配置文件
cd /usr/local/zookeeper-3.4.13/conf
cp zoo_sample.cfg zoo.cfg
vim zoo.cfg
这个zoo.cfg是zookeeper的配置文件,这里我搭的是单机版,如果想搭集群版也是通过修改配置文件即可。
# The number of milliseconds of each tick
tickTime=2000
# The number of ticks that the initial
# synchronization phase can take
initLimit=10
# The number of ticks that can pass between
# sending a request and getting an acknowledgement
syncLimit=5
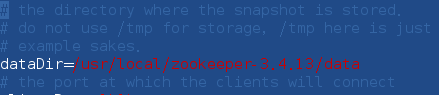
# the directory where the snapshot is stored.
# do not use /tmp for storage, /tmp here is just
# example sakes.
dataDir=/usr/local/zookeeper-3.4.13/data #这里最好自己设置
# the port at which the clients will connect
clientPort=2181
# the maximum number of client connections.
# increase this if you need to handle more clients
#maxClientCnxns=60
#
# Be sure to read the maintenance section of the
# administrator guide before turning on autopurge.
#
# http://zookeeper.apache.org/doc/current/zookeeperAdmin.html#sc_maintenance
#
# The number of snapshots to retain in dataDir
#autopurge.snapRetainCount=3
# Purge task interval in hours
# Set to "0" to disable auto purge feature
#autopurge.purgeInterval=1
server.1=cnblogs01:8888:9888 #这里修改为自己的主机名或者IP
server.2=cnblogs02:8888:9888
server.3=cnblogs03:8888:9888
创建/usr/local/zookeeper-3.4.13/data文件夹,新建一个myid,写入1
mkdir data
vim myid
1.3.5 启动ZooKeeper
/usr/local/zookeeper-3.4.13/bin/zkServer.sh start

1.4 安装Codis
1.4.1 安装Codis
Codis 源代码需要下载到 $GOPATH/src/github.com/CodisLabs/codis
mkdir -p $GOPATH/src/github.com/CodisLabs
cd $_ && git clone https://github.com/CodisLabs/codis.git -b release3.2
1.4.2 编译Codis
cd $GOPATH/src/github.com/CodisLabs/codis
make
直接通过 make 进行编译,这里报了个错 ./autogen.sh:行5: autoconf: 未找到命令
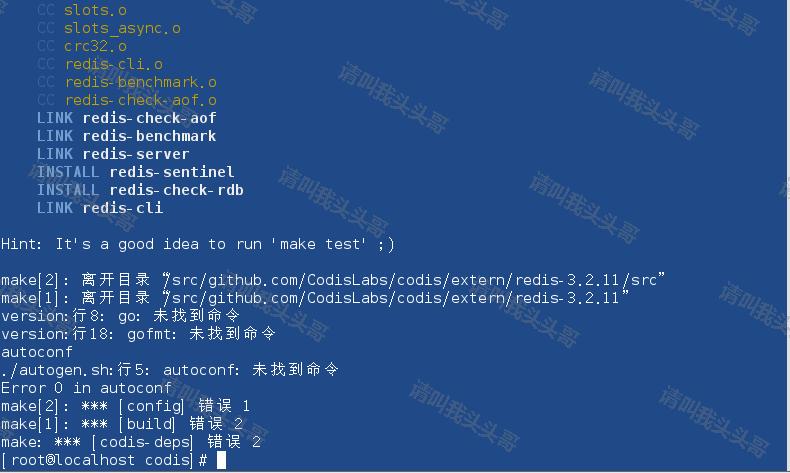
安装autoconf
yum install autoconf
安装autoconf之后,继续通过 make 编译。
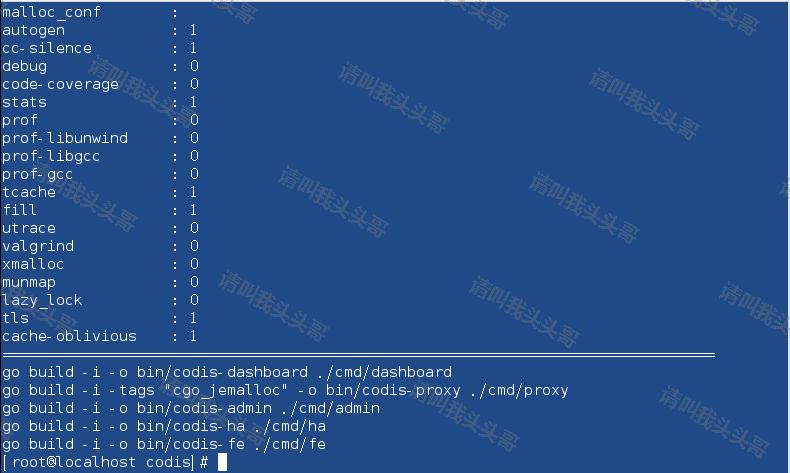
dashboard,proxy,admin,ha,fe这些codis的组件编译完成了。
注意的是,目录结构一定要是,gopath的自己的定义,单后后面的目录需要新建,必须和官网一样,不一样,要报错。 $GOPATH/src/github.com/CodisLabs/
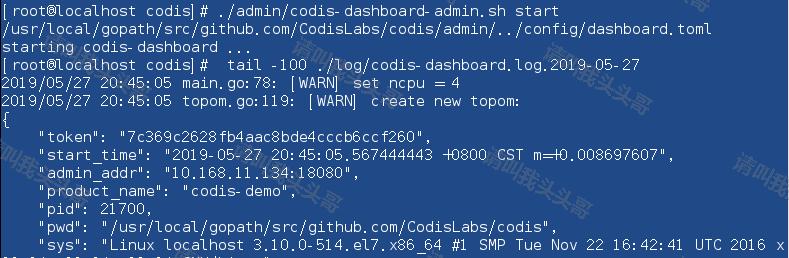
1.4.3 启动codis-dashboard
使用 codis-dashboard-admin.sh 脚本启动 dashboard,并查看 dashboard 日志确认启动是否有异常。
./admin/codis-dashboard-admin.sh start
tail -100 ./log/codis-dashboard.log.2019-05-26 注意:2019-05-26为当前日期。

1.4.3 启动codis-proxy
使用 codis-proxy-admin.sh 脚本启动 codis-proxy,并查看 proxy 日志确认启动是否有异常。
./admin/codis-proxy-admin.sh start
tail -100 ./log/codis-proxy.log.2019-05-26

1.4.4 启动codis-server
使用 codis-server-admin.sh 脚本启动 codis-server,并查看 redis 日志确认启动是否有异常。
./admin/codis-server-admin.sh start
tail -100 /tmp/redis_6379.log
查看日志如下图所示,启动codis时报错提示:
21875:M 26 May 20:51:24.154 * Increased maximum number of open files to 10032 (it was originally set to 1024).
21875:M 26 May 20:51:24.154 # Creating Server TCP listening socket 127.0.0.1:6379: bind: Address already in use

因为Redis默认端口号就是6379,由于之前(centos安装Redis)设置了本机默认开机启动Redis,所以6379已被占用。
解决方案
如下图所示,修改 /usr/local/gopath/src/github.com/CodisLabs/codis/config/redis.conf 配置文件的端口号。改为6380

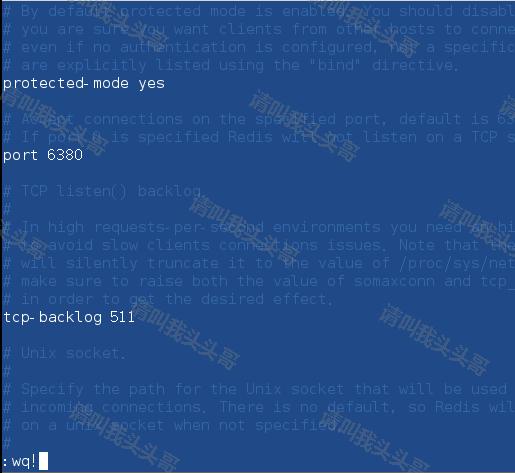
修改端口号以后再通过 ./admin/codis-server-admin.sh start 启动codis-server。
tail -100 /tmp/redis_6379.log 查看日志如下:
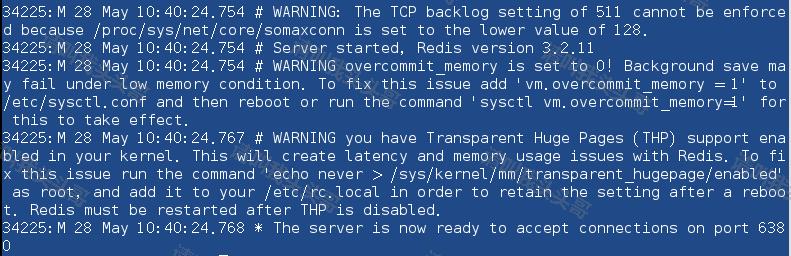
注意:如果redis.conf中对应的logfile也改成6380的话,查看日志就得用 tail -100 /tmp/redis_6380.log
1.4.5 启动codis-fe
使用 codis-fe-admin.sh 脚本启动 codis-fe,并查看 fe 日志确认启动是否有异常。
./admin/codis-fe-admin.sh start
tail -100 ./log/codis-fe.log.2019-05-26
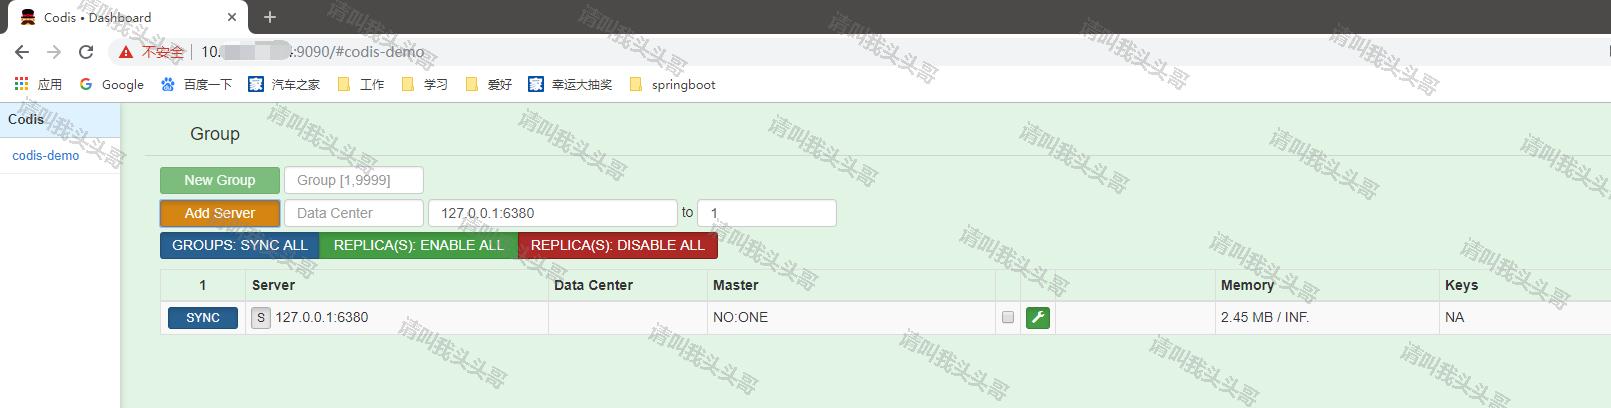
1.5 通过fe添加group
通过web浏览器访问集群管理页面(fe地址:127.0.0.1:9090) 选择我们刚搭建的集群 codis-demo,在 Proxy 栏可看到我们已经启动的 Proxy, 但是 Group 栏为空,因为我们启动的 codis-server 并未加入到集群 添加 NEW GROUP,NEW GROUP 行输入 1,再点击 NEW GROUP 即可 添加 Codis Server,Add Server 行输入我们刚刚启动的 codis-server 地址,添加到我们刚新建的 Group,然后再点击 Add Server 按钮即可,如下图所示:
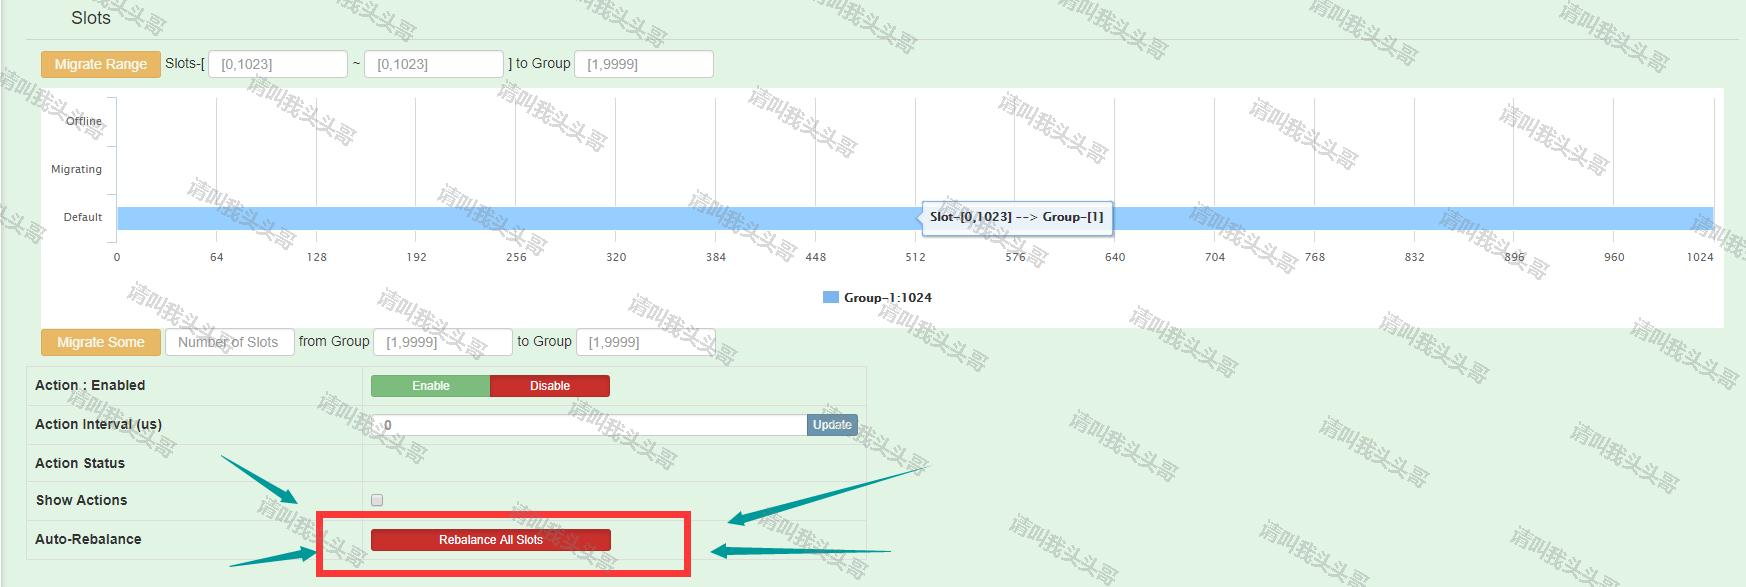
1.6 通过fe初始化slot
新增的集群 slot 状态是 offline,因此我们需要对它进行初始化(将 1024 个 slot 分配到各个 group),而初始化最快的方法可通过 fe 提供的 rebalance all slots 按钮来做,如下图所示,点击此按钮,我们即快速完成了一个集群的搭建。
1.7 通过 ansible 快速部署集群
使用 ansible 可快速在单机、多机部署多套 codis 集群。 ansible 文件夹包含了部署 codis 集群的 playbook,根据自己部署环境修改 groups_var/all 文件里参数,修改 hosts 文件添加部署的环境 IP 即可。 ansible 安装也及其简单,各部署机器无需安装任何额外的 agent,彼此之间通过 ssh 通信。
git clone https://github.com/ansible/ansible.git -b stable-2.3
cd ./ansible
source ./hacking/env-setup
cd $codis_dir/ansible
ansible-playbook -i hosts site.yml
v集群配置
2.1 添加Redis实例
这里再分别添加6381、6382两个Redis实例。
cp config/redis.conf config/redis6381.conf
cp config/redis.conf config/redis6382.conf
分别更新6381、6382.conf的port、pidfile和logfile
vim config/redis6381.conf
更新之后,启动新增的两个Redis实例。
./bin/codis-server ./config/redis6381.conf
./bin/codis-server ./config/redis6382.conf

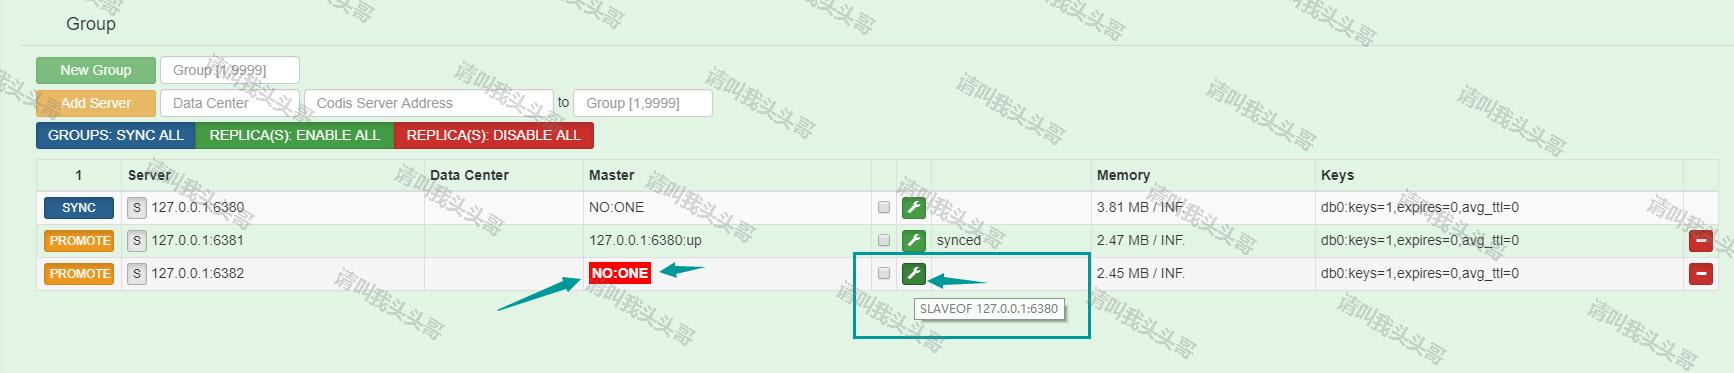
按照上面add server的方法(如下图)添加两个实例,注意,若未执行 ./bin/codis-server ./config/redis6381.conf ,添加时会报错。

刚添加进来的默认状态是NO:ONE,如下图,点击小扳手(SLAVEOF 127.0.0.1:6380)。
测试效果:
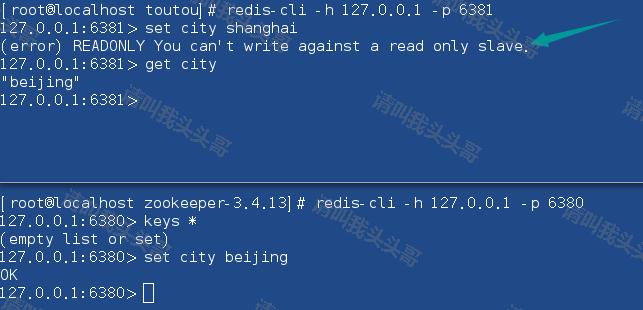
注意:如上图,开启集群管理之后,6380可读可写,81和82只有只读权限。
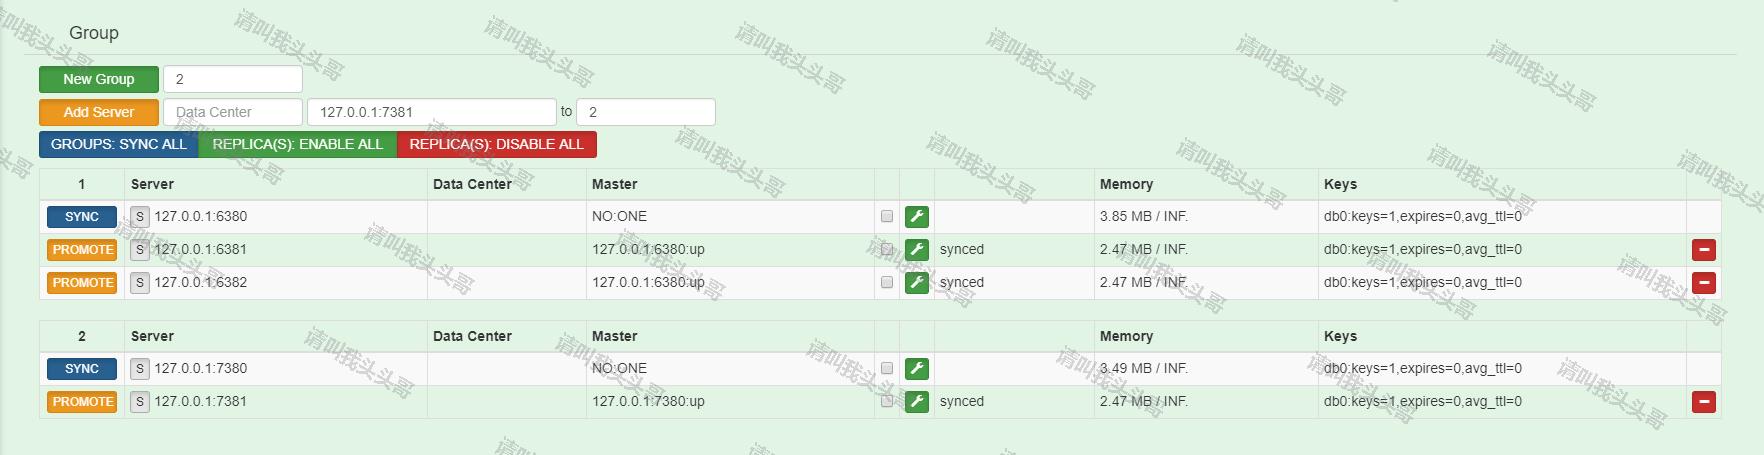
2.2 创建新的分组
按照上面步骤继续创建7380和7381.

在Codis • Dashboard(http://ip:9090/#codis-demo)中添加新的分组和server成员。
v博客总结
本篇文章只聊了codis,不聊集群,如果对集群感兴趣的可以看看之前的一篇文章。《详解Redis Cluster集群》
本文"安装步骤"段落,大面积采用的是Codis github上的介绍,该段落也可以去github看看。当然本文中也加入了一些github上没有说的太清楚或者不太好理解的细节。
本来打算在本文中直接介绍springboot引入codis的,但是这篇文章已经很长,排版起来实在不方便。所以关于springboot可以在这里看。《SpringBoot进阶教程(五十九)整合Codis》。
其他参考资料:
作 者:请叫我头头哥
出 处:http://www.cnblogs.com/toutou/
关于作者:专注于基础平台的项目开发。如有问题或建议,请多多赐教!
版权声明:本文版权归作者和博客园共有,欢迎转载,但未经作者同意必须保留此段声明,且在文章页面明显位置给出原文链接。
特此声明:所有评论和私信都会在第一时间回复。也欢迎园子的大大们指正错误,共同进步。或者直接私信我
声援博主:如果您觉得文章对您有帮助,可以点击文章右下角【推荐】一下。您的鼓励是作者坚持原创和持续写作的最大动力!