springboot实现服务器端消息推送(websocket + sockjs + stomp)
服务器端推送技术在web开发中比较常用,可能早期很多人的解决方案是采用ajax向服务器轮询消息,这种方式的轮询频率不好控制,所以大大增加了服务器的压力,后来有了下面的方案:当客户端向服务器发送请求时,服务器端会抓住这个请求不放,等有数据更新的时候才返回给客户端,当客户端接收到数据后再次发送请求,周而复始,这样就大大减少了请求次数,减轻了服务器的压力,当前主要有SSE(Server Send Event 服务器端事件发送)的服务器端推送和基于Servlet3.0+异步方法特性实现的服务器端推送。而本次我将利用webSokcet实现服务器端消息推送。话不多说上代码:
1、pom.xml,新建springboot项目,加入webSocket启动包spring-boot-starter-websocket;
2、WebSocketConfig

package com.example.demo.websocket;

import org.springframework.context.annotation.Configuration;
import org.springframework.messaging.simp.config.MessageBrokerRegistry;
import org.springframework.web.socket.config.annotation.AbstractWebSocketMessageBrokerConfigurer;
import org.springframework.web.socket.config.annotation.EnableWebSocketMessageBroker;
import org.springframework.web.socket.config.annotation.StompEndpointRegistry;

@Configuration
@EnableWebSocketMessageBroker  //注解开启STOMP协议来传输基于代理的消息,此时控制器支持使用@MessageMapping
public class WebSocketConfig extends AbstractWebSocketMessageBrokerConfigurer {

    @Override
    public void configureMessageBroker(MessageBrokerRegistry config) {
        config.enableSimpleBroker("/topic","/user");//topic用来广播,user用来实现p2p
    }

    @Override
    public void registerStompEndpoints(StompEndpointRegistry registry) {
        registry.addEndpoint("/webServer").withSockJS();
        registry.addEndpoint("/queueServer").withSockJS();//注册两个STOMP的endpoint,分别用于广播和点对点
    }

}
3、接收消息类:ReceiveMessage
package com.example.demo.websocket;

public class ReceiveMessage {

    private String name;

    public String getName() {
        return name;
    }
    public void setName(String name) {
        this.name = name;
    }
}
4、响应消息类:ResponseMessage
package com.example.demo.websocket;

public class ResponseMessage {

    private String id;
    private String name;
    private String content;
    public String getId() {
        return id;
    }
    public void setId(String id) {
        this.id = id;
    }
    public String getName() {
        return name;
    }
    public void setName(String name) {
        this.name = name;
    }
    public String getContent() {
        return content;
    }
    public void setContent(String content) {
        this.content = content;
    }
    public ResponseMessage(String id, String name, String content) {
        super();
        this.id = id;
        this.name = name;
        this.content = content;
    }

}
5、控制器类:SubController
package com.example.demo.websocket;

import org.springframework.beans.factory.annotation.Autowired;
import org.springframework.messaging.handler.annotation.MessageMapping;
import org.springframework.messaging.simp.SimpMessagingTemplate;
import org.springframework.stereotype.Controller;

@Controller
public class SubController {
    @Autowired
    public SimpMessagingTemplate template;


    @MessageMapping("/subscribe")
    public void subscribe(ReceiveMessage rm) {
        for(int i =1;i<=20;i++) {
            //广播使用convertAndSend方法,第一个参数为目的地,和js中订阅的目的地要一致
            template.convertAndSend("/topic/getResponse", rm.getName());
            try {
                Thread.sleep(1000);
            } catch (InterruptedException e) {
                e.printStackTrace();
            }
        }

    }

    @MessageMapping("/queue")
    public void queuw(ReceiveMessage rm) {
        System.out.println("进入方法");
        for(int i =1;i<=20;i++) {
            /*广播使用convertAndSendToUser方法,第一个参数为用户id,此时js中的订阅地址为
            "/user/" + 用户Id + "/message",其中"/user"是固定的*/
            template.convertAndSendToUser("zhangsan","/message",rm.getName());
            try {
                Thread.sleep(1000);
            } catch (InterruptedException e) {
                e.printStackTrace();
            }
        }

    }
}
6、在src/main/resource包下建一个static包,引入jquery-3.2.1.min.js、sock.js、stomp.js,创建topic.html和queue.html。
<html>
<head>
    <meta charset="UTF-8">
    <title>Hello topic</title>
    <script src="sock.js"></script>
    <script src="stomp.js"></script>
    <script src="jquery-3.2.1.min.js"></script>
    <script type="text/javascript">
        var stompClient = null;
        function setConnected(connected){
            document.getElementById("connect").disabled = connected;
            document.getElementById("disconnect").disabled = !connected;
            $("#response").html();
        }
        function connect() {
            var socket = new SockJS("/webServer");
            stompClient = Stomp.over(socket);
            stompClient.connect({}, function(frame) {
                setConnected(true);
                console.log('Connected: ' + frame);
                stompClient.subscribe('/topic/getResponse', function(response){
                    var response1 = document.getElementById('response');
                    var p = document.createElement('p');
                    p.style.wordWrap = 'break-word';
                    p.appendChild(document.createTextNode(response.body));
                    response1.appendChild(p);
                });
            });
        }

        function disconnect() {
            if (stompClient != null) {
                stompClient.disconnect();
            }
            setConnected(false);
            console.log("Disconnected");
        }

        function sendName() {
            var name = document.getElementById('name').value;
            console.info(1111111111);
            stompClient.send("/subscribe", {}, JSON.stringify({ 'name': name }));
        }
    </script>
</head>
<body onload="disconnect()">
<noscript><h2 style="color: #ff0000">Seems your browser doesn't support Javascript! Websocket relies on Javascript being enabled. Please enable
    Javascript and reload this page!</h2></noscript>
<div>
    <div>
        <button id="connect" onclick="connect();">Connect</button>
        <button id="disconnect" disabled="disabled" onclick="disconnect();">Disconnect</button>
    </div>
    <div id="conversationDiv">
        <labal>名字</labal><input type="text" id="name" />
        <button id="sendName" onclick="sendName();">Send</button>
        <p id="response"></p>
    </div>
</div>

</body>
</html>
<html>
<head>
    <meta charset="UTF-8">
    <title>Hello queue</title>
    <script src="sock.js"></script>
    <script src="stomp.js"></script>
    <script src="jquery-3.2.1.min.js"></script>
    <script type="text/javascript">
        var stompClient = null;
        function setConnected(connected){
            document.getElementById("connect").disabled = connected;
            document.getElementById("disconnect").disabled = !connected;
            $("#response").html();
        }
        function connect() {
            var socket = new SockJS("/queueServer");
            stompClient = Stomp.over(socket);
            stompClient.connect({}, function(frame) {
                setConnected(true);
                console.log('Connected: ' + frame);
                stompClient.subscribe('/user/'+document.getElementById('user').value+'/message', function(response){
                    var response1 = document.getElementById('response');
                    var p = document.createElement('p');
                    p.style.wordWrap = 'break-word';
                    p.appendChild(document.createTextNode(response.body));
                    response1.appendChild(p);
                });
            });
        }

        function disconnect() {
            if (stompClient != null) {
                stompClient.disconnect();
            }
            setConnected(false);
            console.log("Disconnected");
        }

        function sendName() {
            var name = document.getElementById('name').value;
            console.info(1111111111);
            stompClient.send("/queue", {}, JSON.stringify({ 'name': name}));
        }
    </script>
</head>
<body onload="disconnect()">
<noscript><h2 style="color: #ff0000">Seems your browser doesn't support Javascript! Websocket relies on Javascript being enabled. Please enable
    Javascript and reload this page!</h2></noscript>
<div>
    <div>
        <labal>用户</labal><input type="text" id="user" />
        <button id="connect" onclick="connect();">Connect</button>
        <button id="disconnect" disabled="disabled" onclick="disconnect();">Disconnect</button>
    </div>
    <div id="conversationDiv">
        <labal>名字</labal><input type="text" id="name" />
        <button id="sendName" onclick="sendName();">Send</button>
        <p id="response"></p>
    </div>
</div>

</body>
</html>
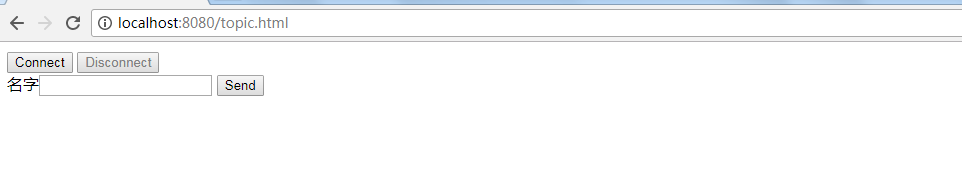
启动项目后,先访问topic.html,如图所示

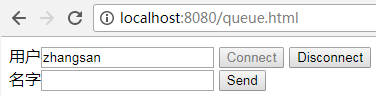
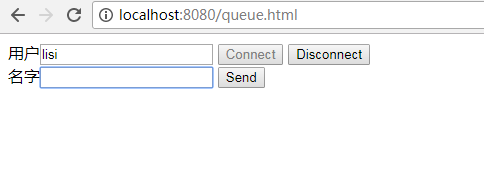
访问queue.html,首先以不同的用户名建立连接,如图所示

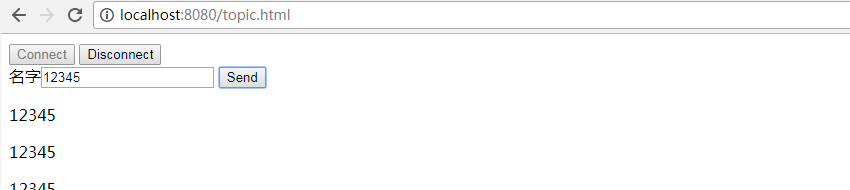
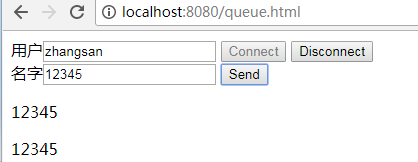
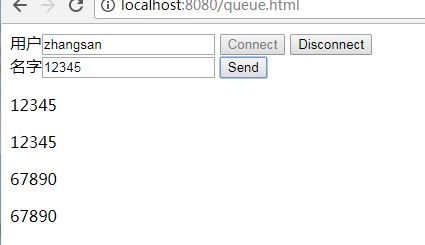
zhangsan窗口发送12345后:
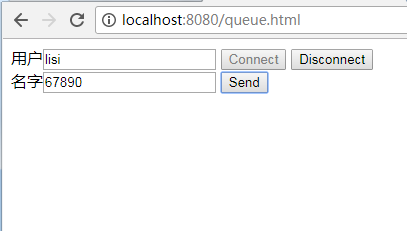
lisi窗口发送67890后:
由此便实现了服务端两种推送消息的方式(广播 和点对点)。
转自http://www.cnblogs.com/hhhshct/p/8849449.html 君临-行者无界