官网文档:Activity:http://androiddoc.qiniudn.com/guide/components/activities.html
Activity是一个应用程序的组件,他在屏幕上提供了一个区域,允许用户在上面做一些交互性的操作, 比如打电话,照相,发送邮件,或者显示一个地图!Activity可以理解成一个绘制用户界面的窗口, 而这个窗口可以填满整个屏幕,也可能比屏幕小或者浮动在其他窗口的上方!

从上面这段话,我们可以得到以下信息:

1. Activity用于显示用户界面,用户通过Activity交互完成相关操作 2. 一个App允许有多个Activity

注意事项:

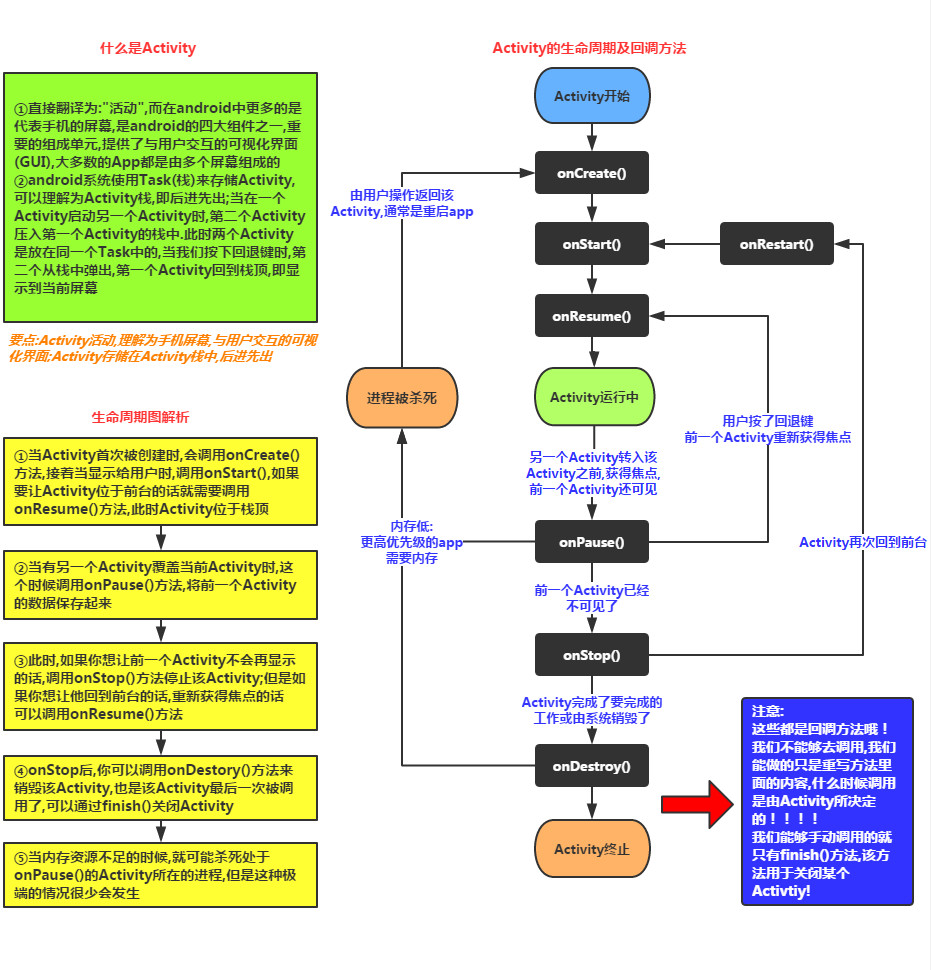
1. onPause()和onStop()被调用的前提是: 打开了一个新的Activity!而前者是旧Activity还可见的状态;后者是旧Activity已经不可见

android:persistableMode="persistAcrossReboots"
然后我们的Activity就拥有了持久化的能力了,一般我们会搭配另外两个方法来使用:

public void onSaveInstanceState(Bundle outState, PersistableBundle outPersistentState)
public void onRestoreInstanceState(Bundle savedInstanceState, PersistableBundle persistentState)
4.启动一个Activity的几种方式
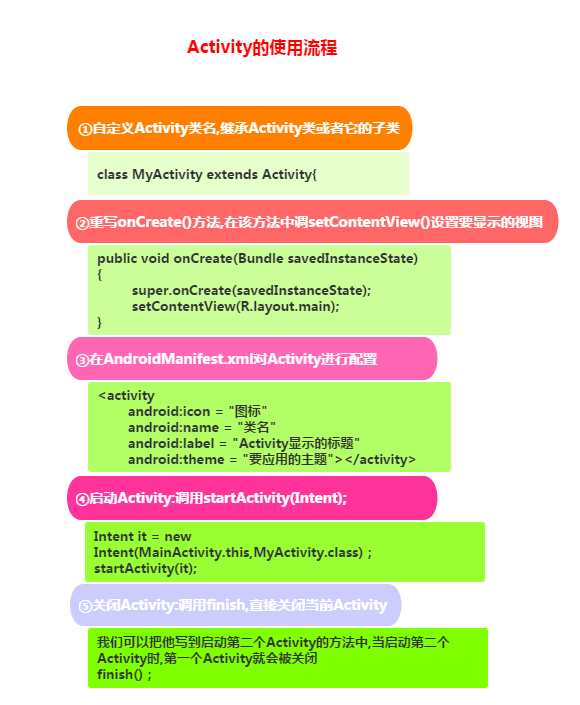
1. 显式启动:通过包名来启动,写法如下:

①最常见的:
startActivity(new Intent(当前Act.this,要启动的Act.class));②通过Intent的ComponentName:
ComponentName cn = new ComponentName("当前Act的全限定类名","启动Act的全限定类名") ;
Intent intent = new Intent() ;
intent.setComponent(cn) ;
startActivity(intent) ;③初始化Intent时指定包名:
Intent intent = new Intent("android.intent.action.MAIN");
intent.setClassName("当前Act的全限定类名","启动Act的全限定类名");
startActivity(intent);
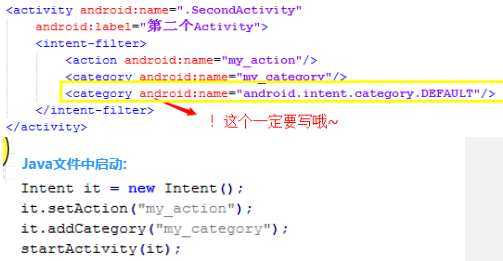
2.隐式启动:通过Intent-filter的Action,Category或data来实现 这个是通过Intent的 intent-filter**来实现的

3. 另外还有一个直接通过包名启动apk的:

Intent intent = getPackageManager().getLaunchIntentForPackage
("apk第一个启动的Activity的全限定类名") ;
if(intent != null) startActivity(intent) ;
5.横竖屏切换与状态保存的问题
App横竖屏切换的时候会销毁当前的Activity然后重新创建一个,你可以自行在生命周期 的每个方法里都添加打印Log的语句,来进行判断,又或者设一个按钮一个TextView点击按钮后,修改TextView 文本,然后横竖屏切换,会神奇的发现TextView文本变回之前的内容了! 横竖屏切换时Act走下述生命周期:
onPause-> onStop-> onDestory-> onCreate->onStart->onResume
关于横竖屏切换可能遇到下述问题:
1.先说下如何禁止屏幕横竖屏自动切换吧,很简单,在AndroidManifest.xml中为Act添加一个属性: android:screenOrientation, 有下述可选值:

unspecified:默认值 由系统来判断显示方向.判定的策略是和设备相关的,所以不同的设备会有不同的显示方向。
landscape:横屏显示(宽比高要长)
portrait:竖屏显示(高比宽要长)
user:用户当前首选的方向
behind:和该Activity下面的那个Activity的方向一致(在Activity堆栈中的)
sensor:有物理的感应器来决定。如果用户旋转设备这屏幕会横竖屏切换。
nosensor:忽略物理感应器,这样就不会随着用户旋转设备而更改了("unspecified"设置除外)。
2.横竖屏时想加载不同的布局:

1)准备两套不同的布局,Android会自己根据横竖屏加载不同布局: 创建两个布局文件夹:layout-land横屏,layout-port竖屏 然后把这两套布局文件丢这两文件夹里,文件名一样,Android就会自行判断,然后加载相应布局了!

2 )自己在代码中进行判断,自己想加载什么就加载什么:

我们一般是在onCreate()方法中加载布局文件的,我们可以在这里对横竖屏的状态做下判断,关键代码如下:

if (this.getResources().getConfiguration().orientation == Configuration.ORIENTATION_LANDSCAPE){
     setContentView(R.layout.横屏);
}

else if (this.getResources().getConfiguration().orientation ==Configuration.ORIENTATION_PORTRAIT) {
    setContentView(R.layout.竖屏);
}
3. 如何让模拟器横竖屏切换

如果你的模拟器是GM的话。直接按模拟器上的切换按钮即可,原生模拟器可按ctrl + f11/f12切换!

4. 状态保存问题:

这个上面也说过了,通过一个Bundle savedInstanceState参数即可完成! 三个核心方法:

onCreate(Bundle savedInstanceState);
onSaveInstanceState(Bundle outState);
onRestoreInstanceState(Bundle savedInstanceState);
重写onSaveInstanceState()方法,往这个bundle中写入数据,比如:

outState.putInt("num",1);

这样,然后你在onCreate或者onRestoreInstanceState中就可以拿出里面存储的数据,不过拿之前要判断下是否为null!

savedInstanceState.getInt("num");
6.系统给我们提供的常见的Activity
//1.拨打电话
// 给移动客服10086拨打电话
Uri uri = Uri.parse("tel:10086");
Intent intent = new Intent(Intent.ACTION_DIAL, uri);
startActivity(intent);

//2.发送短信
// 给10086发送内容为“Hello”的短信
Uri uri = Uri.parse("smsto:10086");
Intent intent = new Intent(Intent.ACTION_SENDTO, uri);
intent.putExtra("sms_body", "Hello");
startActivity(intent);

//3.发送彩信(相当于发送带附件的短信)
Intent intent = new Intent(Intent.ACTION_SEND);
intent.putExtra("sms_body", "Hello");
Uri uri = Uri.parse("content://media/external/images/media/23");
intent.putExtra(Intent.EXTRA_STREAM, uri);
intent.setType("image/png");
startActivity(intent);

//4.打开浏览器:
// 打开Google主页
Uri uri = Uri.parse("http://www.baidu.com");
Intent intent  = new Intent(Intent.ACTION_VIEW, uri);
startActivity(intent);

//5.发送电子邮件:(阉割了Google服务的没戏!!!!)
// 给someone@domain.com发邮件
Uri uri = Uri.parse("mailto:someone@domain.com");
Intent intent = new Intent(Intent.ACTION_SENDTO, uri);
startActivity(intent);
// 给someone@domain.com发邮件发送内容为“Hello”的邮件
Intent intent = new Intent(Intent.ACTION_SEND);
intent.putExtra(Intent.EXTRA_EMAIL, "someone@domain.com");
intent.putExtra(Intent.EXTRA_SUBJECT, "Subject");
intent.putExtra(Intent.EXTRA_TEXT, "Hello");
intent.setType("text/plain");
startActivity(intent);
// 给多人发邮件
Intent intent=new Intent(Intent.ACTION_SEND);
String[] tos = {"1@abc.com", "2@abc.com"}; // 收件人
String[] ccs = {"3@abc.com", "4@abc.com"}; // 抄送
String[] bccs = {"5@abc.com", "6@abc.com"}; // 密送
intent.putExtra(Intent.EXTRA_EMAIL, tos);
intent.putExtra(Intent.EXTRA_CC, ccs);
intent.putExtra(Intent.EXTRA_BCC, bccs);
intent.putExtra(Intent.EXTRA_SUBJECT, "Subject");
intent.putExtra(Intent.EXTRA_TEXT, "Hello");
intent.setType("message/rfc822");
startActivity(intent);

//6.显示地图:
// 打开Google地图中国北京位置(北纬39.9,东经116.3)
Uri uri = Uri.parse("geo:39.9,116.3");
Intent intent = new Intent(Intent.ACTION_VIEW, uri);
startActivity(intent);

//7.路径规划
// 路径规划:从北京某地(北纬39.9,东经116.3)到上海某地(北纬31.2,东经121.4)
Uri uri = Uri.parse("http://maps.google.com/maps?f=d&saddr=39.9 116.3&daddr=31.2 121.4");
Intent intent = new Intent(Intent.ACTION_VIEW, uri);
startActivity(intent);

//8.多媒体播放:
Intent intent = new Intent(Intent.ACTION_VIEW);
Uri uri = Uri.parse("file:///sdcard/foo.mp3");
intent.setDataAndType(uri, "audio/mp3");
startActivity(intent);

//获取SD卡下所有音频文件,然后播放第一首=-=
Uri uri = Uri.withAppendedPath(MediaStore.Audio.Media.INTERNAL_CONTENT_URI, "1");
Intent intent = new Intent(Intent.ACTION_VIEW, uri);
startActivity(intent);

//9.打开摄像头拍照:
// 打开拍照程序
Intent intent = new Intent(MediaStore.ACTION_IMAGE_CAPTURE);
startActivityForResult(intent, 0);
// 取出照片数据
Bundle extras = intent.getExtras();
Bitmap bitmap = (Bitmap) extras.get("data");

//另一种:
//调用系统相机应用程序,并存储拍下来的照片
Intent intent = new Intent(MediaStore.ACTION_IMAGE_CAPTURE);
time = Calendar.getInstance().getTimeInMillis();
intent.putExtra(MediaStore.EXTRA_OUTPUT, Uri.fromFile(new File(Environment
.getExternalStorageDirectory().getAbsolutePath()+"/tucue", time + ".jpg")));
startActivityForResult(intent, ACTIVITY_GET_CAMERA_IMAGE);

//10.获取并剪切图片
// 获取并剪切图片
Intent intent = new Intent(Intent.ACTION_GET_CONTENT);
intent.setType("image/*");
intent.putExtra("crop", "true"); // 开启剪切
intent.putExtra("aspectX", 1); // 剪切的宽高比为1:2
intent.putExtra("aspectY", 2);
intent.putExtra("outputX", 20); // 保存图片的宽和高
intent.putExtra("outputY", 40);
intent.putExtra("output", Uri.fromFile(new File("/mnt/sdcard/temp"))); // 保存路径
intent.putExtra("outputFormat", "JPEG");// 返回格式
startActivityForResult(intent, 0);
// 剪切特定图片
Intent intent = new Intent("com.android.camera.action.CROP");
intent.setClassName("com.android.camera", "com.android.camera.CropImage");
intent.setData(Uri.fromFile(new File("/mnt/sdcard/temp")));
intent.putExtra("outputX", 1); // 剪切的宽高比为1:2
intent.putExtra("outputY", 2);
intent.putExtra("aspectX", 20); // 保存图片的宽和高
intent.putExtra("aspectY", 40);
intent.putExtra("scale", true);
intent.putExtra("noFaceDetection", true);
intent.putExtra("output", Uri.parse("file:///mnt/sdcard/temp"));
startActivityForResult(intent, 0);

//11.打开Google Market
// 打开Google Market直接进入该程序的详细页面
Uri uri = Uri.parse("market://details?id=" + "com.demo.app");
Intent intent = new Intent(Intent.ACTION_VIEW, uri);
startActivity(intent);

//12.进入手机设置界面:
// 进入无线网络设置界面(其它可以举一反三)
Intent intent = new Intent(android.provider.Settings.ACTION_WIRELESS_SETTINGS);
startActivityForResult(intent, 0);

//13.安装apk:
Uri installUri = Uri.fromParts("package", "xxx", null);
returnIt = new Intent(Intent.ACTION_PACKAGE_ADDED, installUri);

//14.卸载apk:
Uri uri = Uri.fromParts("package", strPackageName, null);
Intent it = new Intent(Intent.ACTION_DELETE, uri);
startActivity(it);

//15.发送附件:
Intent it = new Intent(Intent.ACTION_SEND);
it.putExtra(Intent.EXTRA_SUBJECT, "The email subject text");
it.putExtra(Intent.EXTRA_STREAM, "file:///sdcard/eoe.mp3");
sendIntent.setType("audio/mp3");
startActivity(Intent.createChooser(it, "Choose Email Client"));

//16.进入联系人页面:
Intent intent = new Intent();
intent.setAction(Intent.ACTION_VIEW);
intent.setData(People.CONTENT_URI);
startActivity(intent);

//17.查看指定联系人:
Uri personUri = ContentUris.withAppendedId(People.CONTENT_URI, info.id);//info.id联系人ID
Intent intent = new Intent();
intent.setAction(Intent.ACTION_VIEW);
intent.setData(personUri);
startActivity(intent);


