在开发中,经常会碰到Email邮件发送的场景,如注册,找回密码,发送验证码,向客户发送邮件,通过邮件发送系统情况,通过邮件发送报表信息等等,实际应用场景很多。
        首先介绍以下与发送接受邮件相关的一些协议:
        1.发送邮件:SMPT、MIME,是一种基于"推"的协议,通过SMPT协议将邮件发送至邮件服务器,MIME协议是对SMPT协议的一种补充,如发送图片附件等。
        2.接收邮件:POP、IMAP,是一种基于"拉"的协议,收件人通过POP协议从邮件服务器拉取邮件。
邮件发送需要的配置
因为各大邮件都有其对应安全系统,我们必须要拿到其对应的客户端授权码才行,在项目中配置SMTP服务协议以及主机配置账户,就可以在项目中使用各大邮件运营商进行发送邮件了。
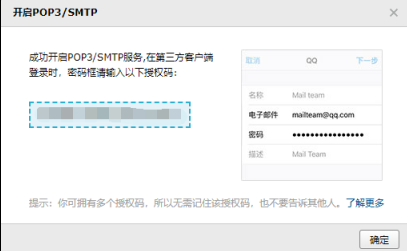
由于国内使用QQ邮箱的用户较多,所以这里选择QQ邮箱为例。具体要登录QQ邮箱,点击设置、账户选项,向下拉选择开启POP3/SMTP服务
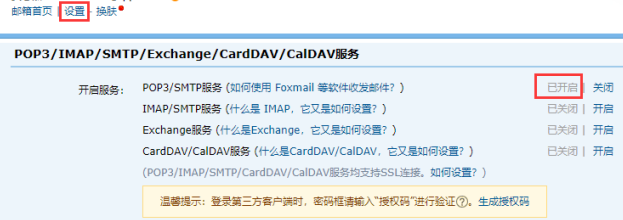
点击开启后会进入验证过程,根据引导步骤发送短信,验证成功后即可得到自己 QQ 邮 箱的客户端授权码了,如图 所示。
<project xmlns="http://maven.apache.org/POM/4.0.0"
    xmlns:xsi="http://www.w3.org/2001/XMLSchema-instance"
    xsi:schemaLocation="http://maven.apache.org/POM/4.0.0 http://maven.apache.org/xsd/maven-4.0.0.xsd">
    <modelVersion>4.0.0</modelVersion>
    <groupId>com.email</groupId>
    <artifactId>sendemail</artifactId>
    <version>0.0.1-SNAPSHOT</version>

    <parent>
        <groupId>org.springframework.boot</groupId>
        <artifactId>spring-boot-starter-parent</artifactId>
        <version>2.0.0.RELEASE</version>
        <relativePath /> <!-- lookup parent from repository -->
    </parent>

    <properties>
        <!-- 声明项目配置依赖编码格式为 utf-8 -->
        <project.build.sourceEncoding>UTF-8</project.build.sourceEncoding>
        <project.reporting.outputEncoding>UTF-8</project.reporting.outputEncoding>
        <fastjson.version>1.2.24</fastjson.version>
    </properties>

    <dependencies>
        <!-- 引入模板引擎. -->
        <dependency>
            <groupId>org.springframework.boot</groupId>
            <artifactId>spring-boot-starter-thymeleaf</artifactId>
        </dependency>

        <dependency>
            <groupId>org.springframework.boot</groupId>
            <artifactId>spring-boot-starter-mail</artifactId>
        </dependency>
        <dependency>
            <groupId>org.springframework.boot</groupId>
            <artifactId>spring-boot-starter-web</artifactId>
        </dependency>

        <dependency>
            <groupId>org.springframework.boot</groupId>
            <artifactId>spring-boot-starter-test</artifactId>
            <scope>test</scope>
            <exclusions>
                <exclusion>
                    <groupId>org.junit.vintage</groupId>
                    <artifactId>junit-vintage-engine</artifactId>
                </exclusion>
            </exclusions>
        </dependency>
        <dependency>
            <groupId>junit</groupId>
            <artifactId>junit</artifactId>
            <scope>test</scope>
        </dependency>

        <!--devtools热部署 -->
        <dependency>
            <groupId>org.springframework.boot</groupId>
            <artifactId>spring-boot-devtools</artifactId>
            <optional>true</optional>
            <scope>true</scope>
        </dependency>

    </dependencies>

    <build>
        <plugins>
            <plugin>
                <artifactId>maven-compiler-plugin</artifactId>
                <configuration>
                    <source>1.8</source>
                    <target>1.8</target>
                </configuration>
            </plugin>
        </plugins>
    </build>
</project>
spring.mail.host=smtp.qq.com
spring.mail.username=635498720@qq.com
spring.mail.password=
spring.mail.smtp.port=465
spring.mail.from=635498720@qq.com

spring.properties.mail.smtp.starttls.enable=true
spring.properties.mail.smtp.starttls.required=true
spring.properties.mail.smtp.ssl.enable=true
spring.default-encoding=utf-8
package com.tszr.email.emailserver;

import java.io.File;

import javax.mail.MessagingException;
import javax.mail.internet.MimeMessage;

import org.slf4j.Logger;
import org.slf4j.LoggerFactory;
import org.springframework.beans.factory.annotation.Autowired;
import org.springframework.beans.factory.annotation.Value;
import org.springframework.core.io.FileSystemResource;
import org.springframework.mail.SimpleMailMessage;
import org.springframework.mail.javamail.JavaMailSender;
import org.springframework.mail.javamail.MimeMessageHelper;
import org.springframework.stereotype.Service;

@Service
public class MailService {
    private final Logger logger = LoggerFactory.getLogger(this.getClass());

    /**
     * Spring Boot 提供了一个发送邮件的简单抽象,使用的是下面这个接口,这里直接注入即可使用
     */
    @Autowired
    private JavaMailSender mailSender;

    /**
     * 获取配置文件中自己的qq邮箱
     */
    @Value("${spring.mail.from}")
    private String from;

    /**
     * 简单文本邮件
     *
     * @param to      收件人
     * @param subject 主题
     * @param content 内容
     */
    public void sendSimpleMail(String to, String subject, String content) {
        // 创建SimpleMailMessage对象
        SimpleMailMessage message = new SimpleMailMessage();
        // 邮件发送人
        message.setFrom(from);
        // 邮件接收人
        message.setTo(to);
        // 邮件主题
        message.setSubject(subject);
        // 邮件内容
        message.setText(content);
        // 通过JavaMailSender类把邮件发送出去
        mailSender.send(message);
    }

    /**
     * html邮件
     *
     * @param to      收件人
     * @param subject 主题
     * @param content 内容
     */
    public void sendHtmlMail(String to, String subject, String content) {
        // 获取MimeMessage对象
        MimeMessage message = mailSender.createMimeMessage();
        MimeMessageHelper messageHelper;
        try {
            messageHelper = new MimeMessageHelper(message, true);
            // 邮件发送人
            messageHelper.setFrom(from);
            // 邮件接收人
            messageHelper.setTo(to);
            // 邮件主题
            message.setSubject(subject);
            // 邮件内容,html格式
            messageHelper.setText(content, true);
            // 发送
            mailSender.send(message);
            // 日志信息
            logger.info("邮件已经发送。");
        } catch (Exception e) {
            logger.error("发送邮件时发生异常!", e);
        }
    }

    /* 带附件邮件 */
    public void sendAttachmentMail(String to, String subject, String content, String filePath) {
        logger.info("发送带附件邮件开始:{},{},{},{}", to, subject, content, filePath);
        MimeMessage message = mailSender.createMimeMessage();
        MimeMessageHelper helper;
        try {
            helper = new MimeMessageHelper(message, true);
            // true代表支持多组件,如附件,图片等
            helper.setFrom(from);
            helper.setTo(to);
            helper.setSubject(subject);
            helper.setText(content, true);
            FileSystemResource file = new FileSystemResource(new File(filePath));
            String fileName = file.getFilename();
            helper.addAttachment(fileName, file);// 添加附件,可多次调用该方法添加多个附件
            mailSender.send(message);
            logger.info("发送带附件邮件成功");
        } catch (MessagingException e) {
            logger.error("发送带附件邮件失败", e);
        }
    }

    /* 发送带图片的邮件 */
    public void sendInlineResourceMail(String to, String subject, String content, String rscPath, String rscId) {

        logger.info("发送带图片邮件开始:{},{},{},{},{}", to, subject, content, rscPath, rscId);
        MimeMessage message = mailSender.createMimeMessage();

        MimeMessageHelper helper;
        try {
            helper = new MimeMessageHelper(message, true);
            helper.setFrom(from);
            helper.setTo(to);
            helper.setSubject(subject);
            helper.setText(content, true);
            FileSystemResource res = new FileSystemResource(new File(rscPath));
            helper.addInline(rscId, res);// 重复使用添加多个图片
            mailSender.send(message);
            logger.info("发送带图片邮件成功");
        } catch (MessagingException e) {
            logger.error("发送带图片邮件失败", e);
        }
    }
}
package com.tszr.email;

import org.springframework.boot.SpringApplication;
import org.springframework.boot.autoconfigure.SpringBootApplication;

@SpringBootApplication
public class Apllication {
    public static void main(String[] args) {
        SpringApplication.run(Apllication.class, args);
    }
}