微信小程序自定义tabbar的实现
目的:当采用微信的自定义tabbar组件的时候,切换的时候会出现闪屏的效果;当使用微信默认的tabbar的时候,限制了tabbar的数量以及灵活配置。
方案:自己动手写一个和微信小程序提供的tabbar相同的效果,而且还可以满足灵活配置的功能.有参照有赞小程序
效果:
- 效果A:

2.效果B:

实现:
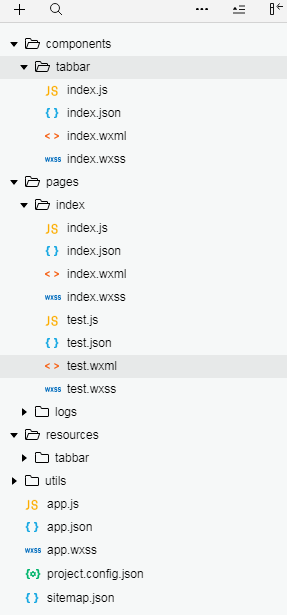
项目结构如下:
II 效果A实现:
1》wxml的代码:
Page({
  data: {
    blockid:0,
    bgcolor:'#ffffff',
    color:"#cccccc",
    selectedColor:'#333333',
    showborder:false,
    bordercolor:"",
    tabbar:[
      {
        pagePath: "page/home0/index",
        selectedIconPath: '/resources/tabbar/homeh.png',
        iconPath: '/resources/tabbar/home.png',
        text: '首页A',
        isdot: false,
        number: 0
      }, {
        pagePath: "page/home1/index",
        selectedIconPath: '/resources/tabbar/kindh.png',
        iconPath: '/resources/tabbar/kind.png',
        text: '首页B',
        isdot: true,
        number: 0
      }, {
        pagePath: "page/home2/index",
        selectedIconPath: '/resources/tabbar/myh.png',
        iconPath: '/resources/tabbar/my.png',
        text: '首页C',
        isdot: false,
        number: 5
      }, {
        pagePath: "page/home3/index",
        selectedIconPath: '/resources/tabbar/shopcarth.png',
        iconPath: '/resources/tabbar/shopcart.png',
        text: '首页D',
        isdot: false,
        number: 0
      }
    ]
  },
  // event.detail 的值为当前选中项的索引
  tabbarChange(e) {

    var index = parseInt(e.detail);
    this.setData({
      blockid:index
    })
  }
})
2》json文件如下:
{
  "usingComponents": {
    "tabbar": "../../components/tabbar/index"
  }
}
3》js文件如下:
Page({
  data: {
    blockid:0,
    bgcolor:'#ffffff',
    color:"#cccccc",
    selectedColor:'#333333',
    showborder:false,
    bordercolor:"",
    tabbar:[
      {
        pagePath: "page/home0/index",
        selectedIconPath: '/resources/tabbar/homeh.png',
        iconPath: '/resources/tabbar/home.png',
        text: '首页A',
        isdot: false,
        number: 0
      }, {
        pagePath: "page/home1/index",
        selectedIconPath: '/resources/tabbar/kindh.png',
        iconPath: '/resources/tabbar/kind.png',
        text: '首页B',
        isdot: true,
        number: 0
      }, {
        pagePath: "page/home2/index",
        selectedIconPath: '/resources/tabbar/myh.png',
        iconPath: '/resources/tabbar/my.png',
        text: '首页C',
        isdot: false,
        number: 5
      }, {
        pagePath: "page/home3/index",
        selectedIconPath: '/resources/tabbar/shopcarth.png',
        iconPath: '/resources/tabbar/shopcart.png',
        text: '首页D',
        isdot: false,
        number: 0
      }
    ]
  },
  // event.detail 的值为当前选中项的索引
  tabbarChange(e) {

    var index = parseInt(e.detail);
    this.setData({
      blockid:index
    })
  }
})
III效果B实现:
1》wxml的代码:
<block wx:if="{{blockid==0}}">
  这里是首页A
</block>
<block wx:if="{{blockid==1}}">
  这里是首页B
</block>
<block wx:if="{{blockid==2}}">
  这里是首页C
</block>
<block wx:if="{{blockid==3}}">
  这里是首页D
</block>

<!--底部tabbar【一般正常用法,index页面特殊用法】-->
<tabbar tabbarData="{{tabbar}}" active="{{0}}" bgcolor="{{bgcolor}}" color="{{color}}" selectedColor="{{selectedColor}}"  showborder="{{showborder}}"  bind:tapChange="tabbarChange" />
2》json的代码
{
  "usingComponents": {
    "tabbar": "../../components/tabbar/index"
  }
}
3》js的代码
Page({

  /**
   * 页面的初始数据
   */
  data: {
    blockid: 0,
    bgcolor: 'green',
    color: "red",
    selectedColor: 'blue',
    showborder: false,
    bordercolor: "",
    tabbar: [{
      pagePath: "page/home0/index",
      selectedIconPath: '/resources/tabbar/homeh.png',
      iconPath: '/resources/tabbar/home.png',
      text: '首页A',
    }, {
      pagePath: "page/home1/index",
      selectedIconPath: '/resources/tabbar/kindh.png',
      iconPath: '/resources/tabbar/kind.png',
      text: '首页B',
    }, {
      pagePath: "page/home2/index",
      selectedIconPath: '/resources/tabbar/myh.png',
      iconPath: '/resources/tabbar/my.png',
      text: '首页C',
    }, {
      pagePath: "page/home3/index",
      selectedIconPath: '/resources/tabbar/shopcarth.png',
      iconPath: '/resources/tabbar/shopcart.png',
      text: '首页D',
    }]
  },
  // event.detail 的值为当前选中项的索引
  tabbarChange(e) {

    var index = parseInt(e.detail);
    this.setData({
      blockid: index
    })
  },
})
github地址如下:https://github.com/weiyunhelong/WeChatTabbar,欢迎下载并使用!