官方wiki:https://github.com/arut/nginx-rtmp-module#readme
Nginx rtmp 功能特点
1. 支持音视频直播
2. 支持flv/mp4视频格式,输入可以是文件或者HTTP流
3. 支持两种流的分发模式 pushand pull
4. 可以将直播流录制成flv文件
5. H264/AAC编码
6. 支持在线转码 Onlinetranscoding with FFmpeg
7. 支持HLS (HTTP LiveStreaming)需要 libavformat (>= 8. 53.31.100) from ffmpeg (ffmpeg.org)
8. HTTPcallbacks (publish/play/record/update etc)
9. 支持外部程序(exec)
10. HTTPcontrol module for recording audio/video and dropping clients
11. 先进内存控制技术,可以在使用少量内存的情况下完成流畅的直播功能。
12 . 可以和以下协同工作。FMS server(Wirecast, FMS, Wowza,)Player(JWPlayer, FlowPlayer, StrobeMediaPlayback,)外部程序(ffmpeg,avconv,rtmpdump,flvstreamer )
13. Statistics in XML/XSL in machine- & human- readable form
14. 支持跨平台 Linux/FreeBSD/MacOS
实现环境:
| rhel6.1 | 172.16.6.36 |
| rhel6.1 | 172.16.6.39 |
编译环境:安装gcc、openssl-devel、pcre-devel
网络yum源配置参考链接:http://lyd0721.blog.51cto.com/4894702/1428467
下载并解压nginx-rtmp-module模块
编译安装nginx
|
1
2
3
4
|
[root@localhost ~]# tar xf nginx-1.4.7.tar.gz
[root@localhost ~]# cd nginx-1.4.7
[root@localhost ~]# ./configure --prefix=/usr --sbin-path=/usr/sbin/nginx --conf-path=/etc/nginx/nginx.conf --error-log-path=/var/log/nginx/error.log --http-log-path=/var/log/nginx/access.log --pid-path=/var/run/nginx/nginx.pid --lock-path=/var/lock/nginx.lock --user=nginx --group=nginx --with-http_ssl_module --with-http_flv_module --with-http_stub_status_module --with-http_gzip_static_module --http-client-body-temp-path=/var/tmp/nginx/client/ --http-proxy-temp-path=/var/tmp/nginx/proxy/ --http-fastcgi-temp-path=/var/tmp/nginx/fcgi/ --http-uwsgi-temp-path=/var/tmp/nginx/uwsgi --http-scgi-temp-path=/var/tmp/nginx/scgi --add-module=/root/nginx-rtmp-module-master
[root@localhost ~]# make && make install
|
在/etc/init.d/目录下为nginx提供服务器脚本并赋予其执行权限
|
1
2
3
4
5
6
7
8
9
10
11
12
13
14
15
16
17
18
19
20
21
22
23
24
25
26
27
28
29
30
31
32
33
34
35
36
37
38
39
40
41
42
43
44
45
46
47
48
49
50
51
52
53
54
55
56
57
58
59
60
61
62
63
64
65
66
67
68
69
70
71
72
73
74
75
76
77
78
79
80
81
82
83
84
85
86
87
88
89
90
91
92
93
94
95
96
97
98
99
100
101
102
103
104
105
106
107
108
109
|
#!/bin/sh## nginx - this script starts and stops the nginx daemon## chkconfig: - 85 15# description: Nginx is an HTTP(S) server, HTTP(S) reverse # proxy and IMAP/POP3 proxy server# processname: nginx# config: /etc/nginx/nginx.conf# config: /etc/sysconfig/nginx# pidfile: /var/run/nginx.pid# Source function library.. /etc/rc.d/init.d/functions
# Source networking configuration.. /etc/sysconfig/network
# Check that networking is up.[ "$NETWORKING" = "no" ] && exit 0
nginx="/usr/sbin/nginx"
prog=$(basename $nginx)
NGINX_CONF_FILE="/etc/nginx/nginx.conf"
[ -f /etc/sysconfig/nginx ] && . /etc/sysconfig/nginx
lockfile=/var/lock/subsys/nginx
make_dirs() {# make required directoriesuser=`nginx -V 2>&1 | grep "configure arguments:" | sed 's/[^*]*--user=([^ ]*).*/1/g' -`
options=`$nginx -V 2>&1 | grep 'configure arguments:'`
for opt in $options; do
if [ `echo $opt | grep '.*-temp-path'` ]; then
value=`echo $opt | cut -d "=" -f 2`
if [ ! -d "$value" ]; then
# echo "creating" $valuemkdir -p $value && chown -R $user $value
fifidone}start() {[ -x $nginx ] || exit 5
[ -f $NGINX_CONF_FILE ] || exit 6
make_dirsecho -n $"Starting $prog: "
daemon $nginx -c $NGINX_CONF_FILEretval=$?echo[ $retval -eq 0 ] && touch $lockfile
return $retval
}stop() {echo -n $"Stopping $prog: "
killproc $prog -QUITretval=$?echo[ $retval -eq 0 ] && rm -f $lockfile
return $retval
}restart() {configtest || return $?
stopsleep 1
start}reload() {configtest || return $?
echo -n $"Reloading $prog: "
killproc $nginx -HUPRETVAL=$?echo}force_reload() {restart}configtest() {$nginx -t -c $NGINX_CONF_FILE}rh_status() {status $prog}rh_status_q() {rh_status >/dev/null 2>&1
}case "$1" in
start)rh_status_q && exit 0
$1;;stop)rh_status_q || exit 0
$1;;restart|configtest)$1;;reload)rh_status_q || exit 7
$1;;force-reload)force_reload;;status)rh_status;;condrestart|try-restart)rh_status_q || exit 0
;;*)echo $"Usage: $0 {start|stop|status|restart|condrestart|try-restart|reload|force-reload|configtest}"
exit 2
esac |
|
1
|
[root@localhost ~]# chmod +x nginx
|
添加nginx至服务列表并设置其开机自动启动
|
1
2
|
[root@localhost ~]# chkconfig --add nginx
[root@localhost ~]# chkconfig nginx on
|
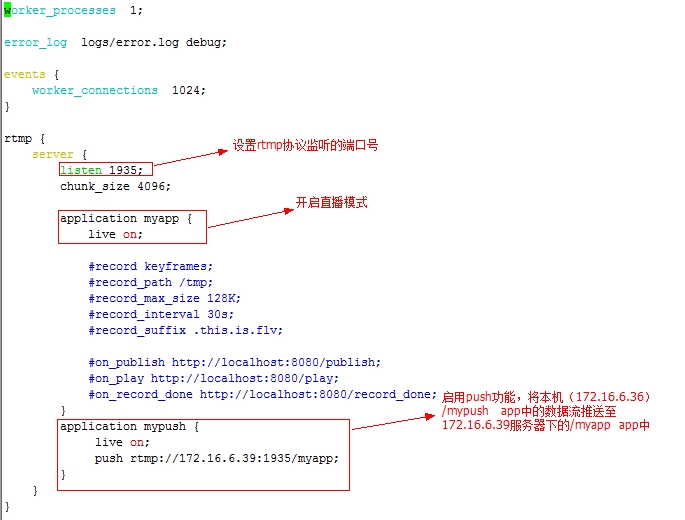
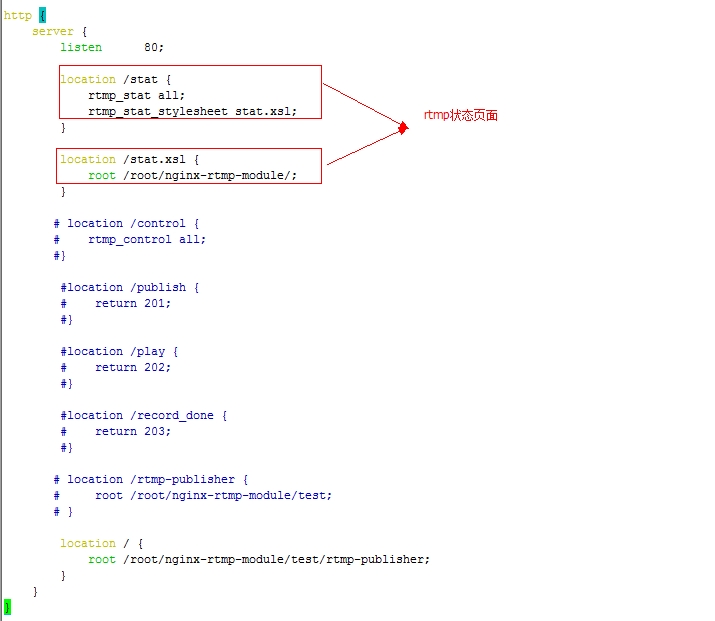
备份/etc/nginx配置文件,把nginx-rtmp-module-master/test/nginx.conf复制到/etc/nginx目录下
|
1
2
3
4
|
[root@localhost ~]# cd /etc/nginx/
[root@localhost nginx]# mv nginx.conf nginx.conf.bak
[root@localhost ~]# cd nginx-rtmp-module-master/test/
[root@localhost test]# mv nginx.conf /etc/nginx/
|
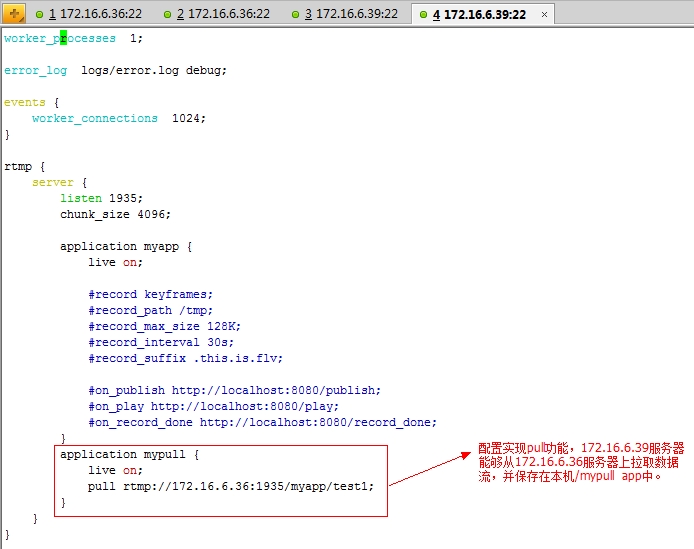
修改/etc/nginx/nginx.conf配置文件
172.16.6.39上面的环境与172.16.6.36相同,只不过要在172.16.6.39上实现pull的功能
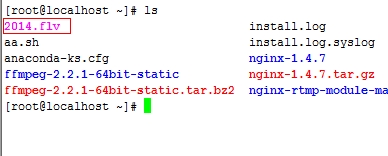
下载一个.flv结尾的视频文件,使用ffmpeg模拟视频直播源进行测试play、push及pull功能是否实现
使用ffmpeg模拟直播效果,ffmpeg下载链接http://www.ffmpeg.org/download.html
进入ffmpeg-2.2.1-64bit-static目录下,执行如下命令
|
1
|
[root@localhost ffmpeg-2.2.1-64bit-static]# ./ffmpeg -re -i ~/2014.flv -f flv rtmp://172.16.6.36/myapp/test1
|
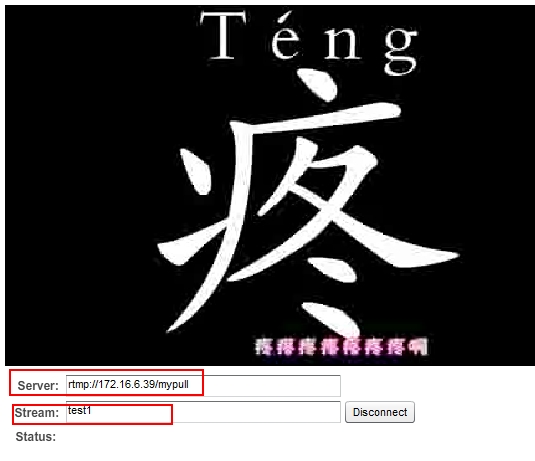
然后登录此链接验证能够播放:http://www.wowza.com/resources/3.5.0/examples/LiveVideoStreaming/FlashRTMPPlayer/player.html
验证pull功能是否实现
验证push功能
使用ffmpeg推流的时候,应该推至/mypush中,/mypush有流之后才能push至172.16.6.39的/myapp中,所以执行如下命令
|
1
|
[root@localhost ffmpeg-2.2.1-64bit-static]# ./ffmpeg -re -i ~/2014.flv -f flv rtmp://172.16.6.36/mypush/test1
|
