第1章 设计Restful接口
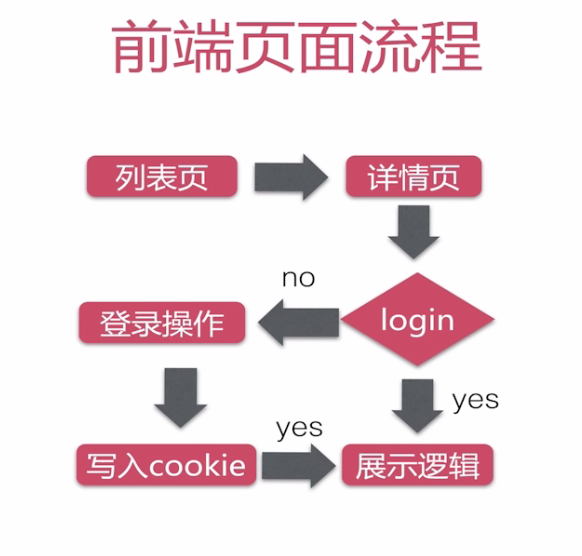
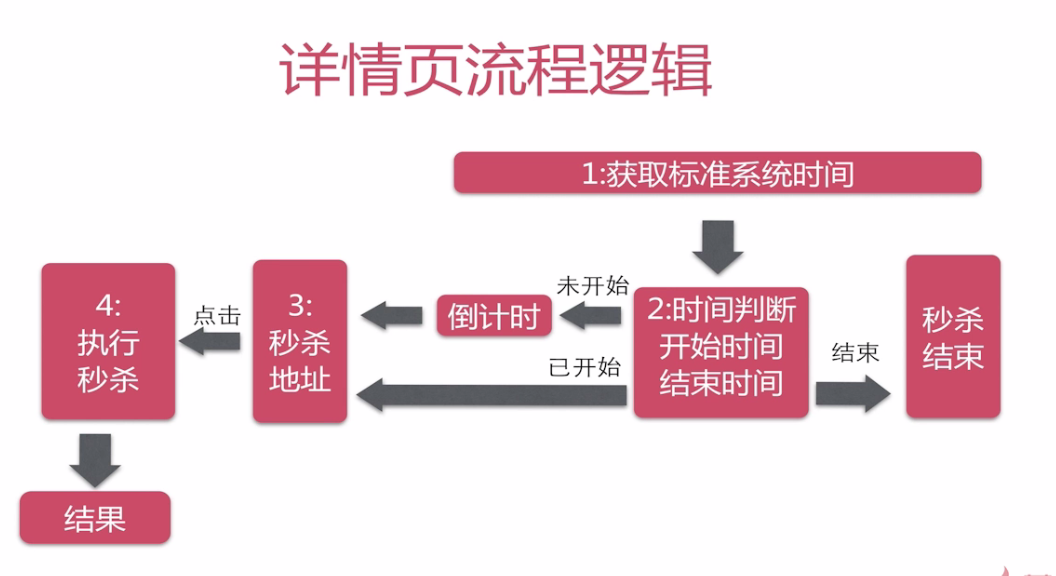
1.1前端交互流程设计
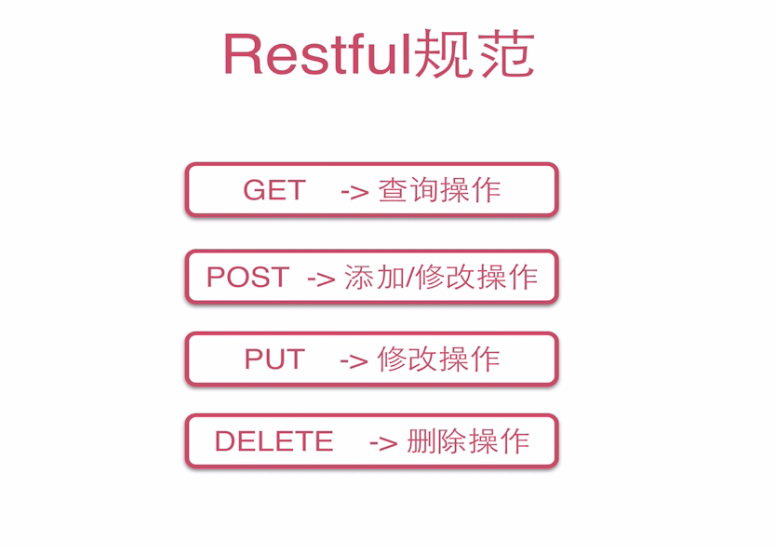
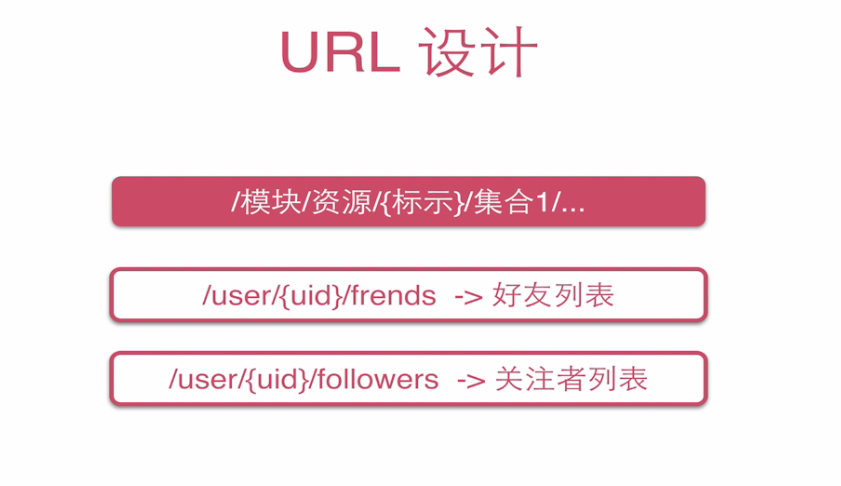
1.2 学习Restful接口设计
什么是Restful?它就是一种优雅的URI表述方式,用来设计我们资源的访问URL。通过这个URL的设计,我们就可以很自然的感知到这个URL代表的是哪种业务场景或者什么样的数据或资源。基于Restful设计的URL,对于我们接口的使用者、前端、web系统或者搜索引擎甚至是我们的用户,都是非常友好的。
第2章 SpringMVC整合spring
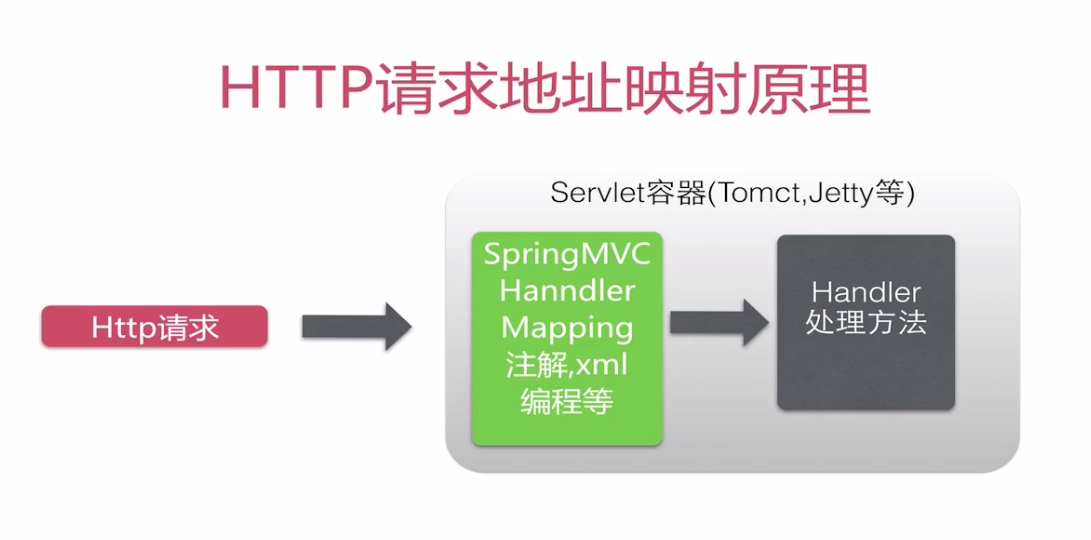
2.1 SpringMvc理论
蓝色部分是需要我们自己开发的
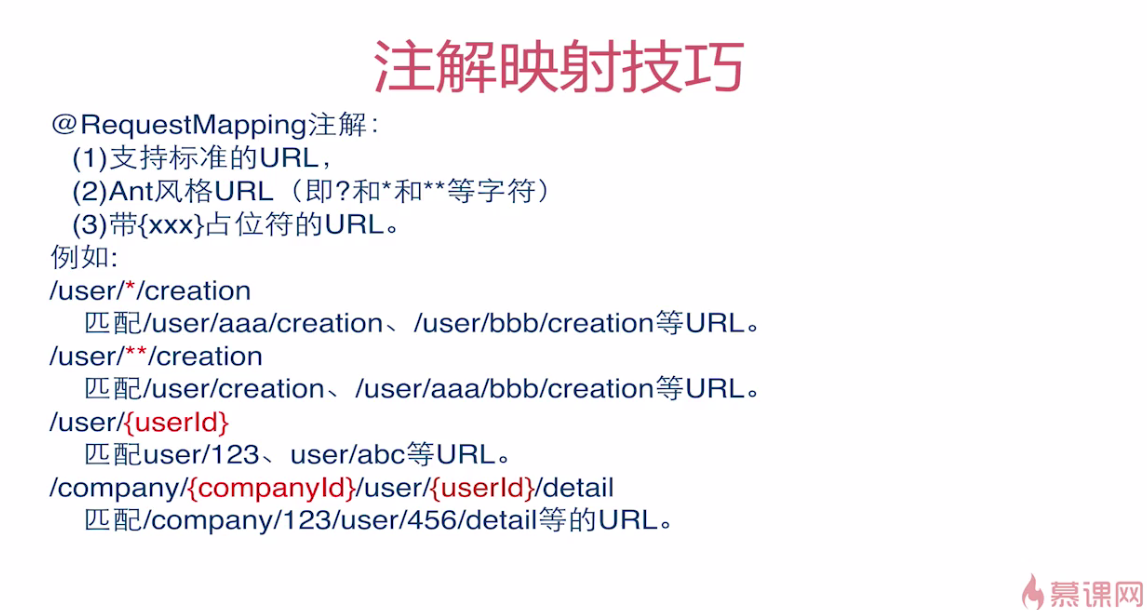
?表一个字符
*表任意个字符
**表任意路径
{}中的字符以参数形式传入
2.2 整合配置springMVC框架
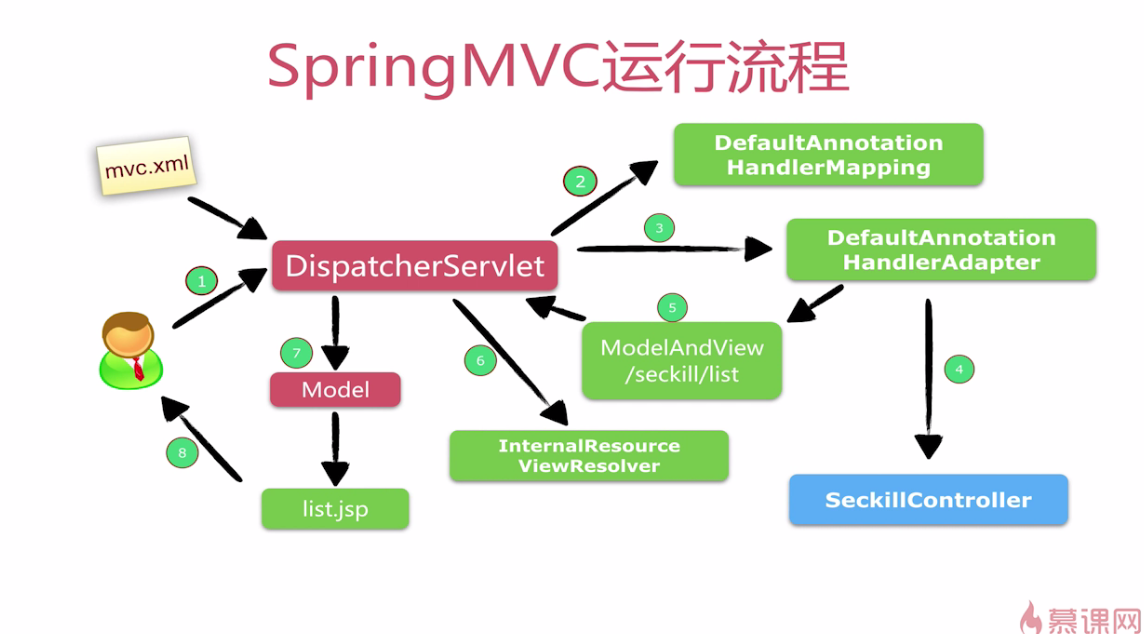
首先在WEB-INF的web.xml中进行我们前端控制器DispatcherServlet的配置,如下:
<web-app xmlns="http://java.sun.com/xml/ns/javaee"
         xmlns:xsi="http://www.w3.org/2001/XMLSchema-instance"
         xsi:schemaLocation="http://java.sun.com/xml/ns/javaee
                      http://java.sun.com/xml/ns/javaee/web-app_3_0.xsd"
         version="3.0"
         metadata-complete="true">
<!--用maven创建的web-app需要修改servlet的版本为3.0-->

<!--配置DispatcherServlet-->
    <servlet>
        <servlet-name>seckill-dispatcher</servlet-name>
        <servlet-class>org.springframework.web.servlet.DispatcherServlet</servlet-class>
        <!--
            配置SpringMVC 需要配置的文件
            spring-dao.xml,spring-service.xml,spring-web.xml
            整合顺序 Mybites -> spring -> springMvc  spring和springMVC不需要整合,两者都出自spring
        -->
        <init-param>
            <param-name>contextConfigLocation</param-name>    <!-- config配置文件的location -->
            <param-value>classpath:spring/spring-*.xml</param-value>
        </init-param>
        </servlet>
        <servlet-mapping>
            <servlet-name>seckill-dispatcher</servlet-name>
            <!-- 默认匹配所有的请求 -->
            <url-pattern>/</url-pattern>
        </servlet-mapping>
</web-app>
然后在spring容器中进行web层相关bean(即Controller)的配置,在spring包下创建一个spring-web.xml,内容如下:
<?xml version="1.0" encoding="UTF-8"?>
<beans xmlns="http://www.springframework.org/schema/beans"
    xmlns:xsi="http://www.w3.org/2001/XMLSchema-instance" xmlns:mvc="http://www.springframework.org/schema/mvc"
    xmlns:context="http://www.springframework.org/schema/context"
    xsi:schemaLocation="http://www.springframework.org/schema/mvc http://www.springframework.org/schema/mvc/spring-mvc-4.1.xsd
        http://www.springframework.org/schema/beans http://www.springframework.org/schema/beans/spring-beans.xsd
        http://www.springframework.org/schema/context http://www.springframework.org/schema/context/spring-context-4.1.xsd">

    <!-- 配置springMVC -->
    <!--1.开启springmvc注解模式 简化配置: (1)自动注册DefaultAnnotationHandlerMapping,AnnotationMethodHandlerAdapter
        (2)默认提供一系列的功能:数据绑定,数字和日期的format@NumberFormat,@DateTimeFormat xml,json的默认读写支持 -->
    <mvc:annotation-driven />

    <!-- servlet-mapping 映射路径:“/” -->
    <!--2.静态资源默认servlet配置 -->
    <!-- 1).加入对静态资源处理:js,gif,png 2).允许使用 "/" 做整体映射 -->
    <mvc:default-servlet-handler />

    <!--3:配置JSP 显示ViewResolver -->
    <bean
        class="org.springframework.web.servlet.view.InternalResourceViewResolver">
        <property name="viewClass"
            value="org.springframework.web.servlet.view.JstlView" />
        <property name="prefix" value="/WEB-INF/jsp/" />
        <property name="suffix" value=".jsp" />
    </bean>

    <!--4:扫描web相关的bean -->
    <context:component-scan base-package="org.myseckill.web" />


</beans>
这样我们便完成了Spring MVC的相关配置(即将Spring MVC框架整合到了我们的项目中)
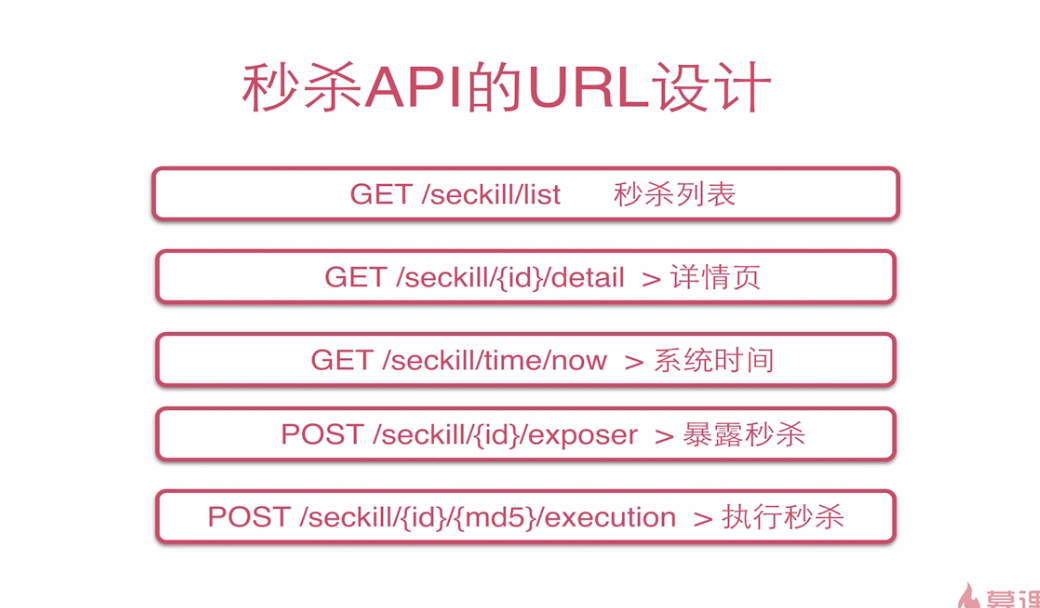
第3章 实现秒杀相关的Restful接口
在org.myseckill下新建一个web文件夹,用于存放我们的controller
在该包下创建一个SeckillController.java,内容如下:
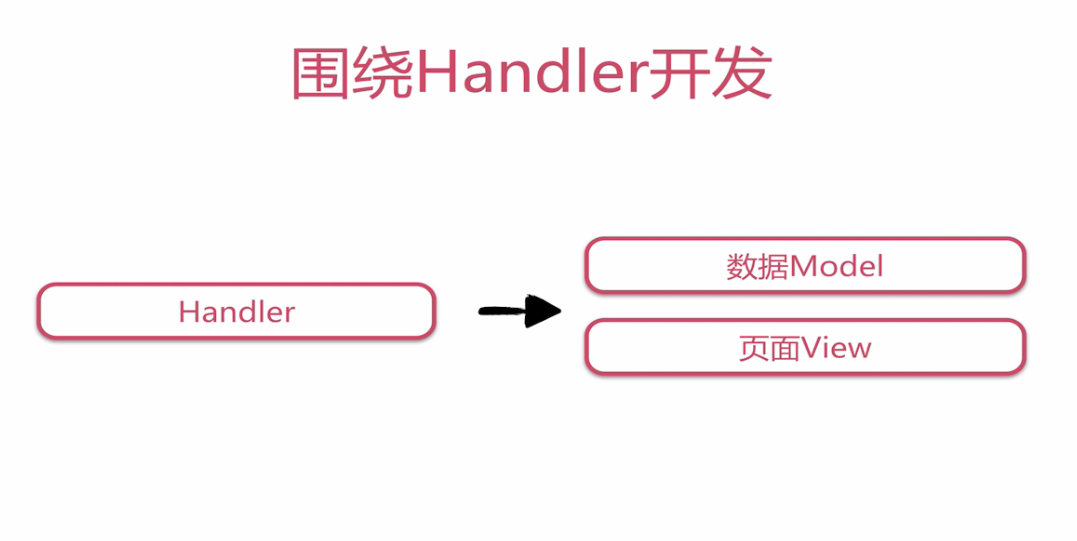
controller即MVC中的C控制层,职责是接收参数,做跳转的控制
/**
 * controller即MVC中的C控制层,职责是接收参数,做跳转的控制
 * Controller开发中的方法完全是对照Service接口方法进行开发的,第一个方法用于访问我们商品的列表页,
 * 第二个方法访问商品的详情页,第三个方法用于返回一个json数据,数据中封装了我们商品的秒杀地址,
 * 第四个方法用于封装用户是否秒杀成功的信息,第五个方法用于返回系统当前时间。
 * @author TwoHeads
 *
 */
@Controller
@RequestMapping("/seckill")  //一级映射,相当于二级映射前面都有"/seckill"   url:模块/资源/{}/细分
public class SeckillController {
    private Logger logger = LoggerFactory.getLogger(this.getClass());

    @Autowired
    private SeckillService seckillService;

    @RequestMapping(value="/list",method=RequestMethod.GET) //二级映射
    public String list(Model model) {
        //model用于存放渲染list的数据    list.jsp是页面的模板,model是数据
        //list.jsp+mode=ModelAndView
        //获取秒杀的列表页
        List<Seckill> list = seckillService.getSeckillList();
        model.addAttribute("list",list);
        return "list"; //即WEB-INF/jsp/"list".jsp
    }

    @RequestMapping(value="/{seckillId}/detail",method=RequestMethod.GET)
    public String detail(@PathVariable("seckillId") Long seckillId,Model model) {
        //判断seckillId有没有传
        if(seckillId == null) {     //之前把Long seckillId写为了long seckillId,不是一个对象,导致无法判断null
            return "redirect:/seckill/list";
        }
        Seckill seckill = seckillService.getById(seckillId);
        //如果传的id不存在
        if(seckill == null) {
            return "forward:/seckill/list";
        }
        model.addAttribute("seckill",seckill);
        return "detail";
    }

    //ajax接口  返回类型是json 暴露秒杀接口的方法

    //只接受post方式,即直接在浏览器中输入这个地址是无效的,地址栏回车属于get方式。post方式只能设计一个表单,一个提交按钮,才可以。
    //produces告诉浏览器我们的contentType是json
    @RequestMapping(value="/{seckillId}/exposer",
            method=RequestMethod.POST,
            produces= {"application/json;charset=UTF-8"})
    //@ResponseBody这个注解告诉springMVC返回的是一个json类型的数据
    @ResponseBody
    public SeckillResult<Exposer> exposer(Long seckillId) {

        SeckillResult<Exposer> result;

        try {
            Exposer exposer = seckillService.exportSeckillUrl(seckillId);
            result = new SeckillResult<Exposer>(true,exposer);
        } catch (Exception e) {
            logger.error(e.getMessage(),e);
            //出现异常则调用SeckillResult的另一个构造方法
            result = new SeckillResult<Exposer>(false,e.getMessage());
        }

        return result;
    }

    //所有的ajax请求都统一的返回SeckillResult,dto用于web层和service层的数据传递,SeckillResult和Exposer,SeckillExecution全都是dto包下的类
    @RequestMapping(value="/{seckillId}/{md5}/execution",
            method=RequestMethod.POST,
            produces= {"application/json;charset=UTF-8"})
    @ResponseBody
    //参数seckillId和md5都可以从url映射的请求参数中{seckillId},{md5}取得,而用户标识killPhone在url中并没有,从用户浏览器request请求的cookie中取得
    //required = false使当cookie没有killPhone参数时springMVC不报错,把killphone的验证逻辑放到程序中来
    public SeckillResult<SeckillExecution> execute(@PathVariable("seckillId") Long seckillId,
                                                   @PathVariable("md5")String md5,
                                                   @CookieValue(value = "killPhone",required = false)Long phone){

        if(phone == null) {
            return new SeckillResult<SeckillExecution>(false,"未注册");
        }

        SeckillResult<SeckillExecution> result;
        try {
            SeckillExecution execution = seckillService.executeSeckill(seckillId, phone, md5);
            return new SeckillResult<SeckillExecution>(true, execution);
        } catch (SeckillCloseException e) {
            //SeckillCloseException和RepeatKillException是允许的异常
            SeckillExecution execution = new SeckillExecution(seckillId, SeckillStatEnum.END);
            return new SeckillResult<SeckillExecution>(false, execution);

        } catch (RepeatKillException e) {
            SeckillExecution execution = new SeckillExecution(seckillId, SeckillStatEnum.REPEAT_KILL);
            return new SeckillResult<SeckillExecution>(false, execution);

        } catch (Exception e) {
            logger.error(e.getMessage(), e);
            //其他所有未知异常算作INNER_ERROR
            SeckillExecution execution = new SeckillExecution(seckillId, SeckillStatEnum.INNER_ERROR);
            return new SeckillResult<SeckillExecution>(false, execution);
        }

    }

    @RequestMapping(value="/time/now",method=RequestMethod.GET)
    public SeckillResult<Long> time(){
        Date now = new Date();
        return new SeckillResult<Long>(true, now.getTime());
    }


}
所有的ajax请求都统一的返回SeckillResult,
dto用于web层和service层的数据传递,SeckillResult和Exposer,SeckillExecution全都是dto包下的类
@ResposeBody注解的使用
1、
@responseBody注解的作用是将controller的方法返回的对象通过适当的转换器转换为指定的格式之后,写入到response对象的body区,通常用来返回JSON数据或者是XML
数据,需要注意的呢,在使用此注解之后不会再走试图处理器,而是直接将数据写入到输入流中,他的效果等同于通过response对象输出指定格式的数据。
2、
@RequestMapping("/login")
@ResponseBody
public User login(User user){
return user;
}
User字段:userName pwd
那么在前台接收到的数据为:'{"userName":"xxx","pwd":"xxx"}'
效果等同于如下代码:
@RequestMapping("/login")
public void login(User user, HttpServletResponse response){
response.getWriter.write(JSONObject.fromObject(user).toString());
}
Controller开发中的方法完全是对照Service接口方法进行开发的,第一个方法用于访问我们商品的列表页,第二个方法访问商品的详情页,第三个方法用于返回一个json数据,数据中封装了我们商品的秒杀地址,第四个方法用于封装用户是否秒杀成功的信息,第五个方法用于返回系统当前时间。代码中涉及到一个将返回秒杀商品地址封装为json数据的一个Vo类,即SeckillResult.java,在dto包中创建它,内容如下:
//封装json数据结果,将所有的ajax请求返回类型,全部封装成json数据
//泛型SeckillResult<T>可以为SeckillResult<Exposer>也可以为SeckillResult<SeckillExecution>

public class SeckillResult<T> {

    private boolean success;   //标识,判断请求是否成功

    private T data;    //泛型类型的数据

    private String error;    //错误信息


    //如果success是true则有数据
    public SeckillResult(boolean success, T data) {
        super();
        this.success = success;
        this.data = data;
    }


    //如果success是false则传递错误信息
    public SeckillResult(boolean success, String error) {
        super();
        this.success = success;
        this.error = error;
    }
   //getter和setter
}
第4章 基于bootstrap开发页面结构
在WEB-INF下新建jsp文件夹和list.jsp和detail.jsp
直接在http://www.runoob.com/bootstrap/bootstrap-environment-setup.html中找到bootstrap模板,拷贝到list.jsp和detail.jsp中并进行修改
在jsp文件夹下创建common文件夹用于存放公用的的jsp,在其下创建head.jsp如下:
      <meta name="viewport" content="width=device-width, initial-scale=1.0">
      <!-- 引入 Bootstrap -->
      <link href="https://maxcdn.bootstrapcdn.com/bootstrap/3.3.7/css/bootstrap.min.css" rel="stylesheet">

      <!-- HTML5 Shiv 和 Respond.js 用于让 IE8 支持 HTML5元素和媒体查询 -->
      <!-- 注意: 如果通过 file://  引入 Respond.js 文件,则该文件无法起效果 -->
      <!--[if lt IE 9]>
         <script src="https://oss.maxcdn.com/libs/html5shiv/3.7.0/html5shiv.js"></script>
         <script src="https://oss.maxcdn.com/libs/respond.js/1.3.0/respond.min.js"></script>
      <![endif]-->
list.jsp和detail.jsp中便不需要以上内容了
剩下前端的内容暂时先复制了代码
list.jsp:
<%@page contentType="text/html; charset=UTF-8" language="java" %>
<%@include file="common/tag.jsp"%>
<!DOCTYPE html>
<html>
<head>
    <title>秒杀商品列表</title>
    <%@include file="common/head.jsp" %>
</head>
<body>
<div class="container">
    <div class="panel panel-default">
        <div class="panel-heading text-center">
            <h2>秒杀列表</h2>
        </div>
        <div class="panel-body">
            <table class="table table-hover">
                <thead>
                <tr>
                    <th>名称</th>
                    <th>库存</th>
                    <th>开始时间</th>
                    <th>结束时间</th>
                    <th>创建时间</th>
                    <th>详情页</th>
                </tr>
                </thead>
                <tbody>
                <c:forEach items="${list}" var="sk">
                    <tr>
                        <td>${sk.name}</td>
                        <td>${sk.number}</td>
                        <td>
                            <fmt:formatDate value="${sk.startTime}" pattern="yyyy-MM-dd HH:mm:ss" />
                        </td>
                        <td>
                            <fmt:formatDate value="${sk.endTime}" pattern="yyyy-MM-dd HH:mm:ss" />
                        </td>
                        <td>
                            <fmt:formatDate value="${sk.createTime}" pattern="yyyy-MM-dd HH:mm:ss" />
                        </td>
                        <td><a class="btn btn-info" href="/seckill/${sk.seckillId}/detail" target="_blank">详情</a></td>
                    </tr>
                </c:forEach>
                </tbody>
            </table>

        </div>
    </div>
</div>


<!-- jQuery文件。务必在bootstrap.min.js 之前引入 -->
<script src="http://apps.bdimg.com/libs/jquery/2.0.0/jquery.min.js"></script>

<!-- 最新的 Bootstrap 核心 JavaScript 文件 -->
<script src="http://apps.bdimg.com/libs/bootstrap/3.3.0/js/bootstrap.min.js"></script>
</body>
</html>
detail.jsp:
<%@page contentType="text/html; charset=UTF-8" language="java" %>
<%@include file="common/tag.jsp" %>
<!DOCTYPE html>
<html>
<head>
    <title>秒杀详情页</title>
    <%@include file="common/head.jsp" %>
</head>
<body>
<div class="container">
    <div class="panel panel-default text-center">
        <div class="pannel-heading">
            <h1>${seckill.name}</h1>
        </div>

        <div class="panel-body">
            <h2 class="text-danger">
                <%--显示time图标--%>
                <span class="glyphicon glyphicon-time"></span>
                <%--展示倒计时--%>
                <span class="glyphicon" id="seckill-box"></span>
            </h2>
        </div>
    </div>
</div>
<%--登录弹出层 输入电话--%>
<div id="killPhoneModal" class="modal fade">

    <div class="modal-dialog">

        <div class="modal-content">
            <div class="modal-header">
                <h3 class="modal-title text-center">
                    <span class="glyphicon glyphicon-phone"> </span>秒杀电话:
                </h3>
            </div>

            <div class="modal-body">
                <div class="row">
                    <div class="col-xs-8 col-xs-offset-2">
                        <input type="text" name="killPhone" id="killPhoneKey"
                               placeholder="填写手机号^o^" class="form-control">
                    </div>
                </div>
            </div>

            <div class="modal-footer">
                <%--验证信息--%>
                <span id="killPhoneMessage" class="glyphicon"> </span>
                <button type="button" id="killPhoneBtn" class="btn btn-success">
                    <span class="glyphicon glyphicon-phone"></span>
                    Submit
                </button>
            </div>

        </div>
    </div>

</div>

</body>
<%--jQery文件,务必在bootstrap.min.js之前引入--%>
<script src="http://apps.bdimg.com/libs/jquery/2.0.0/jquery.min.js"></script>
<script src="http://apps.bdimg.com/libs/bootstrap/3.3.0/js/bootstrap.min.js"></script>
<%--使用CDN 获取公共js http://www.bootcdn.cn/--%>
<%--jQuery Cookie操作插件--%>
<script src="http://cdn.bootcss.com/jquery-cookie/1.4.1/jquery.cookie.min.js"></script>
<%--jQuery countDown倒计时插件--%>
<script src="http://cdn.bootcss.com/jquery.countdown/2.1.0/jquery.countdown.min.js"></script>

<script src="/resource/script/seckill.js" type="text/javascript"></script>

<script type="text/javascript">
    $(function () {
        //使用EL表达式传入参数
        seckill.detail.init({
            seckillId:${seckill.seckillId},
            startTime:${seckill.startTime.time},//毫秒
            endTime:${seckill.endTime.time}
        });
    })
</script>
</html>
common文件夹下head.jsp:
<meta name="viewport" content="width=device-width, initial-scale=1.0">
<meta charset="utf-8">
<!-- æ° Bootstrap æ ¸å¿ CSS æ件 -->
<link href="http://apps.bdimg.com/libs/bootstrap/3.3.0/css/bootstrap.min.css" rel="stylesheet">
<!-- å¯éçBootstrap主é¢æ件ï¼ä¸è¬ä¸ä½¿ç¨ï¼ -->
<link href="http://apps.bdimg.com/libs/bootstrap/3.3.0/css/bootstrap-theme.min.css" rel="stylesheet">
<!-- HTML5 Shim å Respond.js ç¨äºè®© IE8 æ¯æ HTML5å
ç´ ååªä½æ¥è¯¢ -->
<!-- 注æï¼ å¦æéè¿ file:// å¼å
¥ Respond.js æ件ï¼å该æ件æ æ³èµ·ææ -->
<!--[if lt IE 9]>
<script src="https://oss.maxcdn.com/libs/html5shiv/3.7.0/html5shiv.js"></script>
<script src="https://oss.maxcdn.com/libs/respond.js/1.3.0/respond.min.js"></script>
<![endif]-->
common文件夹下tag.jsp:
<%@taglib prefix="c" uri="http://java.sun.com/jsp/jstl/core" %>
<%@taglib prefix="fmt" uri="http://java.sun.com/jsp/jstl/fmt" %>
<%@taglib prefix="fn" uri="http://java.sun.com/jsp/jstl/functions" %>
运行时出现404错误,原因如下:
我用的Eclipse,和老师用的IDEA不一样,我的项目跑起来的路径是:http://localhost:8080/myseckill/
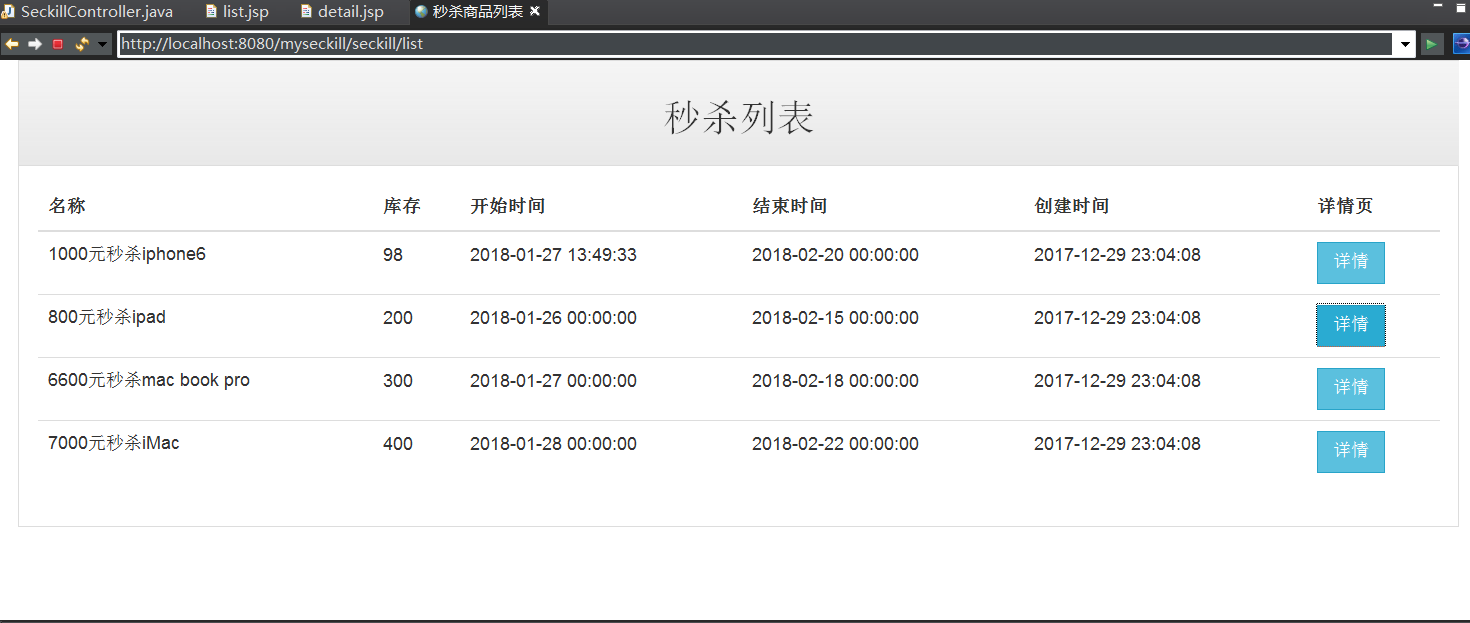
http://localhost:8080/myseckill/seckill/list 就是列表页。
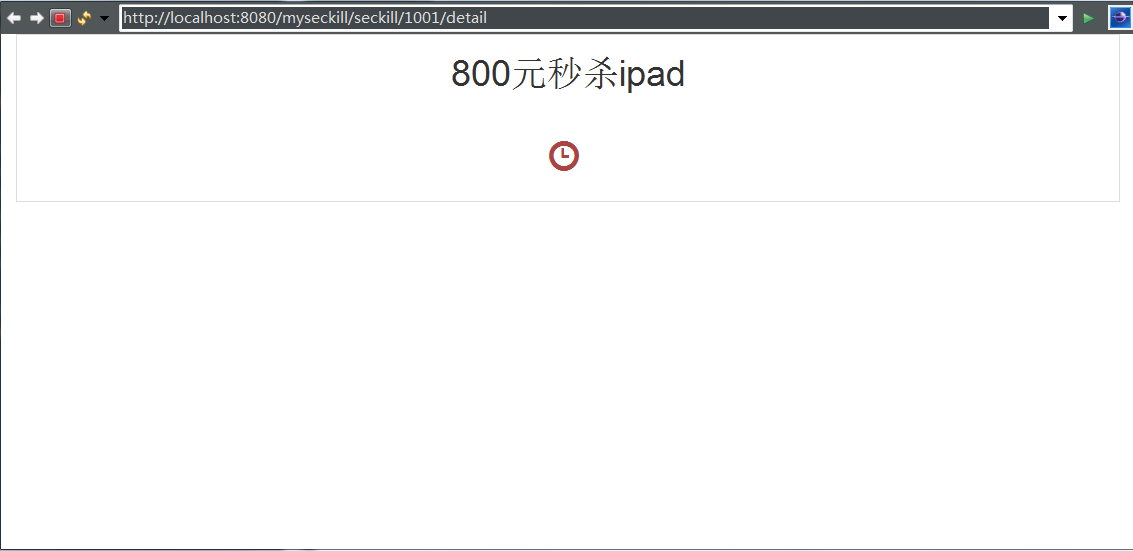
http://localhost:8080/myseckill/seckill/1000/detail 就是详情页。
老师的http://localhost:8080/seckill/list 才是详情页,不包含项目名称
将详情页超链接href="/seckill/${sk.seckillId}/detail"改为href="/myseckill/seckill/${sk.seckillId}/detail"
运行成功页面如下
第5章 交互逻辑编程
在webapp下新建/resource/script/seckill.js
41//存放主要交互逻辑的js代码
// javascript 模块化(package.类.方法)

var seckill = {

    //封装秒杀相关ajax的url
    URL: {
        now: function () {
            return '/myseckill/seckill/time/now';
        },
        exposer: function (seckillId) {
            return '/myseckill/seckill/' + seckillId + '/exposer';
        },
        execution: function (seckillId, md5) {
            return '/myseckill/seckill/' + seckillId + '/' + md5 + '/execution';
        }
    },

    //验证手机号
    validatePhone: function (phone) {
        if (phone && phone.length == 11 && !isNaN(phone)) {
            return true;//直接判断对象会看对象是否为空,空就是undefine就是false; isNaN 非数字返回true
        } else {
            return false;
        }
    },

    //详情页秒杀逻辑
    detail: {
        //详情页初始化
        init: function (params) {
            //手机验证和登录,计时交互
            //规划我们的交互流程
            //在cookie中查找手机号
            var userPhone = $.cookie('killPhone');
            //验证手机号
            if (!seckill.validatePhone(userPhone)) {
                //绑定手机 控制输出
                var killPhoneModal = $('#killPhoneModal');
                killPhoneModal.modal({
                    show: true,//显示弹出层
                    backdrop: 'static',//禁止位置关闭
                    keyboard: false//关闭键盘事件
                });

                $('#killPhoneBtn').click(function () {
                    var inputPhone = $('#killPhoneKey').val();
                    console.log("inputPhone: " + inputPhone);
                    if (seckill.validatePhone(inputPhone)) {
                        //电话写入cookie(7天过期)
                        $.cookie('killPhone', inputPhone, {expires: 7, path: '/myseckill/seckill'});
                        //验证通过  刷新页面
                        window.location.reload();
                    } else {
                        //todo 错误文案信息抽取到前端字典里
                        $('#killPhoneMessage').hide().html('<label class="label label-danger">手机号错误!</label>').show(300);
                    }
                });
            }

            //已经登录
            //计时交互
            var startTime = params['startTime'];
            var endTime = params['endTime'];
            var seckillId = params['seckillId'];
            $.get(seckill.URL.now(), {}, function (result) {
                if (result && result['success']) {
                    var nowTime = result['data'];
                    //时间判断 计时交互
                    seckill.countDown(seckillId, nowTime, startTime, endTime);
                } else {
                    console.log('result: ' + result);
                    alert('result: ' + result);
                }
            });
        }
    },

    handlerSeckill: function (seckillId, node) {
        //获取秒杀地址,控制显示器,执行秒杀
        node.hide().html('<button class="btn btn-primary btn-lg" id="killBtn">开始秒杀</button>');

        $.get(seckill.URL.exposer(seckillId), {}, function (result) {
            //在回调函数种执行交互流程
            if (result && result['success']) {
                var exposer = result['data'];
                if (exposer['exposed']) {
                    //开启秒杀
                    //获取秒杀地址
                    var md5 = exposer['md5'];
                    var killUrl = seckill.URL.execution(seckillId, md5);
                    console.log("killUrl: " + killUrl);
                    //绑定一次点击事件
                    $('#killBtn').one('click', function () {
                        //执行秒杀请求
                        //1.先禁用按钮
                        $(this).addClass('disabled');//,<-$(this)===('#killBtn')->
                        //2.发送秒杀请求执行秒杀
                        $.post(killUrl, {}, function (result) {
                            if (result && result['success']) {
                                var killResult = result['data'];
                                var state = killResult['state'];
                                var stateInfo = killResult['stateInfo'];
                                //显示秒杀结果
                                node.html('<span class="label label-success">' + stateInfo + '</span>');
                            }
                        });
                    });
                    node.show();
                } else {
                    //未开启秒杀(浏览器计时偏差)
                    var now = exposer['now'];
                    var start = exposer['start'];
                    var end = exposer['end'];
                    seckill.countDown(seckillId, now, start, end);
                }
            } else {
                console.log('result: ' + result);
            }
        });

    },

    countDown: function (seckillId, nowTime, startTime, endTime) {
        console.log(seckillId + '_' + nowTime + '_' + startTime + '_' + endTime);
        var seckillBox = $('#seckill-box');
        if (nowTime > endTime) {
            //秒杀结束
            seckillBox.html('秒杀结束!');
        } else if (nowTime < startTime) {
            //秒杀未开始,计时事件绑定
            var killTime = new Date(startTime + 1000);//todo 防止时间偏移
            seckillBox.countdown(killTime, function (event) {
                //时间格式
                var format = event.strftime('秒杀倒计时: %D天 %H时 %M分 %S秒 ');
                seckillBox.html(format);
            }).on('finish.countdown', function () {
                //时间完成后回调事件
                //获取秒杀地址,控制现实逻辑,执行秒杀
                console.log('______fininsh.countdown');
                seckill.handlerSeckill(seckillId, seckillBox);
            });
        } else {
            //秒杀开始
            seckill.handlerSeckill(seckillId, seckillBox);
        }
    }

}
遇到的问题:
1.无法弹出手机号输入框
发现seckill.js加载失败,但程序并未报错

把<script src="/resource/script/seckill.js" type="text/javascript"></script>修改为
<script src="/myseckill/resource/script/seckill.js" type="text/javascript"></script>
老师使用的IDEA与eclipse的路径不同
2.输入手机号后还是一直弹出手机号输入框
seckill.js逻辑中登入成功会刷新页面,猜想应该是cookie写入失败,刷新后认为是新用户
将seckill.js中$.cookie('userPhone', inputPhone, {expires: 7, path: '/seckill'});修改为
$.cookie('userPhone', inputPhone, {expires: 7, path: '/myseckill/seckill'});
path中加入项目名,不然写不进去cookie
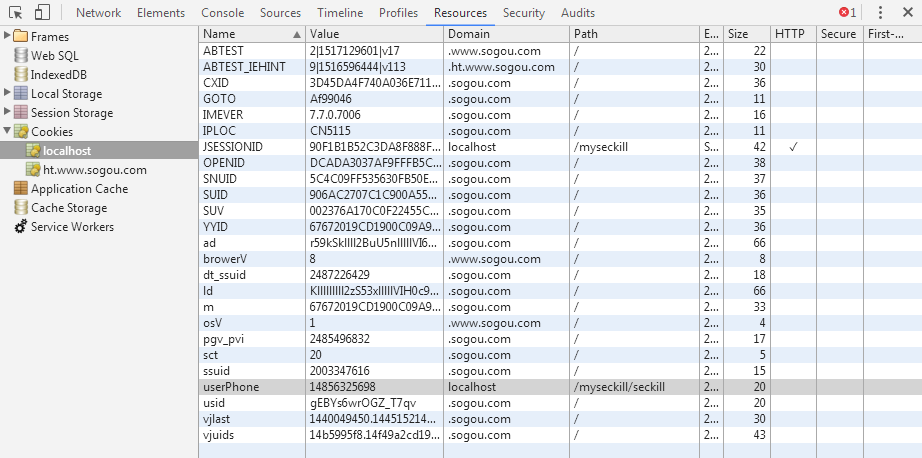
cookie写入成功,不再重复要求登录(输入手机号)
3./time/now 404错误

修改路径无效
发现原因是web层SeckillController中没有加入@ResponseBody注解
@RequestMapping(value="/time/now",method=RequestMethod.GET)
    @ResponseBody
    public SeckillResult<Long> time(){
        Date now = new Date();
        return new SeckillResult<Long>(true, now.getTime());
    }
测试成功:
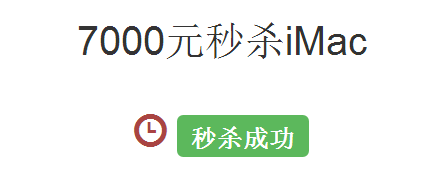
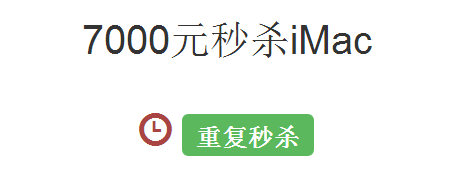
但不能显示重复秒杀结果
将SeckillController中execute方法中的false都改为true,因为seckill.js中当success的值为true时才输出结果
public class SeckillResult<T> {

    private boolean success;   //标识,判断请求是否成功而不是秒杀是否成功
if (result && result['success']) {
                                var killResult = result['data'];
                                var state = killResult['state'];
                                var stateInfo = killResult['stateInfo'];
                                //显示秒杀结果
                                node.html('<span class="label label-success">' + stateInfo + '</span>');
这样,当出现异常(包括我们允许的异常)时,也算请求成功
public SeckillResult<SeckillExecution> execute(@PathVariable("seckillId") Long seckillId,
                                                   @PathVariable("md5")String md5,
                                                   @CookieValue(value = "killPhone",required = false)Long phone){

        if(phone == null) {
            return new SeckillResult<SeckillExecution>(false,"未注册");
        }

        SeckillResult<SeckillExecution> result;
        try {
            SeckillExecution execution = seckillService.executeSeckill(seckillId, phone, md5);
            return new SeckillResult<SeckillExecution>(true, execution);
        } catch (SeckillCloseException e) {
            //SeckillCloseException和RepeatKillException是允许的异常
            SeckillExecution execution = new SeckillExecution(seckillId, SeckillStatEnum.END);
            return new SeckillResult<SeckillExecution>(true, execution);

        } catch (RepeatKillException e) {
            SeckillExecution execution = new SeckillExecution(seckillId, SeckillStatEnum.REPEAT_KILL);
            return new SeckillResult<SeckillExecution>(true, execution);

        } catch (Exception e) {
            logger.error(e.getMessage(), e);
            //其他所有未知异常算作INNER_ERROR
            SeckillExecution execution = new SeckillExecution(seckillId, SeckillStatEnum.INNER_ERROR);
            return new SeckillResult<SeckillExecution>(true, execution);
        }

    }
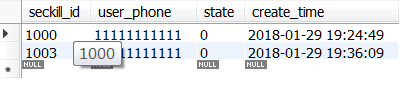
成功显示结果
mysql中也相应进行了减库存操作
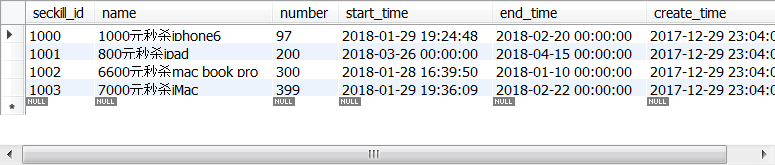
success_killed成功秒杀明细: