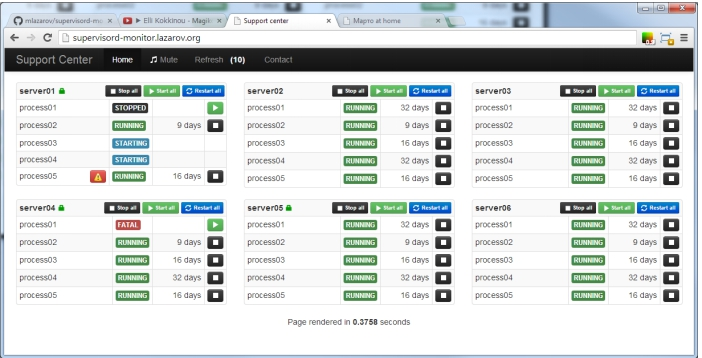
Supervisor(http://supervisord.org/)C/S架构的进程控制系统,是用Python开发的一个client/server服务,是Linux/Unix系统下的一个进程管理工具,基于linux操作系统的一款服务器管理工具,不支持Windows系统。
用以监控服务器的运行,发现问题能立即自动预警及自动重启等功能。
Supervisor类似于monit,
monit和supervisor的一个比较大的差异是supervisor管理的进程必须由supervisor来启动,
monit可以管理已经在运行的程序;
supervisor还要求管理的程序是非daemon程序,supervisord会帮你把它转成daemon程序,
因此如果用supervisor来管理nginx的话,必须在nginx的配置文件里添加一行设置daemon off让nginx以非daemon方式启动。
因为Supervisor是Python开发的,安装前先检查一下系统否安装了Python2.4以上版本。下面以CentOS7,Python2.7版本环境下,介绍Supervisor的安装与配置步聚:
1.2安装Python包管理工具(easy_install)
easy_install是setuptools包里带的一个命令,使用easy_install实际上是在调用setuptools来完成安装模块的工作,所以安装setuptools即可。
wget --no-check-certificate https://bootstrap.pypa.io/ez_setup.py -O - | sudo python
或者
yum install python-setuptools -y
下载supervisor的网址
https://pypi.python.org/pypi/supervisor/
wget https://pypi.python.org/packages/31/7e/788fc6566211e77c395ea272058eb71299c65cc5e55b6214d479c6c2ec9a/supervisor-3.3.3.tar.gz
1.3安装supervisor
easy_install supervisor
supervisor安装完成后会生成三个执行程序:
1.supervisord : supervisor的守护进程服务(用于接收进程管理命令)
2.supervisorctl : 客户端(用于和守护进程通信,发送管理进程的指令)
3.echo_supervisord_conf : 生成初始配置文件程序。
1.4配置
运行supervisord服务的时候,需要指定supervisor配置文件,如果没有显示指定,默认在以下目录查找:
$CWD/supervisord.conf
$CWD/etc/supervisord.conf
/etc/supervisord.conf
/etc/supervisor/supervisord.conf (since Supervisor 3.3.0)
../etc/supervisord.conf (Relative to the executable)
../supervisord.conf (Relative to the executable)
$CWD表示运行supervisord程序的目录。
可以通过运行echo_supervisord_conf程序生成supervisor的初始化配置文件,如下所示:
mkdir -p /etc/supervisor/conf.d
echo_supervisord_conf > /etc/supervisor/supervisord.conf
1.5配置文件参数说明
supervisor的配置参数较多,下面介绍一下常用的参数配置,详细的配置及说明,请参考官方文档介绍。
注:分号(;)开头的配置表示注释
[unix_http_server]
file=/tmp/supervisor.sock ;UNIX socket 文件,supervisorctl 会使用
;chmod=0700 ;socket文件的mode,默认是0700
;chown=nobody:nogroup ;socket文件的owner,格式:uid:gid
;[inet_http_server] ;HTTP服务器,提供web管理界面
;port=127.0.0.1:9001 ;Web管理后台运行的IP和端口,如果开放到公网,需要注意安全性
;username=user ;登录管理后台的用户名
;password=123 ;登录管理后台的密码
[supervisord]
logfile=/tmp/supervisord.log ;日志文件,默认是 $CWD/supervisord.log
logfile_maxbytes=50MB ;日志文件大小,超出会rotate,默认 50MB,如果设成0,表示不限制大小
logfile_backups=10 ;日志文件保留备份数量默认10,设为0表示不备份
loglevel=info ;日志级别,默认info,其它: debug,warn,trace
pidfile=/tmp/supervisord.pid ;pid 文件
nodaemon=false ;是否在前台启动,默认是false,即以 daemon 的方式启动
minfds=1024 ;可以打开的文件描述符的最小值,默认 1024
minprocs=200 ;可以打开的进程数的最小值,默认 200
[supervisorctl]
serverurl=unix:///tmp/supervisor.sock ;通过UNIX socket连接supervisord,路径与unix_http_server部分的file一致
;serverurl=http://127.0.0.1:9001 ; 通过HTTP的方式连接supervisord
; [program:xx]是被管理的进程配置参数,xx是进程的名称
[program:xx]
command=/opt/apache-tomcat-8.0.35/bin/catalina.sh run ; 程序启动命令
directory=/opt/apache-tomcat-8.0.35/bin/ ;#设置命令执行目录
autostart=true ; 在supervisord启动的时候也自动启动
startsecs=10 ; 启动10秒后没有异常退出,就表示进程正常启动了,默认为1秒
autorestart=true ; 程序退出后自动重启,可选值:[unexpected,true,false],默认为unexpected,表示进程意外杀死后才重启
startretries=3 ; 启动失败自动重试次数,默认是3
user=tomcat ; 用哪个用户启动进程,默认是root
priority=999 ; 进程启动优先级,默认999,值小的优先启动
redirect_stderr=true ; 把stderr重定向到stdout,默认false
stdout_logfile_maxbytes=20MB ; stdout 日志文件大小,默认50MB
stdout_logfile_backups = 20 ; stdout 日志文件备份数,默认是10
; stdout 日志文件,需要注意当指定目录不存在时无法正常启动,所以需要手动创建目录(supervisord 会自动创建日志文件)
stdout_logfile=/opt/apache-tomcat-8.0.35/logs/catalina.out
stopasgroup=false ;默认为false,进程被杀死时,是否向这个进程组发送stop信号,包括子进程
killasgroup=false ;默认为false,向进程组发送kill信号,包括子进程
;包含其它配置文件
[include]
files = relative/directory/*.ini ;可以指定一个或多个以.ini结束的配置文件
1.6配置管理进程
进程管理配置参数,不建议全都写在supervisord.conf文件中,应该每个进程写一个配置文件放在include指定的目录下包含进supervisord.conf文件中。
1> 创建/etc/supervisor/conf.d目录,用于存放进程管理的配置文件
2> 修改/etc/supervisor/supervisord.conf中的include参数,将/etc/supervisor/conf.d目录添加到include中
[include]
files = /etc/supervisor/conf.d/*.conf
下面是配置Tomcat进程的一个例子:
vim /etc/supervisor/conf.d/tomcat.conf
[program:tomcat]
command=/opt/apache-tomcat-8.0.35/bin/catalina.sh run
stdout_logfile=/opt/apache-tomcat-8.0.35/logs/catalina.out
autostart=true
autorestart=true
startsecs=5
priority=1
stopasgroup=true
killasgroup=true
实例二:
supervisord.conf
[supervisord]
nodaemon=true #前台进行模式
[program:nginx]
#command=nginx -g "daemon off;"
command=/etc/init.d/nginx start
[program:ssh]
command=/etc/init.d/ssh start
[program:serverinfo]
command=python manage.py runserver 0.0.0.0:8080 #设置执行的命令
directory=/data/www/serverinfo #设置命令执行目录
stdout_logfile=/var/log/serverinfo.log #设置日志文件
autostart=true #是否随supervisord进程启动而启动,包括reloadconf
autorestart=true #当挂掉后,自动重启
redirect_stderr=true #是否重定向std err
stopsignal=QUIT #被监控程序kill的信号
1.7启动Supervisor服务
supervisord -c /etc/supervisor/supervisord.conf
线上/etc/supervisor的supervisord.conf配置文件和子配置文件链接:
1.8 控制进程
1.8.1交互终端
supervisord启动成功后,可以通过supervisorctl客户端控制进程,启动、停止、重启。运行supervisorctl命令,不加参数,会进入supervisor客户端的交互终端,并会列出当前所管理的所有进程。
上图中的tomcat就是我们在配置文件中[program:tomcat]指定的名字。
输入help可以查看可以执行的命令列表,如果想看某个命令的作用,运行help 命令名称,如:help stop
stop tomcat // 表示停止tomcat进程
stop all // 表示停止所有进程
// ...
1.8.2 bash终端
supervisorctl status
supervisorctl stop tomcat
supervisorctl start tomcat
supervisorctl restart tomcat
supervisorctl reread
supervisorctl update
1.8.3 Web管理界面

出于安全考虑,默认配置是没有开启web管理界面,需要修改supervisord.conf配置文件打开http访权限,将下面的配置:
;[inet_http_server] ; inet (TCP) server disabled by default
;port=127.0.0.1:9001 ; (ip_address:port specifier, *:port for all iface)
;username=user ; (default is no username (open server))
;password=123 ; (default is no password (open server))
修改成:
[inet_http_server] ; inet (TCP) server disabled by default
port=10.0.0.101:9001 ; (ip_address:port specifier, *:port for all iface)
username=user ; (default is no username (open server))
password=123 ; (default is no password (open server))
port:绑定访问IP和端口,这里是绑定的是本地IP和9001端口
username:登录管理后台的用户名
password:登录管理后台的密码
1.8.4 常见启动报错
[root@ sfaapp9 logs]# supervisorctl
dealer-update-38021-8055-99 FATAL Exited too quickly (process log may have details)
[root@ sfaapp9 conf.d]# killall java
[root@ sfaapp9 conf.d]# ps -ef|grep sup
root 16928 1 0 22:21 ? 00:00:00 /usr/bin/python /usr/bin/supervisord -c /etc/supervisor/supervisord.conf
root 17109 15876 0 22:42 pts/3 00:00:00 grep sup
[root@ sfaapp9 conf.d]# kill -9 16928
[root@ sfaapp9 conf.d]# /etc/init.d/supervisord start
此报错,要关掉所有supervisor管理的进程和supervisor本身进程,然后重启启动supervisor。
[root@ sfaapp9 conf.d]# pwd
1.9开机启动Supervisor服务
1.9.1配置systemctl服务
1. 进入/lib/systemd/system目录,并创建supervisor.service文件
[Unit]
Description=supervisor
After=network.target
[Service]
Type=forking
ExecStart=/usr/bin/supervisord -c /etc/supervisor/supervisord.conf
ExecStop=/usr/bin/supervisorctl $OPTIONS shutdown
ExecReload=/usr/bin/supervisorctl $OPTIONS reload
KillMode=process
Restart=no
RestartSec=42s
[Install]
WantedBy=multi-user.target
2. 设置开机启动
systemctl enable supervisor.service
systemctl daemon-reload
3. 修改文件权限为766
chmod 766 supervisor.service
1.9.2配置service类型服务
vim /etc/rc.d/init.d/supervisord
#!/bin/bash
#
# supervisord This scripts turns supervisord on
#
# Author: Mike McGrath <mmcgrath@redhat.com> (based off yumupdatesd)
#
# chkconfig: - 95 04
#
# description: supervisor is a process control utility. It has a web based
# xmlrpc interface as well as a few other nifty features.
# processname: supervisord
# config: /etc/supervisor/supervisord.conf
# pidfile: /var/run/supervisord.pid
#
# source function library
. /etc/rc.d/init.d/functions
RETVAL=0
start() {
echo -n $"Starting supervisord: "
daemon "supervisord -c /etc/supervisor/supervisord.conf "
RETVAL=$?
echo
[ $RETVAL -eq 0 ] && touch /var/lock/subsys/supervisord
}
stop() {
echo -n $"Stopping supervisord: "
killproc supervisord
echo
[ $RETVAL -eq 0 ] && rm -f /var/lock/subsys/supervisord
}
restart() {
stop
start
}
case "$1" in
start)
start
;;
stop)
stop
;;
restart|force-reload|reload)
restart
;;
condrestart)
[ -f /var/lock/subsys/supervisord ] && restart
;;
status)
status supervisord
RETVAL=$?
;;
*)
echo $"Usage: $0 {start|stop|status|restart|reload|force-reload|condrestart}"
exit 1
esac
exit $RETVAL
将上述脚本内容保存到/etc/rc.d/init.d/supervisor文件中,修改文件权限为755,并设置开机启动
chmod 755 /etc/rc.d/init.d/supervisord
chkconfig supervisord on
注意:修改脚本中supervisor配置文件路径为你的supervisor的配置文件路径/sup
第2章 supervisor-monitor多服务器管理工具

2.1安装 PHP
注意: supervisor-monitor 需要搭建php环境
搭建php环境
[root@ lb01 ~]#
yum install -y php-fpm
并加入开机自启动
chkconfig php-fpm on
启动php-fpm
/etc/init.d/php-fpm start
2.2安装 Supervisor-monitor
[root@ lb01 ~]#
cd /opt
git clone https://github.com/mlazarov/supervisord-monitor
cd /opt/supervisord-monitor/application/config
复制一份配置文件
cp supervisor.php.example supervisor.php
vim /opt/supervisord-monitor/application/config/supervisor.php
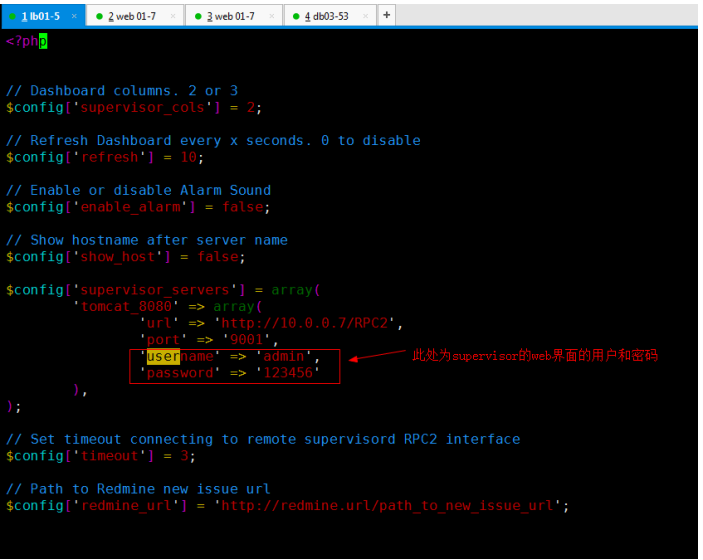
主要修改
$config['supervisor_servers'] = array(
'tomcat_8080' => array(
'url' => 'http://10.0.0.7/RPC2',
'port' => '9001',
'username' => 'admin',
'password' => '123456'
),
);

线上supervisor.php配置文件链接:
2.3nginx配置,使nginx支持php
如果supervisor-monitor安装在代理服务器nginx上,需配置如下:
[root@ lb01 ext]# pwd
/application/nginx/conf/ext
[root@ lb01 ext]# vi supervisor.conf
server {
listen 80;
server_name 10.0.0.5 www.supervisor.com;
root /opt/supervisord-monitor/public_html;
index index.html index.htm index.php;
access_log logs/supervisor_access.log;
error_log logs/supervisor_error.log error;
if ($query_string ~* ".*('|--|union|insert|drop|truncate|update|from|grant|exec|where|select|and|or|count|chr|mid|like|iframe|script|alert|webscan|dbappsecurity|style|confirm|innerhtml|innertext|class).*")
{ return 500; }
location / {
auth_basic "input you user name and password";
auth_basic_user_file /application/nginx/conf/supervisor_passwd;
try_files $uri $uri/ /index.php;
}
location ~ .php$ {
try_files $uri =404;
include fastcgi.conf;
fastcgi_pass 127.0.0.1:9000;
}
}
nginx配置auth_basic 本机认证
yum -y install httpd-tools
[root@ lb01 conf]# htpasswd -c /application/nginx/conf/supervisor_passwd wanjiaji
New password:123456
Re-type new password:123456
Adding password for user wanjiaji
[root@ lb01 conf]# cat /application/nginx/conf/supervisor_passwd
wanjiaji:SWs7bjYdd66xQ
chmod 400 /application/nginx/conf/supervisor_passwd
chown -R nginx.nginx /application/nginx/conf/supervisor_passwd
配置完后,重启nginx

