如果你熟悉avalon,使用过 data-include-rendered 和 data-include-loaded 等回调方法,那么你会很好地理解React组件的各个生命周期。
说白了其实就是React组件状态变化前后的时间点,我们可以利用生命周期的接口在相应的时间点做回调操作。
React的官方文档提及了如下几个组件的生命周期:
Mounting/组件挂载相关:
componentDidMount
Updating/组件更新相关:
shouldComponentUpdate
componentWillUpdate
componentDidUpdate
Unmounting/组件移除相关:
下面我们将通过一些实例来理解它们。顺便说下本文的示例都可以在我的github上下载到。

一. Mounting/组件挂载相关
componentWillMount
在组件挂载之前执行操作,但仅执行一次,即使多次重复渲染该组件,或者改变了组件的state:
<!DOCTYPE html>
<html>
<head lang="en">
    <meta charset="UTF-8">
    <title>componentWillMount</title>
    <script src="react.js"></script>
    <script src="JSXTransformer.js"></script>
</head>
<body>
<div id="a">123</div>
<script type="text/jsx">
    var i = 0;
    var Component1 = React.createClass({
        componentWillMount: function(){
            console.log(i++)
        },
        getInitialState: function() {
            return {
                isClick: !1
            }
        },
        clickCb: function() {
            this.setState({
                isClick : !0
            })
        },
        render: function() {
            return <div onClick={this.clickCb}>isClick:{this.state.isClick? 'yes' : 'nope'}</div>
        }
    });
    var div = document.getElementById('a');
    React.render(
        <Component1 />,div
    );
    React.render(
        <Component1 />,div
    );
</script>
</body>
</html>

如果希望该回调能执行多次,可以使用 React.unmountComponentAtNode(该方法我们下篇文章再介绍)移除掉已有的组件,然后再重新 render:


<!DOCTYPE html>
<html>
<head lang="en">
    <meta charset="UTF-8">
    <title>componentWillMount</title>
    <script src="react.js"></script>
    <script src="JSXTransformer.js"></script>
</head>
<body>
<div id="a">123</div>
<script type="text/jsx">
    var i = 0;
    var Component1 = React.createClass({
        componentWillMount: function(){
            console.log(i++)
        },
        getInitialState: function() {
            return {
                isClick: !1
            }
        },
        clickCb: function() {
            this.setState({
                isClick : !0
            })
        },
        render: function() {
            return <div onClick={this.clickCb}>isClick:{this.state.isClick? 'yes' : 'nope'}</div>
        }
    });
    var div = document.getElementById('a');
    React.render(
        <Component1 />,div
    );
    React.unmountComponentAtNode(div);  //移除掉已有组件
    React.render(
        <Component1 />,div
    );
</script>
</body>
</html>
可以看到输出了两行:

componentDidMount
顾名思义可以猜到这个是在组件初始化挂载之后执行的,比如我们可以利用它来隐藏掉页面的loading菊花层。
同 componentWillMount 一样,同一个组件重复渲染只执行一次,卸载组件后重新渲染可以重新触发一次:
<!DOCTYPE html>
<html>
<head lang="en">
    <meta charset="UTF-8">
    <title>componentDidMount</title>
    <script src="react.js"></script>
    <script src="JSXTransformer.js"></script>
</head>
<body>
<div id="a">123</div>
<div id="b">123</div>
<script type="text/jsx">
    var i = 0,
        div = document.getElementById('a'),
        div2 = document.getElementById('b');

    var Component1 = React.createClass({
        componentDidMount: function(){
            console.log(i++)
        },
        clickCb: function() {
            React.render(
                <Component1 />, div2
            );
        },
        render: function() {
            return <div onClick={this.clickCb}>点我给下一个div挂载组件</div>
        }
    });

    React.render(
        <Component1 />, div
    );
    //React.unmountComponentAtNode(div);  //移除掉已有组件
    React.render(
        <Component1 />, div
    );
</script>
</body>
</html>
注意上述代码点击div1时会将组件挂载到div2上,触发div2的组件的 componentDidMount 回调(毕竟div1和div2上的组件并非同一个)。
二. Updating/组件更新相关:
componentWillReceiveProps
<!DOCTYPE html>
<html>
<head lang="en">
    <meta charset="UTF-8">
    <title>componentWillReceiveProps</title>
    <script src="react.js"></script>
    <script src="JSXTransformer.js"></script>
</head>
<body>
<div id="a">123</div>
<div id="b">123</div>
<script type="text/jsx">
    var i = 0,
        div = document.getElementById('a'),
        div2 = document.getElementById('b');

    var Component1 = React.createClass({
        componentWillReceiveProps: function(){
            console.log(i++)
        },
        clickCb: function() {
            React.render(
                <Component1 />, div2
            );
        },
        render: function() {
            return <div onClick={this.clickCb}>点我给下一个div挂载组件</div>
        }
    });

    React.render(
        <Component1 />, div  //初始化不会触发componentWillReceiveProps
    );
    React.render(
            <Component1 />, div   //重复渲染会触发componentWillReceiveProps
    );
    React.unmountComponentAtNode(div);  //移除掉已有组件
    React.render(
        <Component1 />, div  //初始化不会触发componentWillReceiveProps
    );
</script>
</body>
</html>
注意我们移除掉组件再挂载的时候,相当于重新初始化渲染了组件(得到的props是初始化props而不是新props),故不会触发 componentWillReceiveProps 。
而当我们在div2挂载了组件后再点击div2来重新渲染它的组件,会触发 componentWillReceiveProps :

该接口带有一个参数 nextProps,我们可以利用它来获取新 props 的值(this.props 获取到的是当前的,也就是旧的 props):
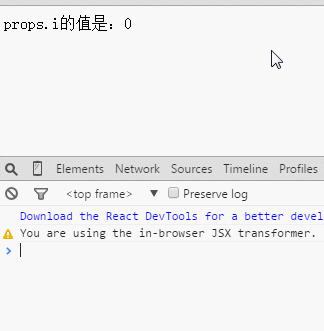
<!DOCTYPE html>
<html>
<head lang="en">
    <meta charset="UTF-8">
    <title>componentWillReceiveProps</title>
    <style>
        div:active{color:orangered;}
    </style>
    <script src="react.js"></script>
    <script src="JSXTransformer.js"></script>
</head>
<body>
<div id="a">123</div>
<script type="text/jsx">
    var i = 0,
        div = document.getElementById('a'),
        render = function(){
            React.render(
                    <Component1 i={i++} />, div
            );
        };

    var Component1 = React.createClass({
        componentWillReceiveProps: function(nextProps){
            console.log(this.props.i, nextProps.i)
        },
        render: function() {
            return <div onClick={render}>props.i的值是:{this.props.i}</div>
        }
    });
    render();
</script>
</body>
</html>
通过点击div1的组件,可以输出 componentWillReceiveProps 时间点(这时候还没重新执行渲染)的 props 以及即将获取到的新 props,执行如下:
shouldComponentUpdate
前面咱们学习的接口都是叫 componentXXX,而这个把 should 放在前面,翻译过来其实就是“是否应该XXX”的意思,那么可以把该接口直接理解为“组件是否应该做更新”的意思,即其了一个决定组件要不要重新渲染的作用。
该接口实际是在组件接收到了新的 props 或者新的 state 的时候(该时间点render还没执行哦)会立即调用,然后通过返回值(Boolean)来决定是否要重新渲染当前的组件。
该接口带有两个参数,第一个参数表示新的props,第二个参数表示新的state。
我们来个例子,比方要求div要点击3次之后,才重新渲染自身组件:
<!DOCTYPE html>
<html>
<head lang="en">
    <meta charset="UTF-8">
    <title>shouldComponentUpdate</title>
    <style>
        div:active{color:orangered;}
    </style>
    <script src="react.js"></script>
    <script src="JSXTransformer.js"></script>
</head>
<body>
<div id="a">123</div>
<script type="text/jsx">
    var div = document.getElementById('a');

    var Component1 = React.createClass({
        getInitialState: function(){
            return { i : 0 }
        },
        shouldComponentUpdate: function(nextProps, nextState){
            console.log( this.state.i, nextState.i );
            return nextState.i > 3 ? true : false; //返回true才会渲染组件
        },
        clickCb: function(){
            this.setState({
                i : this.state.i + 1
            })
        },
        render: function() {
            return <div onClick={this.clickCb}>state.i的值是:{this.state.i}</div>
        }
    });
    React.render(
            <Component1 />, div
    );
</script>
</body>
</html>
执行如下,点击第四次之后才会渲染组件,在div里显示出正确的新state.i:

componentWillUpdate
同 shouldComponentUpdate 一样,在组件收到新的 props 或者 state 的时候会立即调用,而且也有着俩个参数来获取新的 props 和 state。
不过本接口会在 shouldComponentUpdate 执行并返回了 true 的时候才会被调用。我们拿上一个代码示例做点小修改:
<!DOCTYPE html>
<html>
<head lang="en">
    <meta charset="UTF-8">
    <title>componentWillUpdate</title>
    <style>
        div:active{color:orangered;}
    </style>
    <script src="react.js"></script>
    <script src="JSXTransformer.js"></script>
</head>
<body>
<div id="a">123</div>
<script type="text/jsx">
    var div = document.getElementById('a');

    var Component1 = React.createClass({
        getInitialState: function(){
            return { i : 0 }
        },
        shouldComponentUpdate: function(nextProps, nextState){
            console.log( this.state.i, nextState.i );
            return nextState.i > 3 ? true : false; //返回true才会执行componentWillUpdate并重新渲染组件
        },
        componentWillUpdate: function(nextProps, nextState){
            console.log( 'yoyoyo', this.state.i, nextState.i );
        },
        clickCb: function(){
            this.setState({
                i : this.state.i + 1
            })
        },
        render: function() {
            return <div onClick={this.clickCb}>state.i的值是:{this.state.i}</div>
        }
    });
    React.render(
            <Component1 />, div
    );
</script>
</body>
</html>

利用这个接口,我们可以在组件要重新渲染之前做一些需要的改动。
componentDidUpdate
Did表示完成时状态,故该接口会在组件更新、重新渲染完毕了之后才触发,它和 componentWillUpdate 一样有着俩个参数来获取新的 props 和 state。
我们继续拿上一个例子来做修改:
<!DOCTYPE html>
<html>
<head lang="en">
    <meta charset="UTF-8">
    <title>componentDidUpdate</title>
    <style>
        div:active{color:orangered;}
    </style>
    <script src="react.js"></script>
    <script src="JSXTransformer.js"></script>
</head>
<body>
<div id="a">123</div>
<script type="text/jsx">
    var div = document.getElementById('a');

    var Component1 = React.createClass({
        getInitialState: function(){
            return { i : 0 }
        },
        shouldComponentUpdate: function(nextProps, nextState){
            console.log( this.state.i, nextState.i );
            return nextState.i > 3 ? true : false; //返回true才会执行componentWillUpdate并重新渲染组件
        },
        componentDidUpdate: function(nextProps, nextState){
            console.log( '已经渲染完毕咯', this.state.i, nextState.i );
        },
        componentWillUpdate: function(nextProps, nextState){
            console.log( '还没渲染哦', this.state.i, nextState.i );
        },
        clickCb: function(){
            this.setState({
                i : this.state.i + 1
            })
        },
        render: function() {
            return <div onClick={this.clickCb}>state.i的值是:{this.state.i}</div>
        }
    });
    React.render(
            <Component1 />, div
    );
</script>
</body>
</html>
执行如下:

三. Unmounting/组件移除相关:
componentWillUnmount
<!DOCTYPE html>
<html>
<head lang="en">
    <meta charset="UTF-8">
    <title>componentWillUnmount</title>
    <style>
        div:active{color:orangered;}
    </style>
    <script src="react.js"></script>
    <script src="JSXTransformer.js"></script>
</head>
<body>
<div id="a">123</div>
<div id="b"><p>这里是div2,点击我会移除上面div的组件</p></div>
<script type="text/jsx">
    var div = document.getElementById('a'),
        div2 = document.getElementById('b');

    var Component1 = React.createClass({
        DOMArr : [],
        getInitialState: function(){
            return { i : 0 }
        },
        componentDidUpdate: function(nextProps, nextState){
            var dom = document.createElement('p');
            dom.innerText = this.state.i;
            div2.appendChild(dom);
            this.DOMArr.push(dom);
        },
        componentWillUnmount: function(){
            if(!this.DOMArr.length) return;
            var i = 0;
            while(i < this.DOMArr.length){console.log(i);
                div2.removeChild(this.DOMArr[i++]); //移除componentDidUpdate里添加过的DOM
            }
        },
        clickCb: function(){
            this.setState({
                i : this.state.i + 1
            })
        },
        render: function() {
            return <div onClick={this.clickCb}>state.i的值是:{this.state.i}</div>
        }
    });
    React.render(
            <Component1 />, div
    );

    div2.addEventListener('click',function(){
        React.unmountComponentAtNode(div) //点击div2则卸载掉第一个div里的组件
    }, false)
</script>
</body>
</html>
执行如下:

四. getDefaultProps 和 getInitialState
在《React 引领未来的用户界面开发框架》一书中,还把 getDefaultProps 和 getInitialState 列入了组件生命周期的“实例化”阶段。
getDefaultProps
该方法是所有我们提及的方法中最先触发的,你可以在该方法里 return 一个对象来作为组件默认的Props值(当然如果父组件传进来了props,则以传进来的为主),它只在组件初次挂载到页面上时触发一次,即使你重新挂载了组件。
getInitialState
这个在第一篇文章的时候就介绍过了,它用于给组件初始化state的值,调用该方法要求必须 return 一个对象或者null,否则会报错。该方法在组件每次实例化(也就是挂载)的时候都会触发。
我们来段简单的代码辅助理解:
<!DOCTYPE html>
<html>
<head lang="en">
    <meta charset="UTF-8">
    <title>getDefaultProps 和 getInitialState</title>
    <style>
        div:active{color:orangered;}
    </style>
    <script src="react.js"></script>
    <script src="JSXTransformer.js"></script>
</head>
<body>
<div></div>
<div></div>
<script type="text/jsx">
    var diva = document.getElementsByTagName('div')[0],
            divb = document.getElementsByTagName('div')[1];
    var Component1 = React.createClass({
        getDefaultProps: function(){
            console.log('getDefaultProps');
            return { name : Date.now() }
        },
        getInitialState: function(){
            console.log('getInitialState');
            return null; //必须返回一个null或对象,否则会报错
        },

        render: function() {
            console.log(Date.now());
            return <div name={this.props.name}>我只是一个安静的div</div>
        }
    });
    React.render(
            {/* 触发一次 getDefaultProps 和 getInitialState */}
            <Component1 />, diva
    );
    React.render(
            {/* getDefaultProps 和 getInitialState都不触发 */}
            <Component1 />, diva
    );
    React.unmountComponentAtNode(diva);
    React.render(
            {/* 触发一次getInitialState */}
            <Component1 name="a"/>, diva
    );
    React.render(
            {/* 触发一次getInitialState */}
            <Component1/>, divb
    );
</script>
</body>
</html>
执行结果:

至此我们便学习完了React组件里的共九个声明周期的接口,最后出道题给大家思考下,下面的代码输出的顺序应该是什么呢:
<!DOCTYPE html>
<html>
<head lang="en">
    <meta charset="UTF-8">
    <title>题目</title>
    <style>
        div:active{color:orangered;}
    </style>
    <script src="react.js"></script>
    <script src="JSXTransformer.js"></script>
</head>
<body>
<script type="text/jsx">
    var Component1 = React.createClass({
        getDefaultProps: function(){
            console.log('getDefaultProps')
        },
        getInitialState: function(){
            console.log('getInitialState');
            return null
        },
        componentWillMount: function(){
            console.log('componentWillMount')
        },
        componentDidMount: function(){
            console.log('componentDidMount')
        },
        componentWillReceiveProps: function(){
            console.log('componentWillReceiveProps')
        },
        shouldComponentUpdate: function(){
            console.log('shouldComponentUpdate');
            return true;
        },
        componentWillUpdate: function(){
            console.log('componentWillUpdate')
        },
        componentDidUpdate: function(){
            console.log('componentDidUpdate')
        },
        componentWillUnmount: function(){
            console.log('componentWillUnmount')
        },
        render: function() {
            return <div>我只是一个安静的div</div>
        }
    });
    React.render(
            <Component1 />, document.body
    );
    React.render(
            <Component1 />, document.body
    );
    React.unmountComponentAtNode(document.body)
</script>
</body>
</html>
建议思考完了再往下滚动看答案吧,如果想不起来,可以翻到文章前面在回顾一下,多温习多思考,总是好习惯。
顺便再提一下,本文的全部示例都可以在我的github上下载到。
关于上方问题的答案如下:

最后建议大家多实践,不局限于看文章。也希望本文能对你有所帮助,共勉~