原文出自:http://www.cnblogs.com/liunanjava/p/4401089.html
一、Aware相关接口
对于应用程序来说,应该尽量减少对Sping Api的耦合程度,然而有些时候为了运用Spring所提供的一些功能,有必要让Bean了解Spring容器对其进行管理的细节信息,如让Bean知道在容器中是以哪个名称被管理的,或者让Bean知道BeanFactory或者ApplicationContext的存在,也就是让该Bean可以取得BeanFactory或者ApplicationContext的实例,如果Bean可以意识到这些对象,那么就可以在Bean的某些动作发生时,做一些如事件发布等操作。
1.1、Spring提供一些Aware接口:
beanNameAware接口:如果某个bean需要访问配置文件中本身bean的id属性,这个Bean类通过实现该接口,在依赖关系确定之后,初始化方法之前,提供回调自身的能力,从而获得本身bean的id属性,该接口提供了void setBeanName(String name)方法实现,需要指出的是该方法的name参数就是该bean的id属性,该setBeanName方法可以让bean获取得自身的id属性。
BeanFactoryAware接口:实现了BeanFactoryAware接口的bean,可以直接通过 beanfactory来访问spring的容器,当该bean被容器创建以后,会有一个相应的beanfactory的实例引用,该接口有一个方法void setBeanFactory(BeanFactory beanFactory),通过这个方法的参数创建它的BeanFactory实例,实现了BeanFactoryAware接口,就可以让Bean拥有访问Spring容器的能力。缺点:导致代码与spring的api耦合在一起,这种方式不推荐。
ApplicationContextAware接口:在Bean类被初始化后,将会被注入 applicationContext实例,该接口有一个方法,setApplicationContext(ApplicationContext context),使用其参数context用来创建它的applicationContext实例,缺点:导致代码与spring的api耦合在一起,这种方式不推荐。
1.2、beanNameAware接口:

package com.pb.entity;

import org.springframework.beans.factory.BeanNameAware;
/*
 * 实体类实现init方法和BeanNameAware接口
 */
public class Hello implements BeanNameAware{

    @Override
    public void setBeanName(String arg0) {
        System.out.println("回调setBeanName方法  id属性是"+arg0);

    }
    public void init(){
        System.out.println("正在执行初始化方法init");
    }

}
applicationContext.xml
<bean id="hello" class="com.pb.entity.Hello" init-method="init"></bean>
测试类:
package com.pb.demo;

import org.springframework.context.ApplicationContext;
import org.springframework.context.support.ClassPathXmlApplicationContext;

import com.pb.entity.Hello;

public class HelloTest {

    public static void main(String[] args) {
        ApplicationContext context=new ClassPathXmlApplicationContext("applicationContext.xml");
        Hello hello=context.getBean("hello",Hello.class);

    }

}
结果:
回调setBeanName方法  id属性是hello
正在执行初始化方法init
1.3、BeanFactoryAware接口:
package com.pb.entity;

import org.springframework.beans.BeansException;
import org.springframework.beans.factory.BeanFactory;
import org.springframework.beans.factory.BeanFactoryAware;
import org.springframework.beans.factory.BeanNameAware;
/*
 * 实体类实现init方法和BeanNameAware接口
 */
public class Hello implements BeanNameAware,BeanFactoryAware{
    private BeanFactory bf;
    @Override
    public void setBeanName(String arg0) {
        System.out.println("回调setBeanName方法  id属性是"+arg0);

    }
    public void init(){
        System.out.println("正在执行初始化方法init");
    }

    /*
     * 重写setBeanFactory方法
     * @see org.springframework.beans.factory.BeanFactoryAware#setBeanFactory(org.springframework.beans.factory.BeanFactory)
     */
    @Override
    public void setBeanFactory(BeanFactory arg0) throws BeansException {
        this.bf=arg0;

    }
    public BeanFactory getBf() {
        return bf;
    }


}
配置文件不变
测试类:
package com.pb.demo;

import org.springframework.context.ApplicationContext;
import org.springframework.context.support.ClassPathXmlApplicationContext;

import com.pb.entity.Hello;

public class HelloTest {

    public static void main(String[] args) {
        ApplicationContext context=new ClassPathXmlApplicationContext("applicationContext.xml");
        Hello hello=context.getBean("hello",Hello.class);
        System.out.println("得到beanFactory对象 "+hello.getBf());

    }

}
结果:
回调setBeanName方法  id属性是hello
正在执行初始化方法init
得到beanFactory对象 org.springframework.beans.factory.support.DefaultListableBeanFactory@3dc0bb: defining beans [hello]; root of factory hierarchy
1.4、ApplicationContextAware接口:
package com.pb.entity;

import org.springframework.beans.BeansException;
import org.springframework.beans.factory.BeanFactory;
import org.springframework.beans.factory.BeanFactoryAware;
import org.springframework.beans.factory.BeanNameAware;
import org.springframework.context.ApplicationContext;
import org.springframework.context.ApplicationContextAware;
/*
 * 实体类实现init方法和BeanNameAware接口
 */
public class Hello implements BeanNameAware,BeanFactoryAware,ApplicationContextAware{
    private BeanFactory bf;
    private ApplicationContext context;
    @Override
    public void setBeanName(String arg0) {
        System.out.println("回调setBeanName方法  id属性是"+arg0);

    }
    public void init(){
        System.out.println("正在执行初始化方法init");
    }

    /*
     * 重写setBeanFactory方法
     * @see org.springframework.beans.factory.BeanFactoryAware#setBeanFactory(org.springframework.beans.factory.BeanFactory)
     */
    @Override
    public void setBeanFactory(BeanFactory arg0) throws BeansException {
        this.bf=arg0;

    }
    public BeanFactory getBf() {
        return bf;
    }
    @Override
    public void setApplicationContext(ApplicationContext arg0)
            throws BeansException {
        this.context=arg0;

    }
    public ApplicationContext getContext() {
        return context;
    }


}
配置文件不变
测试类
package com.pb.demo;

import org.springframework.context.ApplicationContext;
import org.springframework.context.support.ClassPathXmlApplicationContext;

import com.pb.entity.Hello;

public class HelloTest {

    public static void main(String[] args) {
        ApplicationContext context=new ClassPathXmlApplicationContext("applicationContext.xml");
        Hello hello=context.getBean("hello",Hello.class);
        System.out.println("得到beanFactory对象 "+hello.getBf());
        System.out.println("得到的applicationContext对象:"+hello.getContext());

    }

}
结果:
回调setBeanName方法  id属性是hello
正在执行初始化方法init
得到beanFactory对象 org.springframework.beans.factory.support.DefaultListableBeanFactory@3dc0bb: defining beans [hello]; root of factory hierarchy
得到的applicationContext对象:org.springframework.context.support.ClassPathXmlApplicationContext@1d04653: startup date [Wed Apr 08 00:43:06 CST 2015]; root of context hierarchy
二、BeanPostProcessor类 和BeanFactoryPostProcessor
对容器中的Bean进行处理
实现BeanPostProcessor接口Bean后处理器
public Object postProcessAfterInitialization(Object arg0, String arg1);在bean初始化之后的操作
public Object postProcessBeforeInitialization(Object arg0, String arg1);在bean初始化之前的操作
第一个参数是初始化的Bean,第二个参数是Bean实例的名称
容器后处理器在容器实例化结束后,对容器进行额外的处理
必须实现BeanFactoryPostProcessor接口
public void postProcessBeanFactory(ConfigurableListableBeanFactory arg0)
Spring提供了很多后窗口处理器如:
PropertyPlaceholderConfigurer:属性占位符配置器
PropertyOverrideConfigurer:另外一种属性占位符配置器
两种的区别在于后面一种具有覆盖的性质。
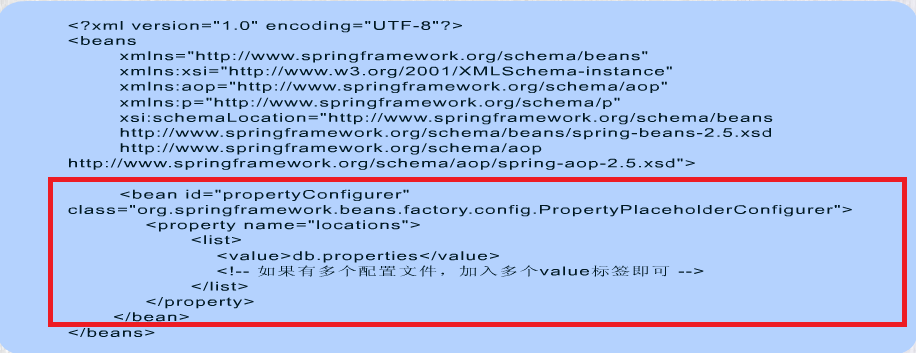
2.1、PropertyPlaceholderConfigurer
是spring内建PropertyEditor,它是beanFactoryPostProcess的实现类
作用:读取properties配置文件
通过该实现类可以将spring的配置文件某些属性值配置到properties文件中,从而只要有 properties的文件,spring的配置文件即可进行相应变动。
使用PropertyPlaceholderConfigure修改某个部分的属性时,不需要打开Spring配置文件,从而保证不会将新的错误引入到spring的配置文件中。
优点:可以从主xml配置文件中分离出部分的配置信息,可以支持多个配置文件,可以将配置文件分割成多个配置文件,从而降低修改配置文件的风险。
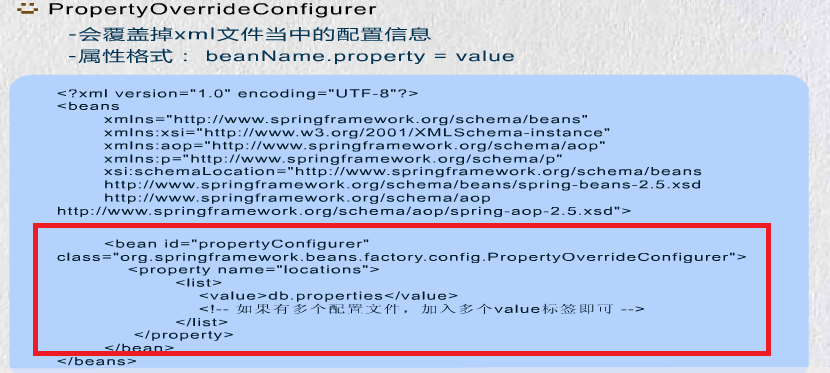
2.2、PropertyOverrideConfigurer
会覆盖掉XML文件中的配置信息,以.properties属性文件中的配置为主
如果没有配置PropertyOverrideConfigurer则使用XML中的配置信息
属性格式:
beanName.property=value
其中beanName是spring xml配置方便就近中的bean id属性,value是属性的值,对于多个properties文件,通过locations属性来进行指定
三、自定义属性编辑器
应用场景:
类型无法识别,如日期等
实现
继承PropertyEditorSupport
重写setAsText()方法
package com.pb.entity;

import java.util.Date;

public class AppDate {
    private Date date;

    public Date getDate() {
        return date;
    }

    public void setDate(Date date) {
        this.date = date;
    }


}
自定义编辑器
package com.pb.entity;

import java.beans.PropertyEditorSupport;
import java.text.ParseException;
import java.text.SimpleDateFormat;

public class CustomerProperty extends PropertyEditorSupport {
    private String format;

    @Override
    public void setAsText(String text) throws IllegalArgumentException {
        SimpleDateFormat sdf=new SimpleDateFormat(format);
        //super.setAsText(text);
        try {
            //转换对象,能过setValue方法重新赋值
            this.setValue(sdf.parse(text));
        } catch (ParseException e) {
            e.printStackTrace();
        }
    }

    public String getFormat() {
        return format;
    }

    public void setFormat(String format) {
        this.format = format;
    }


}
applicationContext.xml
<?xml version="1.0" encoding="UTF-8"?>
<beans xmlns="http://www.springframework.org/schema/beans"
    xmlns:xsi="http://www.w3.org/2001/XMLSchema-instance" xmlns:p="http://www.springframework.org/schema/p"
    xsi:schemaLocation="http://www.springframework.org/schema/beans http://www.springframework.org/schema/beans/spring-beans-3.1.xsd">
    <!--定义bean的类为自定义编辑器 -->
    <bean class="org.springframework.beans.factory.config.CustomEditorConfigurer">
        <!-- 属性 -->
        <property name="customEditors">
            <!-- map -->
            <map>
                <!-- key为日期 -->
                <entry key="java.util.Date">
                    <!--配置map的value -->
                    <bean class="com.pb.entity.CustomerProperty">
                        <!-- 配置属性 -->
                        <property name="format" value="yyyy-MM-dd"></property>
                    </bean>
                </entry>
            </map>
        </property>
    </bean>
    <!--配置AppDate的bean  -->
<bean id="appDate" class="com.pb.entity.AppDate">
<property name="date">
<value>2014-4-8</value>
</property>
</bean>
</beans>
测试类:
package com.pb.demo;

import java.text.SimpleDateFormat;

import org.springframework.context.ApplicationContext;
import org.springframework.context.support.ClassPathXmlApplicationContext;

import com.pb.entity.AppDate;

public class Demo {

    /**
     * @param args
     */
    public static void main(String[] args) {
        ApplicationContext context=new ClassPathXmlApplicationContext("applicationContext.xml");
        AppDate appDate=context.getBean("appDate",AppDate.class);
        SimpleDateFormat sdf=new SimpleDateFormat("yyyy-MM-dd");
        System.out.println(sdf.format(appDate.getDate()));

    }

}
如果不定义自定义编辑器,日期类型是没有办法直接注入的