上文简要总结了一些AOP的基本概念,并在此基础上叙述了Spring AOP的基本原理,并且辅以一个简单例子帮助理解。从本文开始,我们要开始深入到源码层面来一探Spring AOP魔法的原理了。
要使用Spring AOP,第一步是要将这一功能开启,一般有两种方式:
- 通过xml配置文件的方式;
- 通过注解的方式;
1. 配置文件开启AOP功能
我们先来看一下配置文件的方式,这个上文也提到过,在xml文件中加上对应的标签,而且别忘了加上对应的名称空间(即下面的xmlns:aop。。。):
<?xml version="1.0" encoding="UTF-8"?>
<beans xmlns:xsi="http://www.w3.org/2001/XMLSchema-instance"
       xmlns="http://www.springframework.org/schema/beans"
       xmlns:aop = "http://www.springframework.org/schema/aop"
       xsi:schemaLocation="http://www.springframework.org/schema/beans
     http://www.springframework.org/schema/beans/spring-beans-4.0.xsd
     http://www.springframework.org/schema/aop
     http://www.springframework.org/schema/aop/spring-aop-3.0.xsd">

     <aop:aspectj-autoproxy/>

</beans>
这里是通过标签<aop:aspectj-autoproxy/>来完成开启AOP功能,这是一个自定义标签,需要自定义其解析,而这些spring都已经实现好了,前面专门写过一篇文章讲述spring是如何解析自定义xml标签的,我们这里大致回顾一下解析流程:
- 定义一个XML文件来描述你的自定义标签元素;
- 创建一个Handler,扩展自NamespaceHandlerSupport,用于注册下面的parser;
- 创建若干个BeanDefinitionParser的实现,用来解析XML文件中的定义;
- 将上述文件注册到Spring中,这里其实是做一下配置;
我们就不照着这个步骤来了,我们直接参考spring对这个自定义标签的解析过程,上面的4个步骤只是作为参考,在整个解析过程中都会涉及到。
前面讲解析自定义xml标签时候提到过,解析的流程大致如下:
- 首先会去获取自定义标签对应的名称空间;
- 然后根据名称空间找到对应的NamespaceHandler;
- 调用自定义的NamespaceHandler进行解析;
1.1 获取名称空间
这里<aop:aspectj-autoproxy/>对应的名称空间是什么呢?在上面的开启aop的配置文件里面名称空间那里给出了一些线索,其实就是下面这个:
http://www.springframework.org/schema/aop
至于名称空间的获取,也无甚好说的,其实就是直接调用org.w3c.dom.Node提供的相应方法来完成名称空间的提取。
1.2 获取handler
然后又是如何根据名称空间找到对应的NamespaceHandler呢?之前也说到过,在找对应的NamespaceHandler时会去META-INF/spring.handlers这个目录下加载资源文件,我们来找一下spring.handlers这个文件看看(需要去spring-aop对应的jar报下找):
http://www.springframework.org/schema/aop=org.springframework.aop.config.AopNamespaceHandler
看到没,这里是以key-value的形式维护着名称空间和对应handler的关系的,所以对应的handler就是这个AopNamespaceHandler。spring根据名称空间找到这个handler之后,会通过反射的方式将这个类加载,并缓存起来。
1.3 解析标签
上面的handler只有一个自定义的方法:
public void init() {
    // In 2.0 XSD as well as in 2.1 XSD.
    registerBeanDefinitionParser("config", new ConfigBeanDefinitionParser());
    registerBeanDefinitionParser("aspectj-autoproxy", new AspectJAutoProxyBeanDefinitionParser());
    registerBeanDefinitionDecorator("scoped-proxy", new ScopedProxyBeanDefinitionDecorator());

    // Only in 2.0 XSD: moved to context namespace as of 2.1
    registerBeanDefinitionParser("spring-configured", new SpringConfiguredBeanDefinitionParser());
}
这是一个初始化方法,在加载的时候会执行,主要作用就是注册一些解析器,这里我们主要关注AspectJAutoProxyBeanDefinitionParser,这就是我们要找的,它的作用就是解析<aop:aspectj-autoproxy/>标签的。主要流程就是,spring会调用上一步拿到的AopNamespaceHandler的parse()方法,在这个方法里面,会将解析的工作委托给AspectJAutoProxyBeanDefinitionParser来完成具体解析工作,我们就来看一下具体干了啥吧。
开始解析的工作从这里开始:
return handler.parse(ele, new ParserContext(this.readerContext, this, containingBd));
此时我们拿到的handler其实是我们自定义的AopNamespaceHandler了,但是它并没有实现parse()方法,所以这里这个应该是调用的父类(NamespaceHandlerSupport)中的parse()方法:
public BeanDefinition parse(Element element, ParserContext parserContext) {
    // 寻找解析器并进行解析操作
    return findParserForElement(element, parserContext).parse(element, parserContext);
}

private BeanDefinitionParser findParserForElement(Element element, ParserContext parserContext) {
    // 获取元素名称,也就是<aop:aspectj-autoproxy/>中的aspectj-autoproxy
    String localName = parserContext.getDelegate().getLocalName(element);
    // 根据aspectj-autoproxy找到对应的解析器,也就是在registerBeanDefinitionParser("aspectj-autoproxy", new AspectJAutoProxyBeanDefinitionParser());
    // 注册的解析器
    BeanDefinitionParser parser = this.parsers.get(localName);
    if (parser == null) {
        parserContext.getReaderContext().fatal(
            "Cannot locate BeanDefinitionParser for element [" + localName + "]", element);
    }
    return parser;
}
首先是寻找元素对应的解析器,然后调用其parse()方法。结合我们前面的示例,其实就是首先获取在AopNamespaceHandler类中的init()方法中注册对应的AspectJAutoProxyBeanDefinitionParser实例,并调用其parse()方法进行进一步解析:
public BeanDefinition parse(Element element, ParserContext parserContext) {
    AopNamespaceUtils.registerAspectJAnnotationAutoProxyCreatorIfNecessary(parserContext, element);
    extendBeanDefinition(element, parserContext);
    return null;
}

// 下面的代码在AopConfigUtils中
public static void registerAspectJAnnotationAutoProxyCreatorIfNecessary(
        ParserContext parserContext, Element sourceElement) {

    BeanDefinition beanDefinition = AopConfigUtils.registerAspectJAnnotationAutoProxyCreatorIfNecessary(
            parserContext.getRegistry(), parserContext.extractSource(sourceElement));
    useClassProxyingIfNecessary(parserContext.getRegistry(), sourceElement);
    registerComponentIfNecessary(beanDefinition, parserContext);
}

public static BeanDefinition registerAspectJAnnotationAutoProxyCreatorIfNecessary(BeanDefinitionRegistry registry, Object source) {
    return registerOrEscalateApcAsRequired(AnnotationAwareAspectJAutoProxyCreator.class, registry, source);
}

private static BeanDefinition registerOrEscalateApcAsRequired(Class cls, BeanDefinitionRegistry registry, Object source) {
    Assert.notNull(registry, "BeanDefinitionRegistry must not be null");
    if (registry.containsBeanDefinition(AUTO_PROXY_CREATOR_BEAN_NAME)) {
        BeanDefinition apcDefinition = registry.getBeanDefinition(AUTO_PROXY_CREATOR_BEAN_NAME);
        if (!cls.getName().equals(apcDefinition.getBeanClassName())) {
            int currentPriority = findPriorityForClass(apcDefinition.getBeanClassName());
            int requiredPriority = findPriorityForClass(cls);
            if (currentPriority < requiredPriority) {
                apcDefinition.setBeanClassName(cls.getName());
            }
        }
        return null;
    }
    RootBeanDefinition beanDefinition = new RootBeanDefinition(cls);
    beanDefinition.setSource(source);
    beanDefinition.getPropertyValues().add("order", Ordered.HIGHEST_PRECEDENCE);
    beanDefinition.setRole(BeanDefinition.ROLE_INFRASTRUCTURE);
    registry.registerBeanDefinition(AUTO_PROXY_CREATOR_BEAN_NAME, beanDefinition);
    return beanDefinition;
}
上面这一堆代码最核心的部分就在后两个方法中,就是完成了对AnnotationAwareAspectJAutoProxyCreator类的注册,到这里对自定义标签<aop:aspectj-autoproxy/>的解析也就完成了,可以看到其最核心的部分就是完成了对AnnotationAwareAspectJAutoProxyCreator类的注册,那为什么注册了这个类就开启了aop功能呢?这里先卖个关子,后面详细说。
这里再回过头来看一下上面说到的spring对自定义标签解析的4个步骤,其实第一步的schema对应的是在org.springframework.aop.config路径下的spring-aop-3.0.xsd文件,其映射关系是维护在META-INF/spring.schemas文件中的,而spring-aop-3.0.xsd的主要作用就是描述自定义标签。
当通过META-INF/spring.handlers找到对应的AopNamespaceHandler,并通过在其加载后执行init()方法过程中完成了AspectJAutoProxyBeanDefinitionParser的注册,有这个parser再来完成对自定义标签的解析工作,这对应上面4个步骤中的第二步和第三部。至于第四步的配置工作,无非就是将spring.schemas和spring.handlers这两个配置文件放在META-INF/目录下罢了。
关于这部分解析过程,写得不是非常详细,如果有不明白,可以参考之前一篇文章,讲spring是如何解析自定义xml标签。
2. 注解方式开启aop
另一种开启spring aop的方式是通过注解的方式,使用的注解是@EnableAspectJAutoProxy,可以通过配置类的方式完成注册:
@Configuration
@EnableAspectJAutoProxy
public class AppConfig {

}
也可以在启动类上直接加上这个注解,这在springboot中比较常见,其实质也是上面的方式。通过这种方式配置之后,就开启了aop功能,那具体又是如何实现的呢?我们看一下这个注解:
@Target(ElementType.TYPE)
@Retention(RetentionPolicy.RUNTIME)
@Documented
@Import(AspectJAutoProxyRegistrar.class)
public @interface EnableAspectJAutoProxy {

    /**
     * Indicate whether subclass-based (CGLIB) proxies are to be created as opposed
     * to standard Java interface-based proxies. The default is {@code false}.
     */
    boolean proxyTargetClass() default false;

    /**
     * Indicate that the proxy should be exposed by the AOP framework as a {@code ThreadLocal}
     * for retrieval via the {@link org.springframework.aop.framework.AopContext} class.
     * Off by default, i.e. no guarantees that {@code AopContext} access will work.
     * @since 4.3.1
     */
    boolean exposeProxy() default false;

}
这里我们的关注点是其通过@Import(AspectJAutoProxyRegistrar.class)引入了AspectJAutoProxyRegistrar,那这又是什么?
class AspectJAutoProxyRegistrar implements ImportBeanDefinitionRegistrar {

    /**
     * Register, escalate, and configure the AspectJ auto proxy creator based on the value
     * of the @{@link EnableAspectJAutoProxy#proxyTargetClass()} attribute on the importing
     * {@code @Configuration} class.
     */
    @Override
    public void registerBeanDefinitions(
            AnnotationMetadata importingClassMetadata, BeanDefinitionRegistry registry) {

        AopConfigUtils.registerAspectJAnnotationAutoProxyCreatorIfNecessary(registry);

        AnnotationAttributes enableAspectJAutoProxy =
                AnnotationConfigUtils.attributesFor(importingClassMetadata, EnableAspectJAutoProxy.class);
        if (enableAspectJAutoProxy != null) {
            if (enableAspectJAutoProxy.getBoolean("proxyTargetClass")) {
                AopConfigUtils.forceAutoProxyCreatorToUseClassProxying(registry);
            }
            if (enableAspectJAutoProxy.getBoolean("exposeProxy")) {
                AopConfigUtils.forceAutoProxyCreatorToExposeProxy(registry);
            }
        }
    }

}
看到这里,是不是有点眼熟了呢?是的,其实它也是和上面说的xml配置使用的方式一样,通过AopConfigUtils来完成AnnotationAwareAspectJAutoProxyCreator类的注册。是不是比xml配置文件的方式方便许多呢。
4. 开启aop的魔法
通过前面的学习我们了解了可以通过Spring自定义配置完成对AnnotationAwareAspectJAutoProxyCreator类型的自动注册,而这个类到底是做了什么工作来实现AOP的操作呢?这里还是先来看一下AnnotationAwareAspectJAutoProxyCreator的类层次结构:
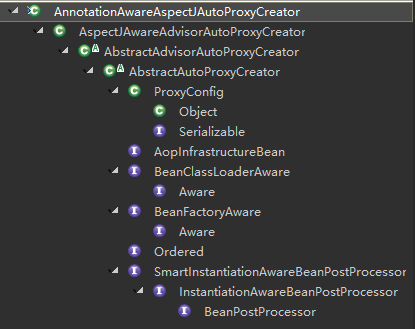
这里有一个很重要的点,就是AnnotationAwareAspectJAutoProxyCreator实现了BeanPostProcessor接口。在IOC部分的文章中有详细说过,Spring在加载Bean的过程中会在实例化bean前后调用BeanPostProcessor的相关方法(相关逻辑是在initializeBean方法中,调用postProcessBeforeInitialization、postProcessAfterInitialization方法),而AOP的魔法就是从这里开始的。
每次看到这里,我内心对spring的软件架构设计都是涌现出无比的佩服,通过后处理器的方式来做扩展,对原有模块是没有任何改动,也不会产生耦合,spring亲自践行着对修改关闭,对扩展开放的原则。
3. 总结
本文我们学习了spring是如何开启aop功能的,无论是通过xml配置文件方式,还是通过Java config这种注解的方式,其最终都是完成了将AnnotationAwareAspectJAutoProxyCreator这个类注册到spring容器当中,那这个类又有什么魔法,可以达到将其注册到容器即达到开启aop的功效,其实其继承自BeanPostProcessor接口,通过后处理器的方式扩展出了开启spring aop的功能。