微信公众平台自定义菜单接口文档:https://mp.weixin.qq.com/wiki/10/0234e39a2025342c17a7d23595c6b40a.html
最近做了下公众号的自定义菜单,下面贴上每一步的操作步骤,一共三步:
1.调用公众号创建自定义菜单接口创建自己想要的菜单(创建自定义菜单表,存储自定义菜单内容,方便后续更新):

举例如下:

levelNum列:菜单级别(1:父菜单,2子菜单)
father列:父级菜单是谁
type列: main:一级菜单,click:点击事件,view:跳转路径,
name:展示的名称
contentText:如果是一级菜单,配置main或者不配(null)都行,配置view也可以,但是切记一级菜单不能直接配click这类的点击事件,否则创建菜单时会失败
contentText与contentType配置对应关系:
main ------>main
cilck ------>key
view ------>url
sequence:展示的顺序
siteId:刷新哪个站点的菜单
后台添加菜单功能如图:

然后做一个刷新自定义菜单的按钮,后期如果菜单有更新,点击按钮判断刷新的是哪个站点的菜单就行了
刷新自定义菜单就是调用微信的创建自定义菜单接口:
package com.odao.weixin.site.web.controller.createMenu;

import java.io.IOException;
import java.io.PrintWriter;
import java.io.Writer;
import java.security.KeyManagementException;
import java.security.NoSuchAlgorithmException;
import java.security.NoSuchProviderException;
import java.util.Map;
import javax.servlet.http.HttpServletRequest;
import javax.servlet.http.HttpServletResponse;
import net.sf.json.JSONObject;
import org.slf4j.Logger;
import org.slf4j.LoggerFactory;
import org.springframework.beans.factory.annotation.Autowired;
import org.springframework.stereotype.Controller;
import org.springframework.web.bind.annotation.RequestMapping;
import com.alibaba.fastjson.JSON;
import com.odao.weixin.api.oauth.MenuManager;
import com.odao.weixin.api.support.AccessTokenKit;
import com.odao.weixin.site.core.GlobalThreadLocal;
import com.odao.weixin.site.subsys.customButton.CustomButtonSys;

@Controller
@RequestMapping("/")
public class CreateMenuController {
	final static Logger logger = LoggerFactory.getLogger(CreateMenuController.class);
	@Autowired
	private CustomButtonSys customButtonSys;


	@RequestMapping("creatMenu.do")
	protected void 	handleRequestInternal(HttpServletRequest request,
			HttpServletResponse response,Writer writer) throws Exception {
		boolean b=false;
		String accesstoken=null;
		String text=null;
		logger.debug("创建自定义菜单请求");

		//获取基础token
		try {
			String token = AccessTokenKit.getTokenNew(微信公众号appid, 微信公众号Secret);
			accesstoken = (String) JSON.parseObject(token, Map.class).get("access_token");//通过AppId 和 AppSecret 获取access_token
		} catch (Exception e1) {
			e1.printStackTrace();
		}

		//创建菜单语句
		text = customButtonSys.getCreatText();
		logger.debug("创建自定义菜单请求的text["+text+"]");

		if(accesstoken!=null&&accesstoken.length()>0&&text!=null&&text.length()>0){
			try {
			    b=MenuManager.createMenu(accesstoken, text);//通过access_token和页面提交的按钮创建字符串创建自定义菜单,成功返回true,失败返回false
			} catch (KeyManagementException e) {
				e.printStackTrace();
			} catch (NoSuchAlgorithmException e) {
				e.printStackTrace();
			} catch (NoSuchProviderException e) {
				e.printStackTrace();
			}
		}

		int result = 0;
		if(b){
			result = 1;
		} else {
			result = 0;
		}
		logger.debug("创建自定义菜单结果:"+result);

		response.setContentType("text/plain");
		response.setHeader("Pragma", "No-cache");
		response.setHeader("Cache-Control", "no-cache");
		response.setDateHeader("Expires", 0);
		PrintWriter out;
		try {
			out = response.getWriter();
			JSONObject resultJSON = new JSONObject();
			String jsonpCallback = request.getParameter("jsonpCallback");// 客户端请求参数
			resultJSON.put("retCode", result);
			out.println(jsonpCallback + "(" + resultJSON.toString(1, 1)+")");// 返回jsonp格式数据
			out.flush();
			out.close();
		} catch (IOException e) {
			// TODO Auto-generated catch block
			e.printStackTrace();
		}
		return;
	}

}
写得比较简陋,你可以自己优化下,功能反正没问题。
2.配置微信公众号事件转发地址:
进入微信公众号,左侧菜单找到基本配置,配置如下:
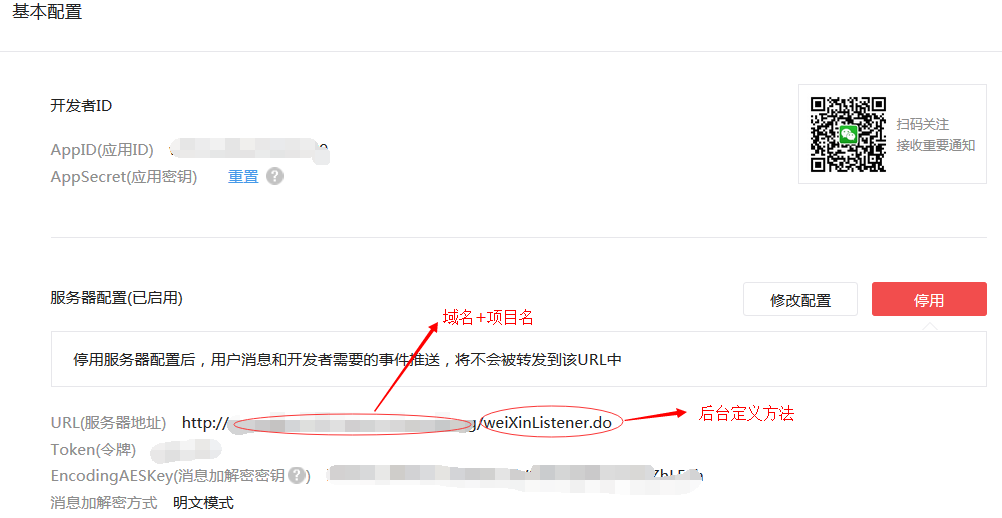
3.编写菜单点击触发事件:
配置好后,你的自定义菜单点击事件都会转发到你的后台Java方法中:
package com.odao.weixin.site.web.controller.weixinListener;

import java.io.InputStream;
import java.io.OutputStream;
import java.io.Writer;
import java.util.ArrayList;
import java.util.Collections;
import java.util.List;
import javax.servlet.http.HttpServletRequest;
import javax.servlet.http.HttpServletResponse;
import com.odao.weixin.api.msg.*;
import com.odao.weixin.site.subsys.listener.ListenerEventService;
import org.slf4j.Logger;
import org.slf4j.LoggerFactory;
import org.springframework.beans.factory.annotation.Autowired;
import org.springframework.stereotype.Controller;
import org.springframework.web.bind.annotation.RequestMapping;
import com.odao.common.util.HttpUtil;
import com.odao.weixin.api.DefaultSession;
import com.odao.weixin.api.HandleMessageAdapter;
import com.odao.weixin.api.support.MySecurity;
import com.odao.weixin.site.util.QpMobileGameWebUtil;


@Controller
@RequestMapping("/")
public class WeiXinListenerController {
	final static Logger logger = LoggerFactory.getLogger(WeiXinListenerController.class);
	// TOKEN 是你在微信平台开发模式中设置的哦
	public static final String TOKEN = "上图中的Token(令牌)";
	@Autowired
	private ListenerEventService listenerEventService;

	@RequestMapping("weiXinListener.do")
	protected void handleRequestInternal(HttpServletRequest request,
			HttpServletResponse response) throws Exception {
		String method = request.getMethod();
		logger.debug("请求类型:" + method);
		if ("GET".equals(method)) {
			doGet(request, response);

		}
		if ("POST".equals(method)) {
			doPost(request, response);

		}

	}

	/**
	 * 微信验证
	 *
	 * @param request
	 * @param response
	 * @throws Exception
	 */
	public void doGet(HttpServletRequest request, HttpServletResponse response)
			throws Exception {
		logger.debug("==================================================");
		logger.debug("微信验证交互请求!!");
		Writer writer = response.getWriter();
		String signature = request.getParameter("signature");// 微信加密签名
		String timestamp = request.getParameter("timestamp");// 时间戳
		String nonce = request.getParameter("nonce");// 随机数
		String echostr = request.getParameter("echostr");// 随机字符串

		// 重写totring方法,得到三个参数的拼接字符串
		List<String> list = new ArrayList<String>(3) {
			private static final long serialVersionUID = 2621444383666420433L;

			public String toString() {
				return this.get(0) + this.get(1) + this.get(2);
			}
		};
		list.add(TOKEN);
		list.add(timestamp);
		list.add(nonce);
		try {
			Collections.sort(list);// 排序
			String tmpStr = new MySecurity().encode(list.toString(),
					MySecurity.SHA_1);// SHA-1加密

			if (signature.equals(tmpStr)) {
				QpMobileGameWebUtil.writeString(writer, echostr);
			} else {
				QpMobileGameWebUtil.writeString(writer, "");
			}
		} catch (Exception e) {
			QpMobileGameWebUtil.writeString(writer, "");
		}

	}

	/**
	 * 微信监听
	 *
	 * @param request
	 * @param response
	 * @throws Exception
	 */
	public void doPost(HttpServletRequest request, HttpServletResponse response)
			throws Exception {
		logger.debug("==================================================");
		logger.debug("微信监听请求!");

		request.setCharacterEncoding("utf-8");
		response.setContentType("text/html; charset=utf-8");
		InputStream is = request.getInputStream();
		OutputStream os = response.getOutputStream();

		final DefaultSession session = DefaultSession.newInstance();
		final String uploadPath = request.getSession().getServletContext()
				.getRealPath("/");// 获取项目路径
		// 请求IP
		final String requestIP = HttpUtil.getIpAddr(request);

		// 处理事件(事件都会到此处)
		session.addOnHandleMessageListener(new HandleMessageAdapter() {
			// 获取基础token
			public void onEventMsg(Msg4Event msg) {
				listenerEventService.onEventMsg(session, msg, requestIP,uploadPath);
			}
		}

		);

		session.process(is, os);// 处理微信消息
		session.close();// 关闭Session

	}

}
我们来看看listenerEventService.onEventMsg(session, msg, requestIP,uploadPath)方法:
package com.odao.weixin.site.subsys.listener;

import java.util.Map;
import org.slf4j.Logger;
import org.slf4j.LoggerFactory;
import org.springframework.beans.factory.annotation.Autowired;
import org.springframework.stereotype.Service;
import com.alibaba.fastjson.JSON;
import com.odao.weixin.api.DefaultSession;
import com.odao.weixin.api.msg.Msg4Event;
import com.odao.weixin.api.msg.Msg4Text;
import com.odao.weixin.api.msg.UserInfo;
import com.odao.weixin.api.support.AccessTokenKit;
import com.odao.weixin.site.cases2017.wxpay.service.SyncXMLUtils;
import com.odao.weixin.site.core.GlobalThreadLocal;
import com.odao.weixin.site.subsys.MenuEvent.MenuEventSys;
import com.odao.weixin.site.subsys.config.WeiXinProcessConfigSys;
import com.odao.weixin.site.subsys.publicsys.UserManager;
import com.odao.weixin.site.subsys.user.GameUserSys;

/**
 * 微信监听处理事件
 *
 * @author Administrator
 *
 */
@Service
public class ListenerEventService {

	final static Logger logger = LoggerFactory.getLogger(ListenerEventService.class);

	private String respContent;

	/**
	 * 处理事件
	 *
	 * @param session
	 * @param msg
	 */
	public void onEventMsg(DefaultSession session, Msg4Event msg,String requestIP, String uploadPath) {
		String eventType = msg.getEvent();
		// ============================订阅关注=============================================
		if (Msg4Event.SUBSCRIBE.equals(eventType)) {
			Msg4Text reMsg = new Msg4Text();
			reMsg.setFromUserName(msg.getToUserName());
			reMsg.setToUserName(msg.getFromUserName());
			reMsg.setCreateTime(msg.getCreateTime());
			reMsg.setContent(respContext);
			session.callback(reMsg);// 回传消息
		}
		// ============================已经关注了的==========================================
		else if (Msg4Event.SCAN.equals(eventType)) {}
		// ============================取消订阅=============================================
		else if (Msg4Event.UNSUBSCRIBE.equals(eventType)) {}
		// ============================点击事件=============================================
		else if (Msg4Event.CLICK.equals(eventType)) {
            //kfrx就是你之前配置菜单时定义的contentText列内容
            if("kfrx".equals(msg.getEventKey())){
                 //do something you want....
            }
         }
	}
}
上述列举了菜单中点击触发的4中类型,订阅关注、已经关注了的、取消关注、点击事件(你之前配置的click)
按照上述操作一步步来,你的自定义菜单就完成啦
不过你开了自己的自定义菜单,公众号中的自定义菜单就被禁用啦,看你自己的需求,到底是自己去公众号配置自定义菜单,还是自己开发自定义回复的才惨吧。
