1.简介:
1、 高级结果映射(一对一、一对多)(重点)
2、 延迟加载
3、 mybatis中的缓存
4、 Spring和mybatis的整合(重点 mapper代理方式)
5、 逆向工程
6、 分页插件
7、 注解
2 高级结果映射
2.1 数据模型分析
1、 明确每张表存储的信息
2、 明确每张表中关键字段(主键、外键、非空)
3、 明确数据库中表与表之间的外键关系
4、 明确业务中表与表的关系(建立在具体的业务)
2.2 单向一对一映射
2.2.1 需求
查询宠物信息,关联查询类别信息。
宠物和类别
2.2.2 Sql
select p.* ,t.*
from pets p,types t
where p.type_id = t.id;
注意:配置文件中配置显示sql语句
|
<settings> <!-- 打印查询语句 --> <setting name="logImpl" value="STDOUT_LOGGING" /> </settings> |
2.2.3 resultType
2.2.3.1 创建扩展类
|
public class PetsExt extends Pets{ //申明类型表的字段
//t.id tid ,t.name tname private int tid;//类型编号 private String tname;//宠物类型
|
2.2.3.2 映射文件
|
<!-- 练习使用resultType映射一对一关联关系 --> <select id="findPetsAndTypes" resultType="com.qf.domain.PetsExt"> select p.* ,t.id tid,t.name tname from pets p,types t where p.type_id = t.id </select> |
2.2.3.3 Mapper接口
2.2.3.4 测试代码
2.2.3.5 小结
使用resultType来进行一对一结果映射,查询出的列的个数和映射的属性的个数要一致。而且映射的属性要存在一个大的对象中(扩展),它是一种平铺式的映射,即数据库查询出多少条记录,则映射成多少个对象。
2.2.4 resultMap
使用resultMap来进行一对一结果映射,它是将关联对象添加到主信息的对象中,具体说是对象嵌套对象的一种映射方式。
2.2.4.1 修改类
|
public class Pets { private int id; private String name; private Date birth_date; //宠物与类型的一对一关联关系 private Types types; |
2.2.4.2 映射文件
|
<resultMap type="com.qf.domain.Pets" id="myPets"> <!-- 映射关系 --> <id property="id" column="id" /> <result property="name" column="name"/> <result property="birth_date" column="birth_date"/> <!-- 配置宠物与类型的一对一关联关系 一个宠物对应 一个类型 association 配置一对一 --> <association property="types" javaType="com.qf.domain.Types"> <!-- 关联表的映射关系 column:可以指定为列别名 --> <id property="id" column="tid"/> <id property="name" column="tname"/> </association> </resultMap> <!-- 练习使用resultMap映射一对一关联关系 resultMap:需要定义resultMap标签 --> <select id="findPetsAndTypes" resultMap="myPets"> select p.* ,t.id tid,t.name tname from pets p,types t where p.type_id = t.id </select> |
2.2.4.3 Mapper接口
2.2.4.4 测试代码
2.2.5 小结
在一对一结果映射时,使用resultType更加简单方便
如果有特殊要求(对象嵌套对象)时,需要使用resultMap进行映射。
查询宠物信息时,点宠物信息展示该宠物类别。
2.2.6 需求
查询类别信息,关联查询宠物信息
一个类型--->多只宠物
一对多
2.3 Sql
|
select t.*,p.id pid,p.name pname,p.birth_date from types t left join pets p on t.id=p.type_id |
2.3.1 映射文件
|
<resultMap type="com.itqf.pojo.Types" id="myTypesResultMap"> <id property="id" column="id"/> <result property="name" column="name"/> <!--association 配置单个对象 --> <!-- <association property=""></association> --> <!-- 配置集合 property="pets" com.itqf.pojo.Types类中的集合属性(List<Pets> pets); ofType="com.itqf.pojo.Pets": 封装的集合的类型 --> <collection property="pets" ofType="com.itqf.pojo.Pets"> <id property="id" column="pid"/> <result column="pname" property="name"/> <result column="birth_date" property="birthDate" /> </collection>
</resultMap>
<select id="findTypesAndPets1" resultMap="myTypesResultMap" > select t.*,p.id pid,p.name pname,p.birth_date from types t left join pets p on t.id=p.type_id </select> |
2.3.2 Mapper接口
2.3.3 测试代码
3 延迟加载
3.1 什么是延迟加载
延迟加载又叫懒加载,也叫按需加载。也就是说先加载主信息,在需要的时候,再去加载从信息。
在mybatis中,resultMap标签 的
association标签(配置单个对象)
collection标签(配置集合)具有延迟加载的功能。
3.2 需求
查询宠物信息,关联查询类别信息
1、 创建一个statement来查询宠物信息
2、 创建一个statement来查询根据编号查询类别信息
3.3 案例演示
|
<resultMap type="com.itqf.pojo.Pets" id="myResultMap"> <id column="id" property="id"/> <result column="name" property="name" /> <result column="birthDate" property="birthDate"/> <result column="type_id" property="typeId"/>
<!-- resultMap 中有 collection 和 association 标签 支持延迟加载 默认是立即加载 property:指定属性 select :指定一个查询语句 该查询语句最终能够返回使用property指定的对象 column: 查询出的宠物信息的当前列 作为参数 传递给com.itqf.mapper.TypesMapper.findTypesById 方法 --> <association property="types" select="com.itqf.mapper.TypesMapper.findTypesById" column="type_id"> </association>
</resultMap>
<select id="findAllPets" resultMap="myResultMap" > select p.id,p.name,p.birth_date as birthDate,type_id from pets p </select> |
查询宠物信息,立即加载关联对象的信息。

3.4 设置延迟加载
在SqlMapConfig.xml中,配置settings标签

根据日志可知:没有立即查询关联对象的数据。
4 查询缓存(了解)
第三方缓存:redis
4.1 Mybatis的缓存理解
Mybatis的缓存,包括一级缓存和二级缓存
一级缓存指的就是sqlsession,在sqlsession中有一个数据区域,是map结构,这个区域就是一级缓存区域。一级缓存中的key是由sql语句、条件、statement等信息组成一个唯一值。一级缓存中的value,就是查询出的结果对象。
Map<String,Object>
如果查完后,增删改操作,清空缓存
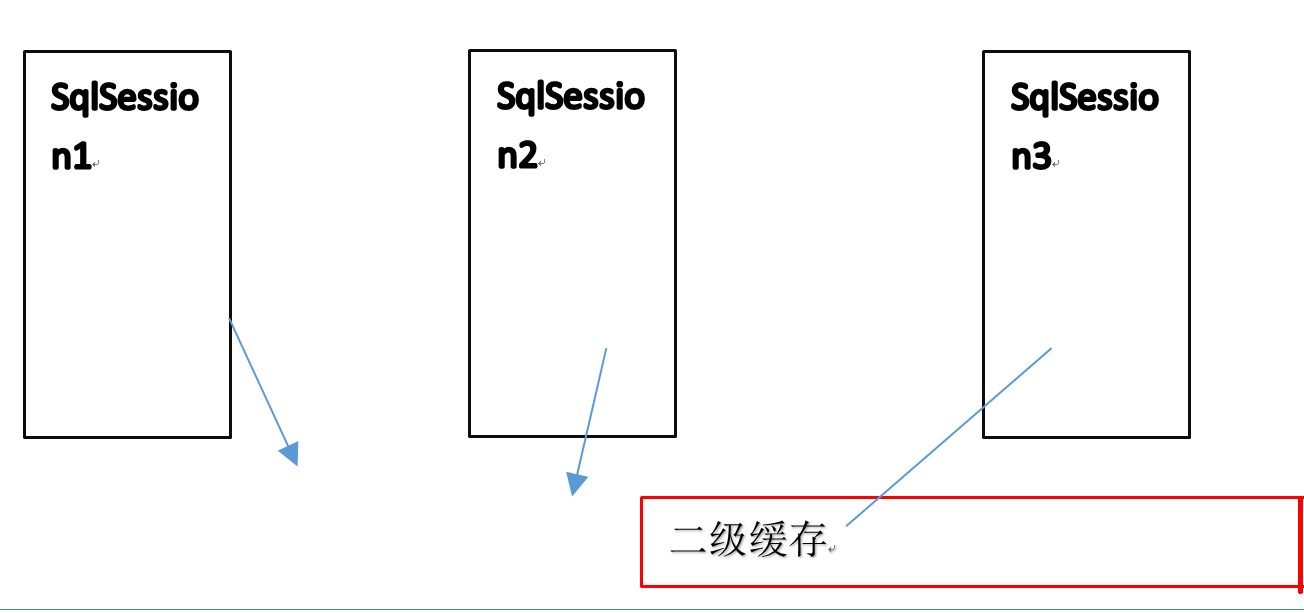
二级缓存指的就是同一个namespace下的mapper,二级缓存中,也有一个map结构,这个区域就是一级缓存区域。一级缓存中的key是由sql语句、条件、statement等信息组成一个唯一值。一级缓存中的value,就是查询出的结果对象。
一级缓存是默认使用的。
二级缓存需要手动开启。
4.2 一级缓存
4.2.1 原理

4.2.2 测试
|
SqlSessionFactory sqlSessionFactory = MyBatisUtil.getSqlSessionFactory(); SqlSession sqlSession = sqlSessionFactory.openSession();
PetsMapper mapper = sqlSession.getMapper(PetsMapper.class); List<Pets> list = mapper.findPets(); for (Pets pets : list) { System.out.println(pets.getName());//+pets.getTypes() 当查询类型时,才发送sql语句 }
Pets pets = new Pets(); pets.setId(20); pets.setName("小黑"); pets.setType_id(1); pets.setBirth_date(new Date()); mapper.savePets(pets);//执行了增删改后,清空缓存
PetsMapper mapper1 = sqlSession.getMapper(PetsMapper.class); List<Pets> list1 = mapper1.findPets(); for (Pets pets1 : list1) { System.out.println(pets1.getName());//+pets.getTypes() 当查询类型时,才发送sql语句 } |
4.3 二级缓存
4.3.1 原理
同一个Mapper会把查询结果存到一个二级缓存中。

4.3.2 开启二级缓存
1、 开启二级缓存的总开关 sqlMapconfig.xml

2、 在mapper映射文件中开启二级缓存

4.3.3 序列化
4.3.4 测试
|
SqlSessionFactory sqlSessionFactory = MyBatisUtil.getSqlSessionFactory(); SqlSession sqlSession = sqlSessionFactory.openSession();
PetsMapper mapper = sqlSession.getMapper(PetsMapper.class); List<Pets> list = mapper.findPets(); for (Pets pets : list) { System.out.println(pets.getName());//+pets.getTypes() 当查询类型时,才发送sql语句 }
// Pets pets = new Pets(); // pets.setId(21); // pets.setName("小黑"); // pets.setType_id(1); // pets.setBirth_date(new Date()); // mapper.savePets(pets); sqlSession.commit(); sqlSession.close();
SqlSession sqlSession2 = sqlSessionFactory.openSession(); PetsMapper mapper1 = sqlSession2.getMapper(PetsMapper.class); List<Pets> list1 = mapper1.findPets(); for (Pets pets1 : list1) { System.out.println(pets1.getName());//+pets.getTypes() 当查询类型时,才发送sql语句 }
sqlSession2.commit(); sqlSession2.close(); |
4.3.5 禁用缓存
在映射文件中:
默认值是true useCache=”false”
|
<select id="selectPetsAndTypes" resultMap="myResultMap" useCache="false"> select p.id,p.name,p.birth_date birthdate,type_id typeId from pets p </select> |
4.3.6 刷新缓存
在映射文件中:
属性:flushCache=”true”
刷新缓存,在查询语句中,默认值是false,在新增删除语句中,默认值是true
5 Mybatis整合spring
5.1 整合思路
1、 数据源信息交给spring管理
2、 SqlSessionFactory交给spring进行单例管理
3、 由spring来管理原始dao的实现类或者mapper代理的代理类。
5.2 需求
使用原始dao方式和mapper代理方式实现以下功能:
根据ID查询Pets信息
5.3 工程搭建
Mysql的驱动包
Mybatis的核心包和依赖包
Mybatis和spring的整合包
Spring的包
C3p0数据库连接池包
5.4 具体整合
5.4.1 整合配置文件
5.4.1.1 Mybatis
在config下,创建mybatis目录,然后创建SqlMapConfig.xml
将db.properties和log4j.properties拷贝到config目录下。
5.4.1.2 Spring
在config下,创建spring目录,然后创建applicationContext.xml
1) 加载属性配置文件
2) 获得DataSource对象
3) 创建SqlSessionFactory对象 SqlSessionFactoryBean
5.4.2 整合代码
5.4.2.1 原始dao开发方式
5.4.2.1.1映射文件
在config/mybatis下创建sqlmapconfig.xml,然后创建映射文件
5.4.2.1.2Dao代码
实现SqlSessionDaoSupport
5.4.2.1.3配置PetsDao实现类
在spring.xml中配置PetsDao实现类
5.4.2.1.4测试代码
5.4.2.2 Mapper代理(必须掌握)
5.4.2.2.1映射文件
将映射文件放到UserMapper接口的同包下
5.4.2.2.2Mapper接口
5.4.2.2.3配置mapper代理类
单个mapper代理类配置
使用MapperFactoryBean 创建代理对象
需要: mapper接口 和 sqlSessionFactory对象
|
<!-- mapper接口方式 --> <bean id="mapper" class="org.mybatis.spring.mapper.MapperFactoryBean"> <property name="mapperInterface" value="com.qf.mapper.PetsMapper"></property> <property name="sqlSessionFactory" ref="sqlSessionFactory"></property> </bean> |
批量设置mapper代理类
MapperScannerConfiger类
需要: mapper接口的包
SqlSessionFactory
|
<bean id="mapperScanner" class="org.mybatis.spring.mapper.MapperScannerConfigurer"> <!-- sqlSessionFactory的名称 --> <property name="sqlSessionFactoryBeanName" value="sqlSessionFactory"></property> <!-- 扫描的包 配置一个包 MapperScannerConfigurer 类会给指定包下的接口都创建代理类 --> <property name="basePackage" value="com.itqf.dao"></property> </bean> |
5.4.2.2.4测试代码
6 逆向工程(会用)
6.1 什么是逆向工程
逆向工程:表---à生成实体类
Mapper接口
Mapper映射文件
6.2 下载逆向工程
https://github.com/mybatis/generator/releases/tag/mybatis-generator-1.3.2
6.3 案例演示
6.4 创建Generator.java
|
List<String> warnings = new ArrayList<String>(); boolean overwrite = true; File configFile = new File("src/generatorConfig.xml"); ConfigurationParser cp = new ConfigurationParser(warnings); System.out.println(cp); Configuration config = cp.parseConfiguration(configFile); System.out.println(config); DefaultShellCallback callback = new DefaultShellCallback(overwrite); System.out.println(callback); MyBatisGenerator myBatisGenerator = new MyBatisGenerator(config, callback, warnings); myBatisGenerator.generate(null); |
6.5 添加generatorConfig.xml
|
<?xml version="1.0" encoding="UTF-8"?> <!DOCTYPE generatorConfiguration PUBLIC "-//mybatis.org//DTD MyBatis Generator Configuration 1.0//EN" "http://mybatis.org/dtd/mybatis-generator-config_1_0.dtd">
<generatorConfiguration> <context id="testTables" targetRuntime="MyBatis3"> <commentGenerator> <!-- 是否去除自动生成的注释 true:是 : false:否 --> <property name="suppressAllComments" value="true" /> </commentGenerator> <!--数据库连接的信息:驱动类、连接地址、用户名、密码 --> <jdbcConnection driverClass="com.mysql.jdbc.Driver" connectionURL="jdbc:mysql://localhost:3306/pet_hospital" userId="root" password="admin"> </jdbcConnection> <javaTypeResolver> <property name="forceBigDecimals" value="false" /> </javaTypeResolver>
<!-- targetProject:生成PO类的位置 --> <javaModelGenerator targetPackage="com.qf.domain" targetProject="./src"> <!-- enableSubPackages:是否让schema作为包的后缀 --> <property name="enableSubPackages" value="false" /> <!-- 从数据库返回的值被清理前后的空格 --> <property name="trimStrings" value="true" /> </javaModelGenerator> <!-- targetProject:mapper映射文件生成的位置 --> <sqlMapGenerator targetPackage="com.qf.mapper" targetProject="./src"> <!-- enableSubPackages:是否让schema作为包的后缀 --> <property name="enableSubPackages" value="false" /> </sqlMapGenerator> <!-- targetPackage:mapper接口生成的位置 --> <javaClientGenerator type="XMLMAPPER" targetPackage="com.qf.mapper" targetProject="./src"> <!-- enableSubPackages:是否让schema作为包的后缀 --> <property name="enableSubPackages" value="false" /> </javaClientGenerator> <!-- 指定数据库表 --> <table tableName="pets"></table> <table tableName="types"></table>
</context> </generatorConfiguration> |
6.6 将逆向工程生成的代码拷贝到指定项目中
6.7 注意事项
Mapper.xml文件已经存在时,如果进行重新生成则mapper.xml文件时,内容不被覆盖而是进行内容追加,结果导致mybatis解析失败。
解决方法:删除原来已经生成的mapper xml文件再进行生成。
Mybatis自动生成的po及mapper.java文件不是内容而是直接覆盖没有此问题。