https://github.com/MetaMask/metamask-extension/blob/develop/docs/porting_to_new_environment.md
MetaMask has been under continuous development for nearly two years now, and we’ve gradually discovered some useful abstractions that have allowed us to grow more easily. A couple of those layers together allow MetaMask to be ported to new environments and contexts increasingly easily (although it still could be easier, and please let us know if you get stuck!)
MetaMask已经持续开发了近两年,我们逐渐发现了一些有用的抽象概念,使我们能够更容易地进行开发。其中的两个层使metamask请求能够越来越容易地移植到新的环境和上下文
Before we get started, it's worth becoming familiar with our basic architecture:
在我们开始之前,有必要熟悉一下我们的基本架构:

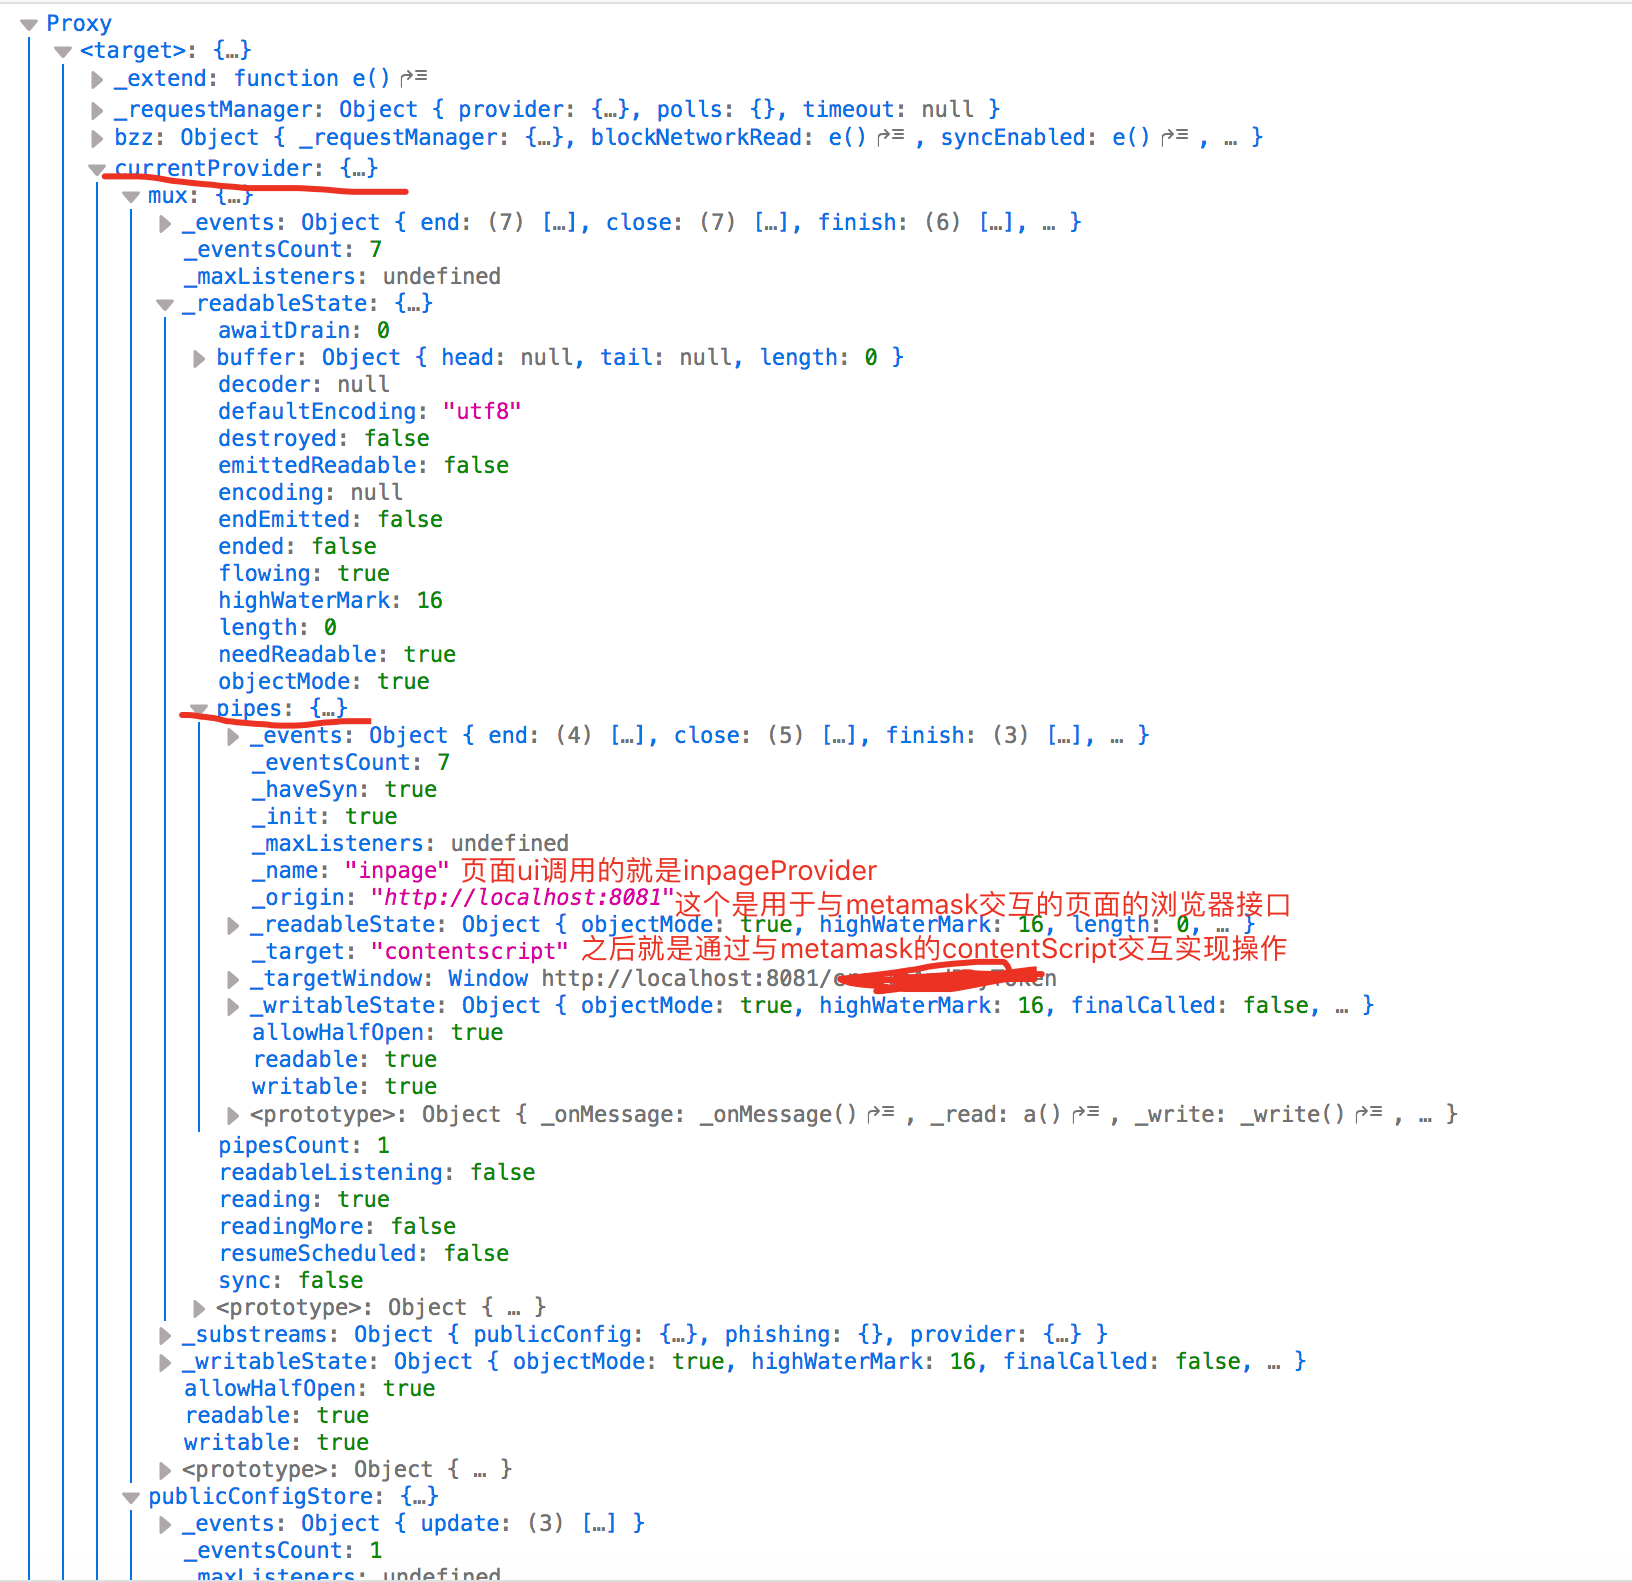
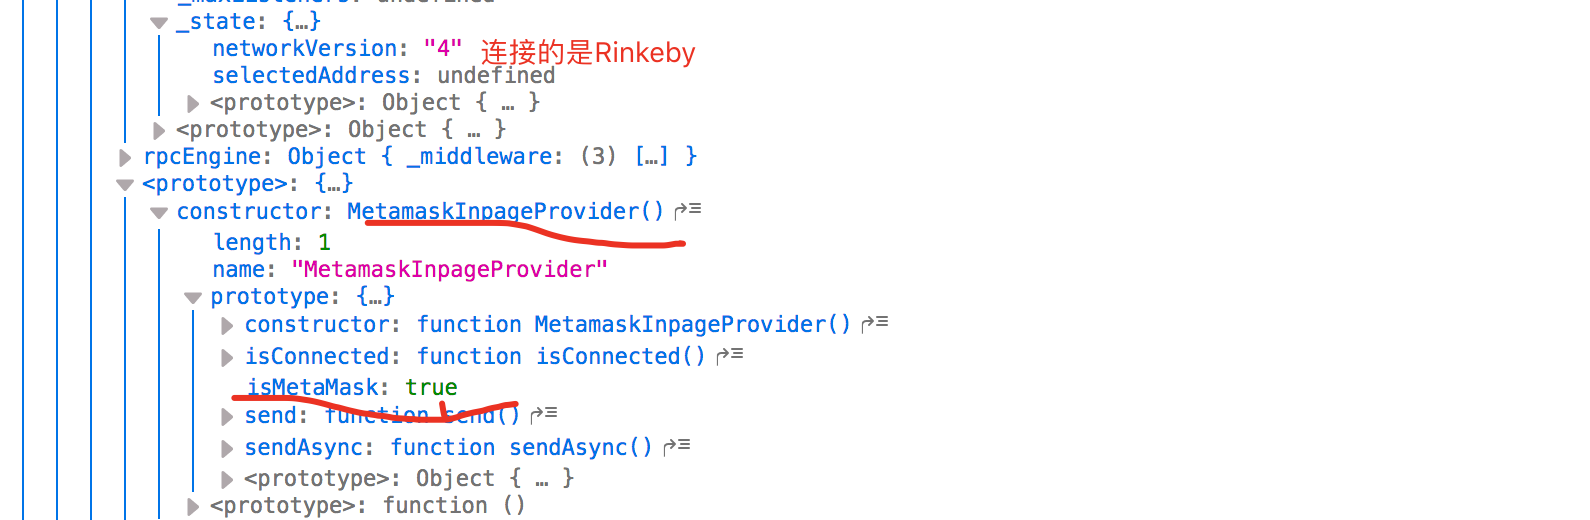
在本地测试一下,通过下面UI code,调用web3:
<script type="text/javascript">
        //这些注释的地方都是之前

        window.addEventListener('load', function() {
            console.log(window.web3);  //调用web3
        });
</script>
得到结果:
The metamask-background describes the file at app/scripts/background.js, which is the web extension singleton. This context instantiates an instance of the MetaMask Controller, which represents the user's accounts, a connection to the blockchain, and the interaction with new Dapps.
metamask-background描述了为web扩展单例的文件app/scripts/background.js(代码的讲解在本博客metamask源码学习-background.js中)。该上下文实例化了一个MetaMask控制器的实例,该实例表示用户的帐户、到区块链的连接以及与新Dapps的交互。
When a new site is visited, the WebExtension creates a new ContentScript in that page's context, which can be seen at app/scripts/contentscript.js. This script represents a per-page setup process, which creates the per-page web3api, connects it to the background script via the Port API (wrapped in a stream abstraction), and injected into the DOM before anything loads.
当访问一个新站点时,WebExtension会在该页面的上下文中创建一个新的ContentScript,可以在app/scripts/ ContentScript .js中看到其的代码(本博客中metamask源码学习-contentscript.js)。这个脚本表示每个页面的设置过程,它创建每个页面的web3api,通过端口API(封装在流抽象中)将其连接到后台脚本,并在加载之前注入DOM。
The most confusing part about porting MetaMask to a new platform is the way we provide the Web3 API over a series of streams between contexts. Once you understand how we create the InpageProvider in the inpage.js script, you will be able to understand how the port-stream is just a thin wrapper around the postMessage API, and a similar stream API can be wrapped around any communication channel to communicate with the MetaMaskController via its setupUntrustedCommunication(stream, domain) method.
将MetaMask移植到新平台上最令人困惑的部分是我们通过上下文之间的一系列流提供Web3 API的方式。当你了解了我们如何在inpage.js脚本中创建InpageProvider之后,您将能够理解端口流为何只是一个围绕postMessage API的thin包装器以及为何一个类似的流API可以被包装在任何通信通道上,通过它的setupUntrustedCommunication(流,域)方法与MetaMaskController进行通信。(代码详细信息看本博客metamask源码学习-inpage.js)
The MetaMask Controller(详细信息看本博客metamask源码学习-metamask-controller.js)
The core functionality of MetaMask all lives in what we call The MetaMask Controller. Our goal for this file is for it to eventually be its own javascript module that can be imported into any JS-compatible context, allowing it to fully manage an app's relationship to Ethereum.
MetaMask的核心功能都存在于我们所称的The MetaMask控制器中。我们对这个文件的目标是让它最终成为能够被导入到任何兼容于js的上下文中的属于自己的javascript模块,,从而完全管理应用程序与以太坊之间的关系。
Constructor
When calling new MetaMask(opts), many platform-specific options are configured. The keys on opts are as follows:
在调用new MetaMask(opts)时,配置了许多特定于平台的选项。如下:
- initState: The last emitted state, used for restoring persistent state between sessions.最后发出的状态,用于在会话之间恢复持久状态
- platform: The
platformobject defines a variety of platform-specific functions, including opening the confirmation view, and opening web sites.平台对象定义了各种特定于平台的功能,包括打开确认视图和打开web站点。 - encryptor - An object that provides access to the desired encryption methods.提供对所需加密方法的访问的对象
Encryptor
An object that provides two simple methods, which can encrypt in any format you prefer. This parameter is optional, and will default to the browser-native WebCrypto API.
提供两种可以以你喜欢的任何格式进行加密的简单方法的对象。这个参数是可选的,默认为浏览器本地的WebCrypto API。
- encrypt(password, object) - returns a Promise of a string that is ready for storage.返回一个可用于存储的字符串的Promise
- decrypt(password, encryptedString) - Accepts the encrypted output of
encryptand returns a Promise of a restoredobjectas it was encrypted.接受加密的输出encryptedString,并返回解密的对象的promise。
Platform Options
The platform object has a variety of options:
- reload (function) - Will be called when MetaMask would like to reload its own context.将在MetaMask想要重新加载其自己的上下文时调用
- openWindow ({ url }) - Will be called when MetaMask would like to open a web page. It will be passed a single
optionsobject with aurlkey, with a string value.将在MetaMask想要打开web页面时调用。它将传递一个带有url键和字符串值的单一选项对象 - getVersion() - Should return the current MetaMask version, as described in the current
CHANGELOG.mdorapp/manifest.json.应该返回当前MetaMask的版本,即在当前的CHANGELOG.md或app/manifest.json中所述的版本号
metamask.getState()
This method returns a javascript object representing the current MetaMask state. This includes things like known accounts, sent transactions, current exchange rates, and more! The controller is also an event emitter, so you can subscribe to state updates via metamask.on('update', handleStateUpdate). State examples available here under the metamask key. (Warning: some are outdated)
metamask-extension/app/scripts/metamask-controller.js
//=============================================================================
// EXPOSED TO THE UI SUBSYSTEM
//=============================================================================

  /**
   * The metamask-state of the various controllers, made available to the UI
   *
   * @returns {Object} status
   */
  getState () {
    const wallet = this.configManager.getWallet()
    const vault = this.keyringController.store.getState().vault
    const isInitialized = (!!wallet || !!vault)

    return {
      ...{ isInitialized },
      ...this.memStore.getFlatState(),
      ...this.configManager.getConfig(),
      ...{
        lostAccounts: this.configManager.getLostAccounts(),
        seedWords: this.configManager.getSeedWords(),
        forgottenPassword: this.configManager.getPasswordForgotten(),
      },
    }
  }
该方法返回一个javascript对象,表示当前的MetaMask状态。这包括已知的帐户、发送的事务、当前汇率等等。控制器也是一个事件发射器,所以你可以通过metamask.on('update', handleStateUpdate)来订阅状态更新。状态示例即一系列json文件,即"metamask"键下的值的信息(警告:有些已经过时)
metamask.getApi()
Returns a JavaScript object filled with callback functions representing every operation our user interface ever performs. Everything from creating new accounts, changing the current network, to sending a transaction, is provided via these API methods. We export this external API on an object because it allows us to easily expose this API over a port using dnode, which is how our WebExtension's UI works!
返回一个JavaScript对象,该对象中包含回调函数,表示用户界面执行的每个操作。通过这些API方法提供了从创建新帐户、更改当前网络到发送事务的所有内容。我们在对象上导出这个外部API,因为它允许我们使用dnode在端口上轻松地公开这个API,这就是WebExtension UI的工作方式!
metamask-extension/app/scripts/metamask-controller.js
  /**
   * Returns an Object containing API Callback Functions.
   * These functions are the interface for the UI.
   * The API object can be transmitted over a stream with dnode.
   *
   * @returns {Object} Object containing API functions.
   */
  getApi () {
    const keyringController = this.keyringController
    const preferencesController = this.preferencesController
    const txController = this.txController
    const noticeController = this.noticeController
    const addressBookController = this.addressBookController
    const networkController = this.networkController

    return {
      // etc
      getState: (cb) => cb(null, this.getState()),
      setCurrentCurrency: this.setCurrentCurrency.bind(this),
      setUseBlockie: this.setUseBlockie.bind(this),
      setCurrentLocale: this.setCurrentLocale.bind(this),
      markAccountsFound: this.markAccountsFound.bind(this),
      markPasswordForgotten: this.markPasswordForgotten.bind(this),
      unMarkPasswordForgotten: this.unMarkPasswordForgotten.bind(this),
      getGasPrice: (cb) => cb(null, this.getGasPrice()),

      // coinbase
      buyEth: this.buyEth.bind(this),
      // shapeshift
      createShapeShiftTx: this.createShapeShiftTx.bind(this),

      // primary HD keyring management
      addNewAccount: nodeify(this.addNewAccount, this),
      placeSeedWords: this.placeSeedWords.bind(this),
      verifySeedPhrase: nodeify(this.verifySeedPhrase, this),
      clearSeedWordCache: this.clearSeedWordCache.bind(this),
      resetAccount: nodeify(this.resetAccount, this),
      removeAccount: nodeify(this.removeAccount, this),
      importAccountWithStrategy: nodeify(this.importAccountWithStrategy, this),

      // hardware wallets
      connectHardware: nodeify(this.connectHardware, this),
      forgetDevice: nodeify(this.forgetDevice, this),
      checkHardwareStatus: nodeify(this.checkHardwareStatus, this),
      unlockHardwareWalletAccount: nodeify(this.unlockHardwareWalletAccount, this),

      // vault management
      submitPassword: nodeify(this.submitPassword, this),

      // network management
      setProviderType: nodeify(networkController.setProviderType, networkController),
      setCustomRpc: nodeify(this.setCustomRpc, this),

      // PreferencesController
      setSelectedAddress: nodeify(preferencesController.setSelectedAddress, preferencesController),
      addToken: nodeify(preferencesController.addToken, preferencesController),
      removeToken: nodeify(preferencesController.removeToken, preferencesController),
      setCurrentAccountTab: nodeify(preferencesController.setCurrentAccountTab, preferencesController),
      setAccountLabel: nodeify(preferencesController.setAccountLabel, preferencesController),
      setFeatureFlag: nodeify(preferencesController.setFeatureFlag, preferencesController),

      // AddressController
      setAddressBook: nodeify(addressBookController.setAddressBook, addressBookController),

      // KeyringController
      setLocked: nodeify(keyringController.setLocked, keyringController),
      createNewVaultAndKeychain: nodeify(this.createNewVaultAndKeychain, this),
      createNewVaultAndRestore: nodeify(this.createNewVaultAndRestore, this),
      addNewKeyring: nodeify(keyringController.addNewKeyring, keyringController),
      exportAccount: nodeify(keyringController.exportAccount, keyringController),

      // txController
      cancelTransaction: nodeify(txController.cancelTransaction, txController),
      updateTransaction: nodeify(txController.updateTransaction, txController),
      updateAndApproveTransaction: nodeify(txController.updateAndApproveTransaction, txController),
      retryTransaction: nodeify(this.retryTransaction, this),
      getFilteredTxList: nodeify(txController.getFilteredTxList, txController),
      isNonceTaken: nodeify(txController.isNonceTaken, txController),
      estimateGas: nodeify(this.estimateGas, this),

      // messageManager
      signMessage: nodeify(this.signMessage, this),
      cancelMessage: this.cancelMessage.bind(this),

      // personalMessageManager
      signPersonalMessage: nodeify(this.signPersonalMessage, this),
      cancelPersonalMessage: this.cancelPersonalMessage.bind(this),

      // personalMessageManager
      signTypedMessage: nodeify(this.signTypedMessage, this),
      cancelTypedMessage: this.cancelTypedMessage.bind(this),

      // notices
      checkNotices: noticeController.updateNoticesList.bind(noticeController),
      markNoticeRead: noticeController.markNoticeRead.bind(noticeController),
    }
  }
The UI(详细信息看本博客metamask源码学习-ui/index.js)
The MetaMask UI is essentially just a website that can be configured by passing it the API and state subscriptions from above. Anyone could make a UI that consumes these, effectively reskinning MetaMask.
MetaMask UI本质上只是一个网站,可以通过从上面传递API和状态订阅来配置它。任何人都可以创建一个使用这些的UI,有效地重新设计MetaMask
You can see this in action in our file ui/index.js. There you can see an argument being passed in named accountManager, which is essentially a MetaMask controller (forgive its really outdated parameter name!). With access to that object, the UI is able to initialize a whole React/Redux app that relies on this API for its account/blockchain-related/persistent states.
你可以从文件ui/index.js中看见它的实现。在这里,您可以看到一个参数在accountManager中传递,accountManager本质上是一个MetaMask控制器(该参数名称已经过时!)通过对该对象的访问,UI能够初始化整个依赖于该API实现其帐户/区块链相关/持久状态的React/Redux应用程序。
metamask-extension/ui/index.js
const render = require('react-dom').render
const h = require('react-hyperscript')
const Root = require('./app/root')
const actions = require('./app/actions')
const configureStore = require('./app/store')
const txHelper = require('./lib/tx-helper')
const { fetchLocale } = require('./i18n-helper')
const log = require('loglevel')

module.exports = launchMetamaskUi

log.setLevel(global.METAMASK_DEBUG ? 'debug' : 'warn')

function launchMetamaskUi (opts, cb) {
  var accountManager = opts.accountManager//accountManager就是一个metamask控制器,所以metamask-controller.js中的函数其都能调用,UI一般就调用getApi ()和getState()两个函数
  actions._setBackgroundConnection(accountManager)//设置后台的连接信息
  // check if we are unlocked first
  accountManager.getState(function (err, metamaskState) {//返回一个javascript对象,表示当前的MetaMask状态
    if (err) return cb(err)
    startApp(metamaskState, accountManager, opts)
      .then((store) => {
        cb(null, store)
      })
  })
}

//打开APP
async function startApp (metamaskState, accountManager, opts) {
  // parse opts
  if (!metamaskState.featureFlags) metamaskState.featureFlags = {}

  const currentLocaleMessages = metamaskState.currentLocale
    ? await fetchLocale(metamaskState.currentLocale)//得到`./_locales/${metamaskState.currentLocale}/messages.json`文件
    : {}
  const enLocaleMessages = await fetchLocale('en')

  const store = configureStore({//配置metamask环境信息,如中间件等

    // metamaskState represents the cross-tab state
    metamask: metamaskState,

    // appState represents the current tab's popup state
    appState: {},

    localeMessages: {
      current: currentLocaleMessages,
      en: enLocaleMessages,
    },

    // Which blockchain we are using:
    networkVersion: opts.networkVersion,
  })

  // if unconfirmed txs, start on txConf page
  //得到时间由小到大排序的所有信息
  const unapprovedTxsAll = txHelper(metamaskState.unapprovedTxs, metamaskState.unapprovedMsgs, metamaskState.unapprovedPersonalMsgs, metamaskState.unapprovedTypedMessages, metamaskState.network)
  const numberOfUnapprivedTx = unapprovedTxsAll.length
  if (numberOfUnapprivedTx > 0) {
    store.dispatch(actions.showConfTxPage({
      id: unapprovedTxsAll[numberOfUnapprivedTx - 1].id,//配置actions中showConfTxPage的值
    }))
  }

  accountManager.on('update', function (metamaskState) {//如果metamaskState由更新时触发
    store.dispatch(actions.updateMetamaskState(metamaskState))
  })

  // global metamask api - used by tooling
  global.metamask = {
    updateCurrentLocale: (code) => {
      store.dispatch(actions.updateCurrentLocale(code))
    },
    setProviderType: (type) => {
      store.dispatch(actions.setProviderType(type))
    },
  }

  // start app,使用react框架来启动该metamask app
  render(
    h(Root, {
      // inject initial state
      store: store,
    }
  ), opts.container)

  return store
}
Putting it Together
As an example, a WebExtension is always defined by a manifest.json file.
metamask-extension/app/manifest.json
{
  "name": "__MSG_appName__",
  "short_name": "__MSG_appName__",
  "version": "4.11.1",
  "manifest_version": 2,
  "author": "https://metamask.io",
  "description": "__MSG_appDescription__",
  "commands": {
    "_execute_browser_action": {
      "suggested_key": {
        "windows": "Alt+Shift+M",
        "mac": "Alt+Shift+M",
        "chromeos": "Alt+Shift+M",
        "linux": "Alt+Shift+M"
      }
    }
  },
  "icons": {
    "16": "images/icon-16.png",
    "128": "images/icon-128.png"
  },
  "applications": {
    "gecko": {
      "id": "webextension@metamask.io"
    }
  },
  "default_locale": "en",
  "background": {
    "scripts": [
      "chromereload.js",
      "background.js"
    ],
    "persistent": true
  },
  "browser_action": {
    "default_icon": {
      "19": "images/icon-19.png",
      "38": "images/icon-38.png"
    },
    "default_title": "MetaMask",
    "default_popup": "popup.html"
  },
  "content_scripts": [
    {
      "matches": [
        "file://*/*",
        "http://*/*",
        "https://*/*"
      ],
      "js": [
        "contentscript.js"
      ],
      "run_at": "document_start",
      "all_frames": true
    }
  ],
  "permissions": [
    "storage",
    "unlimitedStorage",
    "clipboardWrite",
    "http://localhost:8545/",
    "https://*.infura.io/",
    "activeTab",
    "webRequest",
    "*://*.eth/",
    "*://*.test/",
    "notifications"
  ],
  "web_accessible_resources": [
    "inpage.js",
    "phishing.html"
  ],
  "externally_connectable": {
    "matches": [
      "https://metamask.io/*"
    ],
    "ids": [
      "*"
    ]
  }
}
In ours, you can see that background.js is defined as a script to run in the background(上面代码蓝色标识处), and this is the file that we use to initialize the MetaMask controller.
在上面的代码中,可以看见 background.js被定义成在后台运行的脚本并且它(即 background.js其代码的讲解在本博客metamask源码学习-background.js中)也是我们用来初始化MetaMask控制器的文件
In that file, there's a lot going on, so it's maybe worth focusing on our MetaMask controller constructor to start. It looks something like this:
const controller = new MetamaskController({
    // User confirmation callbacks:
    showUnconfirmedMessage: triggerUi,
    unlockAccountMessage: triggerUi,
    showUnapprovedTx: triggerUi,
    // initial state
    initState,
    // platform specific api
    platform,
})
Since background.js is essentially the Extension setup file, we can see it doing all the things specific to the extension platform:
因为background.js本质上是扩展设置文件,我们可以看到它做所有特定于扩展平台的事情
- Defining how to open the UI for new messages, transactions, and even requests to unlock (reveal to the site) their account.定义如何为新消息、事务、甚至为解锁(向站点显示)其帐户的请求打开UI
- Provide the instance's initial state, leaving MetaMask persistence to the platform.提供实例的初始状态,将MetaMask持久化保留到平台
- Providing a
platformobject. This is becoming our catch-all adapter for platforms to define a few other platform-variant features we require, like opening a web link. (Soon we will be moving encryption out here too, since our browser-encryption isn't portable enough!)提供平台对象。这将成为平台的通用适配器,用于定义我们需要的其他一些平台变体特性,比如打开web链接。(不久我们也将把加密技术移到这里,因为我们的浏览器加密还不够便携!)
Ports, streams, and Web3!
Everything so far has been enough to create a MetaMask wallet on virtually any platform that runs JS, but MetaMask's most unique feature isn't being a wallet, it's providing an Ethereum-enabled JavaScript context to websites.
到目前为止,在几乎所有运行JS的平台上都可以创建一个MetaMask wallet,但MetaMask最独特的功能不是钱包,而是为网站提供了一个Ethereum-enabled的JavaScript环境。
MetaMask has two kinds of duplex stream APIs that it exposes: MetaMask有两种公开的双向流api
- metamask.setupTrustedCommunication(connectionStream, originDomain) - This stream is used to connect the user interface over a remote port, and may not be necessary for contexts where the interface and the metamask-controller share a process.此流用于通过远程端口连接用户界面,对于接口和metamask控制器共享进程的上下文可能不需要此流
都在metamask-extension/app/scripts/metamask-controller.js中
  /**
   * Used to create a multiplexed stream for connecting to a trusted context,
   * like our own user interfaces, which have the provider APIs, but also
   * receive the exported API from this controller, which includes trusted
   * functions, like the ability to approve transactions or sign messages.
   *
   * @param {*} connectionStream - The duplex stream to connect to.
   * @param {string} originDomain - The domain requesting the connection,
   * used in logging and error reporting.
   */
  setupTrustedCommunication (connectionStream, originDomain) {
    // setup multiplexing
    const mux = setupMultiplex(connectionStream)
    // connect features
    this.setupControllerConnection(mux.createStream('controller'))
    this.setupProviderConnection(mux.createStream('provider'), originDomain)
  }
- metamask.setupUntrustedCommunication(connectionStream, originDomain) - This method is used to connect a new web site's web3 API to MetaMask's blockchain connection. Additionally, the
originDomainis used to block detected phishing sites.此方法用于将新web站点的web3 API连接到MetaMask的区块链连接。另外,originDomain可以用来阻止检测到的钓鱼网站
//=============================================================================
// SETUP
//=============================================================================

  /**
   * Used to create a multiplexed stream for connecting to an untrusted context
   * like a Dapp or other extension.
   * @param {*} connectionStream - The Duplex stream to connect to.
   * @param {string} originDomain - The domain requesting the stream, which
   * may trigger a blacklist reload.
   */
  setupUntrustedCommunication (connectionStream, originDomain) {
    // Check if new connection is blacklisted
    if (this.blacklistController.checkForPhishing(originDomain)) {
      log.debug('MetaMask - sending phishing warning for', originDomain)
      this.sendPhishingWarning(connectionStream, originDomain)
      return
    }

    // setup multiplexing
    const mux = setupMultiplex(connectionStream)
    // connect features
    this.setupProviderConnection(mux.createStream('provider'), originDomain)
    this.setupPublicConfig(mux.createStream('publicConfig'))
  }
上面有调用到的函数:
  /**
   * Called when we detect a suspicious domain. Requests the browser redirects
   * to our anti-phishing page.
   *
   * @private
   * @param {*} connectionStream - The duplex stream to the per-page script,
   * for sending the reload attempt to.
   * @param {string} hostname - The URL that triggered the suspicion.
   */
  sendPhishingWarning (connectionStream, hostname) {
    const mux = setupMultiplex(connectionStream)
    const phishingStream = mux.createStream('phishing')
    phishingStream.write({ hostname })
  }

  /**
   * A method for providing our API over a stream using Dnode.
   * @param {*} outStream - The stream to provide our API over.
   */
  setupControllerConnection (outStream) {
    const api = this.getApi()
    const dnode = Dnode(api)
    pump(
      outStream,
      dnode,
      outStream,
      (err) => {
        if (err) log.error(err)
      }
    )
    dnode.on('remote', (remote) => {
      // push updates to popup
      const sendUpdate = remote.sendUpdate.bind(remote)
      this.on('update', sendUpdate)
    })
  }

  /**
   * A method for serving our ethereum provider over a given stream.
   * @param {*} outStream - The stream to provide over.
   * @param {string} origin - The URI of the requesting resource.
   */
  setupProviderConnection (outStream, origin) {
    // setup json rpc engine stack
    const engine = new RpcEngine()

    // create filter polyfill middleware
    const filterMiddleware = createFilterMiddleware({
      provider: this.provider,
      blockTracker: this.provider._blockTracker,
    })

    engine.push(createOriginMiddleware({ origin }))
    engine.push(createLoggerMiddleware({ origin }))
    engine.push(filterMiddleware)
    engine.push(createProviderMiddleware({ provider: this.provider }))

    // setup connection
    const providerStream = createEngineStream({ engine })
    pump(
      outStream,
      providerStream,
      outStream,
      (err) => {
        // cleanup filter polyfill middleware
        filterMiddleware.destroy()
        if (err) log.error(err)
      }
    )
  }

  /**
   * A method for providing our public config info over a stream.
   * This includes info we like to be synchronous if possible, like
   * the current selected account, and network ID.
   *
   * Since synchronous methods have been deprecated in web3,
   * this is a good candidate for deprecation.
   *
   * @param {*} outStream - The stream to provide public config over.
   */
  setupPublicConfig (outStream) {
    pump(
      asStream(this.publicConfigStore),
      outStream,
      (err) => {
        if (err) log.error(err)
      }
    )
  }
Web3 as a Stream
If you are making a MetaMask-powered browser for a new platform, one of the trickiest tasks will be injecting the Web3 API into websites that are visited. On WebExtensions, we actually have to pipe data through a total of three JS contexts just to let sites talk to our background process (site -> contentscript -> background).
如果您正在为一个新平台开发一个基于MetaMask-powered的浏览器,那么最棘手的任务之一就是将Web3 API注入到访问的网站中。在WebExtensions,我们实际上需要通过总共三个JS上下文来传输数据,只是为了让站点与我们的后台进程对话(site -> contentscript ->后台)。
To see how we do that, you can refer to the inpage script that we inject into every website. There you can see it creates a multiplex stream to the background, and uses it to initialize what we call the inpage-provider, which you can see stubs a few methods out, but mostly just passes calls to sendAsync through the stream it's passed! That's really all the magic that's needed to create a web3-like API in a remote context, once you have a stream to MetaMask available.
要了解我们如何做到这一点,您可以参考我们注入到每个网站的inpage脚本。在那里,您可以看到它创建了一个到后台的多路复用流,并使用它来初始化inpage-provider,你可以看到inpage-provider的一些方法输出了stubs(存根),但它的大多数方法只是通过它传递的流来传递对sendAsync的调用!一旦你有了一个可用的MetaMask流,以上就是在远程上下文中创建类似web3的API所需要的所有操作。
In inpage.js you can see we create a PortStream, that's just a class we use to wrap WebExtension ports as streams, so we can reuse our favorite stream abstraction over the more irregular API surface of the WebExtension. In a new platform, you will probably need to construct this stream differently. The key is that you need to construct a stream that talks from the site context to the background. Once you have that set up, it works like magic!
在inpage.js你可以看到我们创建了一个我们用来将WebExtension端口包装成流的PortStream类,因此我们可以在WebExtension的更加不规则的API表面上重用我们喜欢的流抽象。在新的平台中,您可能需要以不同的方式构造这个流。关键是您需要构建一个从站点上下文到后台的流。一旦你设置好了,它就会像魔术一样运作!
If streams seem new and confusing to you, that's ok, they can seem strange at first. To help learn them, we highly recommend reading Substack's Stream Handbook, or going through NodeSchool's interactive command-line class Stream Adventure, also maintained by Substack.
如果你对流并不是很了解,那就到Substack's Stream Handbook处去学习吧
还有中文版:https://github.com/jabez128/stream-handbook