1.前言
在使用Vue进行开发的时候,关于vue组件通信的方式,除了通俗易懂了解Vue组件的通信方式这篇博文谈到三种通信方式,其实vue更提倡我们使用vuex来进行组件间的状态管理以及通信问题。Vuex 是一个专为 Vue.js 应用程序开发的状态管理模式。
2.引例
在学习vuex之前,我们不妨先看这样一个例子:
在一个父子组件嵌套环境下,父组件可以改变子组件的背景颜色,而子组件自身也可以改变自己的背景颜色。
虽然使用之前谈到的组件通信方式也可以实现这个例子,但是这不是我们今天想讨论的。
我们可以换个角度看这个例子:
我们可以把子组件的背景颜色看做一种状颜色态,我们把这个颜色状态放在组件的外部,让子组件去读取这个状态来决定自己的背景颜色该是什么,如果父组件需要改变子组件的背景颜色,那么只需让父组件去改变这个状态即可,因为子组件的背景颜色取决于这个颜色状态是什么颜色,控制了这个状态,即控制了子组件的背景颜色。
简而言之一句话:就是需要对状态进行管理,这也就是vuex的核心:状态管理。
3.store
vuex对于状态管理提供了状态仓库store,store的作用就是将所有状态统一存储管理起来,状态仓库store是响应式的,当 Vue 组件从 store 中读取状态的时候,若 store 中的状态发生变化,那么相应的组件也会相应地得到高效更新。说了这么多,我们简单使用一下store。
3.1 安装vuex
在使用vue-cli进行模块化开发时,使用vuex之前必须先安装vuex:
npm install vuex --save
3.2 创建状态仓库store
安装完成后,在项目中main.js文件中按照如下方式引入vuex并创建一个状态仓库store,在状态仓库store内创建第一个状态color并设置该状态初始值为red:
1 import vuex from 'vuex'
2 Vue.use(vuex);
3 var store = new vuex.Store({
4     state:{
5         color:'red'
6     }
7 })
然后,在main.js中的根vue对象中挂载上面创建好的状态仓库store,这样在任何组件中都可以去读取仓库中的状态:
1 new Vue({
2   el: '#app',
3   store,
4   render: h => h(App)
5 })
OK,到这里,状态仓库和状态就创建好了,接下来我们就可以采用读取状态和改变状态的方式来改写上面的例子了,代码如下:
父组件代码:
<template>
  <div id="app">
   <h1>我是父组件</h1>
    <!--点击按钮后,去状态仓库将状态color改成yellow-->
    <input type="button" value="变成黄色" @click="$store.state.color = 'yellow'">
    <Child></Child>
  </div>
</template>

<script>
  import Child from './Child'
  export default {
  name: 'app',
  components:{
    Child
  },
  data () {
    return {

    }
  },
}
</script>

<style>

</style>
子组件代码:
<template>
    <!--子组件的backgroundColor属性值取决于状态仓库中的状态color值-->
    <div class="child" :style="{backgroundColor:$store.state.color}">
      <h1>子组件</h1>
      <!--子组件点击按钮,也可以去状态仓库中改变color状态值-->
      <input type="button" value="变成蓝色" @click="$store.state.color = 'blue'">
    </div>
</template>

<script>
    export default {
        name: "Child",
    }
</script>

<style scoped>
.child{
  width: 500px;
  height: 500px;
}
</style>
效果如下:
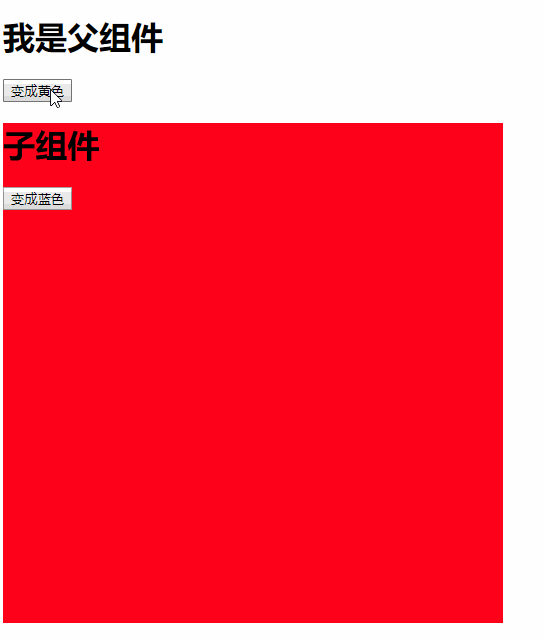
以上例子就是Vuex最简单的使用,怎么样,是不是so easy!!
3.3 优化代码结构
前面为了方便 , 我们把 store 对象写在了 main.js 里面 , 但实际上为了便于日后的维护 , 我们将store单独隔离出来分开写更好 , 我们在 src 目录下 , 新建一个 store 文件夹 , 然后在里面新建一个 index.js :
import Vue from 'vue'
import vuex from 'vuex'
Vue.use(vuex);

export default new vuex.Store({
    state:{
        color:'red'
    }
})
那么相应的 , 在 main.js 里的代码应该改成 :
import Vue from 'vue'
import App from './App.vue'
//引入store
import store from './store'
new Vue({
  el: '#app',
  store,
  render: h => h(App)
})
这样就把 store 单独分离出去了 ,日后当状态越来越多的时候维护起来就更加方便啦!
4.module
虽然我们把 store 单独分离出去了,但是随着项目规模越来越大,组件也越来越多,这就造成store.state里面的状态会越来越多,这么多的状态都堆在store.state里面显然不是一个很好代码结构,更重要的是哪些组件依赖哪些状态也会变得非常不清晰。那有没有什么更好的解决方案呢?其实Vuex早就替我们想到了,Vuex中的modules就是用来解决这个问题的。
modules可以将store.state里面的状态按照各个组件所依赖的情况进行分类,例如,我们将上面例子中子组件Child所依赖的color状态单独写进一个js文件中,然后在store 文件夹下的 index.js 中引入即可,代码如下:
//在store文件夹下新建Child_store.js文件:
export default {
    state:{
        color:'red'
    }
}
然后在store 文件夹下的 index.js 中引入:
import Vue from 'vue'
import vuex from 'vuex'
Vue.use(vuex);

import Child_store from './Child_store.js';//引入Child_store.js中的store对象

export default new vuex.Store({
    modules: {
        Child_store:Child_store
    }
})
做出这样的修改之后 , 我们只需将之前我们使用的 $store.state.color 统统改为 $store.state.Child_store.color即可。
如果还有其他的组件所依赖的状态 ,那就在store文件夹下再新建一个对应的xx_store.js文件 , 然后将他们引入到 index.js 文件中的modules中。
import Vue from 'vue'
import vuex from 'vuex'
Vue.use(vuex);

import Child_store from './Child_store.js';//引入Child_store.js中的store对象
import xxx_store from './xxx_store.js';//引入xxx_store.js中的store对象

export default new vuex.Store({
    modules: {
        Child_store:Child_store,
        xxx_store :xxx_store
    }
})
5. mutation
在上面例子中,我们点击按钮这个动作仅仅依赖了一个color状态,所以我们可以将改变状态的动作直接写在按钮的click的事件中,即@click="$store.state.Child_store.color = 'blue'"。,但是如果按钮点击依赖了多个状态,那么我们就不能把所有状态改变的动作都写在click事件中,当然,也不允许我们这么干。此时我们就需要用到mutations了,mutations允许我们一次性更新多个状态。
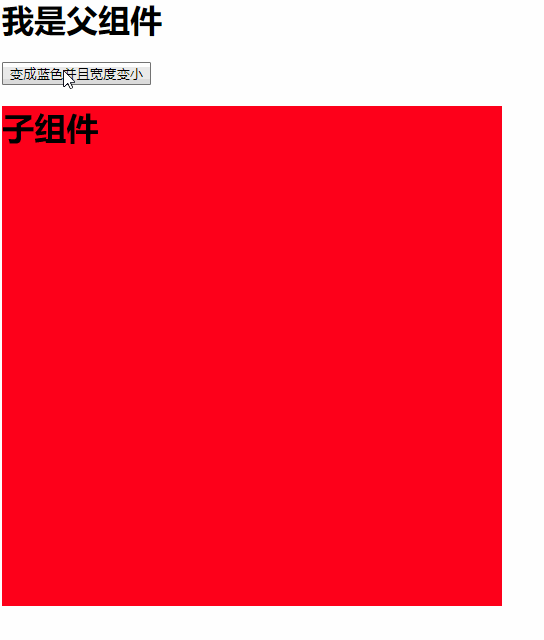
例如,我们给上面例子中的子组件Child再新增一个状态width,用来改变子组件的宽度,我们希望当点击按钮,既改变了子组件的背景颜色,而且也改变子组件的宽度,代码如下:
1.给Child_store.js中增加mutations选项
//Child_store.js
export default {
  state:{
    color:'red',
    '500px'
  },
  mutations:{
    switch(state,payload){    //这里的state对应着上面那个state
      state.color = payload.color;
      state.width = payload.width;
    }
  },
}
在mutations选项中定义switch函数,该函数可以接收两个参数,第一个参数必须是state,即为要改变的状态对象,第二个参数称为载荷(payload),即函数内要使用的参数.
2.子组件代码
<template>
    <div class="child" :style="{backgroundColor:$store.state.Child_store.color,$store.state.Child_store.width}">
      <h1>子组件</h1>
    </div>
</template>

<script>
    export default {
        name: "Child",
    }
</script>

<style scoped>
.child{
  height: 500px;
}
</style>
3.父组件代码
<template>
  <div id="app">
    <h1>我是父组件</h1>
    <input type="button" value="变成蓝色并且宽度变小" @click="$store.commit('switch',{color:'blue','100px'})">
    <Child></Child>
  </div>
</template>

<script>
  import Child from './Child'
  export default {
  name: 'app',
  components:{
    Child
  },
  data () {
    return {
    }
  }
}
</script>

<style>

</style>
父组件中使用$store.commit('switch',{color:'blue','100px'})来触发mutations中的switch函数,$store.commit()接收的第一个参数为要触发的mutations中的哪个函数,第二个参数是一个对象,也就是要触发的switch函数中的载荷payload。
效果如下:
6.action
多个state的操作 , 使用mutations会来触发会比较好维护 , 那么需要执行多个mutations就需要用action了:
1.给Child_store.js中增加actions选项
export default {
  state:{
    color:'red',
    '500px'
  },
  mutations:{
    switch(state,payload){    //这里的state对应着上面那个state
      state.color = payload.color;
      state.width = payload.width;
    }
  },
  actions:{
    switch_action(ctx,payload){      //这里的ctx和我们使用的$store拥有相同的对象和方法
      ctx.commit('switch',payload);
      //你还可以在下面触发其他的mutations方法
    }
  }
}
2.子组件不用变,在父组件中需要使用$store.dispatch('switch_action',{color:'blue','100px'})来触发actions中的switch_action方法
<template>
  <div id="app">
    <h1>我是父组件</h1>
    <input type="button" value="变成蓝色并且宽度变小" @click="$store.dispatch('switch_action',{color:'blue','100px'})">
    <Child></Child>
  </div>
</template>

<script>
  import Child from './Child'
  export default {
  name: 'app',
  components:{
    Child
  },
  data () {
    return {
    }
  }
}
</script>

<style>

</style>
7.getter
有时候我们需要从state 中派生出一些状态,也就是说,某些状态是通过现有的一个或多个状态通过计算得到的,类似于计算属性computed。假如我们现有一个状态show:true,但是我们很多地方又需要一个跟show状态相反的notShow状态,这种情况放在以前,我们会写一个计算属性来返回notShow:
computed(){
    not_show(){
        return !this.$store.state.show;
    }
}
哪个组件里需要notShow状态,就在哪个组件里写一遍上面的代码,如果需要这个状态的组件很多,那么就需要写很多遍重复的代码。这肯定不是我们想要的,而Vuex中的getter就很好的解决了这个问题:
export default {
    state:{
        show:false
    },
    getters:{
        notShow(state){//这里的state对应着上面这个state
            return !state.show;
        }
    }
}
我们在组件中使用$store.state.show来获得状态show,类似的 , 我们可以使用$store.state.notShow来获得状态notShow。
注意 $store.state.notShow的值是不能直接修改的 , 需要对应的 state 发生变化才能修改。
8.总结
了解了以上这些,再回头去看Vuex的官方文档,就应该不会一脸懵逼啦,哈哈哈哈。
(完)