之前搭传统的ssm框架,配置文件很多,看了几天文档才把那些xml的逻辑关系搞得七七八八,搭起来也是很麻烦,那时我完全按网上那个demo的版本要求(jdk和tomcat),所以最后是各种问题没成功跑起来。 今天尝试用springboot来整合,不敢相信才失败几次就成功了!!
现在来记录一下过程:
首先springboot基本的建立就不讲了,之前的博客里面有写。
添加POM依赖:
    <dependency>
            <groupId>org.springframework.boot</groupId>
            <artifactId>spring-boot-starter-thymeleaf</artifactId>
    </dependency>

    <dependency>
            <groupId>mysql</groupId>
            <artifactId>mysql-connector-java</artifactId>
    </dependency>

    <dependency>
            <groupId>org.mybatis.spring.boot</groupId>
            <artifactId>mybatis-spring-boot-starter</artifactId>
            <version>1.3.0</version>
    </dependency>
关于dao层的依赖就是后面两个mysql的connector和mybatis的starter(这个可是好东西)
开始写代码:
这里我们有个简单是数据表:
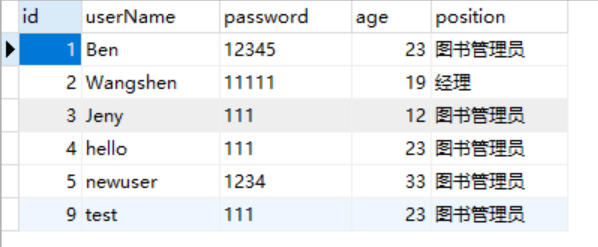
我们的目的是 用get发一个带有 id值的请求,服务器根据id值返回这个图书管理员的全部信息并用json的方式直接显示在页面上,
Controller:
@RestController
public class LibrarianController {

    @Autowired
    private LibrarianService librarianService;

    @GetMapping("/getLibrarian")
    public Librarian getALibrarianInfo(int id) {
        //System.out.println("test :id: "+id);
        return librarianService.selectLibrarian(id);
    }
}
RestController是responsebody+Controller两个注解的合体,一般就拿来直接传json数据。 为什么可以直接传个对象过去呢?这是因为springboot内置了jackson模块,可以在maven的依赖下看到这方面的jar包(之前我写是按网上的教程用gson来处理的,比起来这个简直无敌)
然后看到我们注入的sevice,下面是service
Service:
public interface LibrarianService {
    Librarian selectLibrarian(int id);
}
就是个接口
ServiceImpl:
@Service
public class LibrarianServiceImpl implements LibrarianService{

    @Autowired
    private LibrarianMapper librarianMapper;

    @Override
    public Librarian selectLibrarian(int id) {
        // TODO Auto-generated method stub
        return librarianMapper.selectLibrarian(id);
    }
}
这里记得要加@Service备注,才会被spring生成bean然后注入到controller那里去。
然后看到这里注入了个mapper
Dao:
package com.example.dao;


import org.apache.ibatis.annotations.Mapper;

import com.example.entity.Librarian;

@Mapper
public interface LibrarianMapper {
    Librarian selectLibrarian(int id);
}
这里加的@Mapper是 MyBatis的备注,目的是为了让spring能够根据xml和这个接口动态生成这个接口的实现。如果是加@Repository,就是spring生成一个bean,自动注入service的相关引用中。
然后是Mapper的xml文件(我的MyBatis的相关sql用的是xml)
mapper.xml:
<?xml version="1.0" encoding="UTF-8"?>
<!DOCTYPE mapper PUBLIC "-//mybatis.org//DTD Mapper 3.0//EN" "http://mybatis.org/dtd/mybatis-3-mapper.dtd">
<mapper namespace="com.example.dao.LibrarianMapper">

    <!-- 可根据自己的需求,是否要使用 -->
    <resultMap type="Librarian" id="LibrarianMap">

        <id column="id" property="id" jdbcType="INTEGER" />
        <result column="userName" property="useName" jdbcType="VARCHAR" />
        <result column="password" property="password" jdbcType="VARCHAR" />
        <result column="age" property="age" jdbcType="INTEGER" />
        <result column="position" property="position" jdbcType="VARCHAR" />

    </resultMap>


    <select id="selectLibrarian" parameterType="INTEGER" resultMap="LibrarianMap">
        select *
        from t_librarian
        where 1=1
            and id = #{id,jdbcType=INTEGER}
    </select>


</mapper>
第三行的namespace很重要噢,它是指定这个xml所对应的是哪个dao(mapper)接口
resultMap是做个pojo和数据库表的对应(这里只写个Librarian不用写全路径是因为做了设置,下面会说)
select标签的id对应的就是mapper接口中的方法名,parameterType就是传进来的参数类型
简单的配置与设置:
好现在讲讲设置,这里会想到,那些Controller啊,@Service啊还有MyBatis的注解@Mapper什么的spring怎么知道在哪呢?不用像mvc那样搞个扫描设置吗?
是的要的,这些我们在启动类做了简单的设置:
package com.example.main;

import org.mybatis.spring.annotation.MapperScan;
import org.springframework.boot.SpringApplication;
import org.springframework.boot.autoconfigure.SpringBootApplication;


/**
 * 指定所扫的包,会自动扫描指定包下的全部标有@Component的类,并注册成bean,
 * 当然包括@Component下的子注解@Service,@Repository,@Controller。
 * @author 85060
 *
 */
@SpringBootApplication(scanBasePackages={"com.example.*"})
@MapperScan("com.example.dao")
public class SpringBootDemoApplication {

    public static void main(String[] args) {
        SpringApplication.run(SpringBootDemoApplication.class, args);
    }
}
关于这个SpringBootApplication,它其实是好几个注解的合体(之前的博客里有讲),所以可以直接在这写扫包的设置,然后那个@MapperScan是MyBatis提供的设置注解。
然后还有点配置文件:
spring.thymeleaf.cache=false
spring.devtools.restart.enabled=true
spring.devtools.restart.additional-paths=src/main/java

spring.datasource.driver-class-name=com.mysql.jdbc.Driver
spring.datasource.url=jdbc:mysql://localhost:3306/db_library
spring.datasource.username=root
spring.datasource.password=4008

mybatis.type-aliases-package=com.example.entity
mybatis.mapperLocations=classpath:mappers/*.xml
主要有关的是第四行开始的,最后两行一个是设置基本包(包别名)也就是为什么在mapper.xml中可以只写一个Librarian的原因。
最后一行的很重要,是告诉系统在哪里去找mapper.xml文件。
上一个最后的效果图:

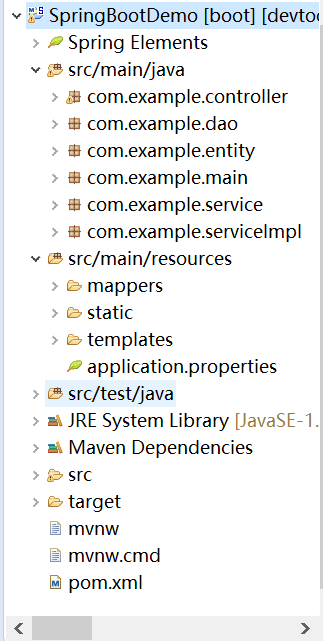
再放一个项目结构图:
放两个springboot和mybatis整合讲得比较好的博客供参考:
https://blog.csdn.net/gebitan505/article/details/54929287(要是着看到这个就省好多功夫了!)
https://blog.csdn.net/blackwoodcliff/article/details/50776155