1、安装Nginx
$ yum -y install gcc # nginx是c写的
$ yum -y install pcre-devel # url重写用到的包
$ yum -y install zlib zlib-devel # 解压缩用到的包
扩展①:
|
yum install -y lsof lsof -i:80 #在nginx启动前,需要先检查端口是否被占用 |
|
yum install elinks # 除了elinks还有curl、lynx等文本浏览器 elinks http://192.168.229.10 -dump |
|
安装killall命令 yum search killall yum -y install psmisc |
2、虚拟主机
2.1、基于IP的虚拟主机
2.2、基于端口的虚拟主机
2.3、基于域名的虚拟主机
vim /etc/hosts


验证:

3、长连接
# 关闭长连接:0代表关闭
keepalive_timeout 0;
# 开启长连接(默认开启)
# keepalive_timeout 65;
# 一个长连接处理最大请求数(定期释放内存,防止内存溢出)
# keepalive_requests 8192;
4、压缩优化(数据压缩)
gzip on; # 启动gzip压缩功能
gzip_proxied any; # nginx做前端代理时启用该选项,表示无论后端服务器的headers返回什么信息,都无条件启用压缩
gzip_min_length 1k; # 小于1k的小文件不压缩(小文件可能会越压缩越大)
gzip_buffers 4 8k; # 设置系统获取几个单位的缓存用于存储gzip的压缩结果数据流,按照原始数据大小以8k为单位申请4倍内存空间
gzip_comp_level 6; # gzip压缩级别,1压缩比最小处理速度最快,9压缩比最大处理最慢也最消耗CPU,一般设置为3即可
gzip_types text/plain text/css text/xml text/javascript application/javascript application/json application/x-javascript application/xml application/xml+rss image/jpeg image/gif image/png; # 页面或文档启用压缩类型
gzip_vary on; # 开启在http header中添加Vary:Accept-Encoding
5、客户端缓存优化
语法:expires [time|epoch|max|off]
默认值:expires off
作用域:http,server,locatio
# 客户端缓存设置:png或gif文件在客户端缓存一个小时
location ~* .(png|gif)$ {
expires 1h;
}
测试浏览器刷新以Chrome为例:
①ctrl+f5:
清空本地缓存从服务器拿数据。
②F5或者 点击 浏览器的刷新图标:
优先从本地找,然后去找服务器核对信息是否一致。从本地拿数据。
③回车:
从本地缓存拿数据。
6、Nginx分发算法
集群分发算法:如何将用户请求按照一定的规律分发给业务服务器。主要分为Nginx集群默认算法和基于请求头分发算法。
nginx的upstream 目前支持4种方式的分配:
(1)轮询(默认)
每个请求按时间顺序逐一分配到不同的后端服务器,如果后端服务器down掉,能自动剔除。
|
upstream backend { # no load balancing method is specified for Round Robin server backend1.example.com weight=1; server backend2.example.com; } |
(2)最小连接数
指定轮询几率,weight和访问比率成正比,用于后端服务器性能不均的情况。
|
upstream backend { least_conn; server backend1.example.com weight=1; server backend2.example.com; } |
(1)和(2):指定轮询几率(weight),weight和访问比率成正比,用于后端服务器性能不均的情况。
(3)ip_hash
每个请求按访问ip的hash结果分配,这样每个访客固定访问一个后端服务,好处是可以解决session的问题。
因此前两种只能处理静态页面,而这种方式可以处理动态网站。
|
upstream backend { ip_hash; server backend1.example.com; server backend2.example.com; } |
如果其中一台服务需要临时移除
|
upstream backend { server backend1.example.com; server backend2.example.com; server backend3.example.com down; } |
(4)通用hash
|
upstream backend { hash $request_uri consistent; server backend1.example.com; server backend2.example.com; } |
(5)最少时间(收费)
按后端服务器的响应时间来分配请求,响应时间短的优先分配。
least_time的参数:
header – Time to receive the first byte from the server
last_byte – Time to receive the full response from the server
last_byte inflight – Time to receive the full response from the server, taking into account incomplete requests
|
upstream backend { least_time header; server backend1.example.com; server backend2.example.com; } |
(6)随机(收费)
least_conn – The least number of active connections
least_time=header (NGINX Plus) – The least average time to receive the response header from the server ($upstream_header_time)
least_time=last_byte (NGINX Plus) – The least average time to receive the full response from the server ($upstream_response_time)
|
upstream backend { random two least_time=last_byte; server backend1.example.com; server backend2.example.com; server backend3.example.com; server backend4.example.com; } |
7、Nginx基于请求头的分发
7.1、基于host分发
基于host分发这种分发方式适用于多集群分发。例如:一个公司有多个网站,每个网站就是一个集群。
7.2、基于开发语言分发
这种分发方式适用于混合开发的网站,某些大型网站既有php也有jsp,就可以基于开发语言分发。
7.3、基于浏览器的分发
这种基于浏览器的分发,常应用于PC端和移动端区分或浏览器适配。
7.4、基于源IP分发
像腾讯新闻、58同城等等网站,往往在什么地方登陆则获取哪个地方的数据。服务器通过源IP匹配判断,从对应的数据库中获取数据。
7.4.1、geo模块
Nginx的geo模块不仅可以有限速白名单的作用,还可以做全局负载均衡,可以要根据客户端ip访问到不同的server。
geo指令是通过ngx_http_geo_module模块提供的。默认情况下,nginx安装时是会自动加载这个模块,除非安装时人为的手动添加--without-http_geo_module。
ngx_http_geo_module模块可以用来创建变量,其值依赖于客户端IP地址。
7.4.2、geo模块
|
upstream bj.server { server 192.168.31.42; # web01 } upstream sh.server { server 192.168.31.43; # web02 } upstream default.server { server 192.168.31.42:81; # web03 } geo $geo { # IP库 default default; 192.168.31.241/32 bj; # 北京 192.168.31.242/32 sh; # 上海 } server { listen 80; server_name www.web1.com;
location / { proxy_pass http://$geo.server$request_uri; } } |
8、keepalived+nginx 高可用集群
8.1、架构图
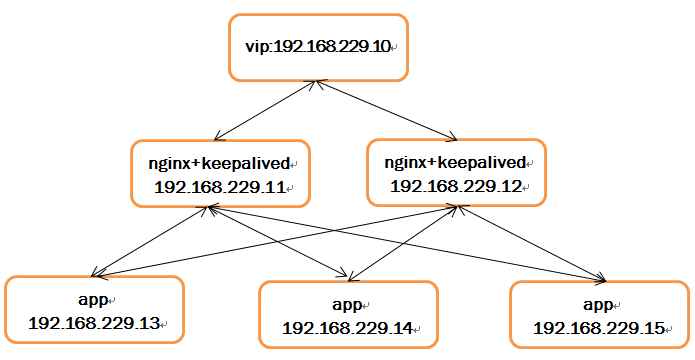
8.2、修改cat /etc/hosts
192.168.229.11 ha1
192.168.229.12 ha2
192.168.229.13 ha3
192.168.229.14 ha4
192.168.229.15 ha5
8.3、服务器免密码登录
ssh-keygen -t rsa #一直Enter
ssh-copy-id -i /root/.ssh/id_rsa.pub root@ha1
8.4、Keepalived介绍
Keepalived的作用是检测服务器的状态,
当服务器宕机或工作出现故障,Keepalived将检测到并将服务器集群中剔除,选择其他服务器代替该服务器的工作;
当服务器恢复工作正常,Keepalived检测到自动将服务器加入服务器群集群。
总结来说:Keepalived软件是一个监控+自愈的软件。
运行协议是VRRP,主分发器的keepalived会向网络广播。
8.5、Keepalived安装
下载:keepalived-2.0.10.tar.gz
依赖:yum install -y kernel-devel
编译与安装:
cd keepalived-2.0.10
./configure --prefix=/usr/local/keepalived
make
make install
服务配置:
mkdir /etc/keepalived
cp /usr/local/keepalived/etc/keepalived/keepalived.conf /etc/keepalived/
ln -s /usr/local/keepalived/sbin/keepalived /sbin/
8.6、keepalived配置
|
! Configuration File for keepalived global_defs { notification_email { acassen@firewall.loc failover@firewall.loc sysadmin@firewall.loc } notification_email_from Alexandre.Cassen@firewall.loc smtp_server 127.0.0.1 smtp_connect_timeout 30 router_id LVS_DEVEL vrrp_skip_check_adv_addr vrrp_strict vrrp_garp_interval 0 vrrp_gna_interval 0 } vrrp_script check_nginx{ script "/etc/keepalived/check-nginx.sh" interval 2 # timeout 1 fall 1 } vrrp_instance nginx { state MASTER interface eth0 virtual_router_id 51 priority 100 advert_int 1 authentication { auth_type PASS auth_pass 1111 } virtual_ipaddress { 192.168.229.10 #vip虚拟IP } track_script{ check_nginx } } virtual_server 192.168.229.10 443 { delay_loop 6 lb_algo rr lb_kind NAT persistence_timeout 50 protocol TCP real_server 192.168.229.11 80 { weight 1 #心跳检查#(HTTP_GET|SSL_GET|TCP_CHECK|SMTP_CHECK|DNS_CHECK|MISC_CHECK|BFD_CHECK) TCP_CHECK{ connect_port 80 retry 3 } } } |
执行脚本:/etc/keepalived/check-nginx.sh
|
#!/bin/bash check_nginx () { nginxpid=`ps -C nginx --no-header | wc -l` if [ $nginxpid -eq 0 ];then service nginx start sleep 1 nginxpid=`ps -C nginx --no-header | wc -l` if [ $nginxpid -eq 0 ];then killall keepalived fi fi } check_nginx |
|
! Configuration File for keepalived global_defs { notification_email { acassen@firewall.loc failover@firewall.loc sysadmin@firewall.loc } notification_email_from Alexandre.Cassen@firewall.loc smtp_server 127.0.0.1 smtp_connect_timeout 30 router_id LVS_DEVEL vrrp_skip_check_adv_addr vrrp_strict vrrp_garp_interval 0 vrrp_gna_interval 0 } vrrp_script check_nginx{ script "/etc/keepalived/check-nginx.sh" interval 2 # timeout 1 fall 1 } vrrp_instance nginx { state BACKUP interface eth0 virtual_router_id 51 priority 100 advert_int 1 authentication { auth_type PASS auth_pass 1111 } virtual_ipaddress { 192.168.229.10 } track_script{ check_nginx } } virtual_server 192.168.229.10 443 { delay_loop 6 lb_algo rr lb_kind NAT persistence_timeout 50 protocol TCP real_server 192.168.229.12 80 { weight 1 TCP_CHECK{ connect_port 80 retry 3 } } } |
8.7、keepalived启动
keepalived #命令直接启动
自定义启动脚本:autostart.sh
|
#!/bin/bash #启动后台服务 ssh ha3 nohup java -jar backend.jar& #后台服务 exit ssh ha4 nohup java -jar backend.jar& #后台服务 exit ssh ha5 nohup java -jar backend.jar& #后台服务 exit #启动keepalived ssh ha1 keepalived #service keepalived start sleep 1 ssh ha2 keepalived #service keepalived start sleep 1 exit |
9、验证
9.1、后台服务验证
服务目录:

index.html文件:
|
<!DOCTYPE html> <html xmlns:th="http://www.thymeleaf.org"> <head> <title>backend</title> <script type="text/javascript"> #var msg="${hostName}"; #alert(msg); </script> </head> <body> <div> <p>templates</p> <p>This is backend instance!</p> <p th:text="${hostName}"></p> <p th:text="${session.hostName}"></p> <img src="/images/desk01.jpg" width="600" height="400"/> <img src="/images/desk02.jpg" width="600" height="400"/> </div> </body> </html> |
application.properties配置文件
|
server.port=8080 spring.mvc.static-path-pattern=/** spring.thymeleaf.cache=false spring.thymeleaf.check-template=true spring.thymeleaf.check-template-location=true spring.thymeleaf.enabled=true spring.thymeleaf.encoding=UTF-8 spring.thymeleaf.mode=HTML spring.thymeleaf.servlet.content-type=text/html |
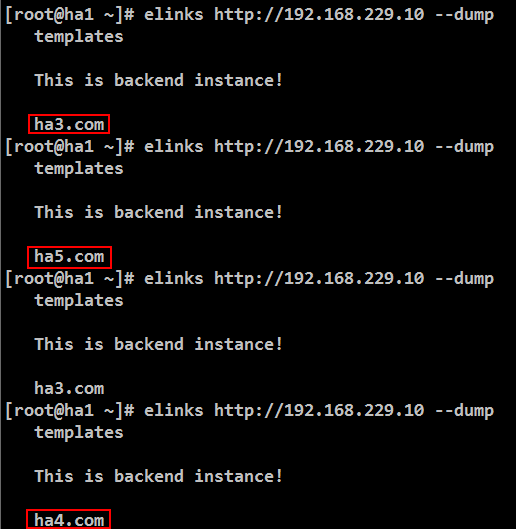
分别在ha3、ha4、ha5启动服务:nohup java -jar backend.jar&;注意验证服务是否正常。

9.2、Nginx服务验证
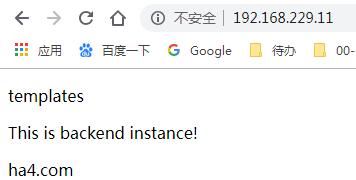
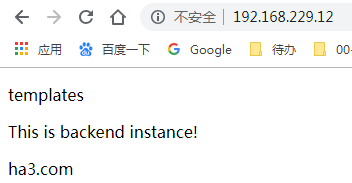
两个Nginx服务正常!
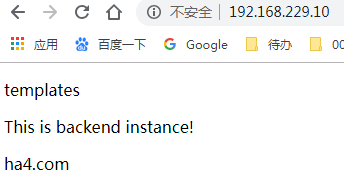
9.3、Keepalived服务验证
9.3.1、两台服务都正常
ha1正常:

ha2正常:

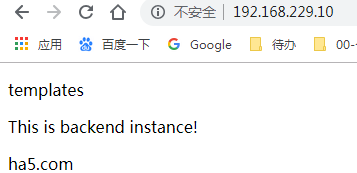
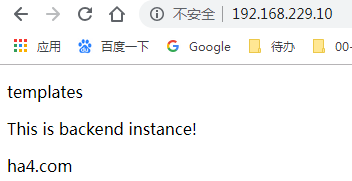
浏览器调用后台服务:
文本浏览器调用后台服务:(间隔2秒调用一次)
9.3.2、一台服务都正常,一台服务异常

9.4、Nginx+Keepalived服务验证
每间隔2秒关闭一台Nginx服务:
[root@ha1 ~]# watch -n 2 killall nginx
通过!!!