springboot整合mybatis源码分析
本文主要讲述mybatis在springboot中是如何被加载执行的,由于涉及的内容会比较多,所以这次只会对调用关系及关键代码点进行讲解,为了避免文章太长,读起来昏昏欲睡,一些不影响整体流程的细节就不涉及了。
源码位置https://github.com/wbo112/blogdemo/tree/main/springbootdemo/springboot-mybatis
1、预备知识
-
FactoryBean
什么是FactoryBean?
我们先看看FactoryBean的源码
//由 BeanFactory 中使用的对象实现的接口,这些对象本身是单个对象的工厂。如果一个 bean 实现了这个接口,它就被用作一个对象暴露的工厂,而不是直接作为一个将暴露自己的 bean 实例。
//注意:实现此接口的 bean 不能用作普通 bean。 FactoryBean 以 bean 样式定义,但为 bean 引用公开的对象 (getObject()) 始终是它创建的对象。
//FactoryBeans 可以支持单例和原型,并且可以根据需要懒惰地或在启动时急切地创建对象。 SmartFactoryBean 接口允许公开更细粒度的行为元数据。
//该接口在框架本身中被大量使用,例如用于 AOP org.springframework.aop.framework.ProxyFactoryBean 或 org.springframework.jndi.JndiObjectFactoryBean。它也可以用于自定义组件;然而,这仅适用于基础设施代码。
//FactoryBean 是一个程序化契约。实现不应该依赖于注释驱动的注入或其他反射设施。 getObjectType() getObject() 调用可能会在引导过程的早期到达,甚至在任何后处理器设置之前。如果您需要访问其他 bean,请实现 BeanFactoryAware 并以编程方式获取它们。
//容器只负责管理FactoryBean 实例的生命周期,而不负责管理FactoryBean 创建的对象的生命周期。因此,暴露的 bean 对象(例如 java.io.Closeable.close() 上的 destroy 方法不会被自动调用。相反,FactoryBean 应该实现 DisposableBean 并将任何此类关闭调用委托给底层对象。
//最后,FactoryBean 对象参与包含 BeanFactory 的 bean 创建同步。除了 FactoryBean 本身(或类似的)内部的延迟初始化之外,通常不需要内部同步。
package org.springframework.beans.factory;

import org.springframework.lang.Nullable;

public interface FactoryBean<T> {

	String OBJECT_TYPE_ATTRIBUTE = "factoryBeanObjectType";

    //返回真正的beanFacotry中的bean对象
	@Nullable
	T getObject() throws Exception;

	//返回真正的beanFacotry中的bean对象的类型
	@Nullable
	Class<?> getObjectType();

	//是否单例
	default boolean isSingleton() {
		return true;
	}

}
上面就是FactoryBean的源码了,源码中的注释我都删除掉了。类上的中文注释是翻译的源码上的,方法上的注释是我自己加的。简单来说就是时间这个接口的类是作为对象暴漏的工厂,真正调用getObject()才会得到实际的bean对象。
2、springboot集成mybatis
-
之前的文章简单说到springboot启动的时候会读取META-INFspring.factories文件,把key=org.springframework.boot.autoconfigure.EnableAutoConfiguration的字符串作为类名去加载(启动会配合META-INFspring-autoconfigure-metadata.properties中的内容过滤掉不符合当前场景的)
springboot集成mybatis也是这样实现的。

-
是由谁来上面的文件的呢
我们的main方法上都会有@SpringBootApplication注解

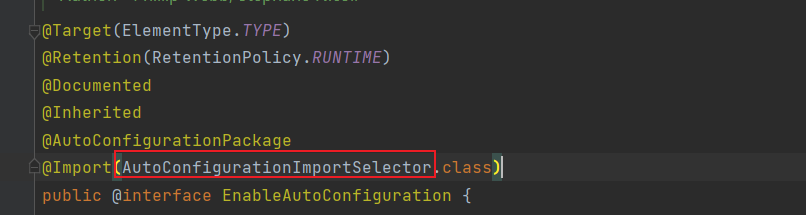
在SpringBootApplication这个上面会有个@EnableAutoConfiguration注解
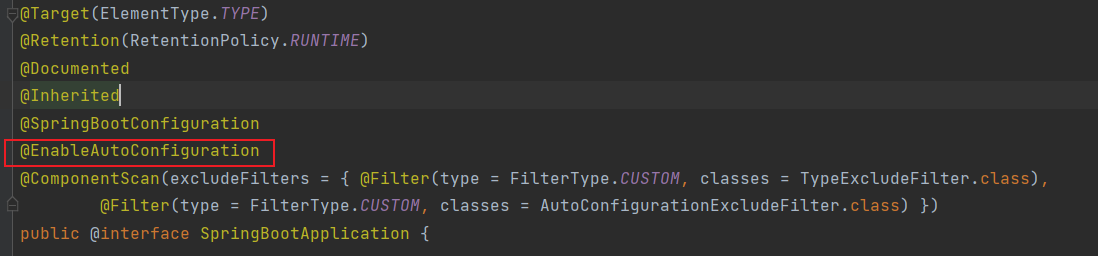
在这个上面会有import注解,参数是AutoConfigurationImportSelector.class。真正读取上面文件的类就是AutoConfigurationImportSelector。
AutoConfigurationImportSelector.java
//真正的读取代码是在这里
	protected AutoConfigurationEntry getAutoConfigurationEntry(AnnotationMetadata annotationMetadata) {
		if (!isEnabled(annotationMetadata)) {
			return EMPTY_ENTRY;
		}
		AnnotationAttributes attributes = getAttributes(annotationMetadata);
		//在这里读取META-INFspring.factories文件中key=org.springframework.boot.autoconfigure.EnableAutoConfiguration的值
		List<String> configurations = getCandidateConfigurations(annotationMetadata, attributes);
		configurations = removeDuplicates(configurations);
		Set<String> exclusions = getExclusions(annotationMetadata, attributes);
		checkExcludedClasses(configurations, exclusions);
		configurations.removeAll(exclusions);
        //在这里读取META-INFspring.factories文件中key=org.springframework.boot.autoconfigure.AutoConfigurationImportFilter的值根据META-INFspring-autoconfigure-metadata.properties进行过滤
		configurations = getConfigurationClassFilter().filter(configurations);
		fireAutoConfigurationImportEvents(configurations, exclusions);
		return new AutoConfigurationEntry(configurations, exclusions);
	}
读取META-INFspring-autoconfigure-metadata.properties文件是在AutoConfigurationImportSelector的内部类ConfigurationClassFilter的构造方法中,真正的过滤也是在这个内部类中
		ConfigurationClassFilter(ClassLoader classLoader, List<AutoConfigurationImportFilter> filters) {
		//在这里读取的META-INFspring-autoconfigure-metadata.properties
			this.autoConfigurationMetadata = AutoConfigurationMetadataLoader.loadMetadata(classLoader);
			this.filters = filters;
		}
//这个也是ConfigurationClassFilter的方法
List<String> filter(List<String> configurations) {
   long startTime = System.nanoTime();
   String[] candidates = StringUtils.toStringArray(configurations);
   boolean skipped = false;
   for (AutoConfigurationImportFilter filter : this.filters) {
   	//执行过滤
      boolean[] match = filter.match(candidates, this.autoConfigurationMetadata);
      for (int i = 0; i < match.length; i++) {
         if (!match[i]) {
            candidates[i] = null;
            skipped = true;
         }
      }
   }
     + TimeUnit.NANOSECONDS.toMillis(System.nanoTime() - startTime) + " ms");
   }
   return result;
}
默认的过滤器是有3个,是在这里

在读取过程中就会读取mybatis-spring-boot-autoconfigure-2.2.0.jar中的META-INFspring.factories配置(本文第一个图),加载下面两个类
org.springframework.boot.autoconfigure.EnableAutoConfiguration=
org.mybatis.spring.boot.autoconfigure.MybatisLanguageDriverAutoConfiguration,
org.mybatis.spring.boot.autoconfigure.MybatisAutoConfiguration
同样的也会用mybatis-spring-boot-autoconfigure-2.2.0.jar中的META-INFspring-autoconfigure-metadata.properties文件进行过滤。

这里的过滤其实就是用类名+.+Conditional*来作为过滤的
org.mybatis.spring.boot.autoconfigure.MybatisAutoConfiguration.ConditionalOnClass=org.apache.ibatis.session.SqlSessionFactory,org.mybatis.spring.SqlSessionFactoryBean
org.mybatis.spring.boot.autoconfigure.MybatisAutoConfiguration.ConditionalOnSingleCandidate=javax.sql.DataSource
比如上面两行org.mybatis.spring.boot.autoconfigure.MybatisAutoConfiguration.ConditionalOnClass是根据等号后面的类是否存在来判断是否被过滤掉,org.mybatis.spring.boot.autoconfigure.MybatisAutoConfiguration.ConditionalOnSingleCandidate看代码也是判断对应类是否存在来判断的,多个条件是and的关系
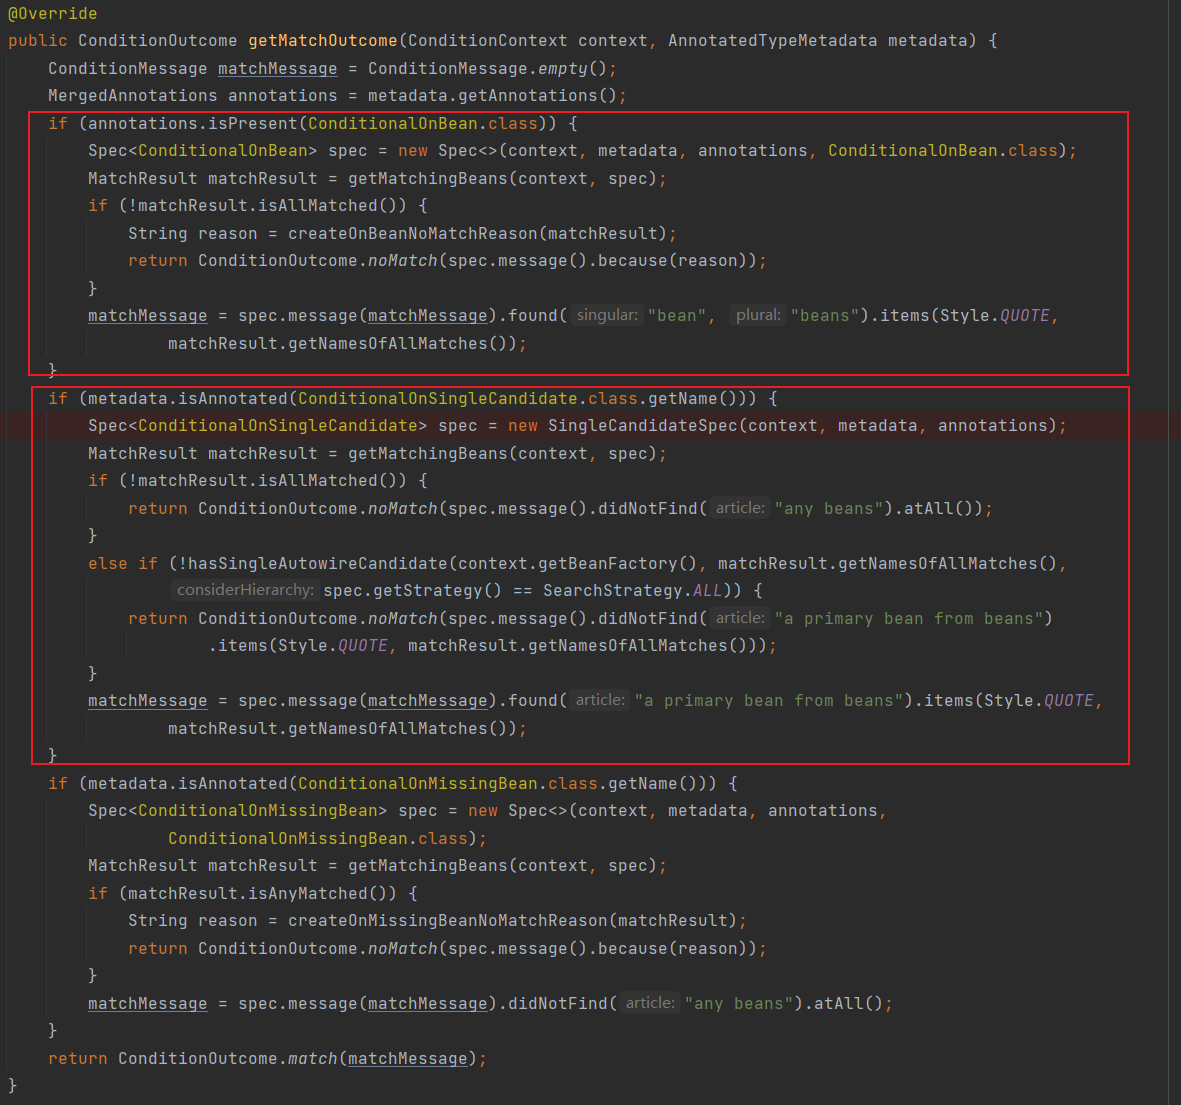
这两个条件的具体判断代码位置在OnBeanCondition中
protected final ConditionOutcome[] getOutcomes(String[] autoConfigurationClasses,
      AutoConfigurationMetadata autoConfigurationMetadata) {
   ConditionOutcome[] outcomes = new ConditionOutcome[autoConfigurationClasses.length];
   for (int i = 0; i < outcomes.length; i++) {
      String autoConfigurationClass = autoConfigurationClasses[i];
      if (autoConfigurationClass != null) {
          //获取*.ConditionalOnClass等号后面的值
         Set<String> onBeanTypes = autoConfigurationMetadata.getSet(autoConfigurationClass, "ConditionalOnBean");
          //进行判断,返回null就是OK的,条件不存在也是null
         outcomes[i] = getOutcome(onBeanTypes, ConditionalOnBean.class);
         if (outcomes[i] == null) {
             //获取*.ConditionalOnSingleCandidate等号后面的值
            Set<String> onSingleCandidateTypes = autoConfigurationMetadata.getSet(autoConfigurationClass,
                  "ConditionalOnSingleCandidate");
              //进行判断,返回null就是OK的,条件不存在也是null
            outcomes[i] = getOutcome(onSingleCandidateTypes, ConditionalOnSingleCandidate.class);
         }
      }
   }
   return outcomes;
}
当前的场景这两个类都是符合的不会被过滤掉。这两个类就会被加载。
3、MybatisAutoConfiguration的加载,beanFatory加载@Mapper类
下面具体看下加载的过程,主要是MybatisAutoConfiguration这个类,所以我们这里也就只看这个类了
//这里就把类上的注解粘了出来简单都介绍下

//这个注解大家都比较熟悉,不多说了
@org.springframework.context.annotation.Configuration
//这个还是条件注解,处理的类和上面配置文件中的处理都在同一个类中
//这个是判断对应类是否存在
@ConditionalOnClass({ SqlSessionFactory.class, SqlSessionFactoryBean.class })
//这个就和配置文件中的处理有区别了,这个是判断beanFacotry中是否只有一个类型DataSource.class的bean的定义,或者有多个,但有一个主要的
@ConditionalOnSingleCandidate(DataSource.class)
//这个是去让注入配置文件
@EnableConfigurationProperties(MybatisProperties.class)
//这个是排序的
@AutoConfigureAfter({ DataSourceAutoConfiguration.class, MybatisLanguageDriverAutoConfiguration.class })
public class MybatisAutoConfiguration implements InitializingBean {
    ......
}
下面这个图是ConditionalOnClass,ConditionalOnSingleCandidate执行处理的位置,还是在OnBeanCondition这个类中
在进行完过滤判断后,确定MybatisAutoConfiguration类要加载之后,会扫描内部类和方法上,符合条件的也都会被加载,主要是找@Configuration,@Bean这两个注解。我们当前这个类中依次会加载如下内容
加载这个内部类,ConditionalOnMissingBean这个条件当前是成立的,关于条件这块都会忽略掉,不多说这块了。同时由于类上有Import注解,也就会继续加载AutoConfiguredMapperScannerRegistrar.class这个类,
类上有方法@Bean注解


这两个类也会被加载
这里就会加载MybatisAutoConfiguration,MapperScannerRegistrarNotFoundConfiguration,AutoConfiguredMapperScannerRegistrar,SqlSessionTemplate,SqlSessionFactory这几个作为bean的定义(后面两个是方法)。
由于AutoConfiguredMapperScannerRegistrar实现了ImportBeanDefinitionRegistrar接口,在加载的过程中,会调用registerBeanDefinitions去注册额外的bean的定义。
这个方法比较重要,我们进去看看
    @Override
    public void registerBeanDefinitions(AnnotationMetadata importingClassMetadata, BeanDefinitionRegistry registry) {
	//这个是判断beanFactory中是否存在AutoConfigurationPackages的bean,这里是存在的
      if (!AutoConfigurationPackages.has(this.beanFactory)) {
        logger.debug("Could not determine auto-configuration package, automatic mapper scanning disabled.");
        return;
      }

      logger.debug("Searching for mappers annotated with @Mapper");
	  //这里获取要扫描的包名,这里会是{“com.example.springbootmybatis”},其实也就是我们在哪里找mapper,后面单独说下这个
      List<String> packages = AutoConfigurationPackages.get(this.beanFactory);
      if (logger.isDebugEnabled()) {
        packages.forEach(pkg -> logger.debug("Using auto-configuration base package '{}'", pkg));
      }
	 //下面这些代码主要就是定义一个bean的定义,添加到BeanFactory中
      BeanDefinitionBuilder builder = BeanDefinitionBuilder.genericBeanDefinition(MapperScannerConfigurer.class);
      builder.addPropertyValue("processPropertyPlaceHolders", true);
      //这就是要扫描的注解类型,就是@Mapper
      builder.addPropertyValue("annotationClass", Mapper.class);
      //这里是要扫描的包的路径
      builder.addPropertyValue("basePackage", StringUtils.collectionToCommaDelimitedString(packages));
      BeanWrapper beanWrapper = new BeanWrapperImpl(MapperScannerConfigurer.class);
      Set<String> propertyNames = Stream.of(beanWrapper.getPropertyDescriptors()).map(PropertyDescriptor::getName)
          .collect(Collectors.toSet());
      if (propertyNames.contains("lazyInitialization")) {
        // Need to mybatis-spring 2.0.2+
        builder.addPropertyValue("lazyInitialization", "${mybatis.lazy-initialization:false}");
      }
      if (propertyNames.contains("defaultScope")) {
        // Need to mybatis-spring 2.0.6+
        builder.addPropertyValue("defaultScope", "${mybatis.mapper-default-scope:}");
      }
      registry.registerBeanDefinition(MapperScannerConfigurer.class.getName(), builder.getBeanDefinition());
    }
这里我们来看下AutoConfigurationPackages.get(this.beanFactory)这个获取的包名是如何的
先看下这个方法的里面调用
	public static List<String> get(BeanFactory beanFactory) {
		try {
            //BEAN = AutoConfigurationPackages.class.getName(),这个方法也就是获取bean的名字是AutoConfigurationPackages.class.getName(),AutoConfigurationPackages.BasePackages.class类型的bean,再调用AutoConfigurationPackages.BasePackages的get方法
            //下面我们分析下这个值是怎么来的
			return beanFactory.getBean(BEAN, BasePackages.class).get();
		}
		catch (NoSuchBeanDefinitionException ex) {
			throw new IllegalStateException("Unable to retrieve @EnableAutoConfiguration base packages");
		}
	}
由于我们main方法的类上有@SpringBootApplication注解,它的注解上有@EnableAutoConfiguration,它的注解上有@AutoConfigurationPackage,它的注解上@Import(AutoConfigurationPackages.Registrar.class),在加载我们的主类SpringbootMybatisApplication时,就会调用到AutoConfigurationPackages.Registrar的registerBeanDefinitions这个方法
	static class Registrar implements ImportBeanDefinitionRegistrar, DeterminableImports {

		@Override
        //这里的metadata就是我们的SpringbootMybatisApplication
		public void registerBeanDefinitions(AnnotationMetadata metadata, BeanDefinitionRegistry registry) {
           	//我们先看看new PackageImports(metadata)这个方法
			register(registry, new PackageImports(metadata).getPackageNames().toArray(new String[0]));
		}
	......

	}
		//这个比较简单了,就是获取一些包名
		PackageImports(AnnotationMetadata metadata) {

			AnnotationAttributes attributes = AnnotationAttributes
					.fromMap(metadata.getAnnotationAttributes(AutoConfigurationPackage.class.getName(), false));
            //这里是获取我们主类SpringbootMybatisApplication上注解的"basePackages"属性,由于我们没有配置,所以这里就是null
			List<String> packageNames = new ArrayList<>(Arrays.asList(attributes.getStringArray("basePackages")));
              //这里是获取我们主类SpringbootMybatisApplication上注解的"basePackageClasses"属性,由于我们没有配置,所以也不会走到这个for循环
			for (Class<?> basePackageClass : attributes.getClassArray("basePackageClasses")) {
				packageNames.add(basePackageClass.getPackage().getName());
			}
            //这里的packageNames就是空的,会走到这个if分支
			if (packageNames.isEmpty()) {
                //packageNames增加当前SpringbootMybatisApplication类所在的包名com.example.springbootmybatis
				packageNames.add(ClassUtils.getPackageName(metadata.getClassName()));
			}
            //这里的this.packageNames中就只会有com.example.springbootmybatis
			this.packageNames = Collections.unmodifiableList(packageNames);
		}
我们再回头看上面的registerBeanDefinitions
static class Registrar implements ImportBeanDefinitionRegistrar, DeterminableImports {

	@Override
	public void registerBeanDefinitions(AnnotationMetadata metadata, BeanDefinitionRegistry registry) {
       	//上面new PackageImports(metadata)已经分析过了,这时new PackageImports(metadata).getPackageNames().toArray(new String[0])就是{“com.example.springbootmybatis”}
        //这个方法就不点进去了,在这里简单说说
        //方法就是在registry(也就是beanFatory)中增加一个bean的定义(BasePackagesBeanDefinition,它的参数就是{“com.example.springbootmybatis”}),所以上面的AutoConfigurationPackages.get(this.beanFactory)这句返回的结果就是{“com.example.springbootmybatis”}
		register(registry, new PackageImports(metadata).getPackageNames().toArray(new String[0]));
	}
......

}
我们继续看 public void registerBeanDefinitions(AnnotationMetadata importingClassMetadata, BeanDefinitionRegistry registry) 中在registry(也就是beanFacotry)中增加的bean的定义registry.registerBeanDefinition(MapperScannerConfigurer.class.getName(), builder.getBeanDefinition())
由于MapperScannerConfigurer这个类实现了BeanDefinitionRegistryPostProcessor,所以它就会被生成bean之前加载,调用它的postProcessBeanDefinitionRegistry方法
  public void postProcessBeanDefinitionRegistry(BeanDefinitionRegistry registry) {
    if (this.processPropertyPlaceHolders) {
      //这个是主要设置一些属性,比如上面包名,要扫描的注解类名称等等
      processPropertyPlaceHolders();
    }
	//这个类看名字,大家都知道是干什么的了。主要就是扫描mapper注解的类
    ClassPathMapperScanner scanner = new ClassPathMapperScanner(registry);
    scanner.setAddToConfig(this.addToConfig);
    scanner.setAnnotationClass(this.annotationClass);
    scanner.setMarkerInterface(this.markerInterface);
    scanner.setSqlSessionFactory(this.sqlSessionFactory);
    scanner.setSqlSessionTemplate(this.sqlSessionTemplate);
    scanner.setSqlSessionFactoryBeanName(this.sqlSessionFactoryBeanName);
    scanner.setSqlSessionTemplateBeanName(this.sqlSessionTemplateBeanName);
    scanner.setResourceLoader(this.applicationContext);
    scanner.setBeanNameGenerator(this.nameGenerator);
    scanner.setMapperFactoryBeanClass(this.mapperFactoryBeanClass);
    if (StringUtils.hasText(lazyInitialization)) {
      scanner.setLazyInitialization(Boolean.valueOf(lazyInitialization));
    }
    if (StringUtils.hasText(defaultScope)) {
      scanner.setDefaultScope(defaultScope);
    }
    //这里是设置要扫描的注解类,这里会设置@Mapper
    scanner.registerFilters();
    //这里就是要根据传入的包名去做扫描了,这里的this.basePackage就是上面说的com.example.springbootmybatis
    scanner.scan(
        StringUtils.tokenizeToStringArray(this.basePackage, ConfigurableApplicationContext.CONFIG_LOCATION_DELIMITERS));
  }
	public int scan(String... basePackages) {
        ......
		//在这里进行mapper的扫描
		doScan(basePackages);
		......
	}
@Override
public Set<BeanDefinitionHolder> doScan(String... basePackages) {
    //首先会进入这里,我们进去看看
  Set<BeanDefinitionHolder> beanDefinitions = super.doScan(basePackages);

  if (beanDefinitions.isEmpty()) {
    LOGGER.warn(() -> "No MyBatis mapper was found in '" + Arrays.toString(basePackages)
        + "' package. Please check your configuration.");
  } else {
     //我们会走到这里,这个方法也比较重要,我们进去看看
    processBeanDefinitions(beanDefinitions);
  }

  return beanDefinitions;
}
	protected Set<BeanDefinitionHolder> doScan(String... basePackages) {
		Assert.notEmpty(basePackages, "At least one base package must be specified");
		Set<BeanDefinitionHolder> beanDefinitions = new LinkedHashSet<>();
        //根据传入的包名遍历
		for (String basePackage : basePackages) {
            //这里就是扫描类路径下的mapper注解类了。
            //比如我这里的传入的包名是com.example.springbootmybatis,就会被转换成classpath*:com/example/springbootmybatis/**/*.class这个路径进行解析查找,将找到的类作为BeanDefinition的定义,返回
			Set<BeanDefinition> candidates = findCandidateComponents(basePackage);
			for (BeanDefinition candidate : candidates) {
				ScopeMetadata scopeMetadata = this.scopeMetadataResolver.resolveScopeMetadata(candidate);
				candidate.setScope(scopeMetadata.getScopeName());
                //获取bean的名字
				String beanName = this.beanNameGenerator.generateBeanName(candidate, this.registry);
                //这里candidate的类型是ScannedGenericBeanDefinition,所以会进入这个if分支,这个没啥,就是设置一些bean初始化相关属性,不关注了
				if (candidate instanceof AbstractBeanDefinition) {
					postProcessBeanDefinition((AbstractBeanDefinition) candidate, beanName);
				}
                //也会进入这个if分支,这个也不进去看了
				if (candidate instanceof AnnotatedBeanDefinition) {
					AnnotationConfigUtils.processCommonDefinitionAnnotations((AnnotatedBeanDefinition) candidate);
				}
                //这个是判断beanFactory是否包含beanName的bean的定义,不包含就会进入分支,这个分支也没啥特殊的,就是把bean的定义添加到beanFactory中
				if (checkCandidate(beanName, candidate)) {
					BeanDefinitionHolder definitionHolder = new BeanDefinitionHolder(candidate, beanName);
					definitionHolder =
							AnnotationConfigUtils.applyScopedProxyMode(scopeMetadata, definitionHolder, this.registry);
					beanDefinitions.add(definitionHolder);
					registerBeanDefinition(definitionHolder, this.registry);
				}
			}
		}
		return beanDefinitions;
	}
继续会进入这个方法,这个方法比较长,不过比较重要,大家一起跟我看吧,非关键代码我都省略掉吧
private void processBeanDefinitions(Set<BeanDefinitionHolder> beanDefinitions) {
	......
	//这里是给bean定义的添加一个构造方法参数,就是我们扫描出来mapper注解类的类名,我这里是com.example.springbootmybatis.mapper.UserMapper。这个是为后续选择哪个构造方法服务的
    definition.getConstructorArgumentValues().addGenericArgumentValue(beanClassName); // issue #59
    //这个就是设置对应bean的类的类,这里设置成了org.mybatis.spring.mapper.MapperFactoryBean这个类,这注意这个类实现了FactoryBean接口
    definition.setBeanClass(this.mapperFactoryBeanClass);
	......

    if (!explicitFactoryUsed) {
      LOGGER.debug(() -> "Enabling autowire by type for MapperFactoryBean with name '" + holder.getBeanName() + "'.");
       //这句也比较重要,代表属性注入模式
      definition.setAutowireMode(AbstractBeanDefinition.AUTOWIRE_BY_TYPE);
    }
	......
  }
}
到这里,对于@Mapper类的加载就完成了,后面的都是在生成对应bean的时候完成的
4.beanFatory生成对应@Mapper类的bean对象
创建bean对象实例会调用到AbstractBeanFactory的doGetBean这个方法
protected <T> T doGetBean(
			String name, @Nullable Class<T> requiredType, @Nullable Object[] args, boolean typeCheckOnly)
			throws BeansException {
				......
				// Create bean instance.
                //由于我们的是单例对象,会走到这个分支
				if (mbd.isSingleton()) {
					sharedInstance = getSingleton(beanName, () -> {
						try {
                            //在这个方法中会创建bean对象,我们下面看看这个方法
							return createBean(beanName, mbd, args);
						}
						catch (BeansException ex) {
							// Explicitly remove instance from singleton cache: It might have been put there
							// eagerly by the creation process, to allow for circular reference resolution.
							// Also remove any beans that received a temporary reference to the bean.
							destroySingleton(beanName);
							throw ex;
						}
					});
                    //由于我们的sharedInstance对象是,所以在这里最终会调用到FactoryBeanRegistrySupport的doGetObjectFromFactoryBean方法,返回真正的userMapper的bean对象,也就是调用MapperFactoryBean的getObject()方法
					beanInstance = getObjectForBeanInstance(sharedInstance, name, beanName, mbd);
				}
	}
创建bean对象实例最终都会走到AbstractAutowireCapableBeanFactory类的doCreateBean这个方法
	//我们来分析下这块代码,不相关的代码我都省略掉

		protected Object doCreateBean(String beanName, RootBeanDefinition mbd, @Nullable Object[] args)
			throws BeanCreationException {

		// Instantiate the bean.
		BeanWrapper instanceWrapper = null;
		if (mbd.isSingleton()) {
            //看this.factoryBeanInstanceCache这个名字就知道是factoryBean实例的缓存,其实我们当前的userMapper创建的实例已经缓存到这里了,不过无所谓,就算之前没有创建缓存到这里,下面12行就会去创建。所以我们这里就认为之前没有创建过,去看看13行的代码具体是如何创建userMapper的factoryBean实例的
			instanceWrapper = this.factoryBeanInstanceCache.remove(beanName);
		}
		if (instanceWrapper == null) {
            //正常创建userMapper的factoryBean对象是走不到这里的,是在这之前创建的,不过创建方法也是调用的这个
            //这个方法的所用就是根据RootBeanDefinition的getBeanClass()找到对应的类,再查找所有构造方法,根据 RootBeanDefinition.getConstructorArgumentValues()构造方法的参数选择合适的构造方法创建类对象,返回BeanWrapperImpl包装的对象
            //上面的processBeanDefinitions的方法中对RootBeanDefinition的beanClass和constructorArgumentValues都做过了专门的设置。
            //所以我们这里其实是调用的MapperFactoryBean(Class<T> mapperInterface)这个构造方法,里面的参数mapperInterface就是我们的mapper类com.example.springbootmybatis.mapper.UserMapper
			instanceWrapper = createBeanInstance(beanName, mbd, args);
		}
        //这个就是获取创建出来的MapperFactoryBean对象
		Object bean = instanceWrapper.getWrappedInstance();
        //这个是创建创建出来的对象的类型,也就是org.mybatis.spring.mapper.MapperFactoryBean
		Class<?> beanType = instanceWrapper.getWrappedClass();
		if (beanType != NullBean.class) {
			mbd.resolvedTargetType = beanType;
		}
		......

		// Initialize the bean instance.
		Object exposedObject = bean;
		try {
            //这里就是属性填充了,我们去这里看看
			populateBean(beanName, mbd, instanceWrapper);
            //由于我们的MapperFactoryBean继承了SqlSessionDaoSupport,它继承了DaoSupport,它实现了InitializingBean这个接口,所以在这里也会调用到DaoSupport的afterPropertiesSet方法
            exposedObject = initializeBean(beanName, exposedObject, mbd);
        }
		return exposedObject;
	}
protected void populateBean(String beanName, RootBeanDefinition mbd, @Nullable BeanWrapper bw) {
	   ......
           //这个是获取RootBeanDefinition属性注入模式,我们的是在上面processBeanDefinitions这个方法中设置过的
           //definition.setAutowireMode(AbstractBeanDefinition.AUTOWIRE_BY_TYPE);就是这句
    	int resolvedAutowireMode = mbd.getResolvedAutowireMode();
		if (resolvedAutowireMode == AUTOWIRE_BY_NAME || resolvedAutowireMode == AUTOWIRE_BY_TYPE) {
			......
			if (resolvedAutowireMode == AUTOWIRE_BY_TYPE) {
                //最终会走到这里,遍历类的所有属性,使用unsatisfiedNonSimpleProperties方法进行过滤,对属性进行注入。我们这里会对sqlSessionFactory,sqlSessionTemplate这两个属性进行注入(这两个注入的属性都是在MybatisAutoConfiguration的类中,通过方法定义的bean对象,上面也说过了)
				autowireByType(beanName, mbd, bw, newPvs);
			}
			pvs = newPvs;
		}
		......
	}
DaoSupport的afterPropertiesSet方法
	public final void afterPropertiesSet() throws IllegalArgumentException, BeanInitializationException {
		// Let abstract subclasses check their configuration.
        //这个方法是由子类MapperFactoryBean实现的,我们进去看看
		checkDaoConfig();

		// Let concrete implementations initialize themselves.
		try {
			initDao();
		}
		catch (Exception ex) {
			throw new BeanInitializationException("Initialization of DAO failed", ex);
		}
	}
MapperFactoryBean的checkDaoConfig方法
  protected void checkDaoConfig() {
	......
	//这个是获取之前注入的SqlSessionTemplate的Configuration
    Configuration configuration = getSqlSession().getConfiguration();
    if (this.addToConfig && !configuration.hasMapper(this.mapperInterface)) {
      try {
         //会在这里添加我们的mapper类,这里的this.mapperInterface就是com.example.springbootmybatis.mapper.UserMapper,我们进到这里去看看
        configuration.addMapper(this.mapperInterface);
      } catch (Exception e) {
        logger.error("Error while adding the mapper '" + this.mapperInterface + "' to configuration.", e);
        throw new IllegalArgumentException(e);
      } finally {
        ErrorContext.instance().reset();
      }
    }
  }
Configuration的addMapper方法
  public <T> T getMapper(Class<T> type, SqlSession sqlSession) {
    return mapperRegistry.getMapper(type, sqlSession);
  }
MapperRegistry的addMapper方法
  public <T> void addMapper(Class<T> type) {
		......
      try {
        //在knownMappers中添加一个key=com.example.springbootmybatis.mapper.UserMapper的MapperProxyFactory对象
        knownMappers.put(type, new MapperProxyFactory<>(type));
        // It's important that the type is added before the parser is run
        // otherwise the binding may automatically be attempted by the
        // mapper parser. If the type is already known, it won't try.
        //在这里就是去查找mapper.xml文件了,同样的如果我们不是通过xml配置的sql,而是用注解的方式实现的,具体的查找都是通过下面的parse方法来实现,我们进去parse方法看看
        MapperAnnotationBuilder parser = new MapperAnnotationBuilder(config, type);
        parser.parse();
        loadCompleted = true;
      } finally {
        if (!loadCompleted) {
          knownMappers.remove(type);
        }
      }
    }
  }
MapperAnnotationBuilder的parse方法
  public void parse() {
    String resource = type.toString();
    if (!configuration.isResourceLoaded(resource)) {
      //这行就是去从类路径加载mapper的xml文件了,具体的路径规则是这样的type.getName().replace('.', '/') + ".xml"。所以如果我们的mapper的xml文件是按照这种规则指定的,就不需要单独通过mybatis.mapper-locations去单独指定mapper.xml的路径了
      loadXmlResource();
      configuration.addLoadedResource(resource);
      assistant.setCurrentNamespace(type.getName());
      parseCache();
      parseCacheRef();
      //下面这块就是去扫描方法上的注解去生成sql配置了,这里就不进去看了
      for (Method method : type.getMethods()) {
        if (!canHaveStatement(method)) {
          continue;
        }
        if (getAnnotationWrapper(method, false, Select.class, SelectProvider.class).isPresent()
            && method.getAnnotation(ResultMap.class) == null) {
          parseResultMap(method);
        }
        try {
          parseStatement(method);
        } catch (IncompleteElementException e) {
          configuration.addIncompleteMethod(new MethodResolver(this, method));
        }
      }
    }
    parsePendingMethods();
  }
我们再回到doGetBean方法看后面的
protected <T> T doGetBean(
			String name, @Nullable Class<T> requiredType, @Nullable Object[] args, boolean typeCheckOnly)
			throws BeansException {
					......
                    //由于我们的sharedInstance对象是,所以在这里最终会调用到FactoryBeanRegistrySupport的doGetObjectFromFactoryBean方法,返回真正的userMapper的bean对象,也就是调用MapperFactoryBean的getObject()方法
					beanInstance = getObjectForBeanInstance(sharedInstance, name, beanName, mbd);
				}
	}
MapperFactoryBean的getObject方法
  public T getObject() throws Exception {
  //这个getSqlSession()就是我们上面属性注入的。org.mybatis.spring.SqlSessionTemplate的对象,
    return getSqlSession().getMapper(this.mapperInterface);
  }
最终会调用到MapperRegistry的getMapper方法
	public <T> T getMapper(Class<T> type, SqlSession sqlSession) {
    // 我们在上面addMapper的方法中讲过knownMappers已经添加了key=com.example.springbootmybatis.mapper.UserMapper的MapperProxyFactory对象,
    final MapperProxyFactory<T> mapperProxyFactory = (MapperProxyFactory<T>) knownMappers.get(type);
    if (mapperProxyFactory == null) {
      throw new BindingException("Type " + type + " is not known to the MapperRegistry.");
    }
    try {
      //这里就是调用MapperProxyFactory的newInstance的方法了
      return mapperProxyFactory.newInstance(sqlSession);
    } catch (Exception e) {
      throw new BindingException("Error getting mapper instance. Cause: " + e, e);
    }
  }
MapperProxyFactory的newInstance方法
public T newInstance(SqlSession sqlSession) {
  final MapperProxy<T> mapperProxy = new MapperProxy<>(sqlSession, mapperInterface, methodCache);
  return newInstance(mapperProxy);
}
protected T newInstance(MapperProxy<T> mapperProxy) {
  //最终调用到这里,创建一个MapperProxy的代理对象,这个也就是真正的创建的bean对象
  return (T) Proxy.newProxyInstance(mapperInterface.getClassLoader(), new Class[] { mapperInterface }, mapperProxy);
}
到这里,springboot整合mybatis到创建出来mapper对象,整个流程就到这里了,后面调用mapper的方法其实也就是通过MapperProxy代理来实现的。具体springboot中调用mybatis的执行的流程将在接下来的一篇给大家讲解。
5.关于@MapperScan
@MapperScan(basePackages = "com.example.springbootmybatis",annotationClass = Mapper.class)
basePackages是指定扫描的包名
annotationClass是查找对应包名下类上有个Mapper注解的接口,如果没有指定这个参数,会将获取到的所有的类都当作Mapper去处理,这时后面执行sql操作就会出错了不知道是不是mybatis的版本问题,之前记得是不需要指定这个参数的
具体的代码位置是在ClassPathMapperScanner类的registerFilters方法中
public void registerFilters() {
   boolean acceptAllInterfaces = true;

   // if specified, use the given annotation and / or marker interface
   //如果设置了annotationClass = Mapper.class就会走到这里,在这里会过滤class上是否有Mapper注解
   if (this.annotationClass != null) {
     addIncludeFilter(new AnnotationTypeFilter(this.annotationClass));
     acceptAllInterfaces = false;
   }

   // override AssignableTypeFilter to ignore matches on the actual marker interface
   if (this.markerInterface != null) {
     addIncludeFilter(new AssignableTypeFilter(this.markerInterface) {
       @Override
       protected boolean matchClassName(String className) {
         return false;
       }
     });
     acceptAllInterfaces = false;
   }

   //没有设置了annotationClass = Mapper.class,就会走这里,直接返回true
   if (acceptAllInterfaces) {
     // default include filter that accepts all classes
     addIncludeFilter((metadataReader, metadataReaderFactory) -> true);
   }

   // exclude package-info.java
   addExcludeFilter((metadataReader, metadataReaderFactory) -> {
     String className = metadataReader.getClassMetadata().getClassName();
     return className.endsWith("package-info");
   });
 }
大家看到我的demo中是没有使用@MapperScan这个注解的,那什么时候使用这个注解呢,下面我们从源码来看看
MapperScan注解上面会有@Import(MapperScannerRegistrar.class),@Repeatable(MapperScans.class)这两个注解,MapperScannerRegistrar这个注解实现了ImportBeanDefinitionRegistrar,加载主类的过程中会调用registerBeanDefinitions这个方法,
  public void registerBeanDefinitions(AnnotationMetadata importingClassMetadata, BeanDefinitionRegistry registry) {
    //这个是获取主类上MapperScan注解的相关属性比如我们的配置是(@MapperScan(basePackages = "com.example.springbootmybatis")),比如basePackages属性等等都是这个注解上的
    AnnotationAttributes mapperScanAttrs = AnnotationAttributes
        .fromMap(importingClassMetadata.getAnnotationAttributes(MapperScan.class.getName()));
    if (mapperScanAttrs != null) {
      //这里就会根据这些属性创建一个MapperScannerConfigurer类的bean的定义,添加到beanFatory中
      registerBeanDefinitions(importingClassMetadata, mapperScanAttrs, registry,
          generateBaseBeanName(importingClassMetadata, 0));
    }
  }
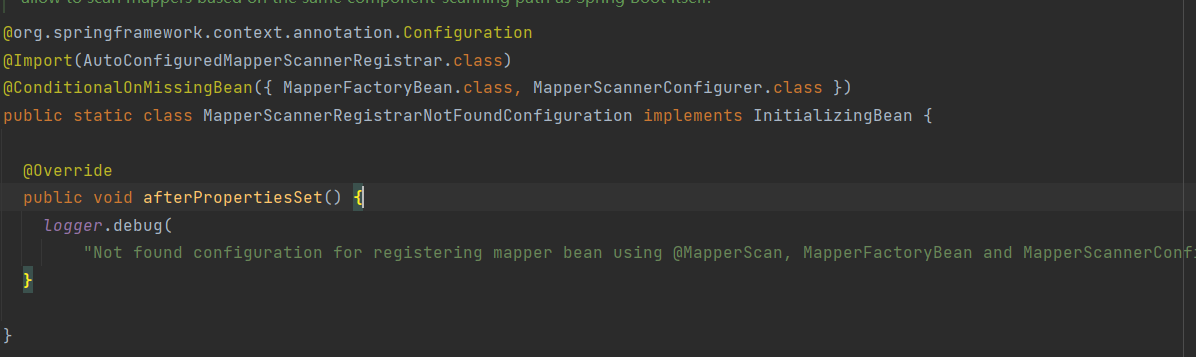
我们再看看之前说的MybatisAutoConfiguration.MapperScannerRegistrarNotFoundConfiguration这个内部类
  @org.springframework.context.annotation.Configuration
  @Import(AutoConfiguredMapperScannerRegistrar.class)
  //由于我们上面已经在beanFactory中添加了MapperScannerConfigurer这个类型的bean的定义,所以这个条件就不会成立,上面的import注解中导入AutoConfiguredMapperScannerRegistrar类也就不会执行
  @ConditionalOnMissingBean({ MapperFactoryBean.class, MapperScannerConfigurer.class })
  public static class MapperScannerRegistrarNotFoundConfiguration implements InitializingBean {

    @Override
    public void afterPropertiesSet() {
      logger.debug(
          "Not found configuration for registering mapper bean using @MapperScan, MapperFactoryBean and MapperScannerConfigurer.");
    }

  }
所以@MapperScan的区别主要就在于MapperScannerConfigurer这个bean定义的生成位置不一样
整个的内容比较多,如果大家觉的哪里讲的不清晰或不清楚的,欢迎评论区留言。