一、准备工作:
1、 下载好相关的图片:

2、创建一个名WeiChat的项目,将图片复制到res-----》drawable-hdpi目录下。

二、编写代码:
1、 最终效果:
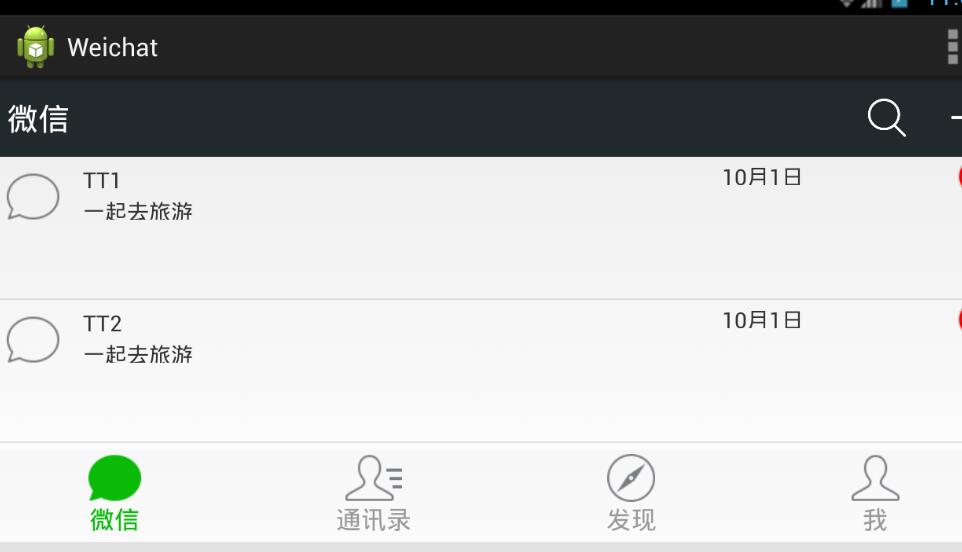
2、微信可划分为头、中间、尾三部分,最后我们将这三部分合并在同一界面。
①头部:headlayout
headlayout.xml文件:
<?xml version="1.0" encoding="utf-8"?>
<LinearLayout xmlns:android="http://schemas.android.com/apk/res/android"
      android:layout_width="match_parent"
    android:layout_height="50dp"
    android:orientation="horizontal"
    android:background="#21292c" >
      <TextView
        android:id="@+id/textView1"
        android:layout_width="wrap_content"
        android:layout_height="wrap_content"
        android:text="@string/weixin"
        android:textColor="#ffffff"
        android:textSize="20sp"
        android:layout_gravity="center"
        android:padding="10dp"/>
    <TextView
         android:layout_width="wrap_content"
        android:layout_height="wrap_content"
        android:layout_weight="1"/>

    <LinearLayout
        android:layout_width="wrap_content"
        android:layout_height="match_parent"
        android:gravity="center">

        <ImageView
            android:id="@+id/imageView2"
            android:layout_width="40dp"
            android:layout_height="30dp"
            android:src="@drawable/fdj"
            android:layout_marginRight="10dp"/>

        <ImageView
            android:id="@+id/imageView1"
            android:layout_width="40dp"
            android:layout_height="30dp"
            android:src="@drawable/barbuttonicon_add" />

    </LinearLayout>

</LinearLayout>
1、通过LinearLayout布局,设置android:orientation="horizontal",android:background="#21292c"两个属性显示背景为灰黑色。
2 、我们通过两个TextView控件来显示“微信” 和字体与右边图片隔离,通过两个ImageView控件显示最右边的两张图片,有LinearLayout布局水平方向让图片对齐。
3、通过gravity属性设置图片在LinearLayout居中,设置ImageView的layout_marginRight设置两张图片不相连。
效果图:

②尾部:footlayout
footlayout.xml文件:
<?xml version="1.0" encoding="utf-8"?>
<LinearLayout xmlns:android="http://schemas.android.com/apk/res/android"
    android:layout_width="match_parent"
    android:layout_height="match_parent"
    android:orientation="vertical" >

<RadioGroup
        android:id="@+id/radioGroup1"
        android:layout_width="match_parent"
        android:layout_height="60dp"
        android:orientation="horizontal"
        android:background="@drawable/group_buton_nomal"
        android:gravity="center">
        <RadioButton
            android:id="@+id/radio0"
            android:layout_width="wrap_content"
            android:layout_height="wrap_content"
            android:checked="true"
            android:text="@string/weixin"
               style="@style/radioStyle"
               android:drawableTop="@drawable/weicho1"/>
        <RadioButton
            android:id="@+id/radio1"
            android:layout_width="wrap_content"
            android:layout_height="wrap_content"
            android:text="@string/addressList"
               style="@style/radioStyle"
               android:drawableTop="@drawable/weicho2"/>
        <RadioButton
            android:id="@+id/radio2"
            android:layout_width="wrap_content"
            android:layout_height="wrap_content"
            android:text="@string/find"
               style="@style/radioStyle"
               android:drawableTop="@drawable/weicho3"/>

         <RadioButton
            android:id="@+id/radio3"
            android:layout_width="wrap_content"
            android:layout_height="wrap_content"
            android:text="@string/set"
               style="@style/radioStyle"
               android:drawableTop="@drawable/weicho4"/>
    </RadioGroup>
</LinearLayout>
1、通过四个RadioButton单选控件来显示下面四张图片,drawableTop属性设置图片,通过styles。xml文件设置样式。
① 设置值为@null将去掉空心圆,设置每个RadioButton控件的layout_weight="1"位权为1,平分位置。
styles.xml文件:
<style name="radioStyle">
        <item name="android:button">@null</item>
        <item name="android:layout_weight">1</item>
        <item name="android:gravity">center</item>
        <item name="android:textColor">@drawable/choscolor</item>
    </style>
2、点击变色:点击图标时图标和文字变为绿色,而其他的则为浅灰色。RadioButton有个checked点击属性。
3、我们添加了五个selector类型的xml文件,分别命名为weicho1到weicho4,最后一命名为choscolor.xml文件(用来设置字体颜色)。
4、当checked=true时就设置drawable属性为绿色图片,通过styles.xml文件的radioStyle设置字体颜色为绿色。(注:其他3个xml文件与weicho1.xml文件一样只是图片名称不一样)
weicho1.xml文件:
<?xml version="1.0" encoding="utf-8"?>
<selector xmlns:android="http://schemas.android.com/apk/res/android" >
    <item android:state_checked="true"
        //绿色图片
        android:drawable="@drawable/tabbar_mainframehl"></item>
    <item
        android:drawable="@drawable/tabbar_mainframe"></item>
</selector>
choscolor.xml文件:
<?xml version="1.0" encoding="utf-8"?>
<selector xmlns:android="http://schemas.android.com/apk/res/android" >
    <item android:state_checked="true"
        android:color="@color/green"></item>
    <item
        android:color="@color/grey"></item>
</selector>
效果图片:
③中间:listviewon1
listviewon1.xml文件:
<?xml version="1.0" encoding="utf-8"?>
<LinearLayout xmlns:android="http://schemas.android.com/apk/res/android"
    android:layout_width="match_parent"
    android:layout_height="match_parent"
    android:orientation="vertical" >
     <ListView
        android:id="@+id/listView1"
        android:layout_width="match_parent"
        android:layout_height="match_parent" >

    </ListView>

</LinearLayout>
1、我们通过一个ListView实现动态添加数据,现在我们就站一个位置,不这么快添加数据。(注见下一章listview动态添加数据篇)。
④合并头、中间、尾三部分:weichatlayout
weichatlayout.xml文件:
<?xml version="1.0" encoding="utf-8"?>
<LinearLayout xmlns:android="http://schemas.android.com/apk/res/android"
    android:layout_width="match_parent"
    android:layout_height="match_parent"
    android:orientation="vertical" >
    <!-- head -->
    <LinearLayout
        android:layout_width="match_parent"
        android:layout_height="wrap_content" >
        <include layout="@layout/headlayout"/>
    </LinearLayout>

    <!-- 中间 -->
    <LinearLayout
        android:layout_width="match_parent"
        android:layout_height="wrap_content"
        android:layout_weight="1">
        <include layout="@layout/listviewon1"/>
    </LinearLayout>

    <!-- 底部 -->
    <LinearLayout
        android:layout_width="match_parent"
        android:layout_height="wrap_content" >
        <include layout="@layout/footlayout"/>
    </LinearLayout>

</LinearLayout>
1、我们通过3个LinearLayout布局设置头,中,尾。
2、通过layout_weight="1"设置中的位权占满剩余的空间,固定头和尾的大小。
3、通过include的layout属性设置相关的布局 。
效果图片:
