| 一、简介 |
在上一篇博客中已经介绍了django rest framework 对于认证的源码流程,以及实现过程,当用户经过认证之后下一步就是涉及到权限的问题。比如订单的业务只能VIP才能查看,所以这时候需要对权限进行控制。下面将介绍DRF的权限控制源码剖析。
| 二、基本使用 |
这里继续使用之前的示例,加入相应的权限,这里先介绍使用示例,然后在分析权限源码
1.在django 项目下新建立目录utils,并建立permissions.py,添加权限控制:
class MyPremission(object):
    message = "您不是会员无权访问"
    def has_permission(self,request,view):
        if request.user.user_type == 1: ## user_type 为1代表普通用户,则不能查看
            return False
        return True
2.在订单视图中使用
class OrderView(APIView):
    '''查看订单'''
    from utils.permissions import MyPremission
    authentication_classes = [Authentication,]    #添加认证
    permission_classes = [MyPremission,]    #添加权限
    def get(self,request,*args,**kwargs):
        #request.user
        #request.auth
        ret = {'code':1000,'msg':"你的订单已经完成",'data':"买了一个mac"}
        return JsonResponse(ret,safe=True)
urls.py
from django.conf.urls import url
from django.contrib import admin
from app01 import views

urlpatterns = [

    url(r'^api/v1/auth', views.AuthView.as_view()),
    url(r'^api/v1/order', views.OrderView.as_view()),
]
models.py
from django.db import models

class UserInfo(models.Model):
    user_type_choice = (
        (1,"普通用户"),
        (2,"会员"),
    )
    user_type = models.IntegerField(choices=user_type_choice)
    username = models.CharField(max_length=32,unique=True)
    password = models.CharField(max_length=64)


class UserToken(models.Model):
    user = models.OneToOneField(to=UserInfo)
    token = models.CharField(max_length=64)
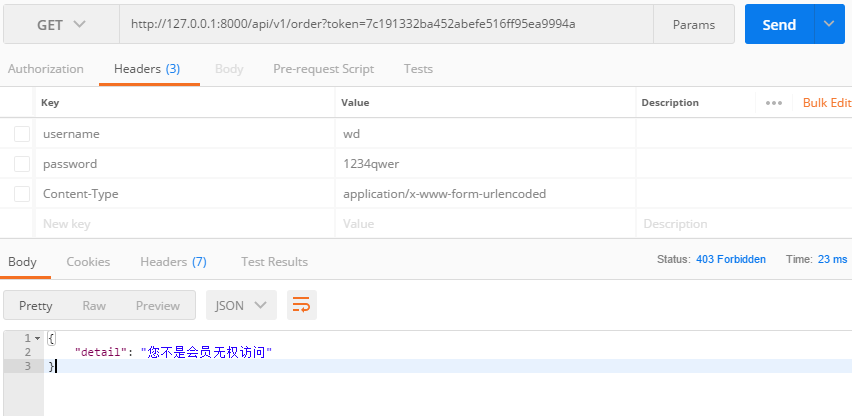
3.验证:订单业务同样使用user_type=1的用户进行验证,这里使用工具postman发送请求验证,结果如下:证明我们的权限生效了。
| 三、权限源码剖析 |
1.同样请求到达视图时候,先执行APIView的dispatch方法,以下源码是我们在认证篇已经解读过了:
dispatch()
def dispatch(self, request, *args, **kwargs):
        """
        `.dispatch()` is pretty much the same as Django's regular dispatch,
        but with extra hooks for startup, finalize, and exception handling.
        """
        self.args = args
        self.kwargs = kwargs
        #对原始request进行加工,丰富了一些功能
        #Request(
        #     request,
        #     parsers=self.get_parsers(),
        #     authenticators=self.get_authenticators(),
        #     negotiator=self.get_content_negotiator(),
        #     parser_context=parser_context
        # )
        #request(原始request,[BasicAuthentications对象,])
        #获取原生request,request._request
        #获取认证类的对象,request.authticators
        #1.封装request
        request = self.initialize_request(request, *args, **kwargs)
        self.request = request
        self.headers = self.default_response_headers  # deprecate?

        try:
            #2.认证
            self.initial(request, *args, **kwargs)

            # Get the appropriate handler method
            if request.method.lower() in self.http_method_names:
                handler = getattr(self, request.method.lower(),
                                  self.http_method_not_allowed)
            else:
                handler = self.http_method_not_allowed

            response = handler(request, *args, **kwargs)

        except Exception as exc:
            response = self.handle_exception(exc)

        self.response = self.finalize_response(request, response, *args, **kwargs)
        return self.response
2.执行inital方法,initial方法中执行perform_authentication则开始进行认证
 def initial(self, request, *args, **kwargs):
        """
        Runs anything that needs to occur prior to calling the method handler.
        """
        self.format_kwarg = self.get_format_suffix(**kwargs)

        # Perform content negotiation and store the accepted info on the request
        neg = self.perform_content_negotiation(request)
        request.accepted_renderer, request.accepted_media_type = neg

        # Determine the API version, if versioning is in use.
        version, scheme = self.determine_version(request, *args, **kwargs)
        request.version, request.versioning_scheme = version, scheme

        # Ensure that the incoming request is permitted
        #4.实现认证
        self.perform_authentication(request)
        #5.权限判断
        self.check_permissions(request)
        self.check_throttles(request)
3.当执行完perform_authentication方法认证通过时候,这时候就进入了本篇文章主题--权限(check_permissions方法),下面是check_permissions方法源码:
    def check_permissions(self, request):
        """
        Check if the request should be permitted.
        Raises an appropriate exception if the request is not permitted.
        """
        for permission in self.get_permissions():   #循环对象get_permissions方法的结果,如果自己没有,则去父类寻找,
            if not permission.has_permission(request, self): #判断每个对象中的has_permission方法返回值(其实就是权限判断),这就是为什么我们需要对权限类定义has_permission方法
                self.permission_denied(
                    request, message=getattr(permission, 'message', None) #返回无权限信息,也就是我们定义的message共有属性
                )
4.从上源码中我们可以看出,perform_authentication方法中循环get_permissions结果,并逐一判断权限,所以需要分析get_permissions方法返回结果,以下是get_permissions方法源码:
 def get_permissions(self):
        """
        Instantiates and returns the list of permissions that this view requires.
        """
        return [permission() for permission in self.permission_classes]  #与权限一样采用列表生成式获取每个认证类对象
5.get_permissions方法中寻找权限类是通过self.permission_class字段寻找,和认证类一样默认该字段在全局也有配置,如果我们视图类中已经定义,则使用我们自己定义的类。
class APIView(View):

    # The following policies may be set at either globally, or per-view.
    renderer_classes = api_settings.DEFAULT_RENDERER_CLASSES
    parser_classes = api_settings.DEFAULT_PARSER_CLASSES
    authentication_classes = api_settings.DEFAULT_AUTHENTICATION_CLASSES
    throttle_classes = api_settings.DEFAULT_THROTTLE_CLASSES
    permission_classes = api_settings.DEFAULT_PERMISSION_CLASSES  #权限控制
    content_negotiation_class = api_settings.DEFAULT_CONTENT_NEGOTIATION_CLASS
    metadata_class = api_settings.DEFAULT_METADATA_CLASS
    versioning_class = api_settings.DEFAULT_VERSIONING_CLASS
6.承接check_permissions方法,当认证类中的has_permission()方法返回false时(也就是认证不通过),则执行self.permission_denied(),以下是self.permission_denied()源码:
    def permission_denied(self, request, message=None):
        """
        If request is not permitted, determine what kind of exception to raise.
        """
        if request.authenticators and not request.successful_authenticator:
            raise exceptions.NotAuthenticated()
        raise exceptions.PermissionDenied(detail=message) # 如果定义了message属性,则抛出属性值
7.认证不通过,则至此django rest framework的权限源码到此结束,相对于认证源码简单一些。
| 四、内置权限验证类 |
django rest framework 提供了内置的权限验证类,其本质都是定义has_permission()方法对权限进行验证:
#路径:rest_framework.permissions
##基本权限验证
class BasePermission(object)

##允许所有
class AllowAny(BasePermission)

##基于django的认证权限,官方示例
class IsAuthenticated(BasePermission):

##基于django admin权限控制
class IsAdminUser(BasePermission)

##也是基于django admin
class IsAuthenticatedOrReadOnly(BasePermission)
.....
| 五、总结 |
1.使用方法:
- 继承BasePermission类(推荐)
- 重写has_permission方法
- has_permission方法返回True表示有权访问,False无权访问
2.配置:
###全局使用
REST_FRAMEWORK = {
   #权限
    "DEFAULT_PERMISSION_CLASSES":['API.utils.permission.MyPremission'],
}

##单一视图使用,为空代表不做权限验证
permission_classes = [MyPremission,]


###优先级
单一视图>全局配置