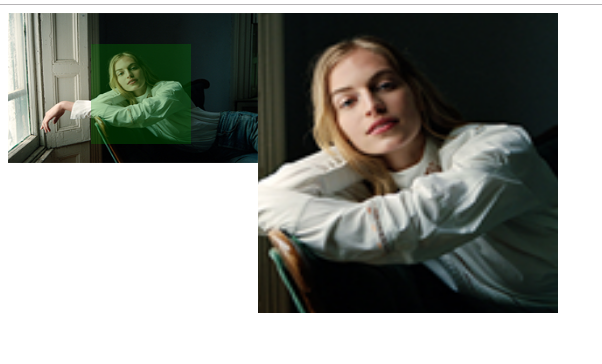
将一个小图放置在一个小盒子里,当鼠标在小盒子里移动时,出现一个移动块,右侧出现一个大盒子,显示出小盒子中移动块所在区域的等比例放大的图片内容。需要实现的效果如下:

基本实现思路为:右侧大盒子为一个可视区域,有左侧小盒子中的图片的等比例放大图片,通过计算图片需要移动的距离来显示出想要放大的内容,超出部分设置为隐藏。
HTML和CSS内容如下:
<head>
    <meta charset="UTF-8">
    <title>放大镜</title>
    <style type="text/css" media="screen">
        img {
      width: 250px;
      height: 150px;
    }
    #pic_wrap {
      position: relative;
      width: 250px;
      height: 150px;
    float: left;
    }
    #float_box {
      width: 100px;
      height: 100px;
      background-color: green;
      filter: opacity(alpha: 30);
      opacity: 0.3;
      position: absolute;
      display: none;
    }
    #big_img {
      background-image: url(images/Layer14.png);
      height: 450px;
      width: 750px;
      background-repeat: no-repeat;
      background-size: cover;
      position: relative;
    }
    #show {
      width: 300px;
      height: 300px;
    float: left;
      background-color: white;
      opacity: 1;
      filter: opacity(alpha:1);
      overflow: hidden;
      display: none;
    }
    </style>
</head>
<body>
    <!-- 原始图片区域 -->
    <div id="pic_wrap">
        <!-- 放大镜所示区域 -->
        <div id="float_box"></div>
        <img src="images/Layer14.png" alt="">
    </div>
    <div id="show">
        <!-- 预留的放大后的图片 -->
        <img src="images/Layer14.png" id="big_img">
    </div>
</body>
HTML和CSS写好之后,利用js给放大镜加交互效果
- 当鼠标移入的时候,放大镜能够显示出来!需要加onmouseover事件。
- 当鼠标没有移除,且鼠标在图片内不停地移动, 需要加onmousemove事件。
- 当鼠标完全移除后,需要加onmouseout事件。
- onmouseover事件需要让放大镜和可视窗口显示出来。
- onmousemove事件,让放大镜和可视窗口中的图片同时移动。
- onmouseout时间,让放大镜和可是窗口消失!
JS代码如下:
var pic_wrap = document.getElementById('pic_wrap'),
    float_box = document.getElementById("float_box"),
    show = document.getElementById('show');
    big_img = document.getElementById("big_img");
  //鼠标移入事件,让放大镜和放大区显示!
  pic_wrap.onmouseover = function() {
    float_box.style.display = "block";
    show.style.display = "block";
  }
  //鼠标不断移动时触发,实时更新放大镜得到的图片
  pic_wrap.onmousemove = function(event) {
    floatMove(float_box, pic_wrap, event);
    showPic();
  }
  //鼠标移出后,放大镜和放大区隐藏
  pic_wrap.onmouseout = function() {
    float_box.style.display = "none";
    show.style.display = "none";
  }
      //由于offset方法包括边框,在使用的时候很容易出现问题,所以用style来实时获取attr!
  function getStyle(obj, attr) {
    if (window.currentStyle) {
      return parseInt(obj.currentStyle[attr]);
    }
    else {
      return parseInt(getComputedStyle(obj,null)[attr]);
    }
  }
  //运动框架,控制放大镜在原图中的位置!
  function floatMove(argu1, argu2, event) {
    var e = event ||window.event;
    var minLeft = getStyle(argu1, "width");
    var maxLeft = getStyle(argu2, "width") - minLeft/2;
    var minHeight = getStyle(argu1, "height");
    var maxHeight = getStyle(argu2, "height") - minHeight/2;
    console.log(maxLeft);
    console.log(maxLeft - minLeft/2);
    if (e.clientX < minLeft/2) {
      float_box.style.left = "0px";//防止放大镜超出左边框
    }
    else if (e.clientX > maxLeft) {
      float_box.style.left = getStyle(argu2, "width") - getStyle(argu1, "width") + "px";//防止放大镜超出右边框
    }
    else {
      float_box.style.left = event.clientX - minLeft/2 + "px"; //放大镜完全在图片内时正常移动
    }
    if (e.clientY < minHeight/2) {
      float_box.style.top = "0px"; //防止放大镜超出上边框
    }
    else if (e.clientY > maxHeight) {
      float_box.style.top = getStyle(argu2, "height") - getStyle(argu1, "height") + "px"; //防止放大镜超出下边框
    }
    else {
      float_box.style.top = event.clientY - minLeft/2 + "px";
    }
  }
  //用来显示放大镜得到的图片,利用坐标计算!实时更新可视区域
  function showPic() {
    var iCurLeft = getStyle(float_box,"left");
    var iCurTop = getStyle(float_box,"top");
    var a = getStyle(pic_wrap,"width") - getStyle(float_box,"width");
    var b = getStyle(big_img,"width") - getStyle(show,"width");
    var moveWidth = -(iCurLeft/a)*b;
    big_img.style.left = moveWidth + "px";
    var c = getStyle(pic_wrap,"height") - getStyle(float_box,"height");
    var d = getStyle(big_img,"height") - getStyle(show,"height");
    var moveHigth = -(iCurTop/c)*d;
    big_img.style.top = moveHigth + "px";
  }