启发式寻路算法:
思路:
啥是启发式寻路算法呢?下面先来看一下咱们要去实现的一个效果,先来直观的感受一下:
也就是说根据起点和终点找到一个最佳能到达的路线,与咱们实际场景相关的第一时间可能就想到了用地图进行导航了,或者游戏中的寻路,所以这个算法是比较实现的,那下面从0开始剖析该算法的整个运作原理,下面先用画图的方式来阐述其实现思路,了解了思想之后再开始撸码,如下:
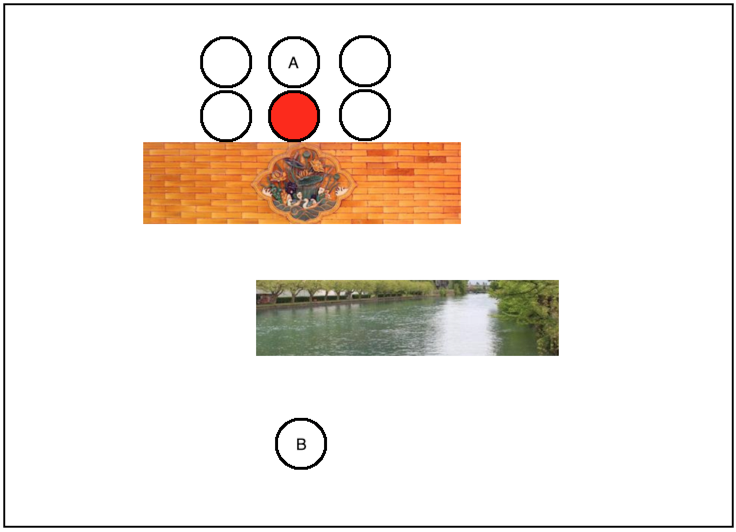
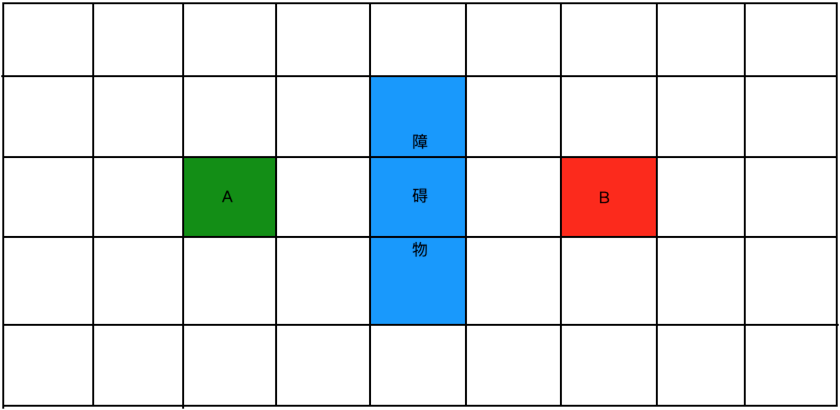
如我们在地图中输入地点和终点坐标,如果中间畅通无阻那直接直线走过去是最近的嘛,但是!!两点之间有障碍,比如:
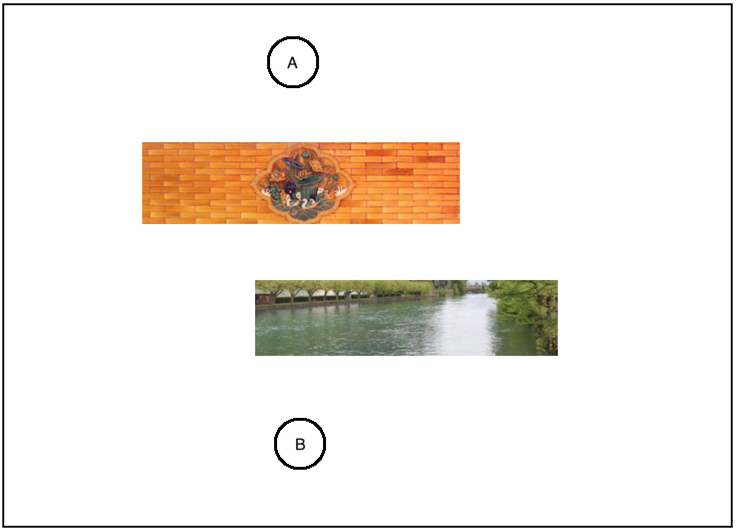
那很显然咱们得绕着障碍物来进行走路了,而从A点到B点的路线可以有多条都可以到达,那怎么来选择一个最佳路线呢? 下面的最佳路线的选择方式就是咱们要研究的算法思路,看好了:
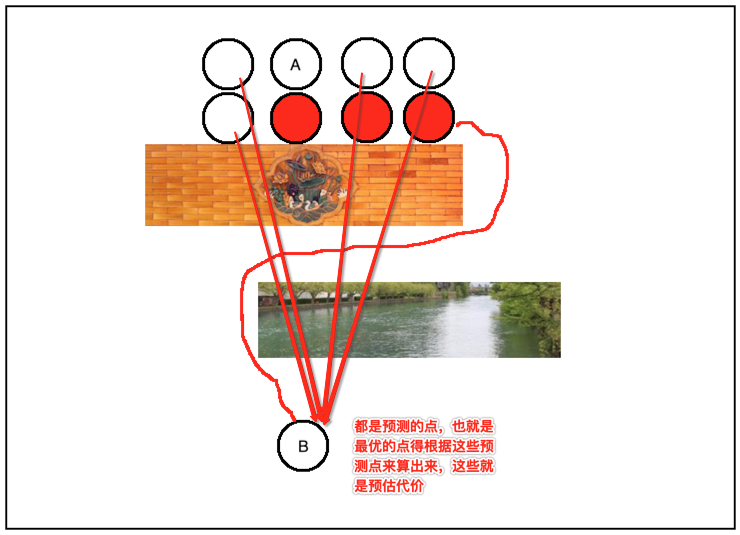
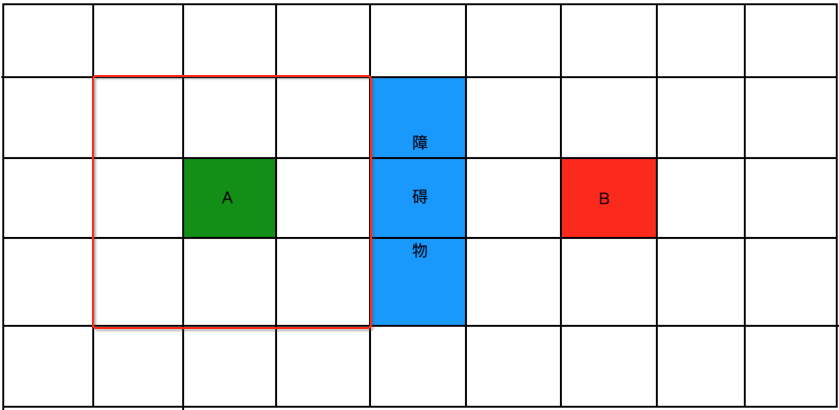
首先在A点最近的周围选几个点,如下:
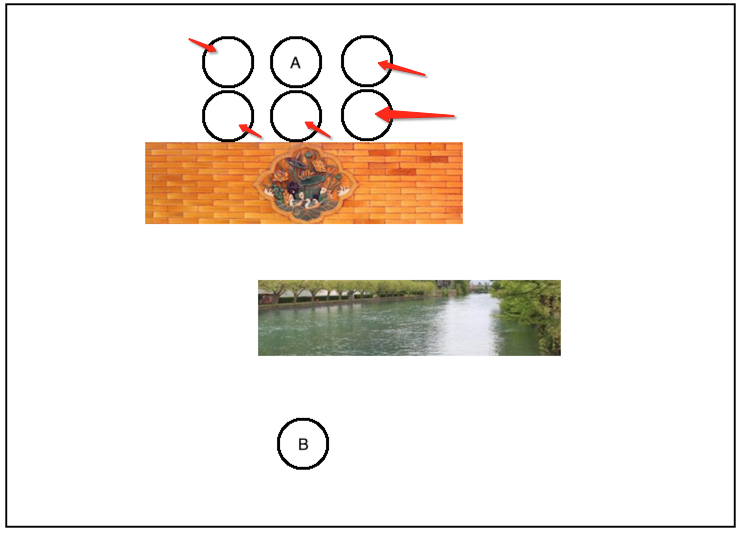
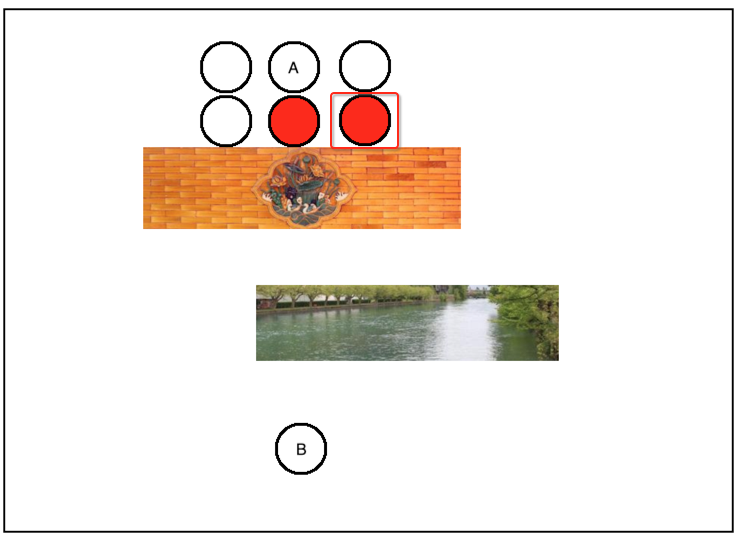
然后从这些周围附近的点中找一个跟B点最近的点,当然就是它了:
此时再往前再找一个跟B最近距离的点,很显然就到了它的右侧点了,如下:
此时再基于这个点再往外启发探测,再找它最近的点,如下:

然后再从中找一个离B点最近的新点,此时就会找到它:

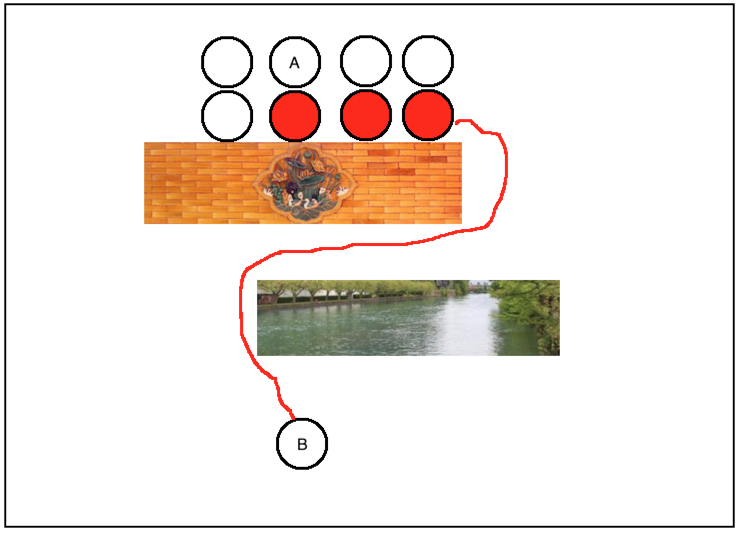
以此类推,慢慢的就可以找到一条距离B最近的一个通路了:
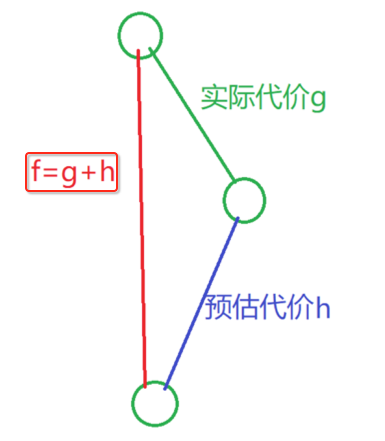
以上是启发式寻路的大体思路,其中这里会涉及到几个名词先了解一下:
实际代价:对于已经走过的点。

预估代价:对于待预测的点。
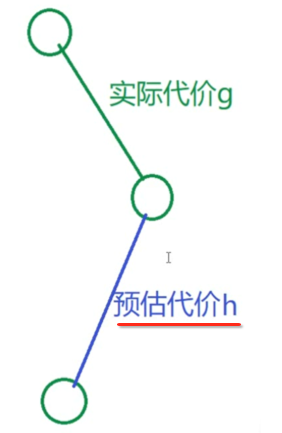
也就是:
真实距离:就是真正走的距离,如下:
而其中预估代价的距离计算很显然是需要根据两点来进行计算,两点算直线可以用勾股定理,初中的数学知识,不过我忘得差不多了。。先回忆一下:

所以咱们可以做直角三角形,如下:


但是!!!这个开根号的计算时间是非常之慢的,像寻路是有大量的点都得要算距离,所以用这种标准的科学算法是不可取的,所以“曼哈顿距离”计算法就应运而生了,先来搜一下它的定义:

而有一张经典的图可以表示它的一个计算思路:

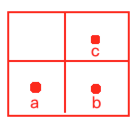
下面来阐述一下它的计算思路,比如说要计算B点和C点距离A谁近,如图:
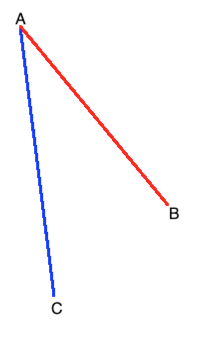
从肉眼很容易看到是B离A近嘛,但是程序的话当然可以利用勾股定理来求出两点之间的距离然后再做对比最终来决定谁离A较近,但是如之前所说勾股定理标准法不可取,因为性能有问题,所以来看一下曼哈顿距离的测算思路:


这就是曼哈顿距离计算法,下面再加到咱们的图,依照这个思路来算距离就可以这样计算了:
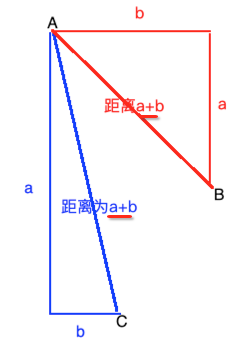
也就是我们简单的通过+号运算就可以测算距离了,而非用到平方+开方那种太重的方式。
好,解决了距离的测算法用曼哈顿算法来做,那么下面还需要知道一个小细节,如图:
请问a->b的距离和a->c的距离是一样的么?很显然不是,做个连线就知道了:
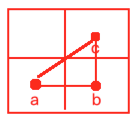
所以似如a->b=10、b-c=10,好么根据勾股定理,a->c的距离为:
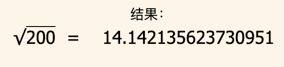
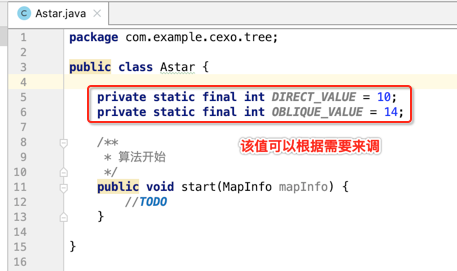
所以我们可以在程序中编写代码时如果是横着走则走10、而如果是斜着走则走14,这个值可以根据自己的情况去定义,这里就采用这种值了。
上面的理论已经很详细的描述了其寻路的思想了,准备要开始基于这个思路撸码,但是在正式撸码之前还得做一些理论上的理解,回到咱们要实践的地图上来,咱们以这比较简单的两点来寻路做为目标进行实现,如下:
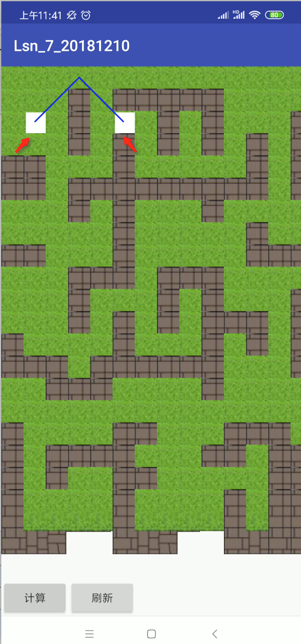
能把它实现好,那所有的寻路都通了,那么,咱们以这俩点为例,摘出来到图上先把整个实现思路再更加细一点的挼清楚,以便到时撸码时思路比较清晰:
好,下面来看一下整个的计算过程,以点A找附近的点,那找哪些附近的点呢?如图:
也就是以A为中心的9个格式既为要探寻的点,而要算真正的距离需要涉及到之前的这个东东:
所以咱们先将A附件的这几个点的实际代价g标出来,横向走定义10,斜着走定为14,所以如下:

接下来算预估代价,怎么来预估呢,下面来看:

所以:
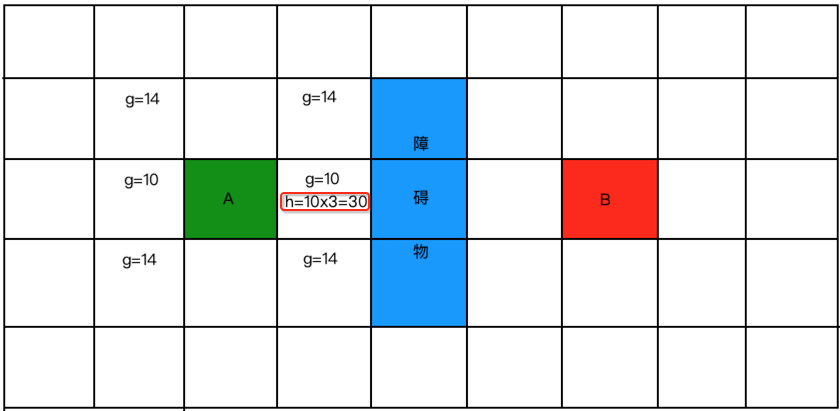
再来预估一个:
为啥?因为如果斜着走就又回用勾股定理来计算了,所以需要根据曼哈顿距离来计算,如下:
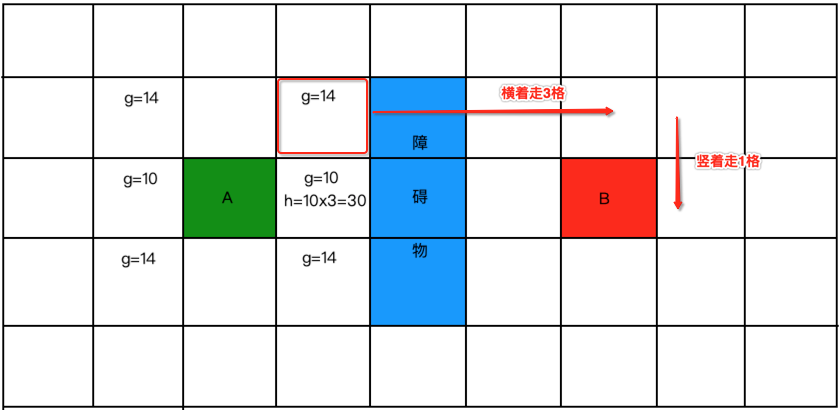
所以:

最后再来根据实际代价+预估代价算出最终的实际距离,如下:
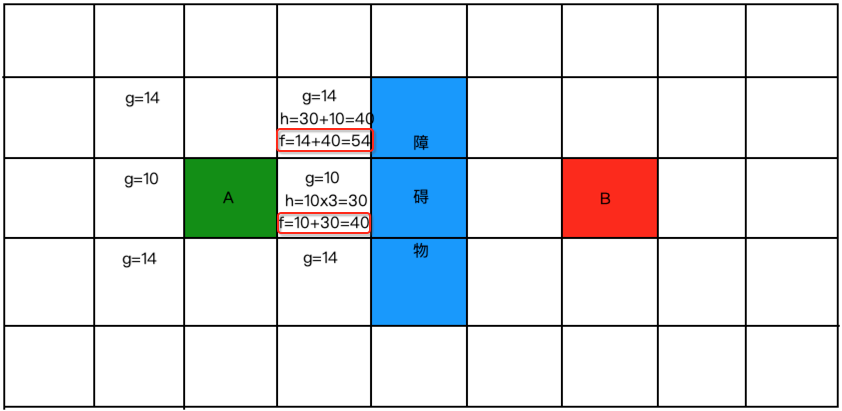
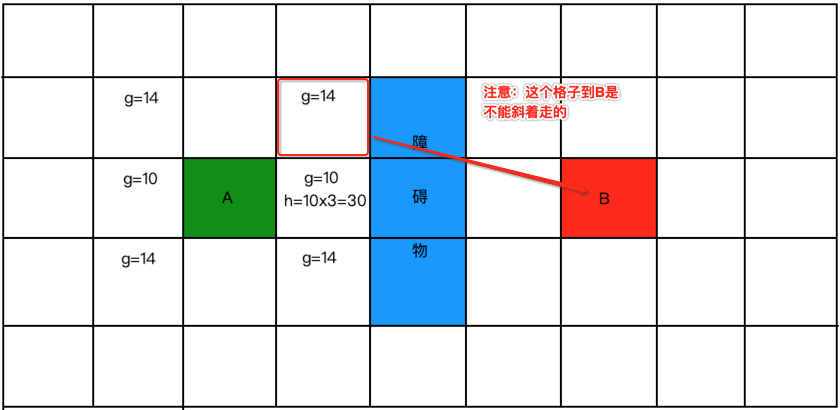
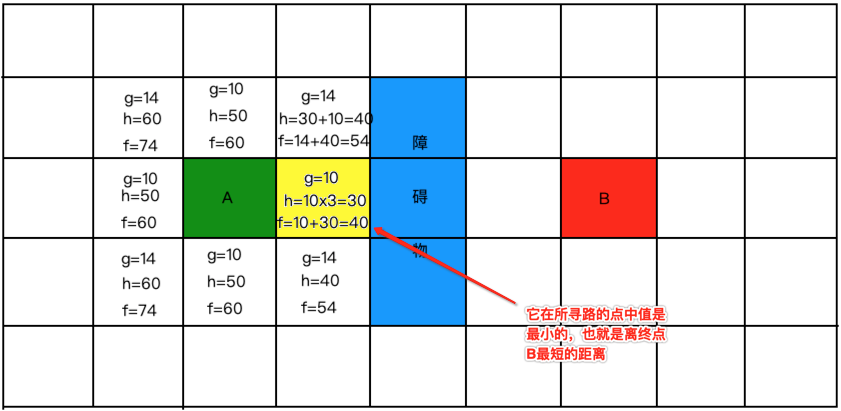
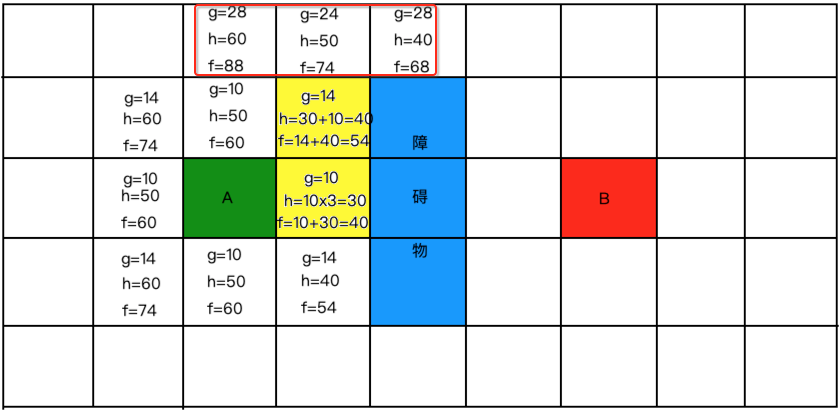
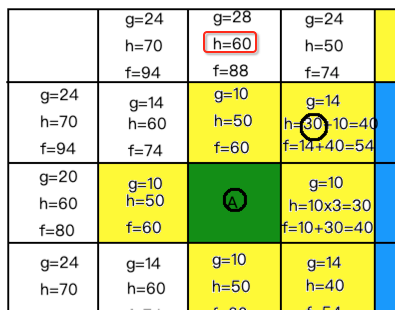
以此为原则,下面来将剩下附近的点都来算一下:

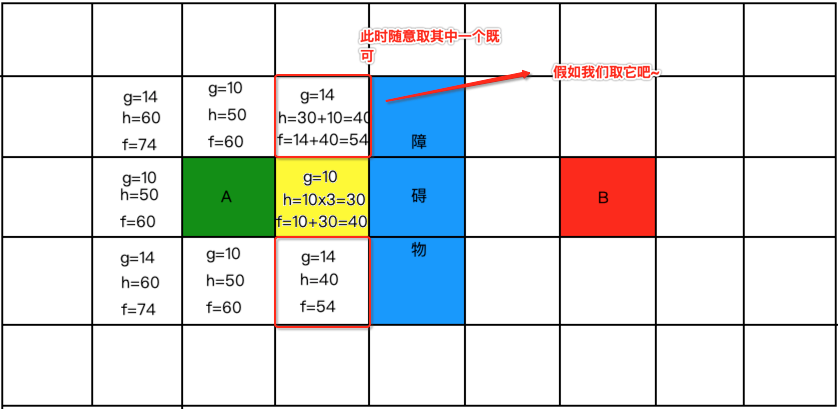
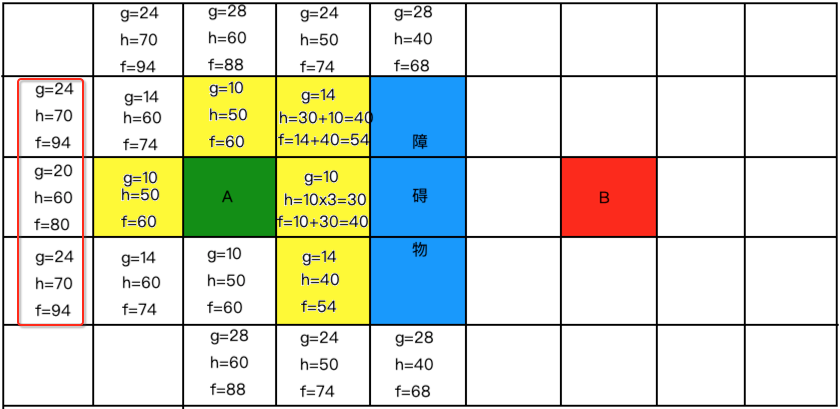
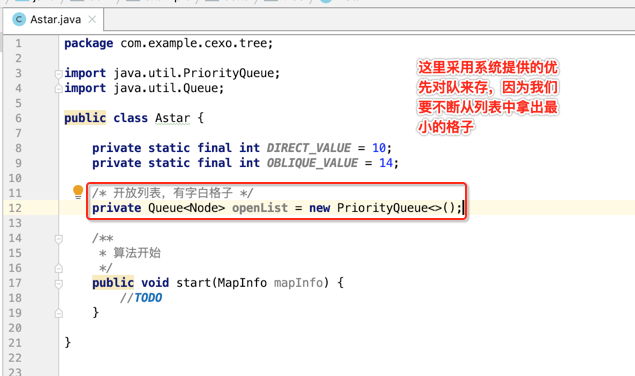
此时需要做一些定义了,因为在实现时需要用它,也就是这些白色有字的需要存放到一个列表中,我们将其定义为“开放列表”。而此时从这些寻路的点中找到一个最小的值,将其标为黄色,如下:
那在程序中对于这个标黄的也得要东西去存它呀,此时这个集合就定义为“关闭列表”,好,接下来再以这个黄色的为中心再去寻路,此时就应该在这个范围去以同样的方式去计算了,如下:
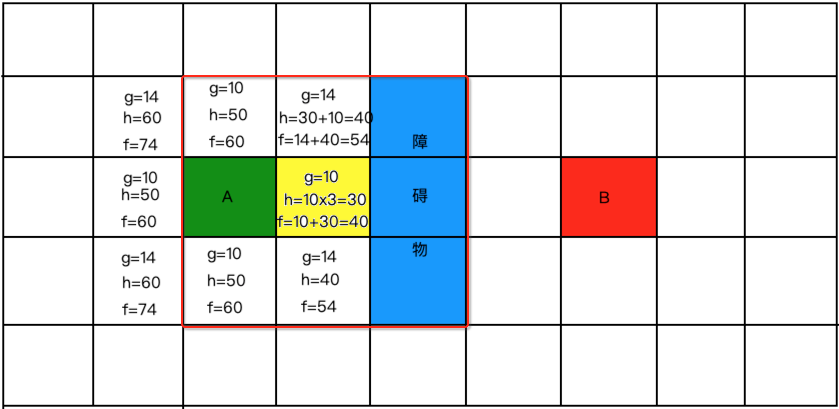
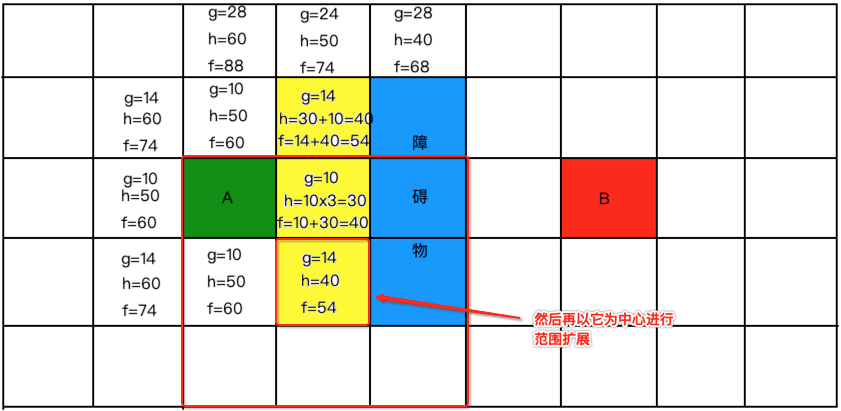
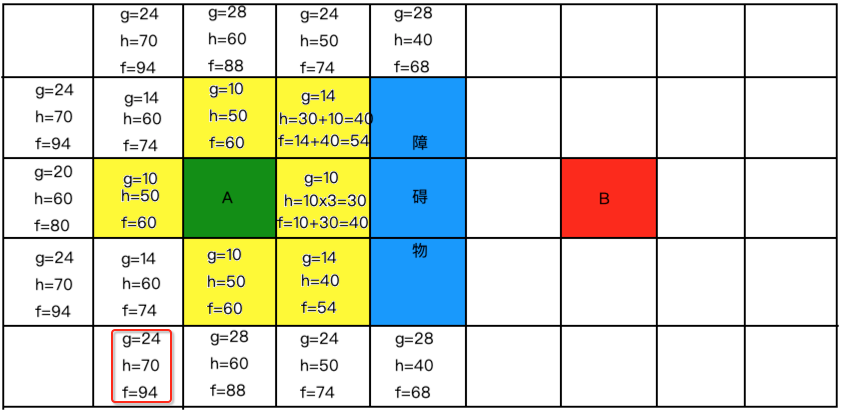
但是!!我们发现没有新的点能够计算,因为要不是已经计算过了的,要不就是障碍物,那接下来就从所剩下的开方列表【白色有字的格子】的中继续找最小的,此时发现有两个最小的:
所以将其标黄放到关闭列表中:
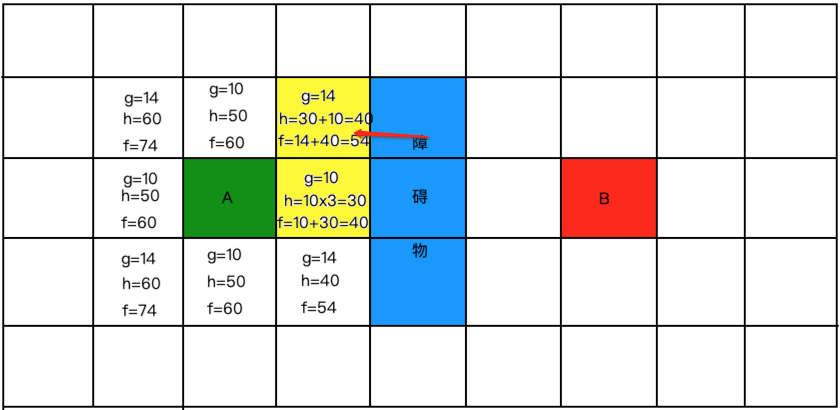
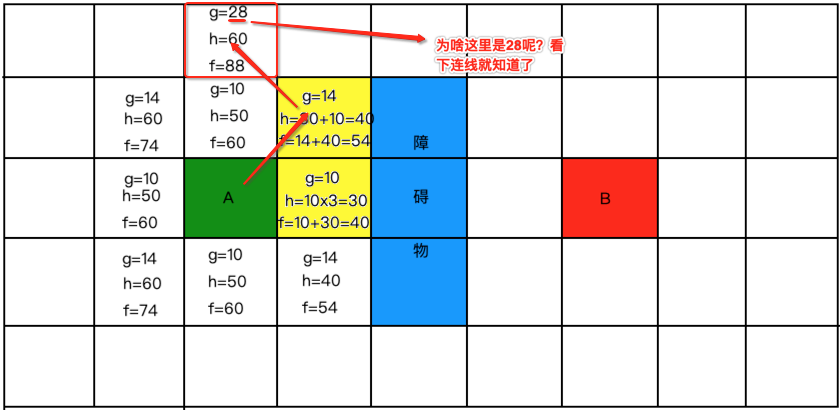
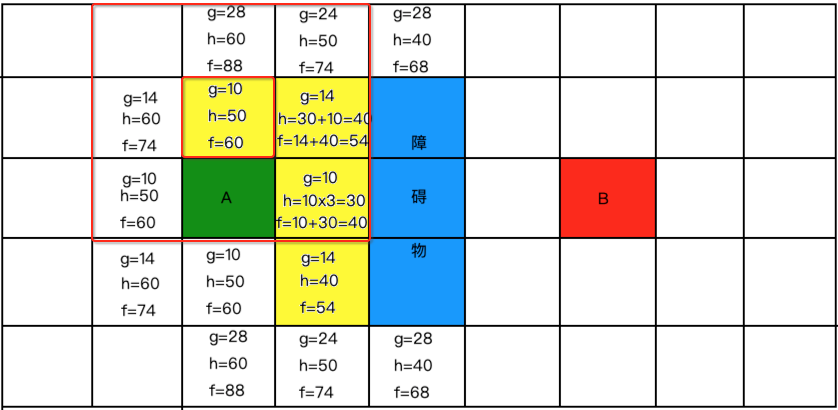
此时以这个为中心点有新格子可以寻了,则开始以之前的规则进行距离计算:
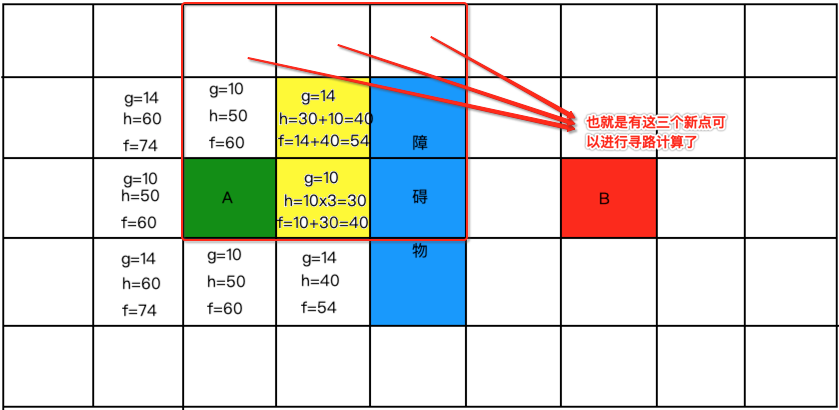
好计算一下:
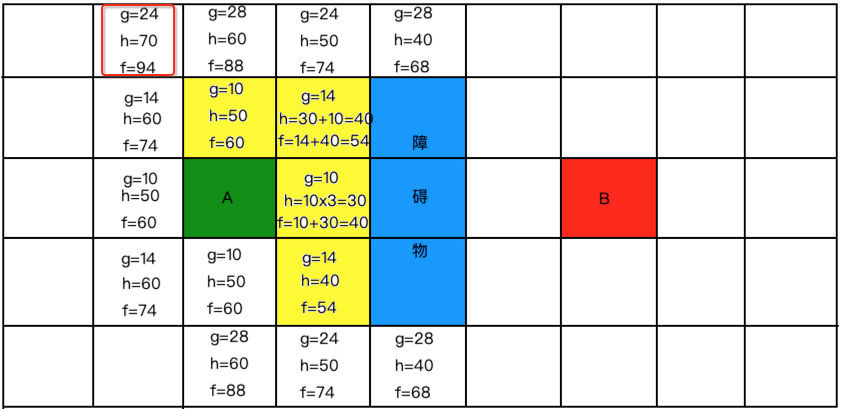
好接下来继续从开放列表中找最小的,标黄并放到关闭列表中:
所以:

就不过多啰嗦了,继续找最小的标黄放到关闭列表中:
继续算新的格子:
再找从开放列表中找最小的:

计算新格子放到开放列表中:
继续从开放列表中找最小的标黄放到关闭列表中,如下:

继续放算新格子放到开放列表中:
继续从开放列表中找最小的标黄放到关闭列表中,如下:

继续放算新格子放到开放列表中:

继续从开放列表中找最小的标黄放到关闭列表中,如下:

继续放算新格子放到开放列表中:
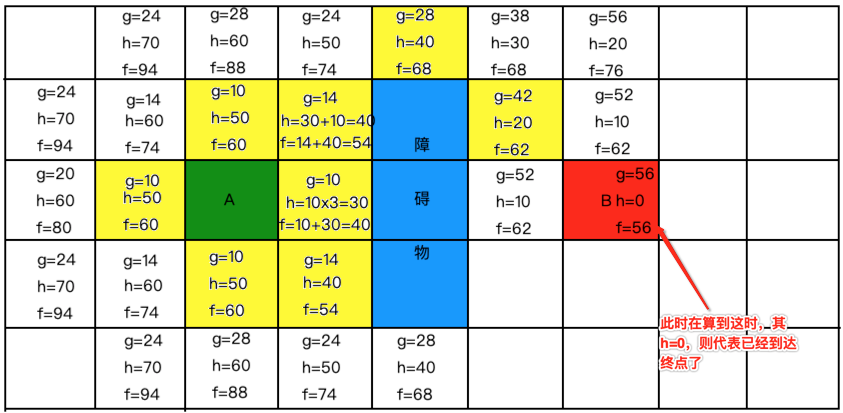
好,找是找到终点了,那。。标黄的关闭列表中存了这么多值,怎么来算出最佳路线呢?这里就需要记录父节点了,啥意思,也就是说我们在算新格子时需要存一下中心点,也就是这个新格子是基于这个中心算出来的,所以中心点可以成为新格子的父节点,啥意思?比如:

同样的:
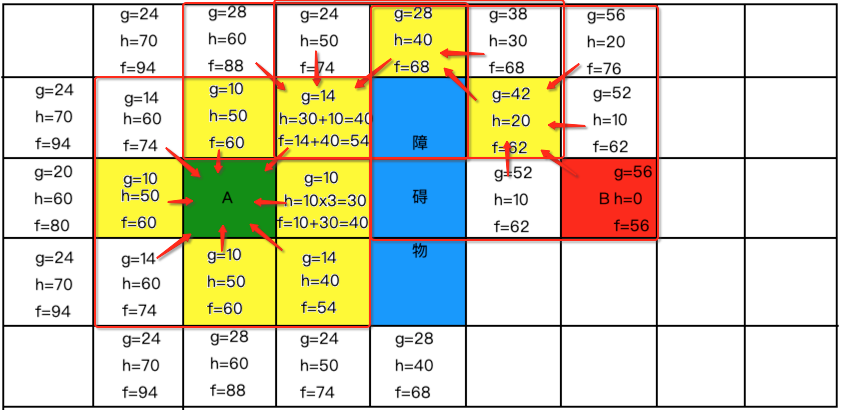
此时以终点开始,来将之前的各中心连成一线,最佳线路其实就出来了,如下:

至此咱们一步步来将整个寻路的思路整理完整了,下面来就可以进入到正式撸码环节啦,这些思路的整理真的非常重要,不然写代码完全没法动手。
代码实现:
地图界面搭建:
如最初效果图所示,这里用到了可视化的方式来验证咱们的算法规划的路线是否靠谱,所以在编写核心算法之前得先搭建一个地图界面,所以它不是我们所讨论的重点,所以把相关代码贴出来就成了,也不难,如果有一点Android游戏编程的基础这些代码是比较简单的:
首先地图用到了三个资源图,如下:
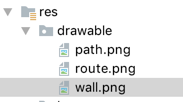
依顺序长这样:


activity_main.xml:
<?xml version="1.0" encoding="utf-8"?>
<RelativeLayout xmlns:android="http://schemas.android.com/apk/res/android"
    xmlns:tools="http://schemas.android.com/tools"
    android:layout_width="match_parent"
    android:layout_height="match_parent"
    tools:context="com.example.cexo.tree.MainActivity">

    <com.example.cexo.tree.ShowMapView
        android:id="@+id/show"
        android:layout_width="match_parent"
        android:layout_height="match_parent" />

    <Button
        android:id="@+id/btn"
        android:layout_width="wrap_content"
        android:layout_height="wrap_content"
        android:layout_alignParentBottom="true"
        android:onClick="cal"
        android:text="计算" />

    <Button
        android:id="@+id/reset"
        android:layout_width="wrap_content"
        android:layout_height="wrap_content"
        android:layout_alignParentBottom="true"
        android:layout_toRightOf="@id/btn"
        android:onClick="reset"
        android:text="刷新" />


</RelativeLayout>
其中有一个自定义的View:
public class ShowMapView extends View {
    public ShowMapView(Context context) {
        super(context);
    }

    public ShowMapView(Context context, @Nullable AttributeSet attrs) {
        super(context, attrs);
    }

    public ShowMapView(Context context, @Nullable AttributeSet attrs, int defStyleAttr) {
        super(context, attrs, defStyleAttr);
    }

    public ShowMapView(Context context, @Nullable AttributeSet attrs, int defStyleAttr, int defStyleRes) {
        super(context, attrs, defStyleAttr, defStyleRes);
    }

    @Override
    public boolean onTouchEvent(MotionEvent event) {
        float x = event.getX();
        float y = event.getY();
        //每格地图大小为80*80,注意:数组和屏幕坐标X和Y相反
        int row = (int) y / 80;
        int col = (int) x / 80;
        if (MapUtils.map[row][col] == 0) {
            MapUtils.touchFlag++;
            if (MapUtils.touchFlag == 1) {
                MapUtils.startRow = row;
                MapUtils.startCol = col;
                MapUtils.map[row][col] = 2;
            } else if (MapUtils.touchFlag == 2) {
                MapUtils.endRow = row;
                MapUtils.endCol = col;
                MapUtils.map[row][col] = 2;
            }
        }
        this.invalidate();
        return super.onTouchEvent(event);
    }

    @Override
    protected void onDraw(Canvas canvas) {
        super.onDraw(canvas);
        Paint paint = new Paint();
        paint.setAntiAlias(true);
        paint.setColor(Color.BLUE);
        paint.setStrokeWidth(5);
        paint.setStyle(Paint.Style.STROKE);
        for (int i = 0; i < MapUtils.map.length; i++) {
            for (int j = 0; j < MapUtils.map[i].length; j++) {
                if (MapUtils.map[i][j] == 0) {
                    Bitmap bm = BitmapFactory.decodeResource(this.getResources(), R.drawable.route);
                    canvas.drawBitmap(bm, j * 80, i * 80, paint);
                } else if (MapUtils.map[i][j] == 1) {
                    Bitmap bm = BitmapFactory.decodeResource(this.getResources(), R.drawable.wall);
                    canvas.drawBitmap(bm, j * 80, i * 80, paint);
                } else if (MapUtils.map[i][j] == 2) {
                    Bitmap bm = BitmapFactory.decodeResource(this.getResources(), R.drawable.path);
                    canvas.drawBitmap(bm, j * 80, i * 80, paint);
                }
            }
        }
        if(MapUtils.path!=null) {
            canvas.drawPath(MapUtils.path, paint);
        }

    }
}
比较简单,就是根据不同的状态在坐标上画相应的图既可,而地图相关的数据封装在工具类中。
MapUtils.java:
import android.graphics.Path;

import java.util.Stack;

public class MapUtils {

    public static int startRow = 0;
    public static int startCol = 0;
    public static int endRow = 0;
    public static int endCol = 0;
    public static int touchFlag = 0;
    public static Stack<Node> result = new Stack<>();
    public static Path path;

    public final static int WALL = 1; //  障碍


    public static int[][] map = {
            {0, 0, 0, 0, 0, 0, 0, 0, 0, 0, 0, 0, 0, 0},
            {0, 0, 0, 1, 0, 1, 1, 1, 1, 1, 0, 0, 0, 0},
            {0, 0, 0, 1, 0, 0, 0, 1, 0, 1, 0, 0, 0, 1},
            {0, 0, 0, 1, 0, 1, 0, 1, 0, 1, 0, 1, 0, 1},
            {1, 1, 0, 0, 0, 1, 0, 0, 0, 0, 0, 1, 0, 1},
            {1, 1, 0, 1, 1, 1, 1, 1, 1, 1, 1, 1, 0, 1},
            {0, 0, 0, 1, 0, 1, 0, 0, 0, 1, 0, 0, 0, 0},
            {0, 0, 0, 0, 0, 1, 0, 0, 0, 0, 0, 1, 0, 0},
            {1, 1, 0, 0, 0, 1, 0, 0, 0, 0, 0, 1, 1, 1},
            {0, 0, 0, 1, 1, 1, 0, 1, 1, 1, 0, 0, 0, 0},
            {0, 0, 0, 1, 0, 0, 0, 1, 0, 1, 0, 0, 0, 1},
            {0, 0, 0, 1, 0, 1, 0, 1, 0, 1, 1, 1, 0, 1},
            {1, 0, 0, 0, 0, 1, 0, 0, 0, 1, 0, 1, 0, 1},
            {1, 1, 1, 0, 1, 1, 1, 1, 1, 1, 0, 0, 0, 1},
            {0, 0, 1, 1, 1, 0, 0, 0, 0, 1, 0, 0, 0, 0},
            {0, 0, 0, 0, 0, 0, 0, 0, 0, 0, 0, 0, 0, 0},
            {1, 0, 0, 0, 0, 1, 1, 0, 0, 0, 1, 1, 1, 0},
            {1, 0, 1, 1, 1, 1, 0, 0, 0, 1, 1, 0, 1, 1},
            {1, 0, 1, 0, 0, 1, 1, 0, 0, 0, 0, 0, 1, 1},
            {1, 0, 0, 0, 0, 1, 0, 0, 0, 0, 1, 0, 1, 1}
    };

}
用了个二维数组来构造地图数据,也是较常见的一种地图构建法,1代表是墙、0代表是道路。
然后MainActivity.java的代码如下,也就是点击则开始计算,清空则将计算结果从地图中给清掉,具体逻辑也比较好理解:
public class MainActivity extends AppCompatActivity {

    ShowMapView showMapView;

    Handler handler = null;

    @Override
    protected void onCreate(Bundle savedInstanceState) {

        handler = new Handler(Looper.getMainLooper());
        super.onCreate(savedInstanceState);
        setContentView(R.layout.activity_main);
        showMapView = (ShowMapView) findViewById(R.id.show);
    }

    public void cal(View view) {
        MapInfo info = new MapInfo(map, map[0].length, map.length, new Node(startCol, startRow), new Node(endCol, endRow));
        Log.i("jett", "start=" + startRow + " " + startCol);
        Log.i("jett", "end=" + endRow + " " + endCol);
        new Astar().start(info);
        new MoveThread(showMapView).start();

    }

    public void reset(View view) {
        MapUtils.path = null;
        MapUtils.result.clear();
        touchFlag = 0;
        for (int i = 0; i < map.length; i++) {
            for (int j = 0; j < map[i].length; j++) {
                if (map[i][j] == 2) {
                    map[i][j] = 0;
                }
            }
        }
        showMapView.invalidate();

    }

    /**
     * 根据计算规划路线来将白色块在线路上循环走一遍
     */
    class MoveThread extends Thread {
        ShowMapView showMapView;

        public MoveThread(ShowMapView showMapView) {
            this.showMapView = showMapView;
        }

        @Override
        public void run() {
            while (result.size() > 0) {
                Log.i("jett", result.size() + "");
                Node node = result.pop();
                map[node.coord.y][node.coord.x] = 2;
                handler.post(new Runnable() {
                    @Override
                    public void run() {
                        showMapView.invalidate();
                    }
                });

                try {
                    Thread.sleep(300);
                } catch (InterruptedException e) {
                    e.printStackTrace();
                }
                map[node.coord.y][node.coord.x] = 0;

            }
            MapUtils.touchFlag = 0;
        }
    }

}
其中用到几个实体,一个是坐标实体:
Coord.java:
/**
 * @Description: 坐标
 */
public class Coord
{

    public int x;
    public int y;

    public Coord(int x, int y)
    {
        this.x = x;
        this.y = y;
    }

    @Override
    public boolean equals(Object obj)
    {
        if (obj == null) return false;
        if (obj instanceof Coord)
        {
            Coord c = (Coord) obj;
            return x == c.x && y == c.y;
        }
        return false;
    }
}
然后就是一个节点Node,里面记录有父节点、实际代价g、预估代价h、坐标值,如下:
Node.java:
/**
 * @Description: 路径结点
 */
public class Node implements Comparable<Node> {

    public Coord coord; // 坐标
    public Node parent; // 父结点
    public int g; // G:是个准确的值,是起点到当前结点的代价
    public int h; // H:是个估值,当前结点到目的结点的估计代价

    public Node(int x, int y) {
        this.coord = new Coord(x, y);
    }

    public Node(Coord coord, Node parent, int g, int h) {
        this.coord = coord;
        this.parent = parent;
        this.g = g;
        this.h = h;
    }

    @Override
    public int compareTo(Node o) {
        if (o == null) return -1;
        if (g + h > o.g + o.h)
            return 1;
        else if (g + h < o.g + o.h) return -1;
        return 0;
    }
}
还有一个地图的实体:MapInfo.java:
/**
 * @Description: 包含地图所需的所有输入数据
 */
public class MapInfo {
    public int[][] map; // 二维数组的地图
    public int width; // 地图的宽
    public int hight; // 地图的高
    public Node start; // 起始结点
    public Node end; // 最终结点

    public MapInfo(int[][] map, int width, int hight, Node start, Node end) {
        this.map = map;
        this.width = width;
        this.hight = hight;
        this.start = start;
        this.end = end;
        Log.i("cexo", "初始化地图成功");
    }
}
最后一个实体就是我们要写核心算法的Astar.java了,里面就定义了一个待咱们实现寻路算法的方法:
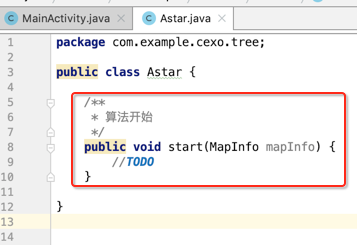
其中最终的结果会存在MapUtils.result栈中,如下:

实现寻路算法:
好,接下来就把注意点放在如何实现寻路算法上了,先来定义俩个常量值,横着走是10,竖着走是14,如下:
然后定义两个列表:开放列表和关闭列表:

接下来在正式编写start()方法之前,先定义一个辅助方法,这样到时在写start()时代码会比较清晰:
1、计算H值:

2、判断是否为终点:
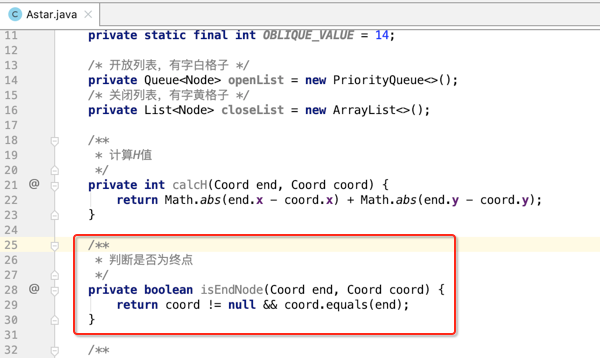
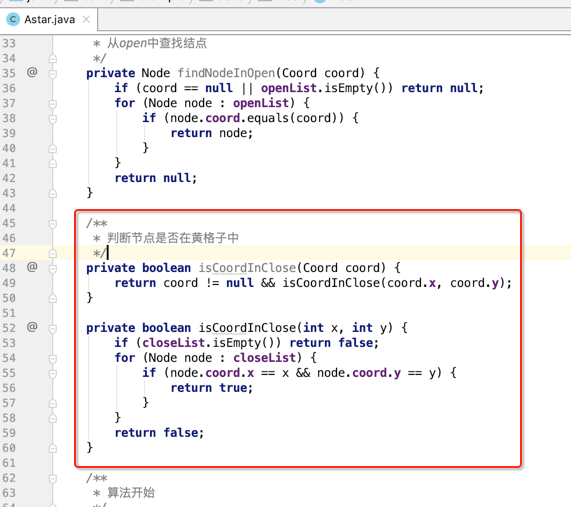
3、从openlist和closelist查找节点,因为我们在填新格子的时候需要过滤已经在openlist和closelist中的节点,所以:

而对于黄格子的判断,也可以这样,返回booelan:
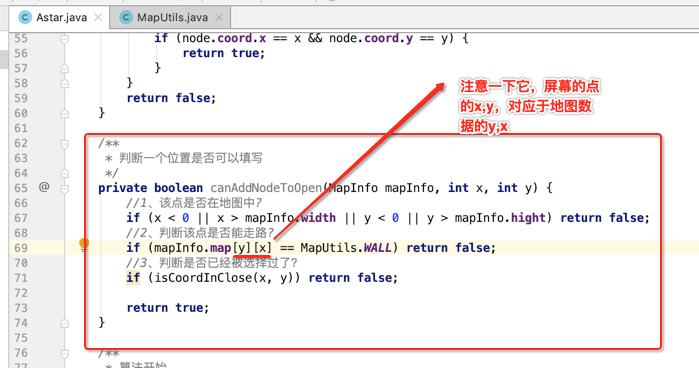
4、判断一个位置是否可以填字,也就是有些格式比如在地图外了,或者是墙屏等,都是不可以填写的:
以上辅助方法一切就绪了,接下来就可以编写咱们的核心算法啦:
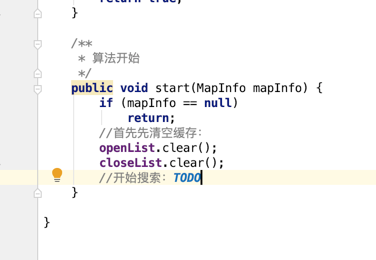

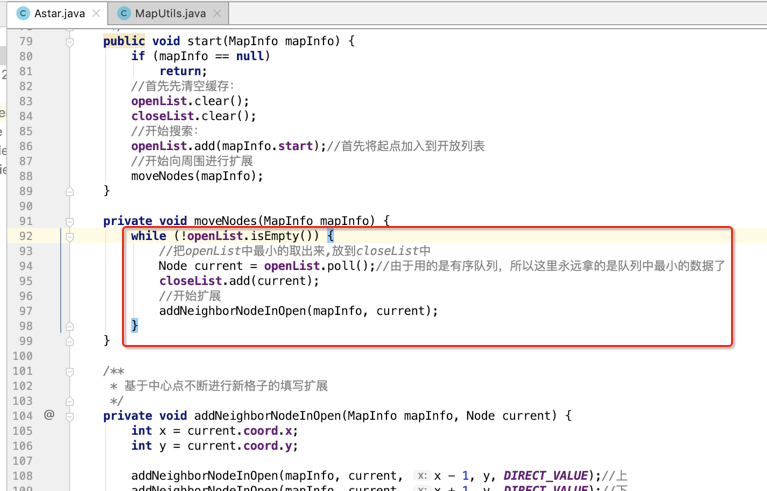
接下来则需要以当前中心点向周围扩展8个,所以可以这样写:

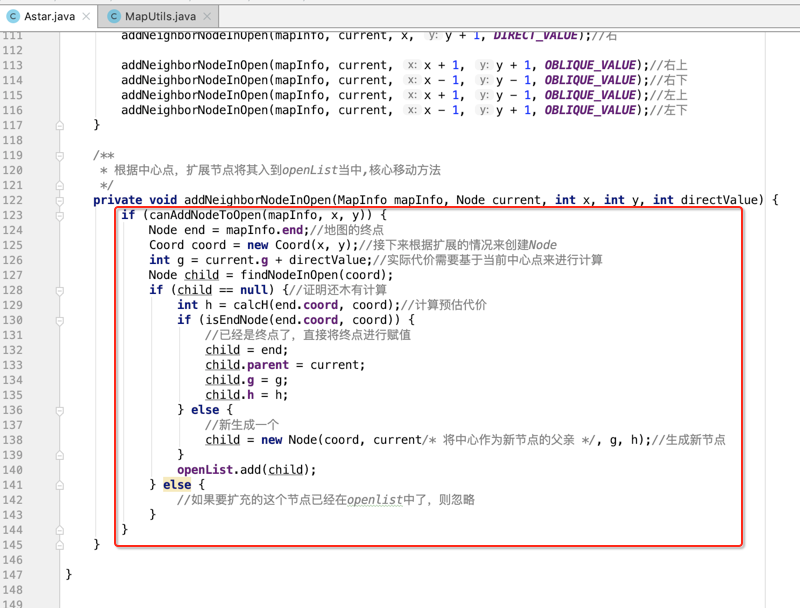
接下来就集中来实现这个核心的移动方法:
最后咱们回到moveNodes()方法来处理找到了终点的处理需要生成我们的结果了,如下:

比较好理解,就不多解释了,下面运行看一下效果:
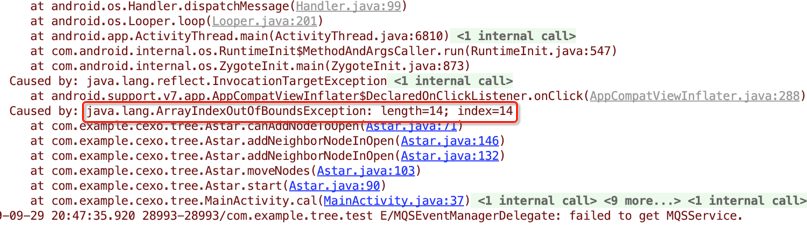
为啥?其实是条件判断写得有问题:
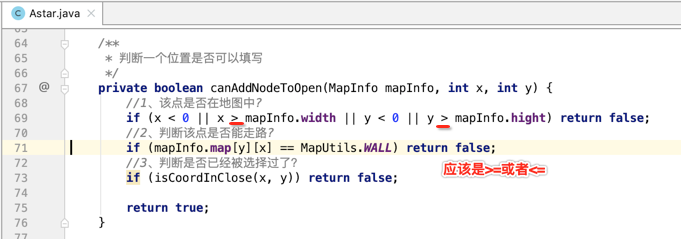
修改一下:

此时再运行就完美了,下面将整个Astar.java的代码贴出来,理解了上面的思路之后写起来其实也还好:
public class Astar {

    private static final int DIRECT_VALUE = 10;
    private static final int OBLIQUE_VALUE = 14;

    /* 开放列表,有字白格子 */
    private Queue<Node> openList = new PriorityQueue<>();
    /* 关闭列表,有字黄格子 */
    private List<Node> closeList = new ArrayList<>();

    /**
     * 计算H值
     */
    private int calcH(Coord end, Coord coord) {
        return Math.abs(end.x - coord.x) + Math.abs(end.y - coord.y);
    }

    /**
     * 判断是否为终点
     */
    private boolean isEndNode(Coord end, Coord coord) {
        return coord != null && coord.equals(end);
    }

    /**
     * 从open中查找结点
     */
    private Node findNodeInOpen(Coord coord) {
        if (coord == null || openList.isEmpty()) return null;
        for (Node node : openList) {
            if (node.coord.equals(coord)) {
                return node;
            }
        }
        return null;
    }

    /**
     * 判断节点是否在黄格子中
     */
    private boolean isCoordInClose(Coord coord) {
        return coord != null && isCoordInClose(coord.x, coord.y);
    }

    private boolean isCoordInClose(int x, int y) {
        if (closeList.isEmpty()) return false;
        for (Node node : closeList) {
            if (node.coord.x == x && node.coord.y == y) {
                return true;
            }
        }
        return false;
    }

    /**
     * 判断一个位置是否可以填写
     */
    private boolean canAddNodeToOpen(MapInfo mapInfo, int x, int y) {
        //1、该点是否在地图中?
        if (x < 0 || x >= mapInfo.width || y < 0 || y >= mapInfo.hight) return false;
        //2、判断该点是否能走路?
        if (mapInfo.map[y][x] == MapUtils.WALL) return false;
        //3、判断是否已经被选择过了?
        if (isCoordInClose(x, y)) return false;

        return true;
    }

    /**
     * 算法开始
     */
    public void start(MapInfo mapInfo) {
        if (mapInfo == null)
            return;
        //首先先清空缓存:
        openList.clear();
        closeList.clear();
        //开始搜索:
        openList.add(mapInfo.start);//首先将起点加入到开放列表
        //开始向周围进行扩展
        moveNodes(mapInfo);
    }

    private void moveNodes(MapInfo mapInfo) {
        while (!openList.isEmpty()) {
            if (isCoordInClose(mapInfo.end.coord)) {
                //如果终点已经在关闭列表中,则需要处理统计结果
                calcPath(mapInfo.map, mapInfo.end);
            }
            //把openList中最小的取出来,放到closeList中
            Node current = openList.poll();//由于用的是有序队列,所以这里永远拿的是队列中最小的数据了
            closeList.add(current);
            //开始扩展
            addNeighborNodeInOpen(mapInfo, current);
        }
    }

    /**
     * 把closeList中的出栈,并构成一个path路径绘制到地图上
     */
    private void calcPath(int[][] map, Node end) {
        //构建一个path的路径线
        MapUtils.path = new Path();
        if (end != null) {
            MapUtils.path.moveTo(end.coord.x * 80 + 40, end.coord.y * 80 + 40);//从结束结点的中心开始画
        }

        while (end != null) {
            MapUtils.path.lineTo(end.coord.x * 80 + 40, end.coord.y * 80 + 40);
            MapUtils.result.push(end);
            end = end.parent;
        }
    }

    /**
     * 基于中心点不断进行新格子的填写扩展
     */
    private void addNeighborNodeInOpen(MapInfo mapInfo, Node current) {
        int x = current.coord.x;
        int y = current.coord.y;

        addNeighborNodeInOpen(mapInfo, current, x - 1, y, DIRECT_VALUE);//上
        addNeighborNodeInOpen(mapInfo, current, x + 1, y, DIRECT_VALUE);//下
        addNeighborNodeInOpen(mapInfo, current, x, y - 1, DIRECT_VALUE);//左
        addNeighborNodeInOpen(mapInfo, current, x, y + 1, DIRECT_VALUE);//右

        addNeighborNodeInOpen(mapInfo, current, x + 1, y + 1, OBLIQUE_VALUE);//右上
        addNeighborNodeInOpen(mapInfo, current, x - 1, y - 1, OBLIQUE_VALUE);//右下
        addNeighborNodeInOpen(mapInfo, current, x + 1, y - 1, OBLIQUE_VALUE);//左上
        addNeighborNodeInOpen(mapInfo, current, x - 1, y + 1, OBLIQUE_VALUE);//左下
    }

    /**
     * 根据中心点,扩展节点将其入到openList当中,核心移动方法
     */
    private void addNeighborNodeInOpen(MapInfo mapInfo, Node current, int x, int y, int directValue) {
        if (canAddNodeToOpen(mapInfo, x, y)) {
            Node end = mapInfo.end;//地图的终点
            Coord coord = new Coord(x, y);//接下来根据扩展的情况来创建Node
            int g = current.g + directValue;//实际代价需要基于当前中心点来进行计算
            Node child = findNodeInOpen(coord);
            if (child == null) {//证明还木有计算
                int h = calcH(end.coord, coord);//计算预估代价
                if (isEndNode(end.coord, coord)) {
                    //已经是终点了,直接将终点进行赋值
                    child = end;
                    child.parent = current;
                    child.g = g;
                    child.h = h;
                } else {
                    //新生成一个
                    child = new Node(coord, current/* 将中心作为新节点的父亲 */, g, h);//生成新节点
                }
                openList.add(child);
            } else {
                //如果要扩充的这个节点已经在openlist中了,则忽略
            }
        }
    }

}
树、森林、二叉树的转换【了解,在考音视频相关的可能用问到】:
树转换成为二叉树:
转换规则:

如图:

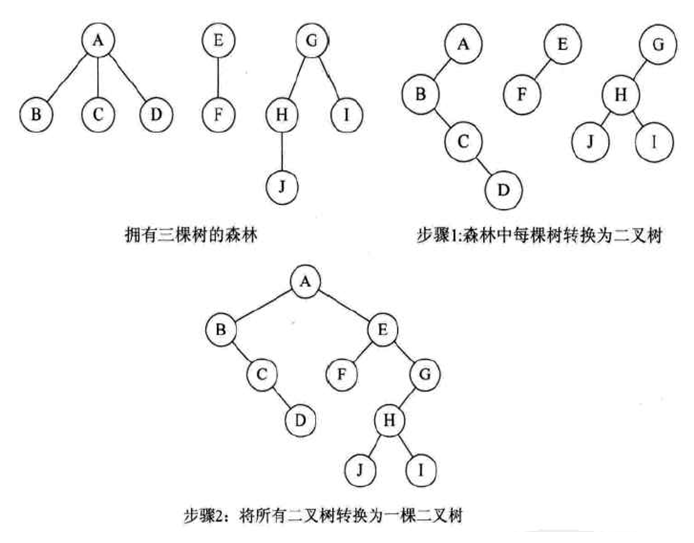
森林转换为二叉树:
转换规则:

如图:
二叉树转换为树:
转换规则:

如图:

二叉树转换为森林:
转换规则:

如图:

以上的各种树的转换只有理论,对于它的代码其实在了解了转换规则之后,其实自己来实现也不难,毕境之前对于比较复杂的排序树都已经实现了嘛~~