经过之前的Jetpack学习,目前对于架构这块的组件只剩下最后三个木有学习了,如下:

所以接下来继续对剩下的库进行学习。
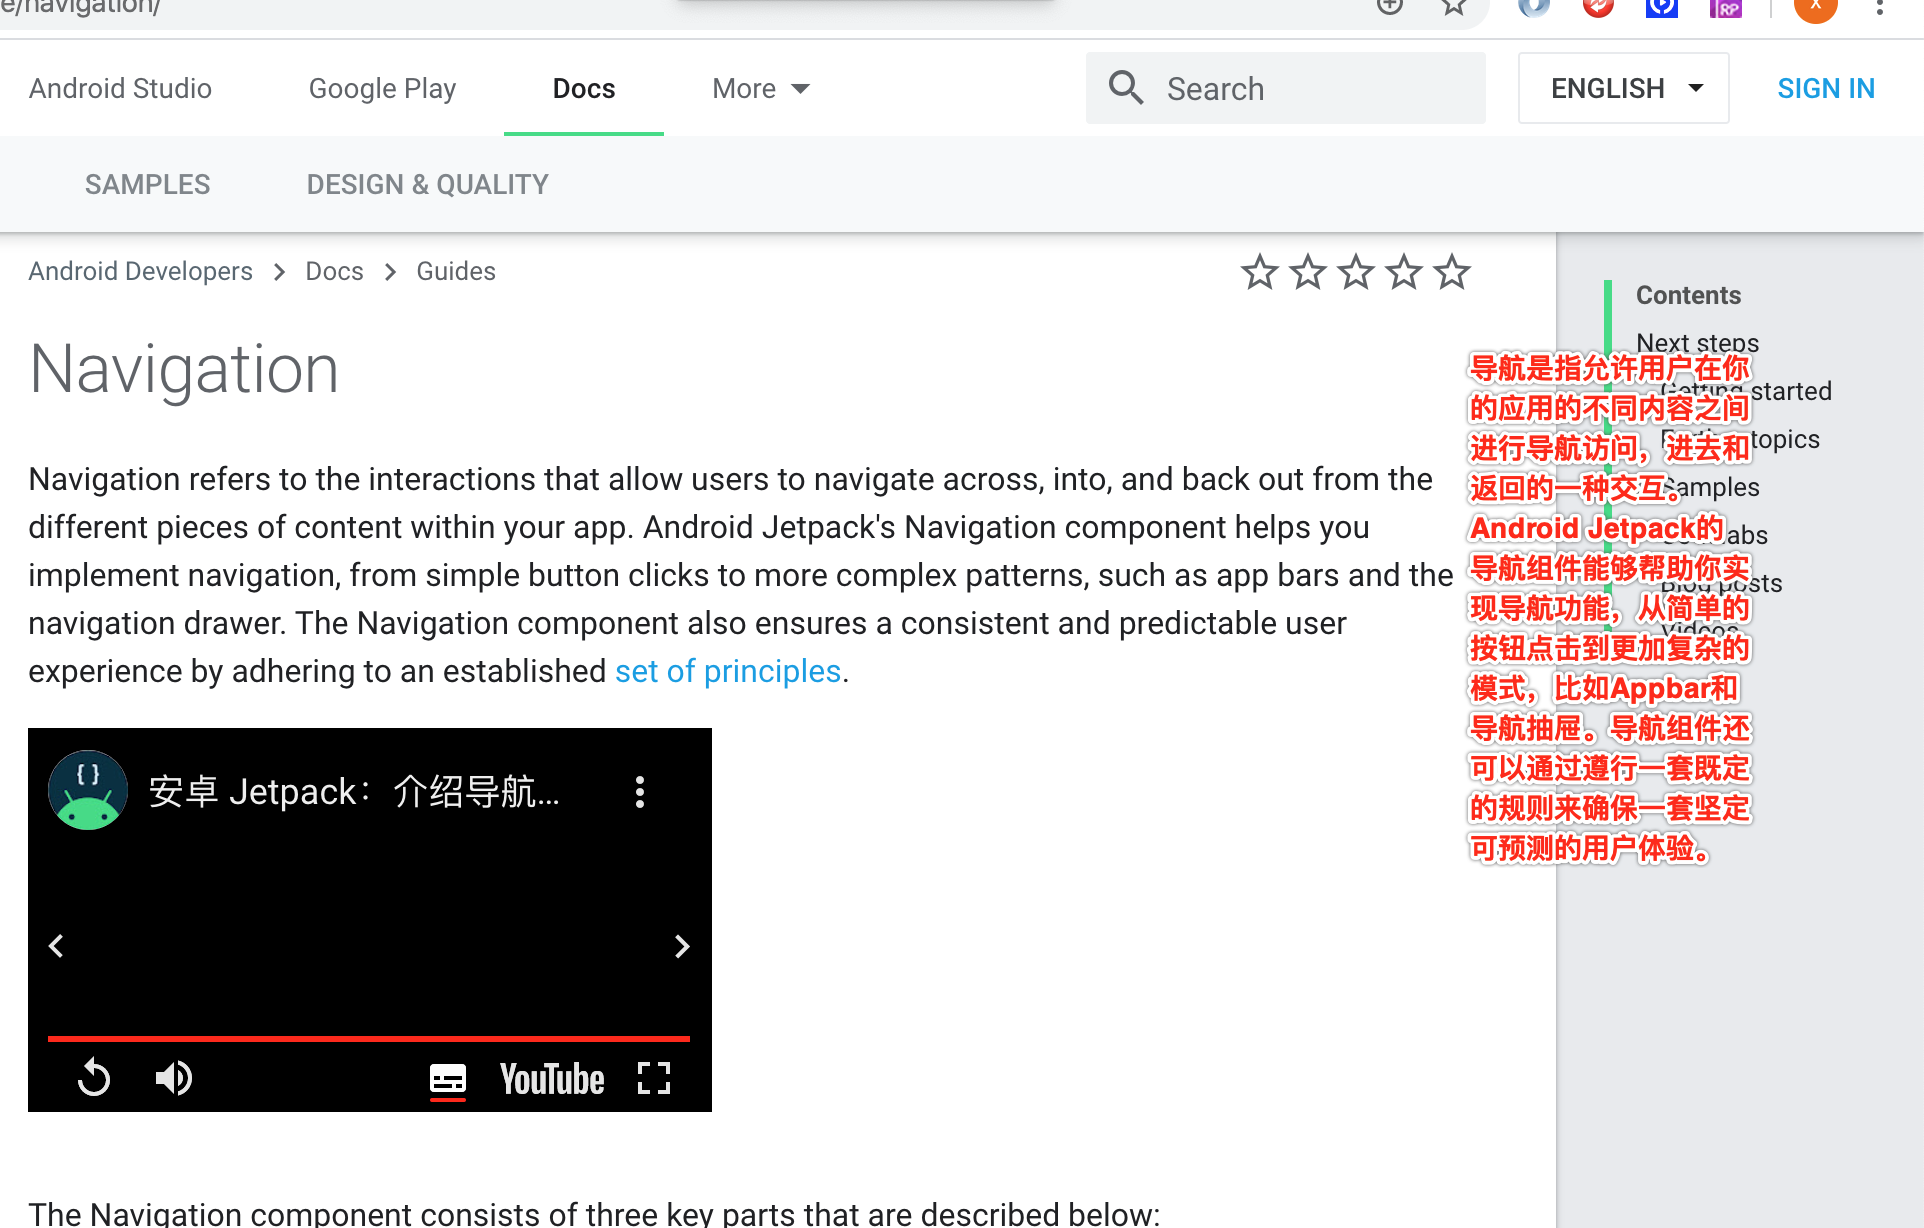
Navigation:
了解:
基本使用:
这里主要是Fragment之间的来回导航,先来看一下最终的效果:

也就是有三个Fragment,第一个跳到第二个;然后第二个既可以跳回第一个,又能跳到第三个;而第三个则又可以跳回到第二个,如果像这种跳转平常实现的话会比较麻烦,这里咱们来看一下具体怎么用导航组件来实现这样的效果:
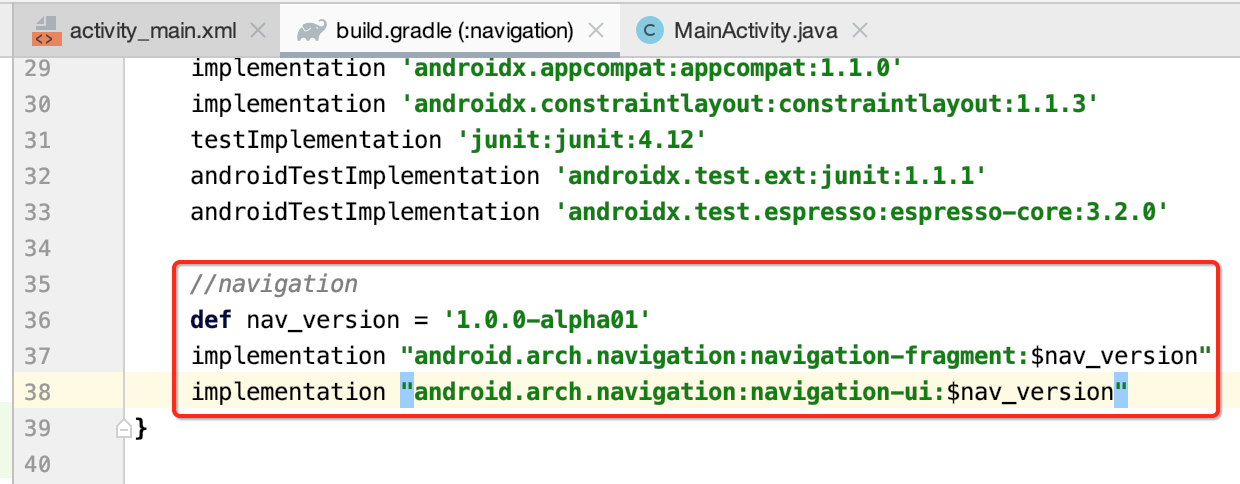
先来添加依赖:
MainActivity:
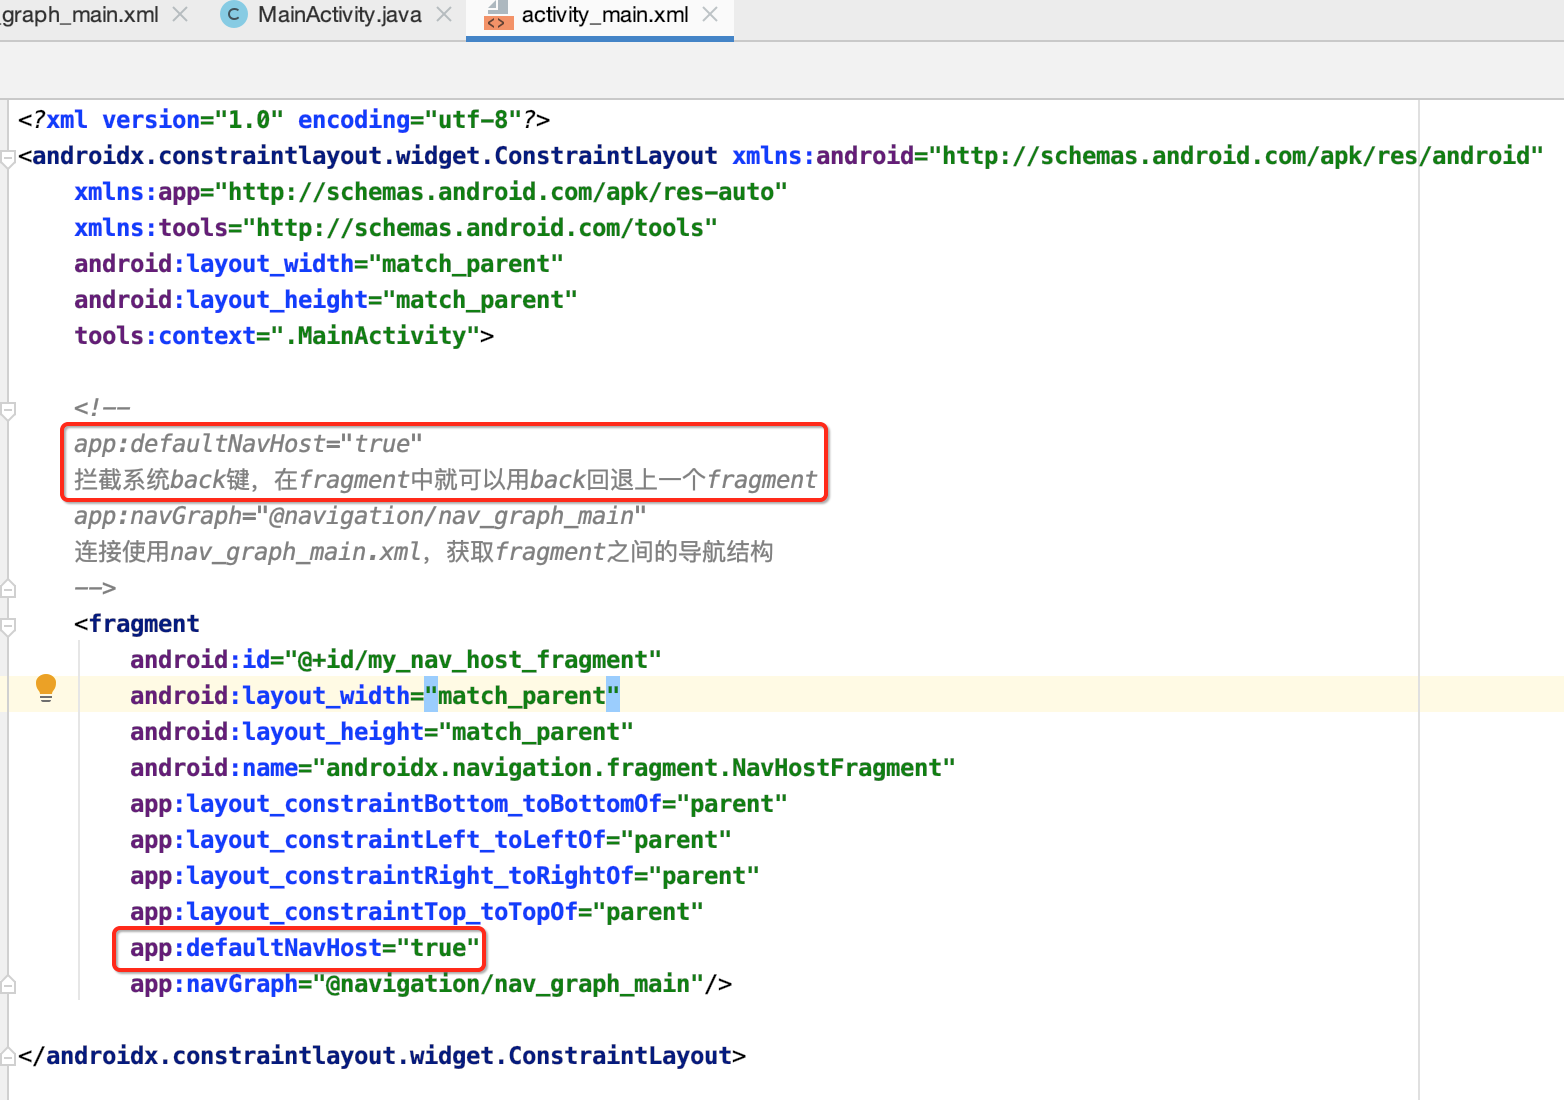
然后再来搭建主Activity:
package com.android.navigation;

import androidx.appcompat.app.AppCompatActivity;

import android.os.Bundle;

public class MainActivity extends AppCompatActivity {

    @Override
    protected void onCreate(Bundle savedInstanceState) {
        super.onCreate(savedInstanceState);
        setContentView(R.layout.activity_main);
    }
}
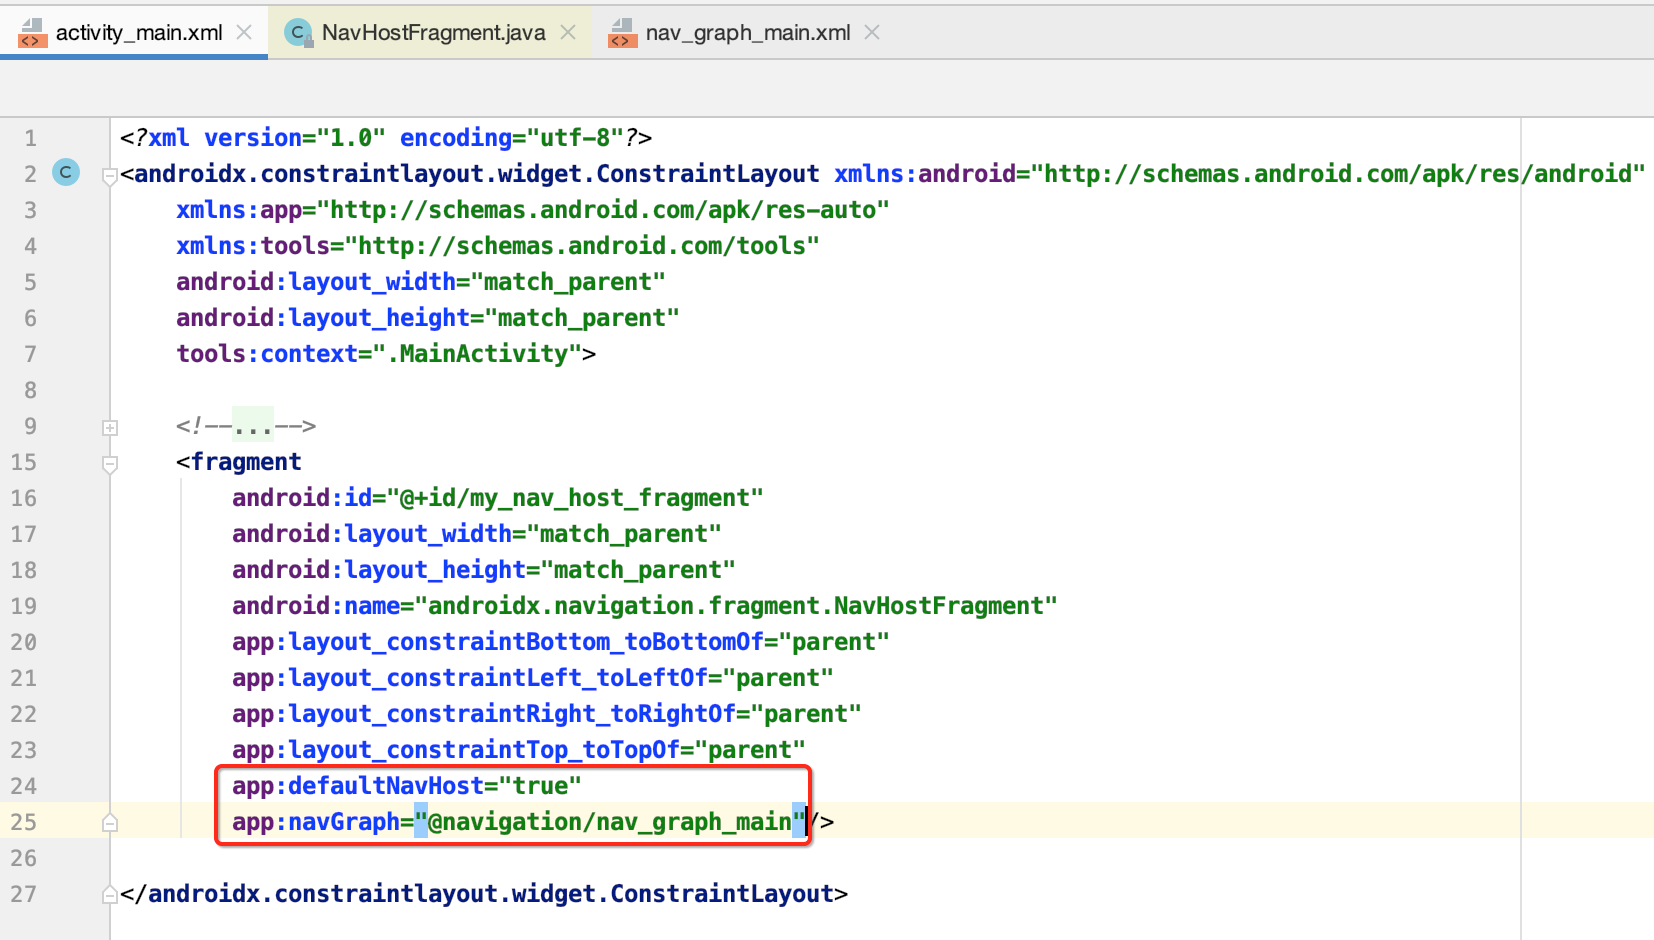
<?xml version="1.0" encoding="utf-8"?>
<androidx.constraintlayout.widget.ConstraintLayout xmlns:android="http://schemas.android.com/apk/res/android"
    xmlns:app="http://schemas.android.com/apk/res-auto"
    xmlns:tools="http://schemas.android.com/tools"
    android:layout_width="match_parent"
    android:layout_height="match_parent"
    tools:context=".MainActivity">

    <!--
    app:defaultNavHost="true"
    拦截系统back键,在fragment中就可以用back回退上一个fragment
    app:navGraph="@navigation/nav_graph_main"
    连接使用nav_graph_main.xml,获取fragment之间的导航结构
    -->
    <fragment
        android:id="@+id/my_nav_host_fragment"
        android:layout_width="match_parent"
        android:layout_height="match_parent"
        android:name="androidx.navigation.fragment.NavHostFragment"
        app:layout_constraintBottom_toBottomOf="parent"
        app:layout_constraintLeft_toLeftOf="parent"
        app:layout_constraintRight_toRightOf="parent"
        app:layout_constraintTop_toTopOf="parent"
        app:defaultNavHost="true"
        app:navGraph="@navigation/nav_graph_main"/>

</androidx.constraintlayout.widget.ConstraintLayout>
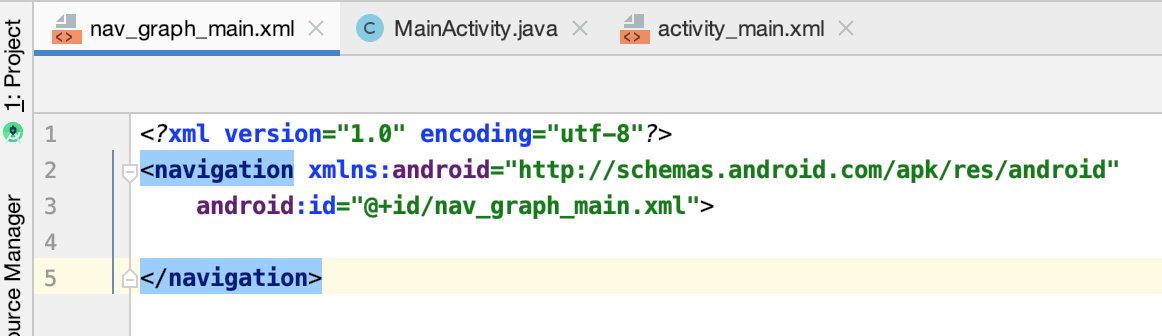
其中它需要依赖于一个导航配置文件:
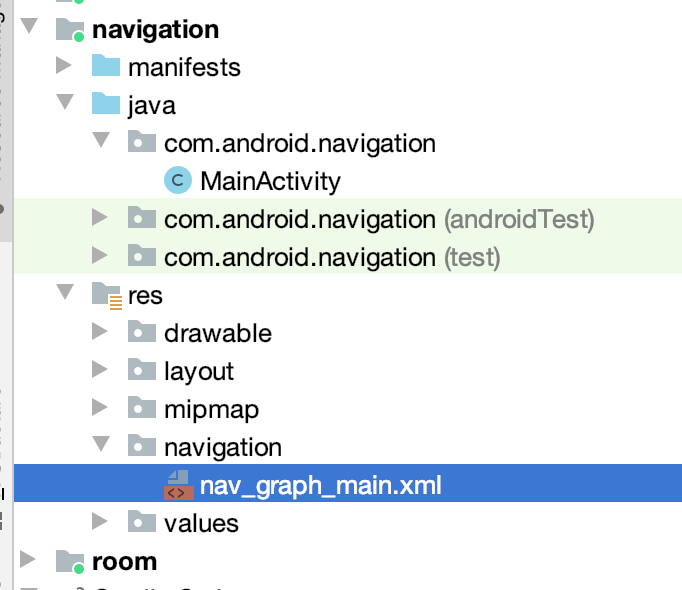
目前这配置文件里面先不配,待会用到时再配,很明显导航的规则肯定需要在这里来定义的:
其中它还有一个拖拉拽的视图:
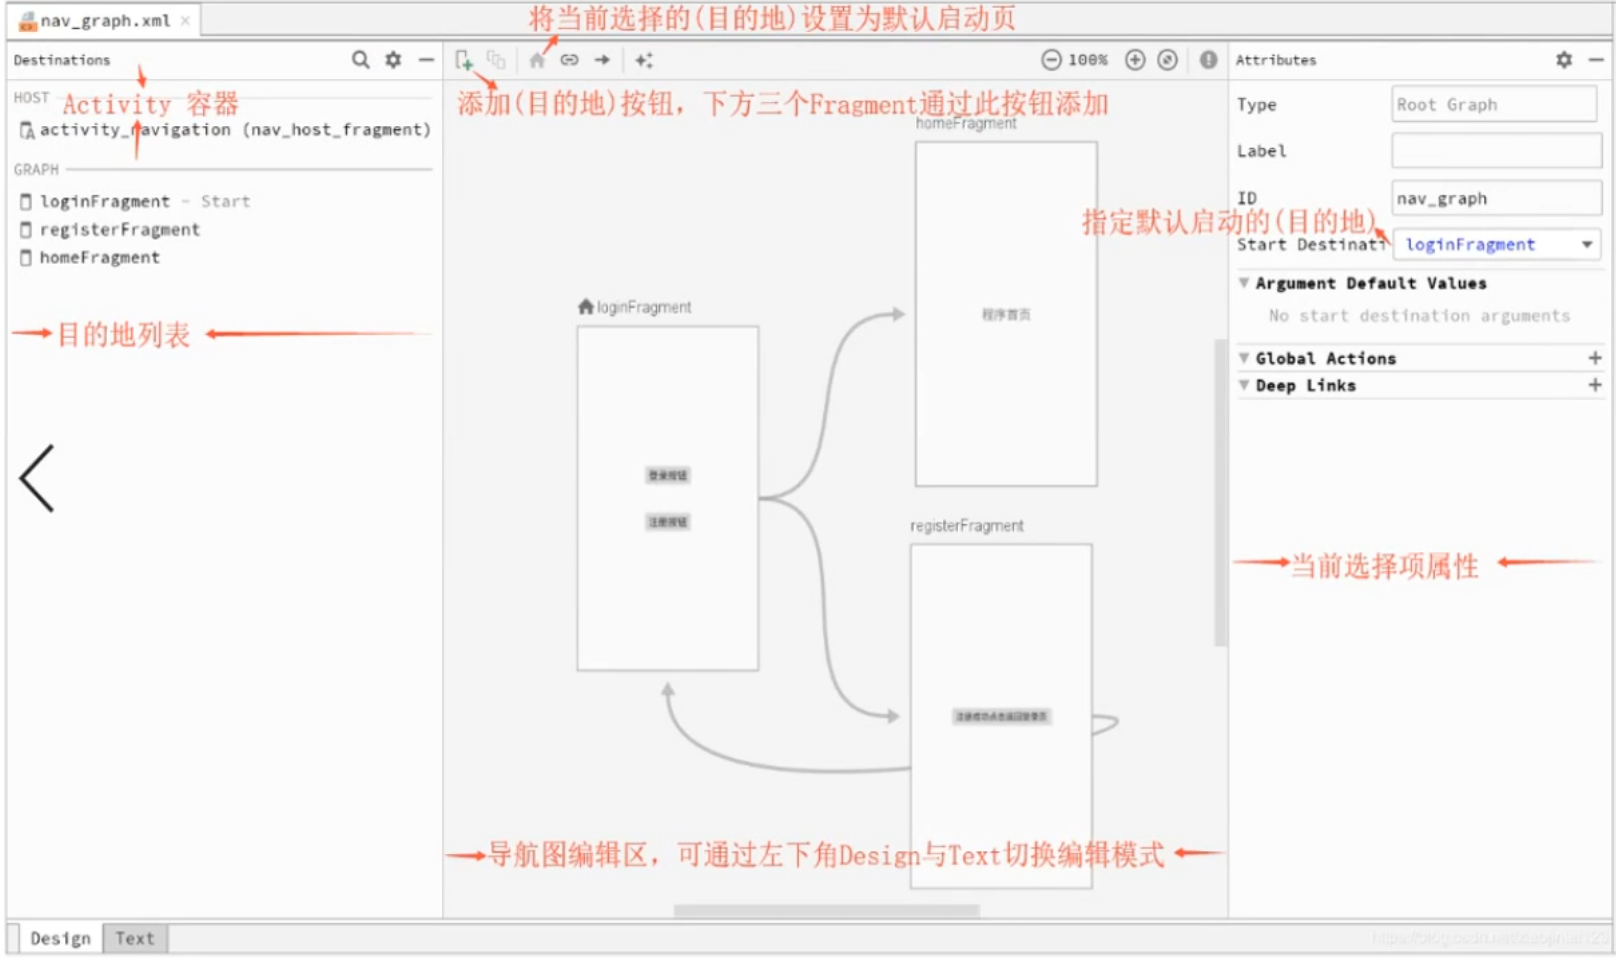
要学的话还是以xml的形式学,就像学布局一样,这样其实实现起来效率更高。
另外这里有一个小细节,就是如果我们平常一个界面只能显示一个Fragment的话,按back键默认是不是直接将当前的Activity给退出了?所以说这里需要配置一下来可以控制back的动作:
建立Fragments:
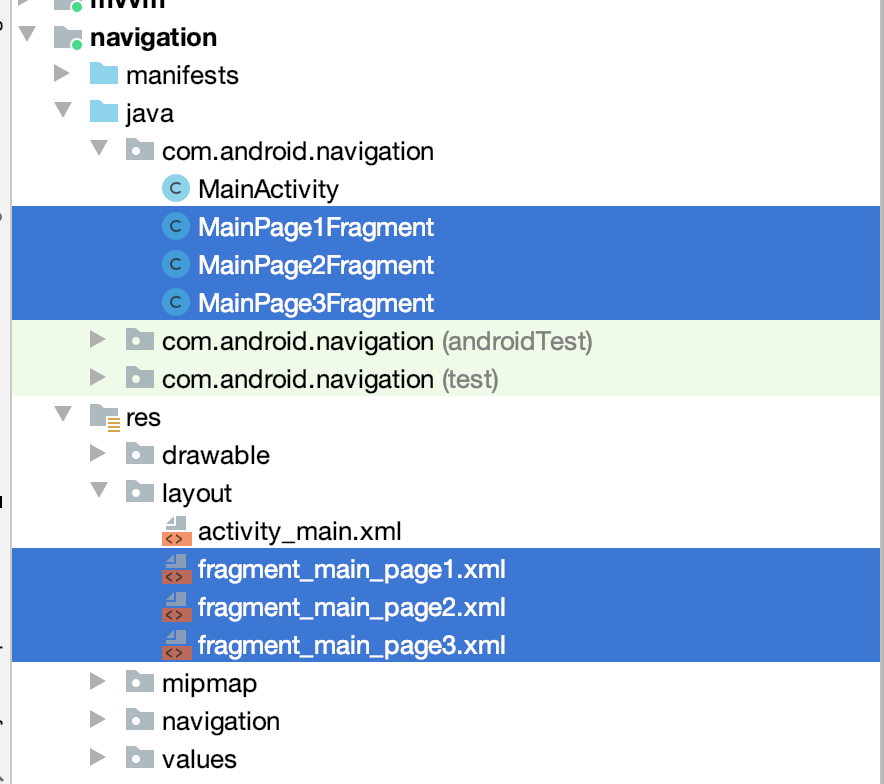
如效果所示,涉及到三个Fragment,所以这里先定义一下:
package com.android.navigation;

import android.os.Bundle;
import android.view.LayoutInflater;
import android.view.View;
import android.view.ViewGroup;
import android.widget.Button;

import androidx.annotation.NonNull;
import androidx.annotation.Nullable;
import androidx.fragment.app.Fragment;

public class MainPage1Fragment extends Fragment {
    @Nullable
    @Override
    public View onCreateView(@NonNull LayoutInflater inflater, @Nullable ViewGroup container, @Nullable Bundle savedInstanceState) {
        return inflater.inflate(R.layout.fragment_main_page1, container, false);
    }

    @Override
    public void onViewCreated(@NonNull View view, @Nullable Bundle savedInstanceState) {
        super.onViewCreated(view, savedInstanceState);
        Button btn = view.findViewById(R.id.btn);
        btn.setOnClickListener(new View.OnClickListener() {
            @Override
            public void onClick(View view) {
                //TODO
            }
        });
    }
}
fragment_main_page1.xml:
<?xml version="1.0" encoding="utf-8"?>
<LinearLayout xmlns:android="http://schemas.android.com/apk/res/android"
    android:id="@+id/main"
    android:layout_width="match_parent"
    android:layout_height="match_parent"
    android:orientation="vertical">

    <TextView
        android:id="@+id/message"
        android:layout_width="wrap_content"
        android:layout_height="wrap_content"
        android:text="MainPage1Fragment"
        android:textSize="20sp"
        android:textStyle="bold" />

    <Button
        android:id="@+id/btn"
        android:layout_width="wrap_content"
        android:layout_height="wrap_content"
        android:text="跳转MainPage2Fragment"
        android:textAllCaps="false" />

</LinearLayout>
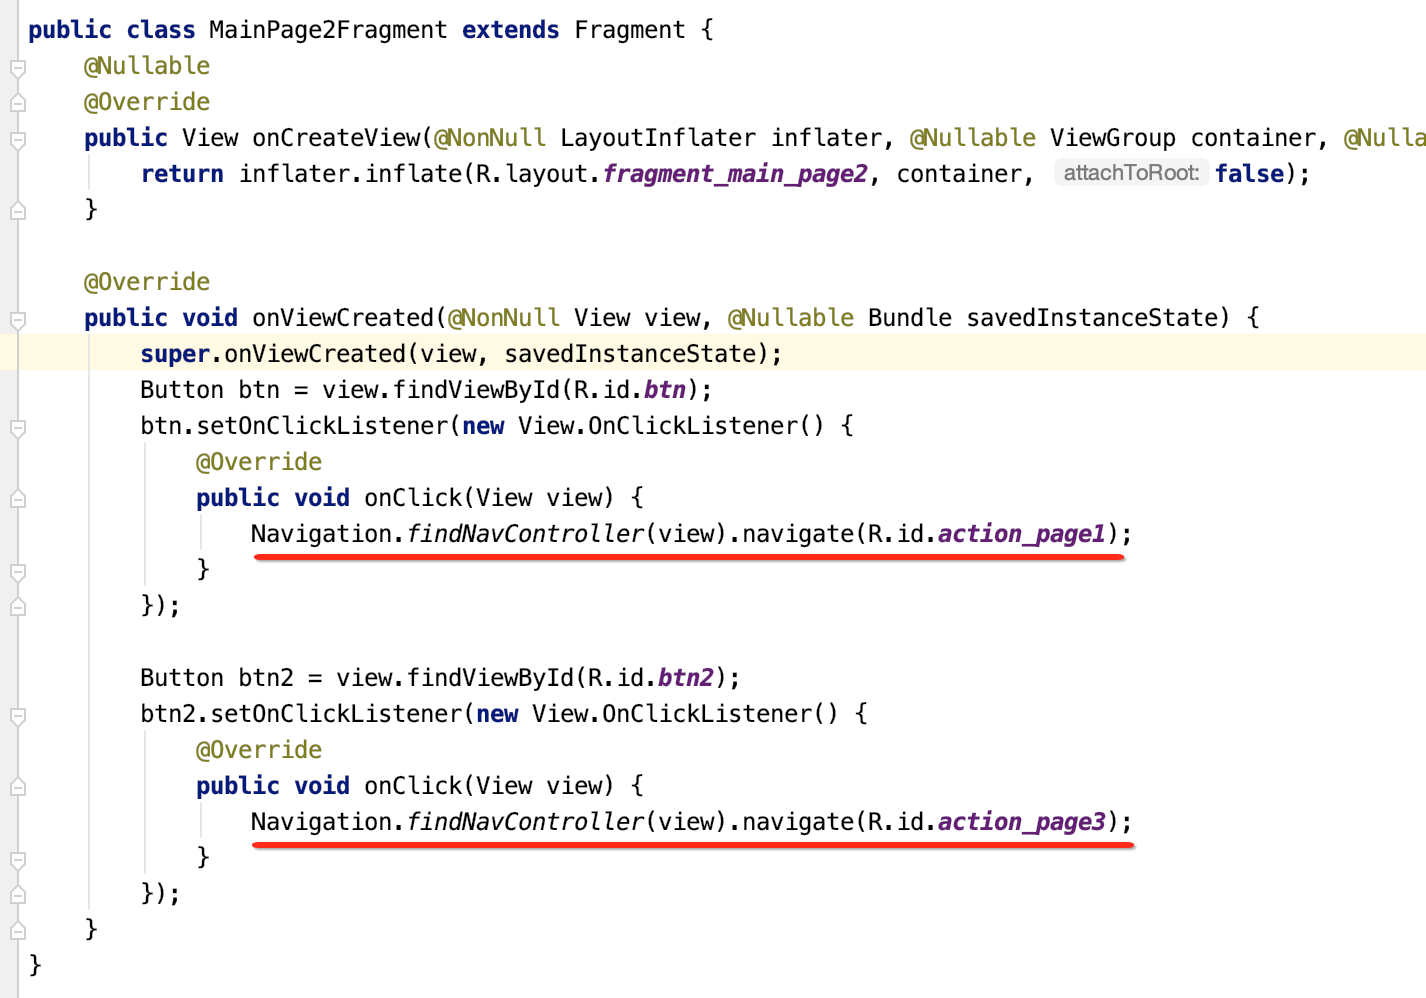
package com.android.navigation;

import android.os.Bundle;
import android.view.LayoutInflater;
import android.view.View;
import android.view.ViewGroup;
import android.widget.Button;

import androidx.annotation.NonNull;
import androidx.annotation.Nullable;
import androidx.fragment.app.Fragment;

public class MainPage2Fragment extends Fragment {
    @Nullable
    @Override
    public View onCreateView(@NonNull LayoutInflater inflater, @Nullable ViewGroup container, @Nullable Bundle savedInstanceState) {
        return inflater.inflate(R.layout.fragment_main_page2, container, false);
    }

    @Override
    public void onViewCreated(@NonNull View view, @Nullable Bundle savedInstanceState) {
        super.onViewCreated(view, savedInstanceState);
        Button btn = view.findViewById(R.id.btn);
        btn.setOnClickListener(new View.OnClickListener() {
            @Override
            public void onClick(View view) {
                //TODO
            }
        });

        Button btn2 = view.findViewById(R.id.btn2);
        btn2.setOnClickListener(new View.OnClickListener() {
            @Override
            public void onClick(View view) {
                //TODO
            }
        });
    }
}
fragment_main_page2.xml:
<?xml version="1.0" encoding="utf-8"?>
<LinearLayout xmlns:android="http://schemas.android.com/apk/res/android"
    android:layout_width="match_parent"
    android:layout_height="match_parent"
    android:orientation="vertical">

    <TextView
        android:id="@+id/textView"
        android:layout_width="wrap_content"
        android:layout_height="wrap_content"
        android:layout_marginLeft="8dp"
        android:layout_marginRight="8dp"
        android:layout_marginBottom="16dp"
        android:text="MainPage2Fragment"
        android:textSize="20sp"
        android:textStyle="bold" />

    <Button
        android:id="@+id/btn"
        android:layout_width="wrap_content"
        android:layout_height="wrap_content"
        android:layout_marginStart="8dp"
        android:layout_marginLeft="8dp"
        android:layout_marginEnd="8dp"
        android:layout_marginRight="8dp"
        android:text="返回MainPage1Fragment"
        android:textAllCaps="false" />

    <Button
        android:id="@+id/btn2"
        android:layout_width="wrap_content"
        android:layout_height="wrap_content"
        android:layout_marginStart="8dp"
        android:layout_marginLeft="8dp"
        android:layout_marginEnd="8dp"
        android:layout_marginRight="8dp"
        android:text="前往MainPage3Fragment"
        android:textAllCaps="false" />

</LinearLayout>
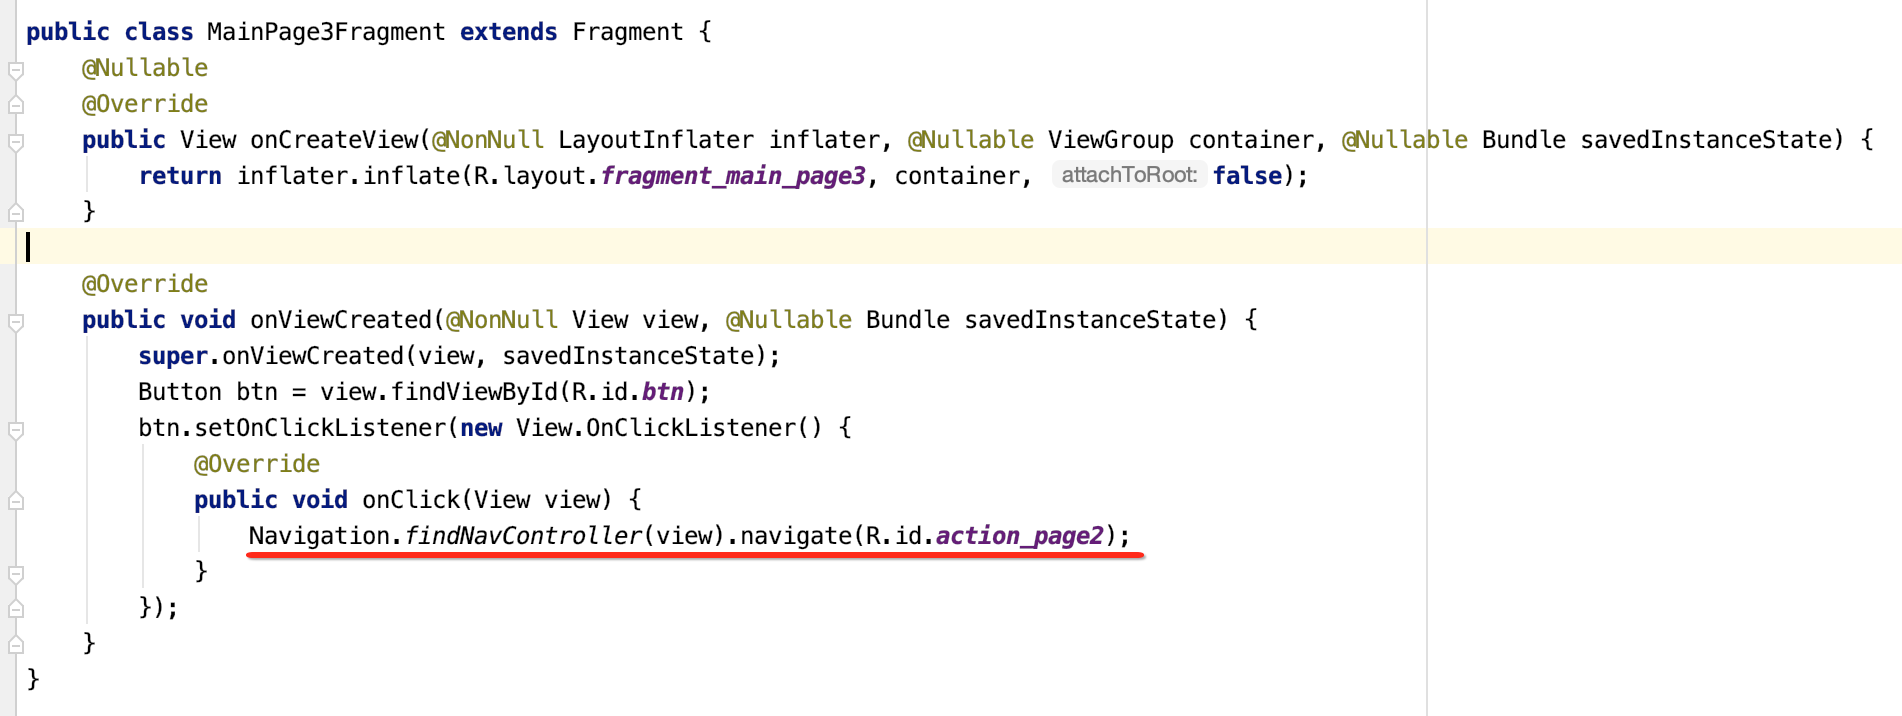
package com.android.navigation;

import android.os.Bundle;
import android.view.LayoutInflater;
import android.view.View;
import android.view.ViewGroup;
import android.widget.Button;

import androidx.annotation.NonNull;
import androidx.annotation.Nullable;
import androidx.fragment.app.Fragment;

public class MainPage3Fragment extends Fragment {
    @Nullable
    @Override
    public View onCreateView(@NonNull LayoutInflater inflater, @Nullable ViewGroup container, @Nullable Bundle savedInstanceState) {
        return inflater.inflate(R.layout.fragment_main_page3, container, false);
    }

    @Override
    public void onViewCreated(@NonNull View view, @Nullable Bundle savedInstanceState) {
        super.onViewCreated(view, savedInstanceState);
        Button btn = view.findViewById(R.id.btn);
        btn.setOnClickListener(new View.OnClickListener() {
            @Override
            public void onClick(View view) {
                //TODO
            }
        });
    }
}
<?xml version="1.0" encoding="utf-8"?>
<LinearLayout xmlns:android="http://schemas.android.com/apk/res/android"
    android:layout_width="match_parent"
    android:layout_height="match_parent"
    android:orientation="vertical">

    <TextView
        android:id="@+id/textView"
        android:layout_width="wrap_content"
        android:layout_height="wrap_content"
        android:layout_marginLeft="8dp"
        android:layout_marginRight="8dp"
        android:layout_marginBottom="16dp"
        android:text="MainPage3Fragment"
        android:textSize="20sp"
        android:textStyle="bold" />

    <Button
        android:id="@+id/btn"
        android:layout_width="wrap_content"
        android:layout_height="wrap_content"
        android:layout_marginStart="8dp"
        android:layout_marginLeft="8dp"
        android:layout_marginEnd="8dp"
        android:layout_marginRight="8dp"
        android:text="跳到MainPage2Fragment"
        android:textAllCaps="false"/>

</LinearLayout>
定义导航配置:
接下来咱们则来配置一下导航规则了,具体如何配置呢?
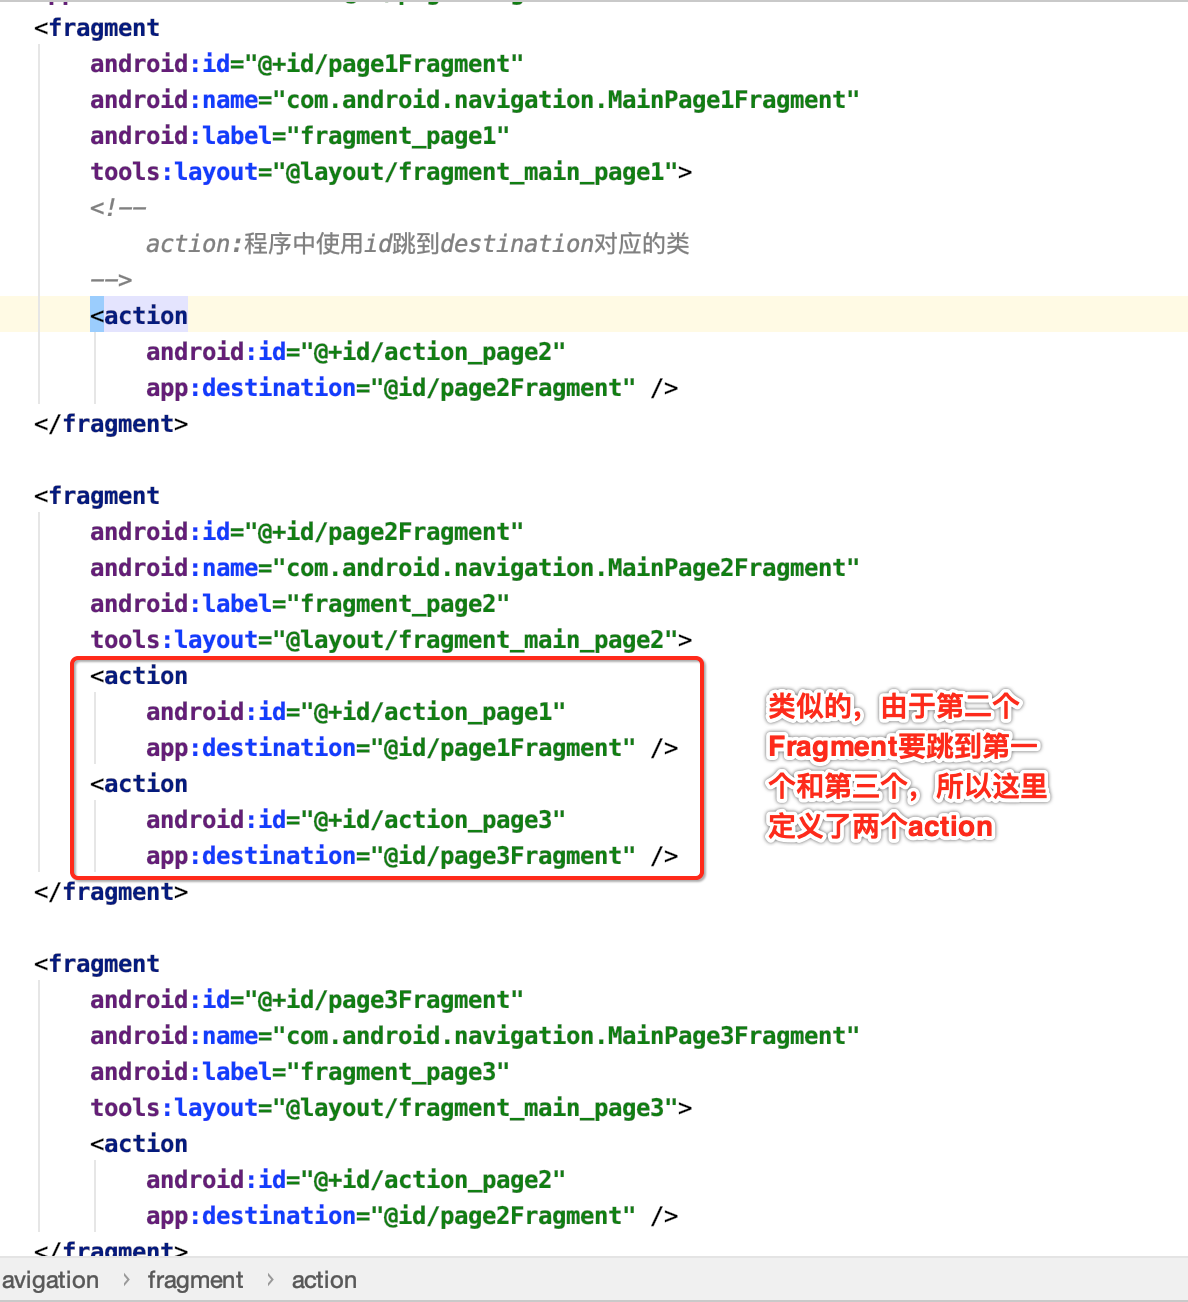
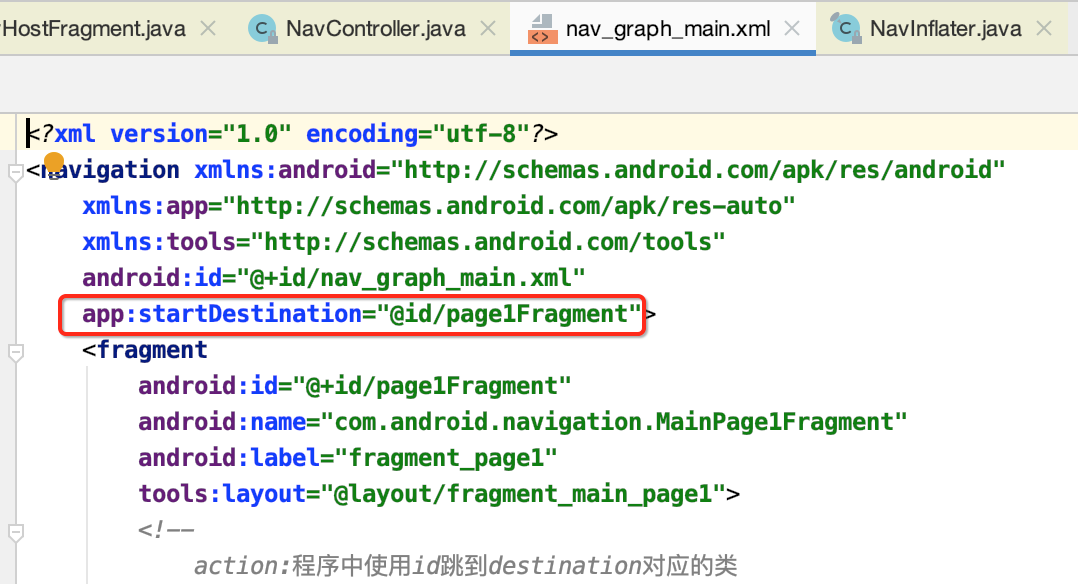
<?xml version="1.0" encoding="utf-8"?>
<navigation xmlns:android="http://schemas.android.com/apk/res/android"
    xmlns:app="http://schemas.android.com/apk/res-auto"
    xmlns:tools="http://schemas.android.com/tools"
    android:id="@+id/nav_graph_main.xml"
    app:startDestination="@id/page1Fragment">
    <fragment
        android:id="@+id/page1Fragment"
        android:name="com.android.navigation.MainPage1Fragment"
        android:label="fragment_page1"
        tools:layout="@layout/fragment_main_page1">
        <!--
            action:程序中使用id跳到destination对应的类
        -->
        <action
            android:id="@+id/action_page2"
            app:destination="@id/page2Fragment" />
    </fragment>

    <fragment
        android:id="@+id/page2Fragment"
        android:name="com.android.navigation.MainPage2Fragment"
        android:label="fragment_page2"
        tools:layout="@layout/fragment_main_page2">
        <action
            android:id="@+id/action_page1"
            app:destination="@id/page1Fragment" />
        <action
            android:id="@+id/action_page3"
            app:destination="@id/page3Fragment" />
    </fragment>

    <fragment
        android:id="@+id/page3Fragment"
        android:name="com.android.navigation.MainPage3Fragment"
        android:label="fragment_page3"
        tools:layout="@layout/fragment_main_page3">
        <action
            android:id="@+id/action_page2"
            app:destination="@id/page2Fragment" />
    </fragment>

</navigation>
其可视视图为:
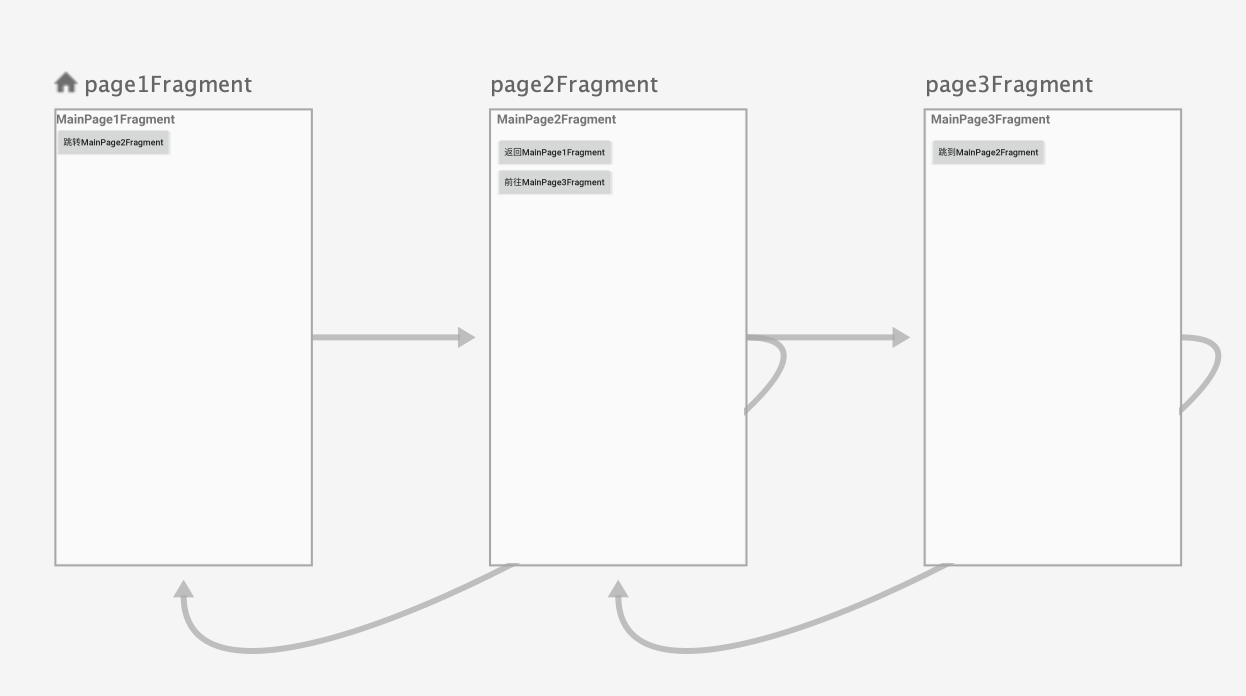
其中大致解释一下其配置:

好,接下来咱们则来完成点击事件:

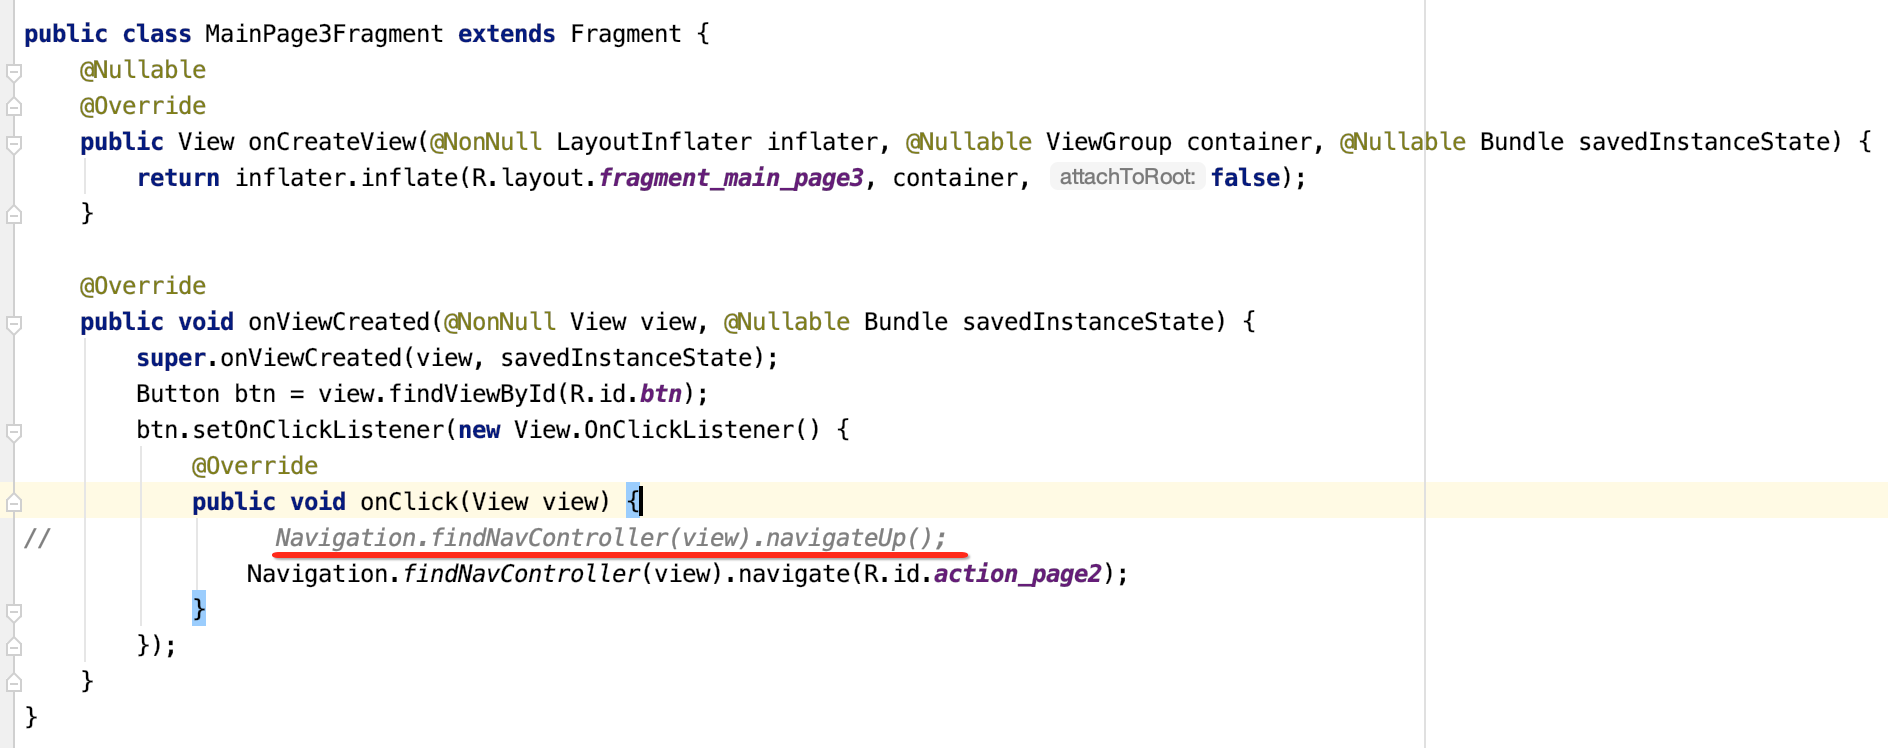
其中关于回退到上一个Fragment其实还有另一种写法:
那有一个问题思考一下,光跳转不带参数么?其实各Fragment之间的数据共享可以使用LiveData既可,以上就已经完成了整个Fragment的导航了,整体使用确实简单,另外关于细节还有很多,这个待实际工作需要时再进一步探究。
原理剖析:
对于上面导航功能的实现它底层是如何实现的呢?下面开始进行源码解读:
NavController对象和NavHostFragment的关系:
这里从哪里开始分析起呢?看主Activity的布局:
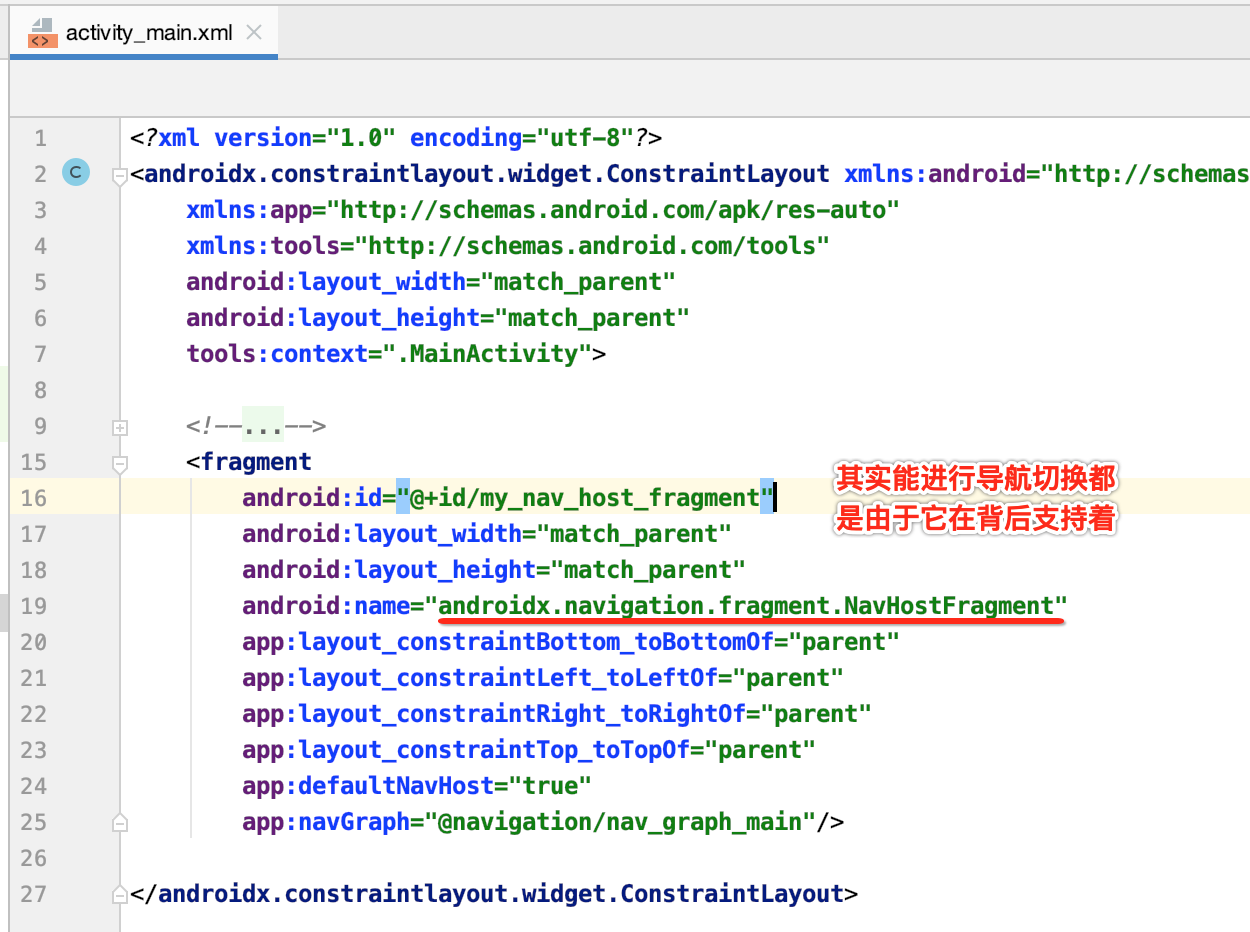
所以将它作为分析的入口:
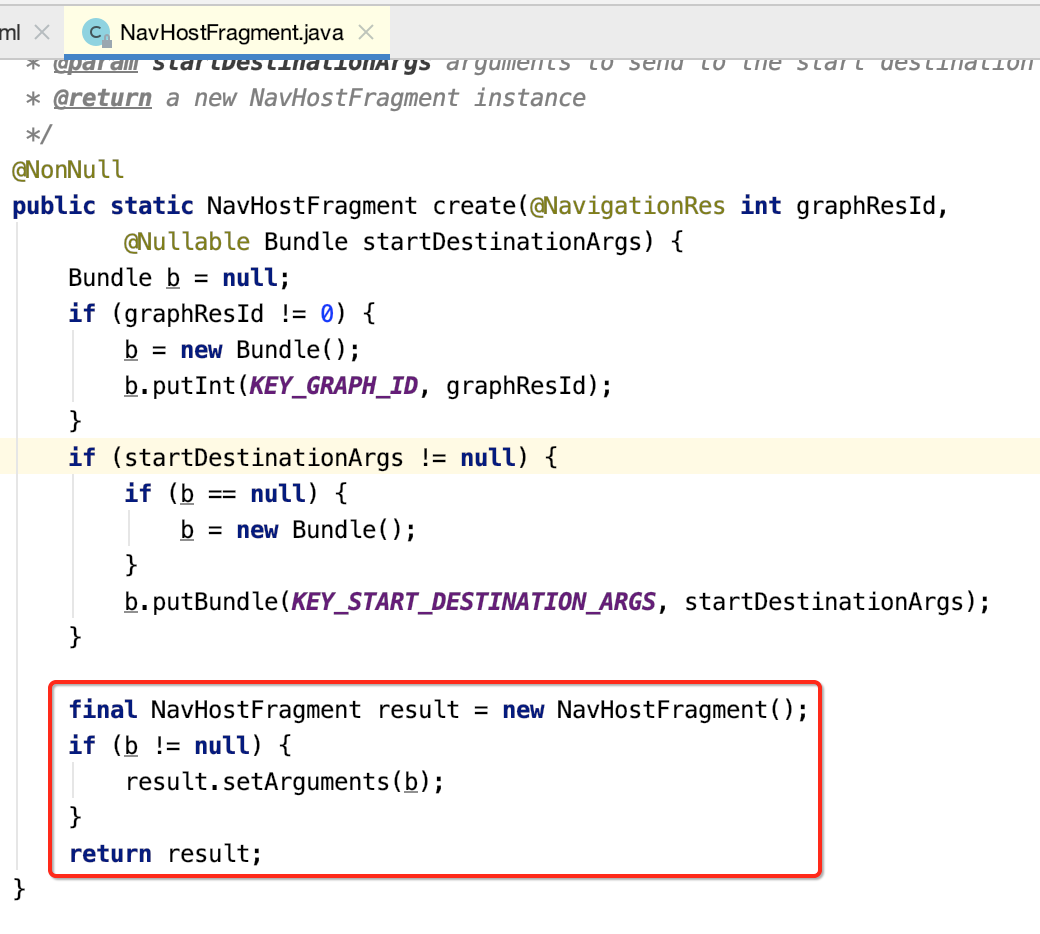
1、NavHostFragment的创建:
(1)初始化Bundle,并且将graphResId,startDestinationArgs存储在Bundle中。


(2)返回NavHostFragment实例。
2.XML文件的属性解析:
接下来则需要解析一下XML的属性,也就是:
则会在这块进行,解析方式跟咱们自定义属性一样的:
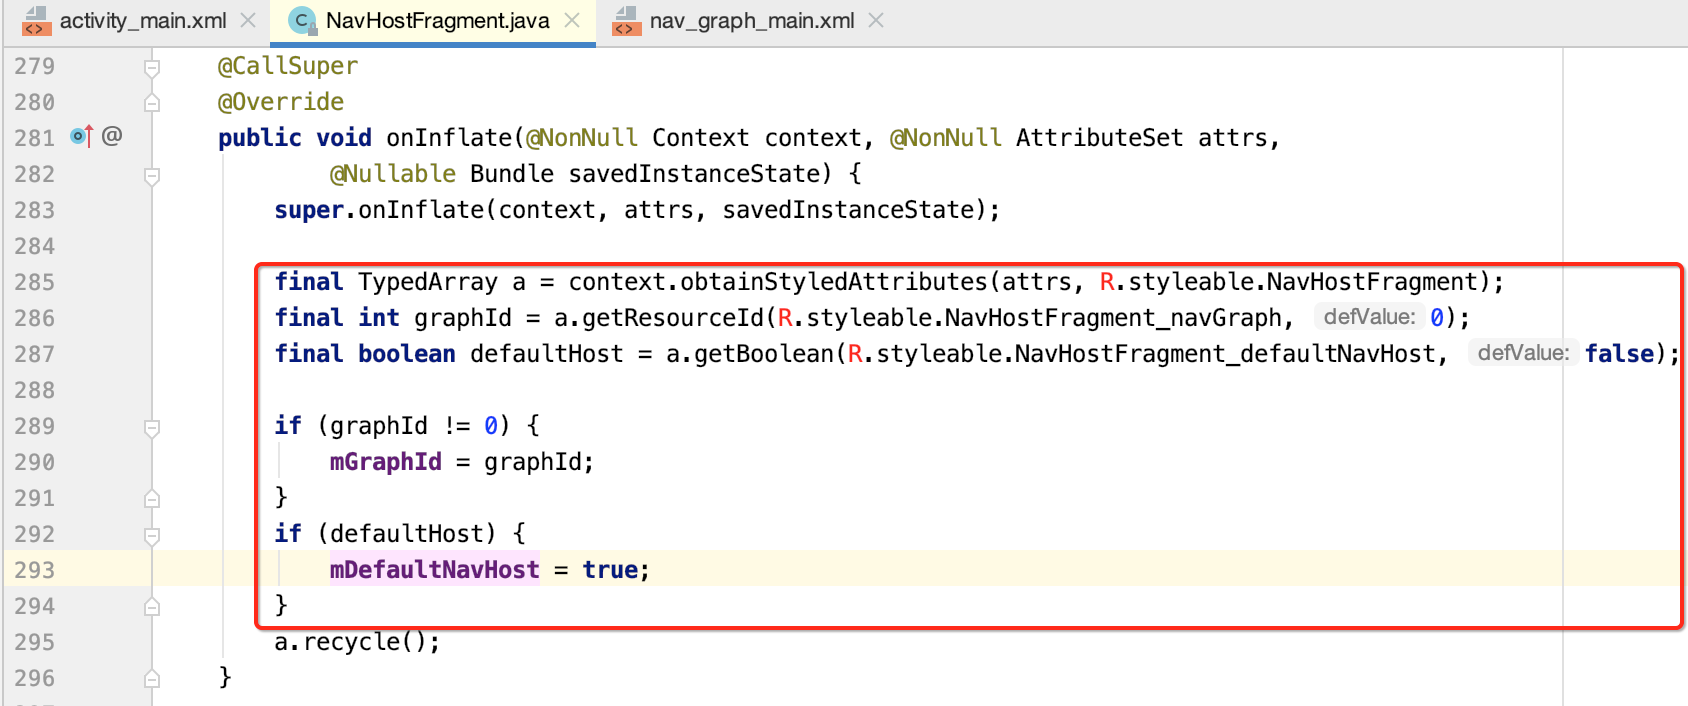
(调用时机:Fragment所关联的Activity在执行setContentView时)
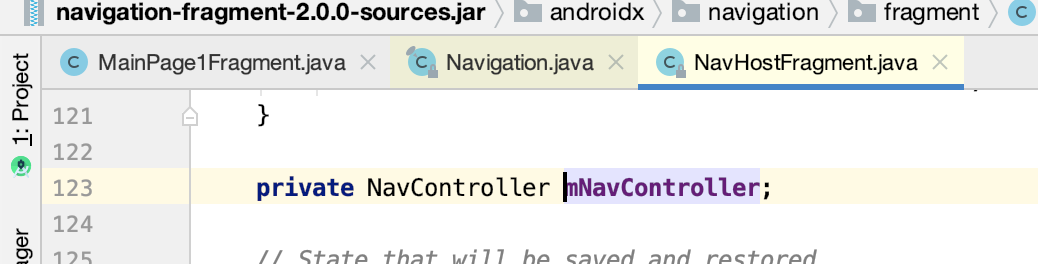
3.导航初始化:NavController在这里被创建,并且NavHostFragment中有一个NavController对象。
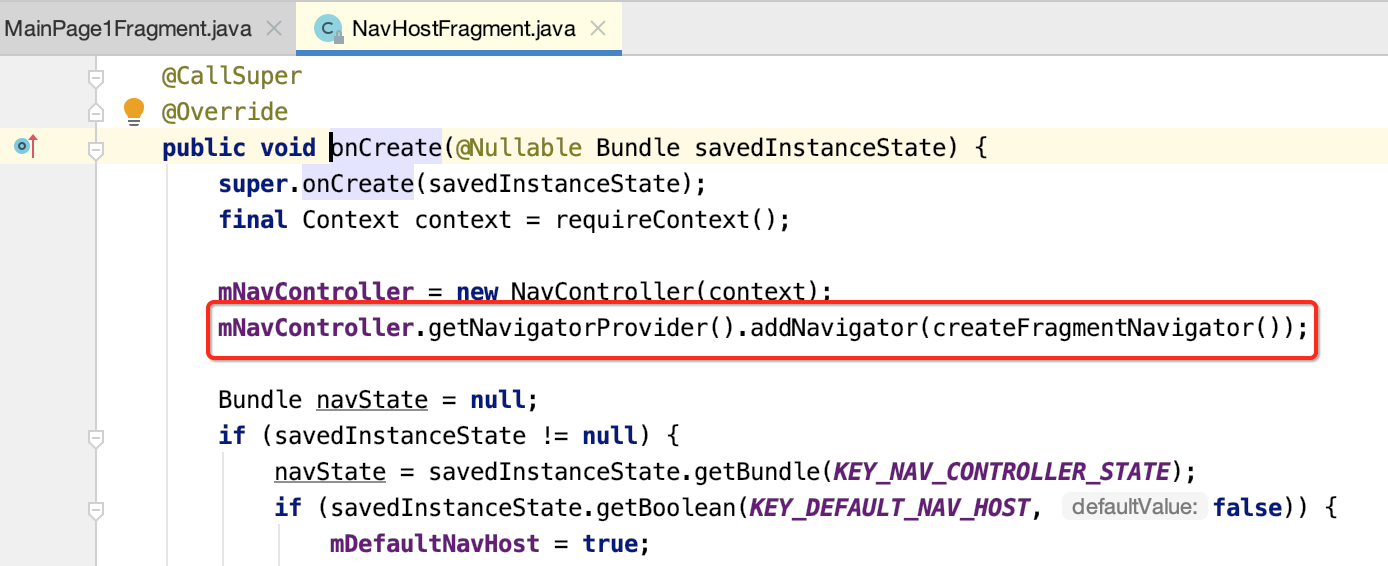
而如果让这个Fragment要显示出来,则会执行它的生命周期方法了,首先是onCreate(),看它里面做了啥?
(1)初始化NavController,NavController为导航的控制类,核心类。
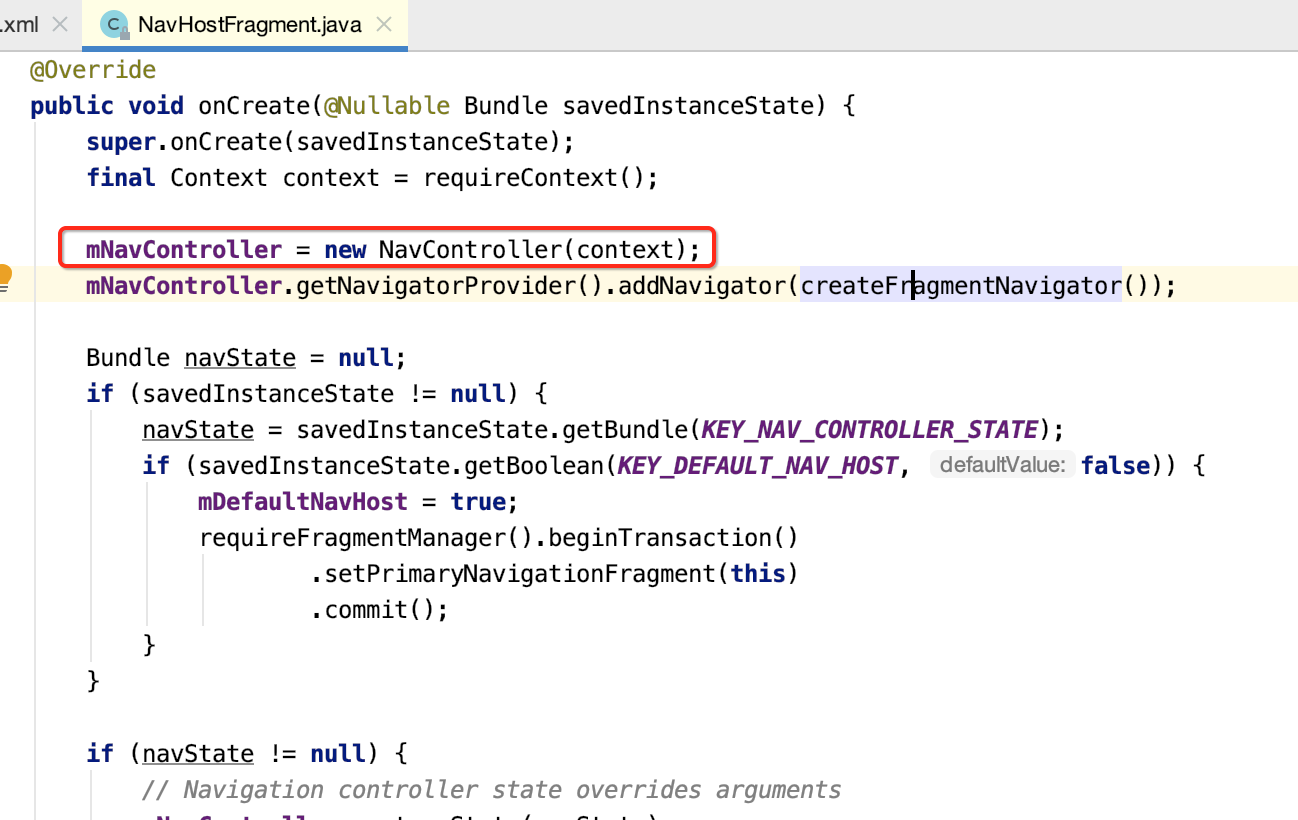
(2)在NavigatorProvider中以键值对保存FragmentNavigator类至HashMap当中。该类之后会做介绍。

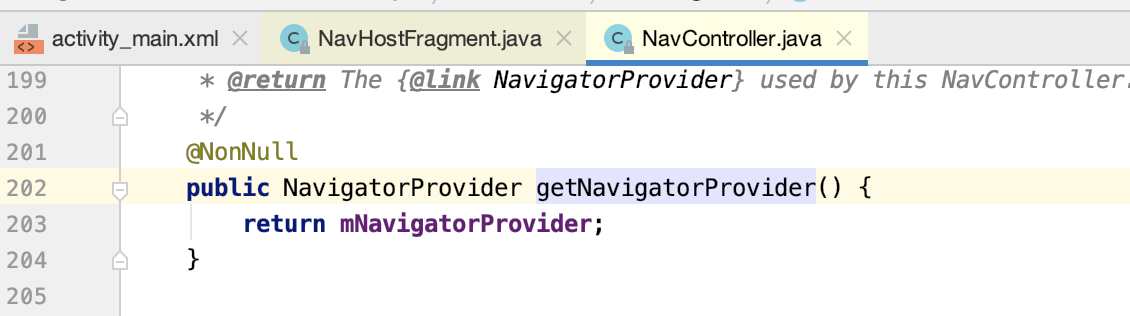
咱们跟进去看一下:


而添加的对象为:
(3)savedInstanceState不为空时候,恢复controller的状态
好,回到主流程继续往下分析:
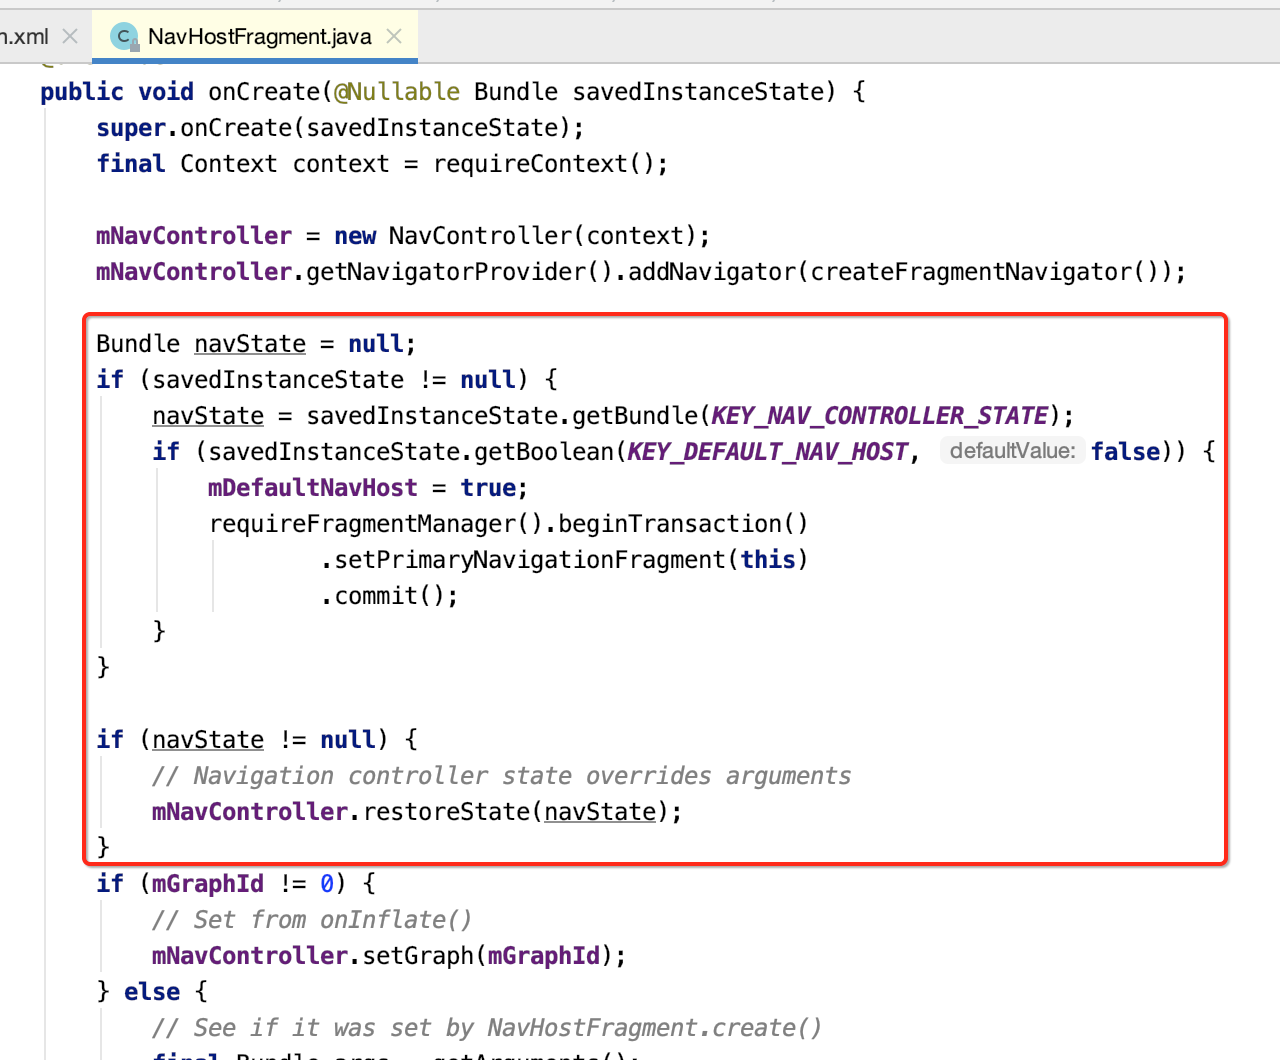
当mDefaltNavHost为true,将会被设置为主导航fragment。可以拦截返回键事件(back事件)。

(4)将graph设置给navController,构建NavGraph。下面会单独分析该模块。

4.NavHostFragment.onCreateView():
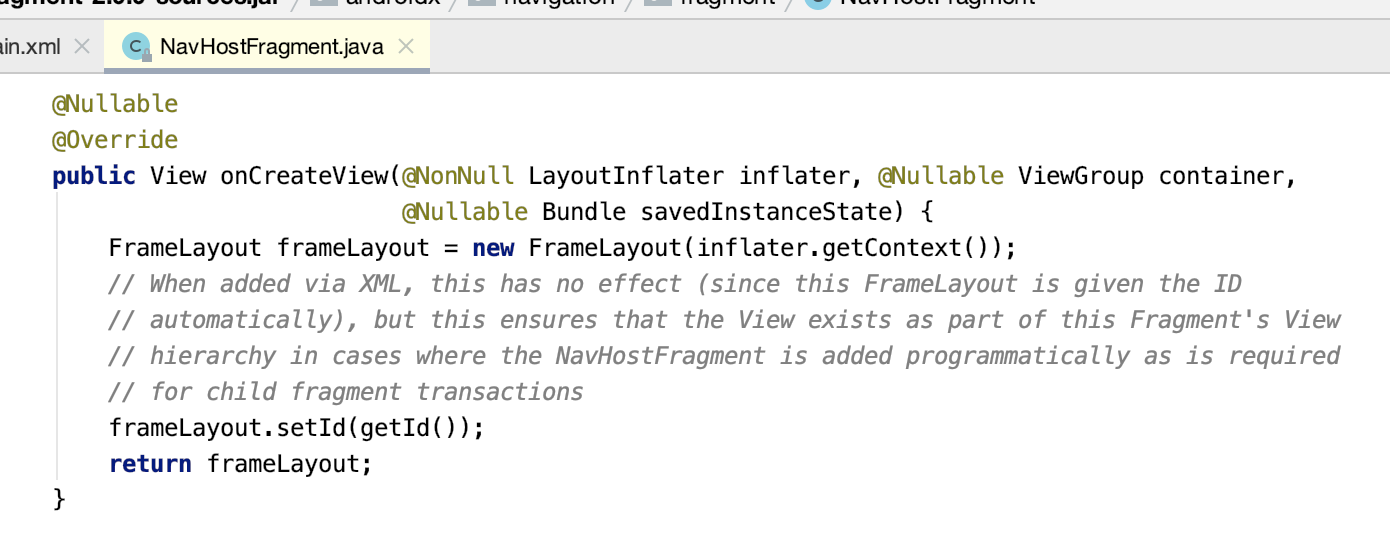
该NavHostFragment的视图就只有一个FrameLayout布局, 在NavHostFragment的创建时,为它创建一个FrameLayout作为导航界面的载体。
5.NavHostFragment.onViewCreated():
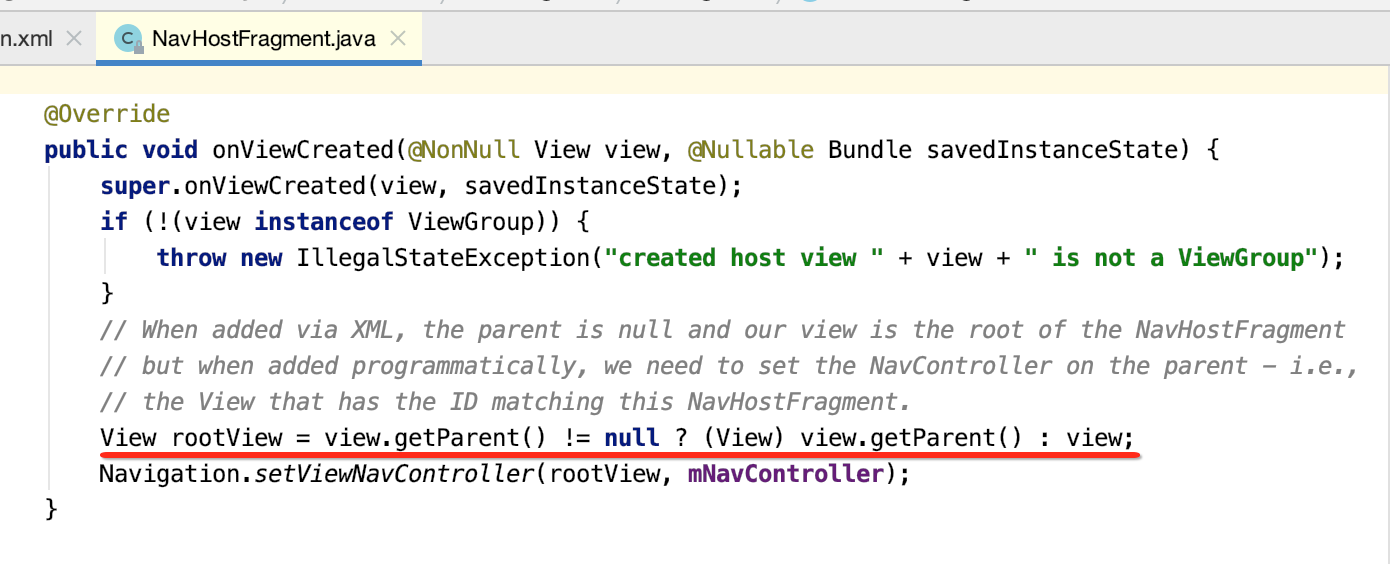
这是啥意思?其实是这样的:
(1)当通过XML添加时,父View是null,我们的view就是NavHostFragment的根。
(2)但是当以代码方式添加时,需要在父级上设置NavController。
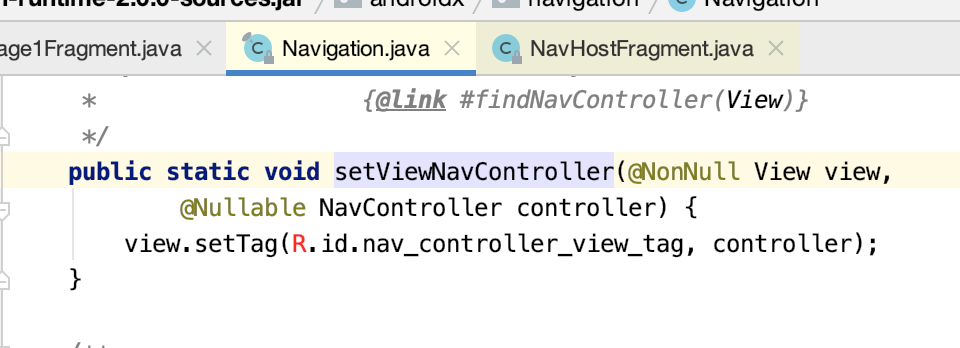
6.Navigation.setViewNavController():
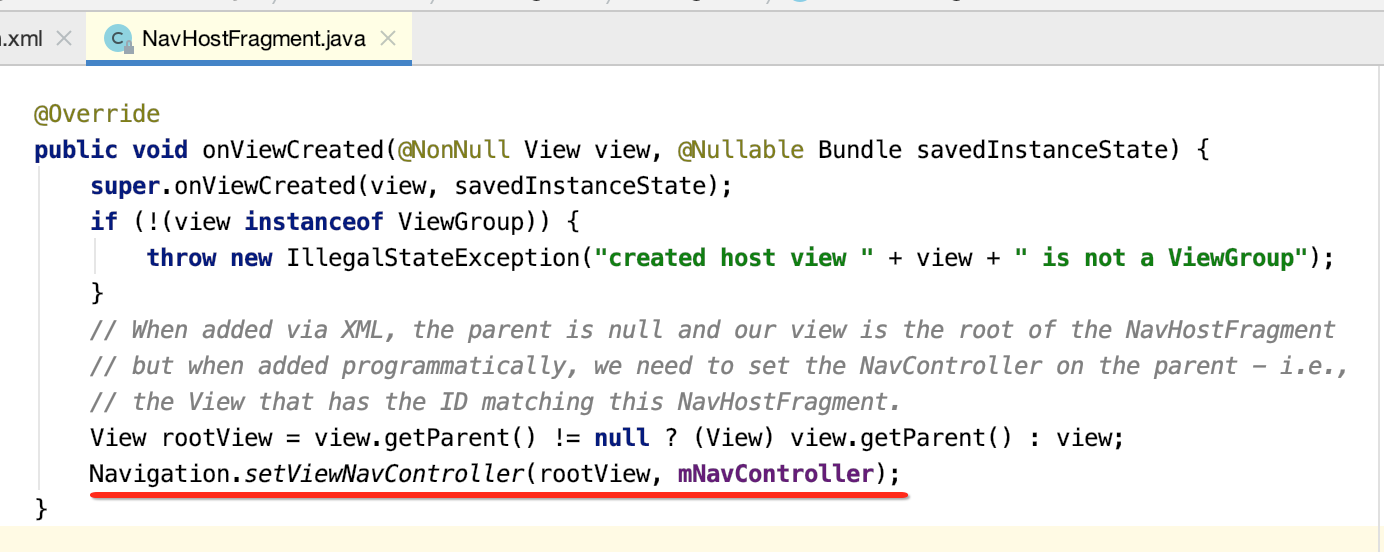
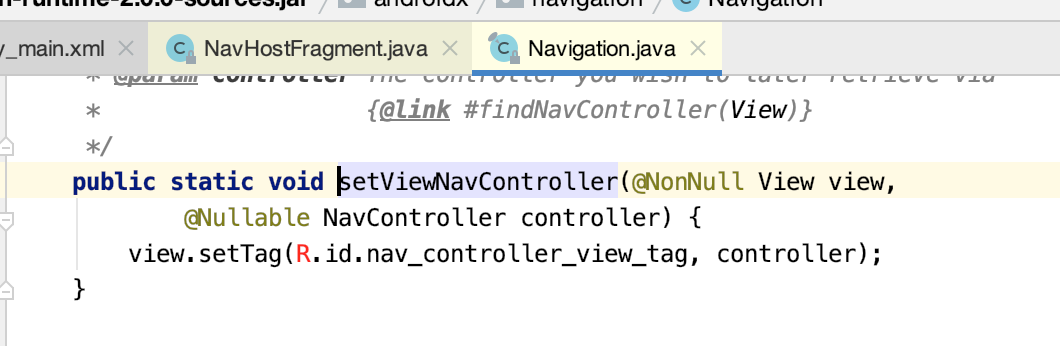
主要是将NavController对象设置为rootView的tag。方便以后递归遍历到NavController对象,确保NavController对象的唯一。
获取NavController:
我们在具体导航时的代码写法是这样的:
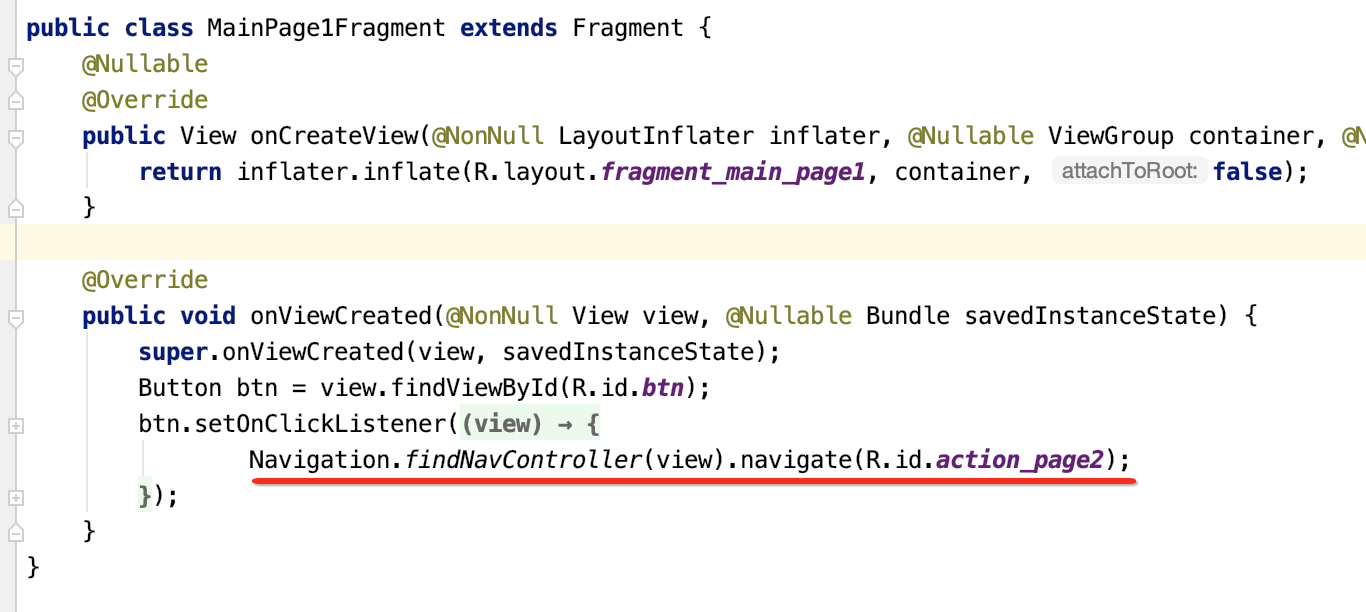
所以咱们来看一下findNavController()方法的细节:
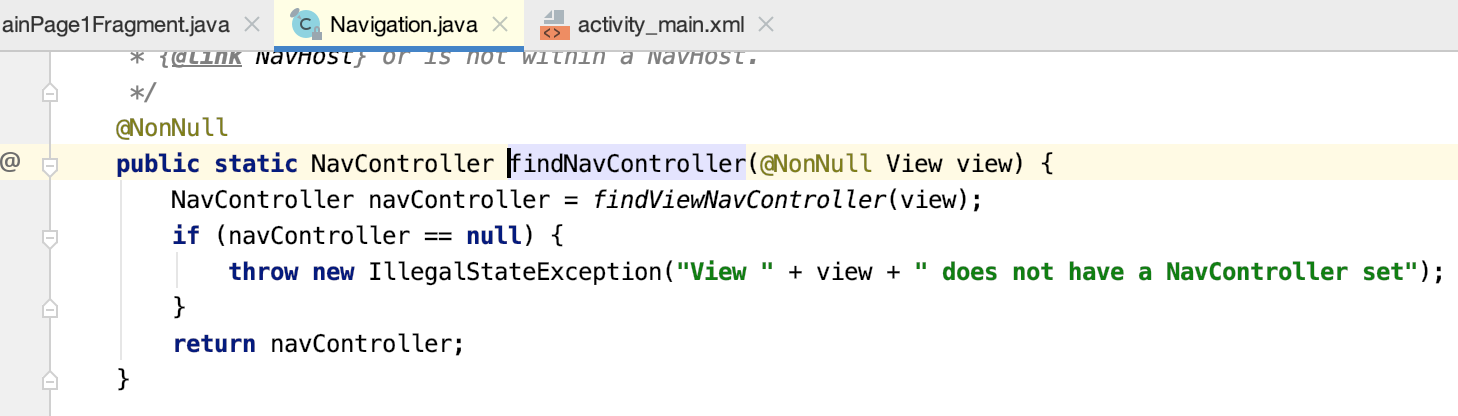
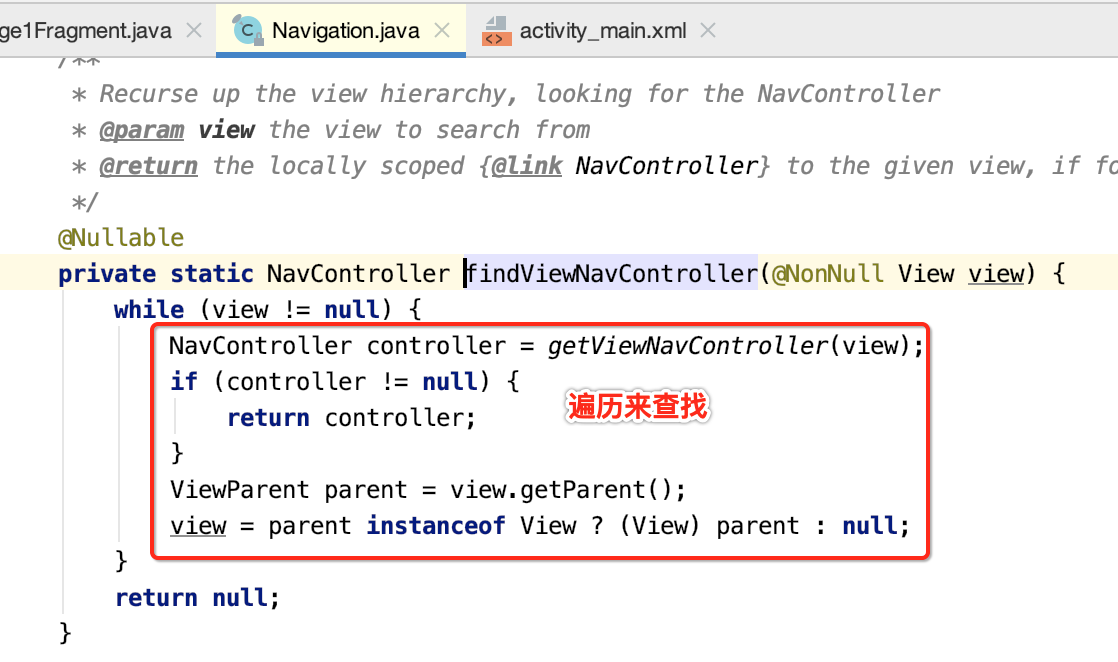

此时的这个tag就是我们之前在onViewCreated()中设置的:

也就是最终会获得它:
NavController是如何参与到导航事件的?
此时则需要回到这块代码进行进一步分析:
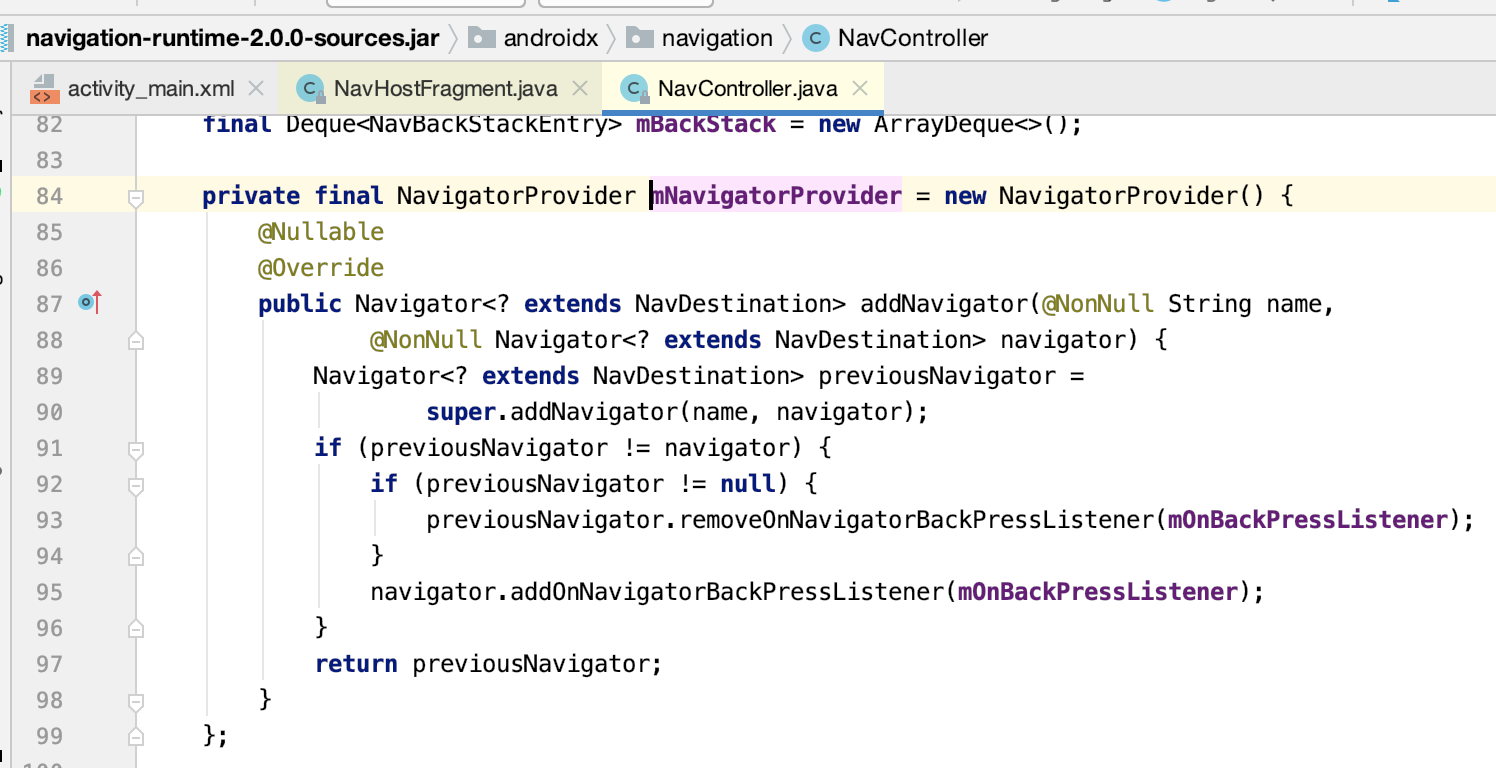
1.其中mNavigatorProvider是NavController中的全局变量,内部通过HashMap键值对的形式保存Navigator类。


其中可以看到添加了一个导航返回的监听了:

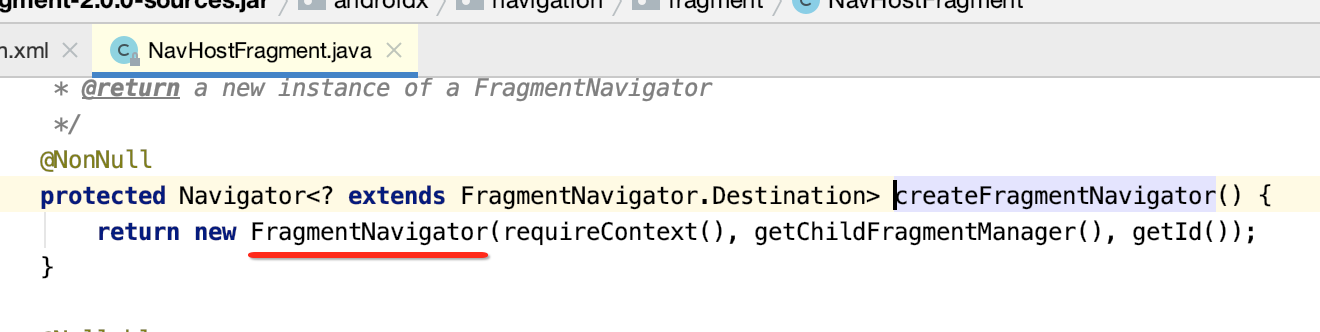
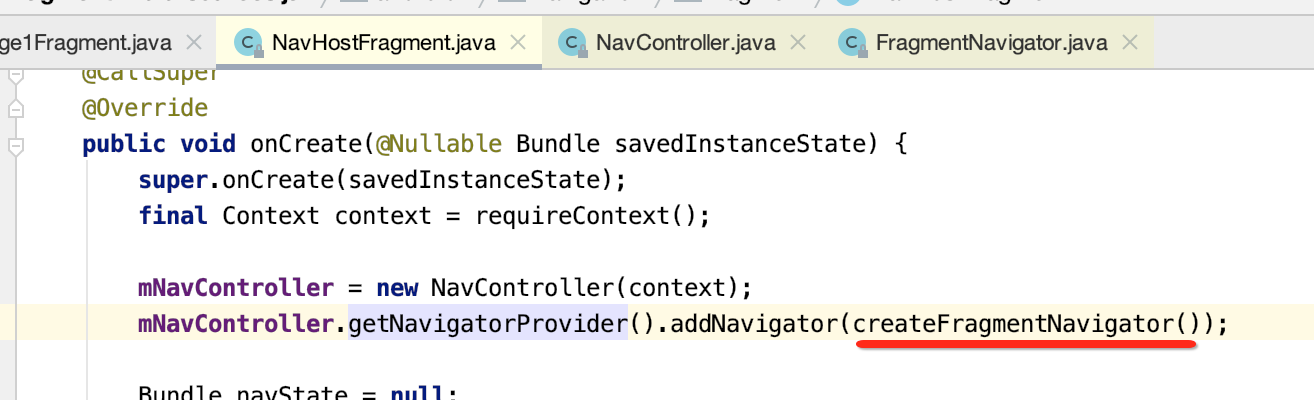
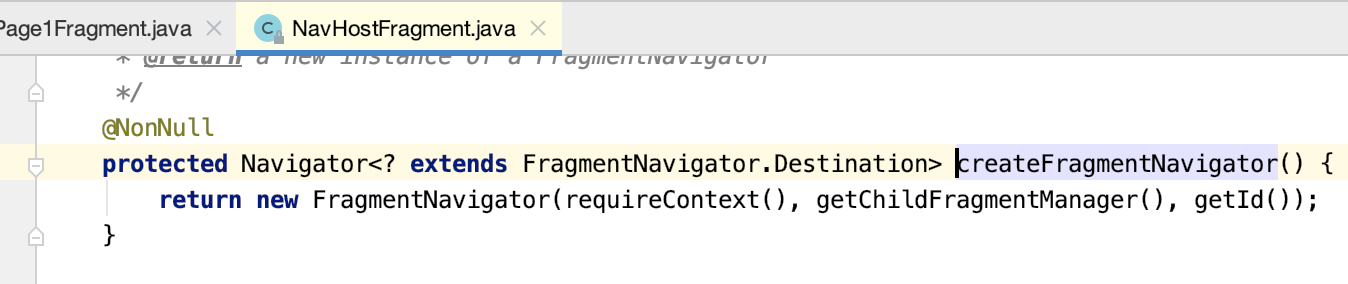
2.createFragmentNavigator方法,构建了FragmentNavigator对象,其中抽象类Navigator还有个重要的实现类ActivityNavigator和NavGraphNavigator。
这两个类的对象在NavController的构造方法中被添加。
而FragmentNavigator看下它的类结构:
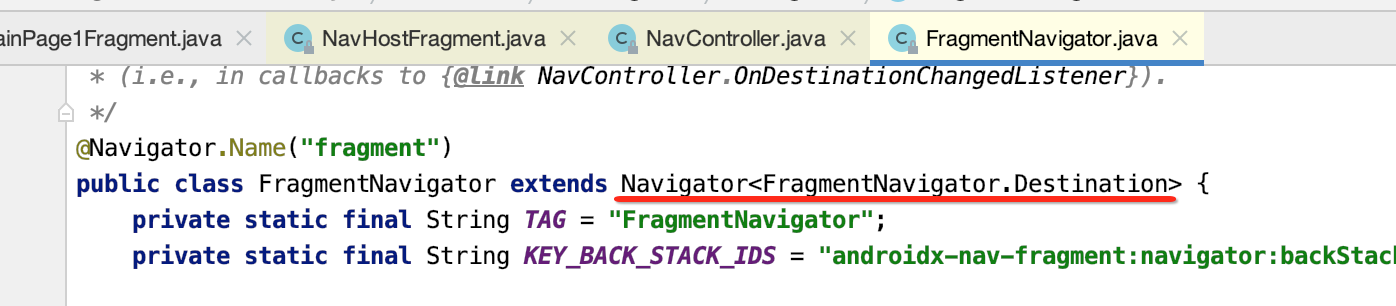
而这个抽象类Navigator有几个继承子类:

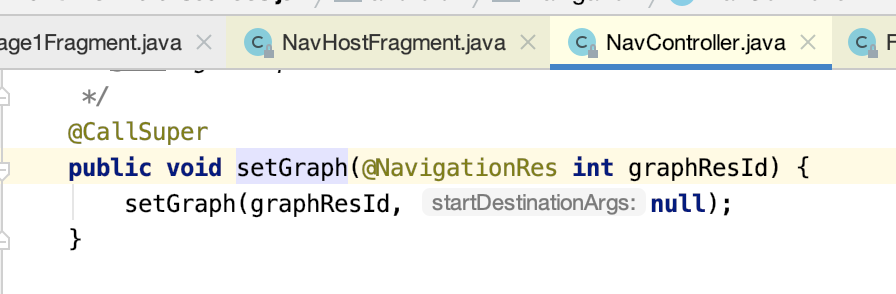
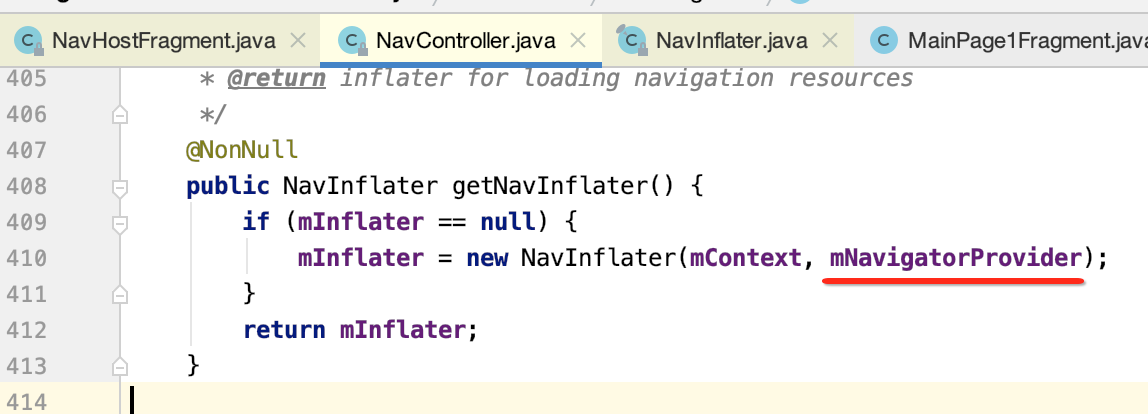
3.其中Navigator类的作用是:能够实例化对应的NavDestination,并且能够实现导航功能,拥有自己的回退栈。构建NavGraph,在构建NavController的时候,我们还调用了NavController.setGraph(graphId)方法,该方法主要是构建NavGraph。

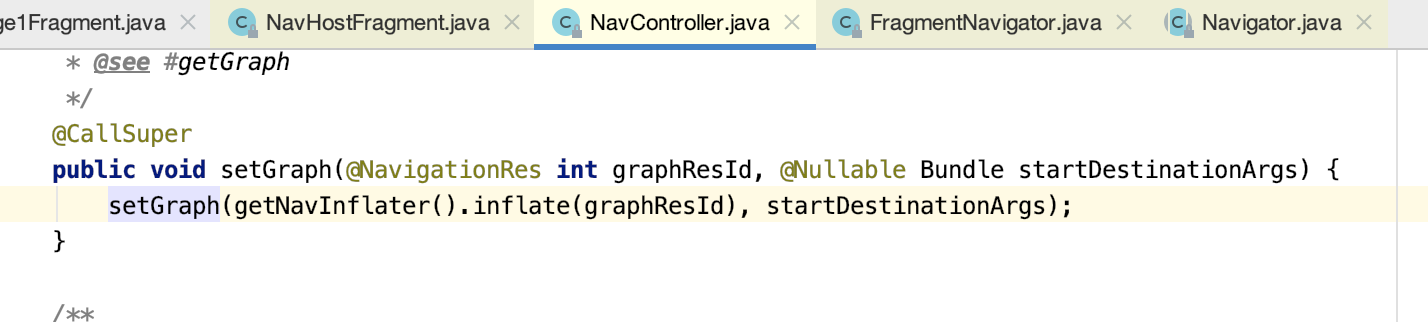
其中调用getNavInflater方法创建NavInflater对象,用于解析导航配置xml:

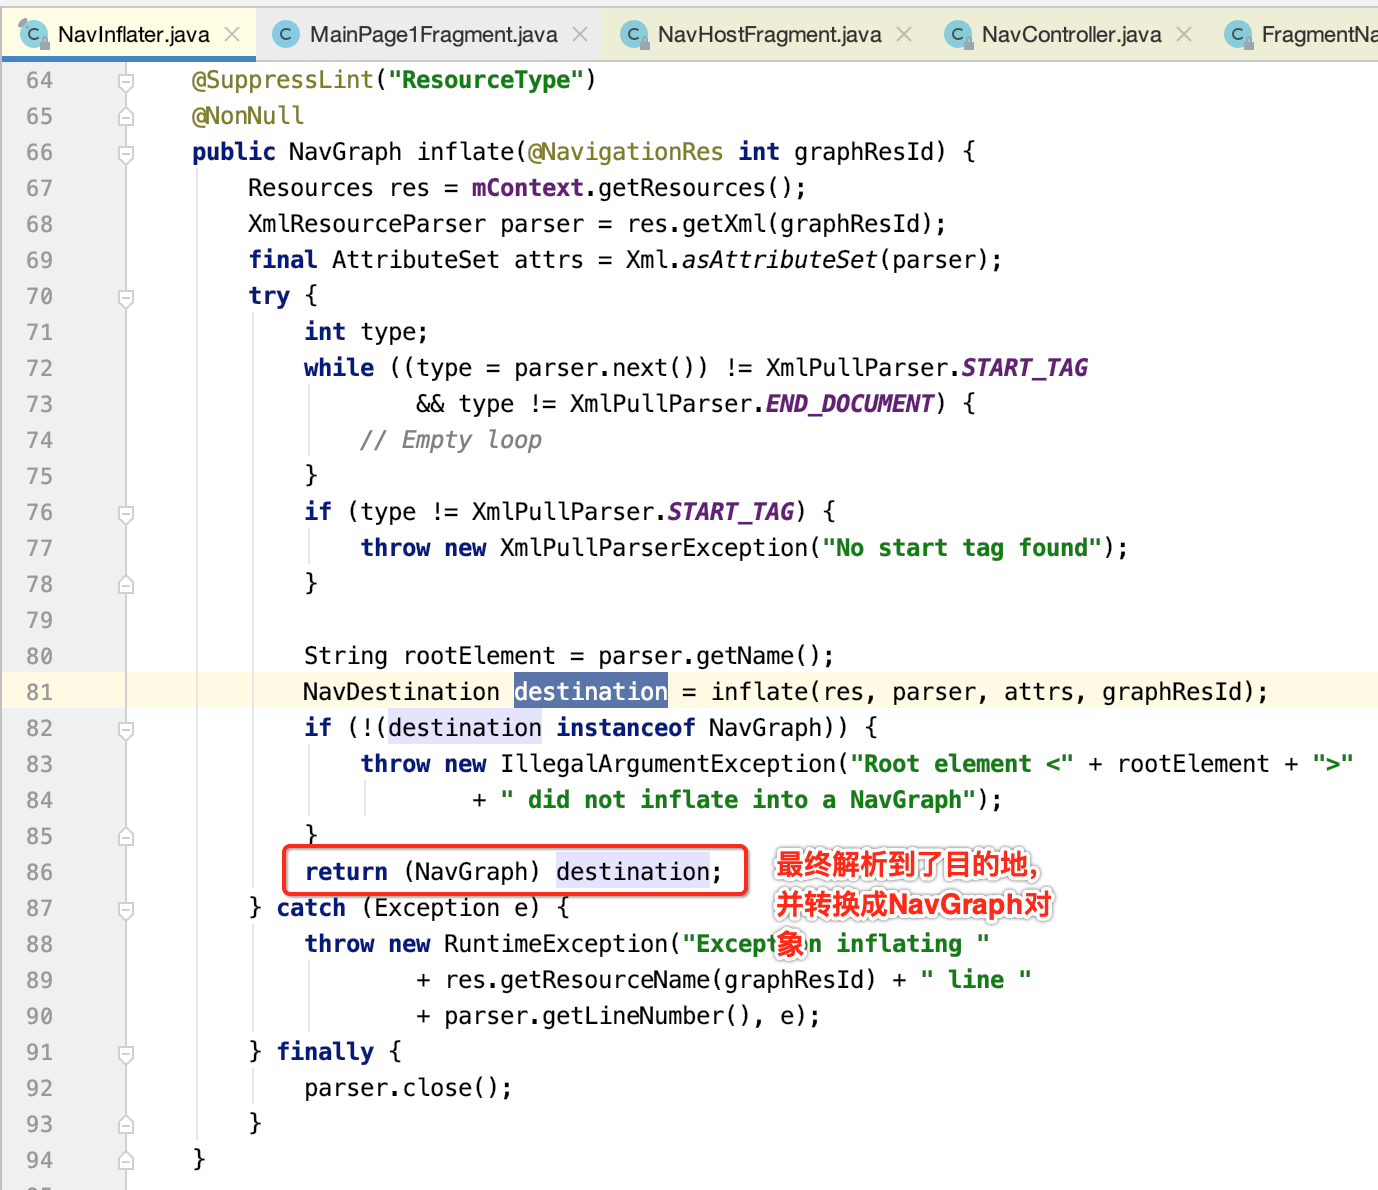
4. NavInflater.inflate():
根据传入的XML资源id构建NavGraph,NavGraph组成Fragment路由的导航地图,而NavDestination代表了导航的每一个目的地。在解析完NavDestination后,需要要求NavDestination为NavGraph,即NavGraph是NavDestination的子类。而且在NavGraph内部存储了NavDestination信息。
5.上面的inflate方法内部会继续调用inflate方法。
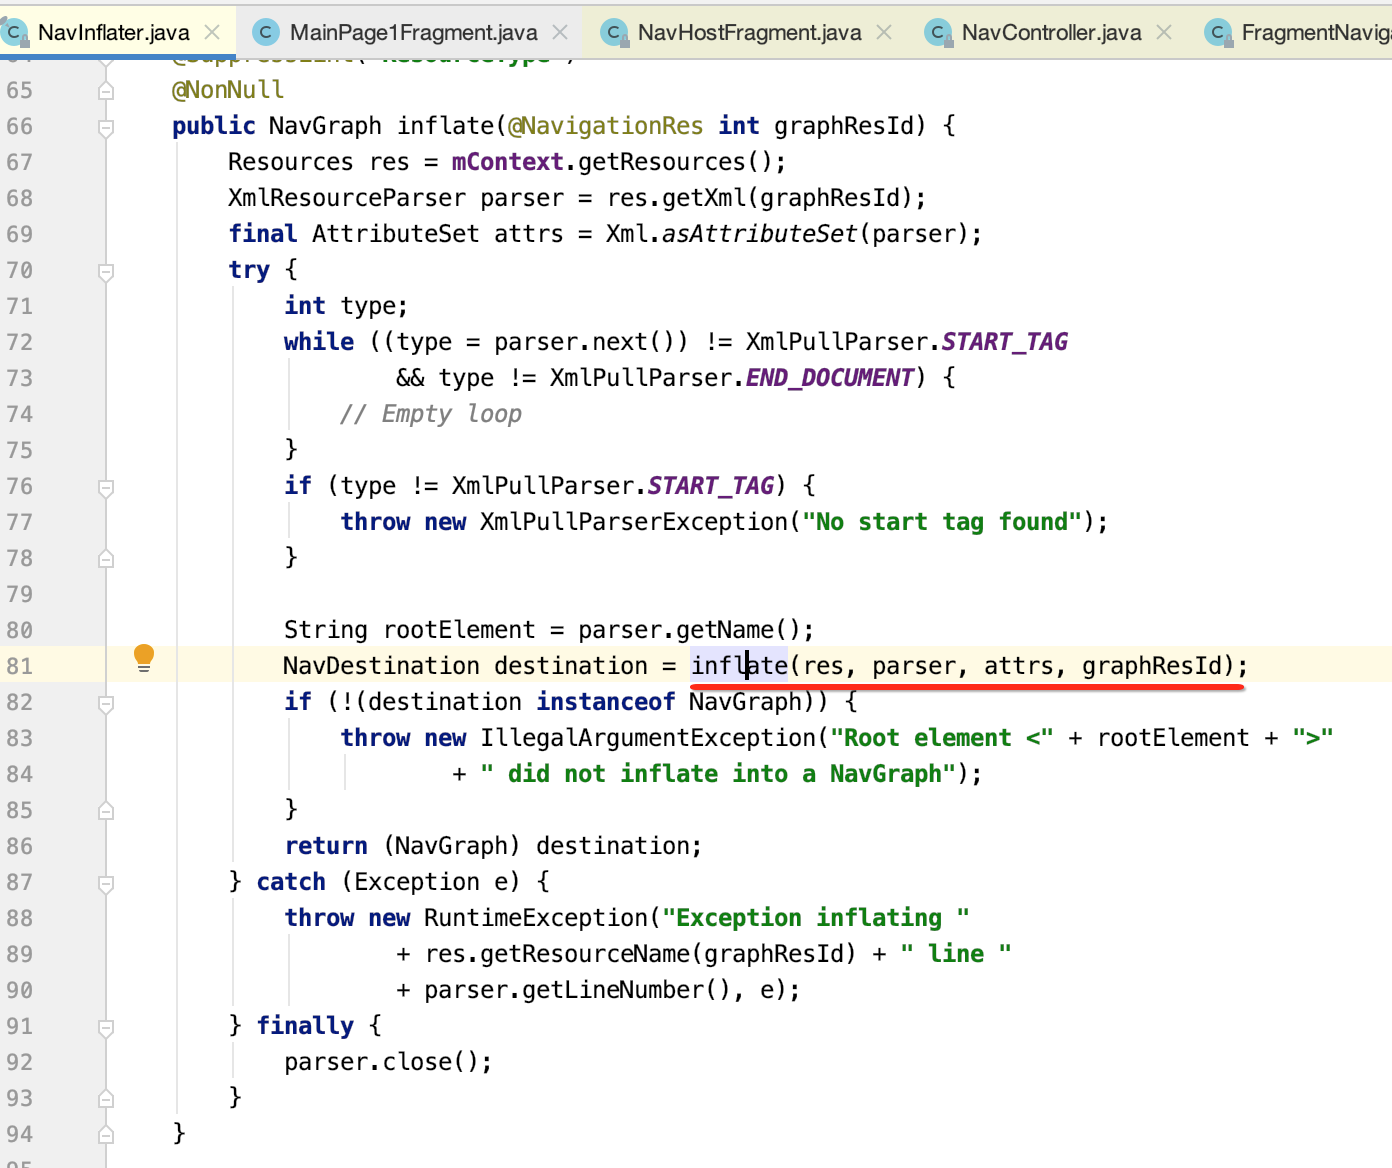
下面具体看一下它的细节:
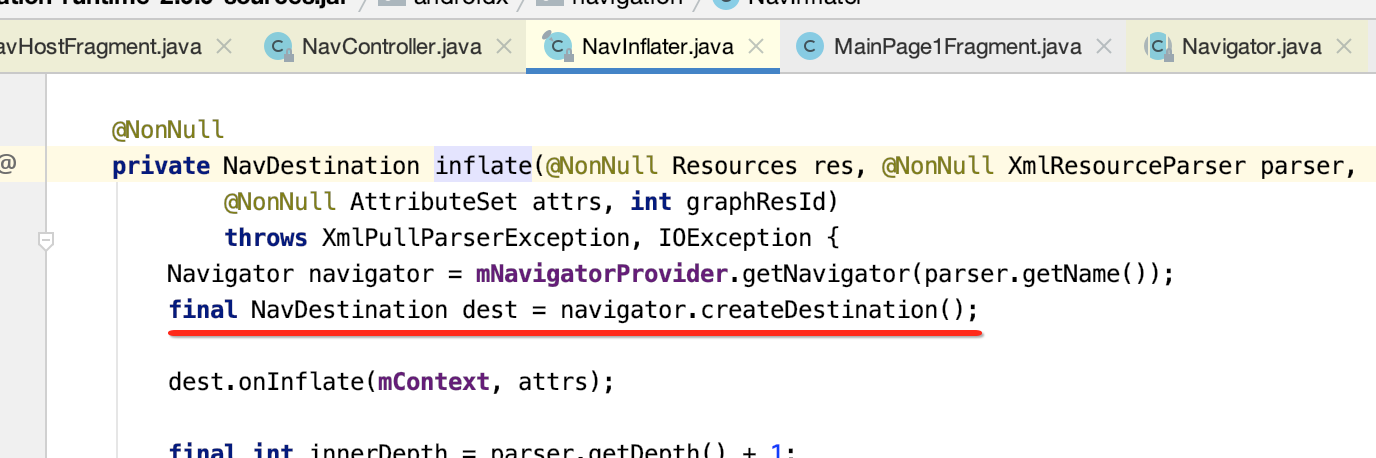
(1)getNavigator方法获取都Navigator实例,该实例在构建NavController是被添加进去,这里获取的是FragmentNavigator对象。
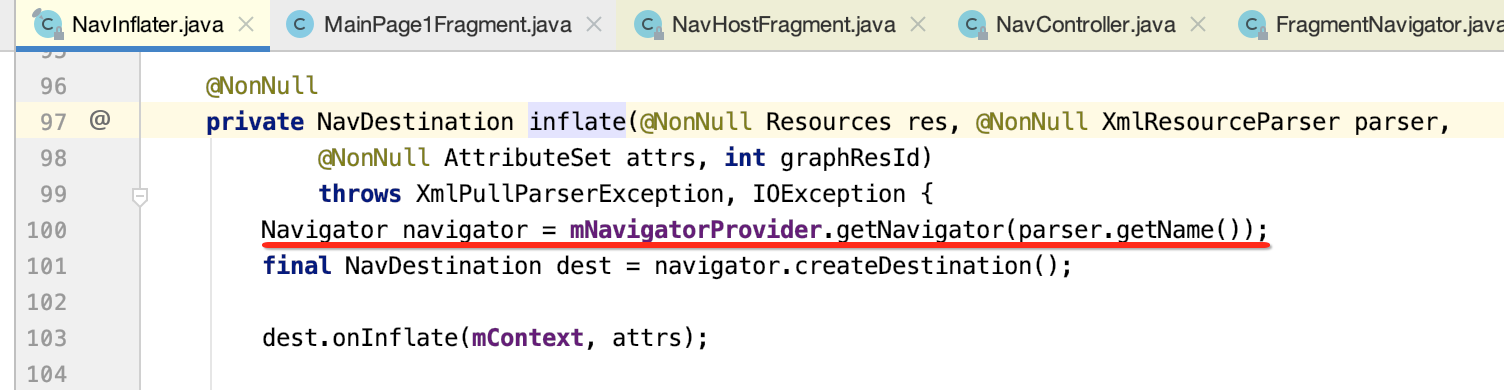
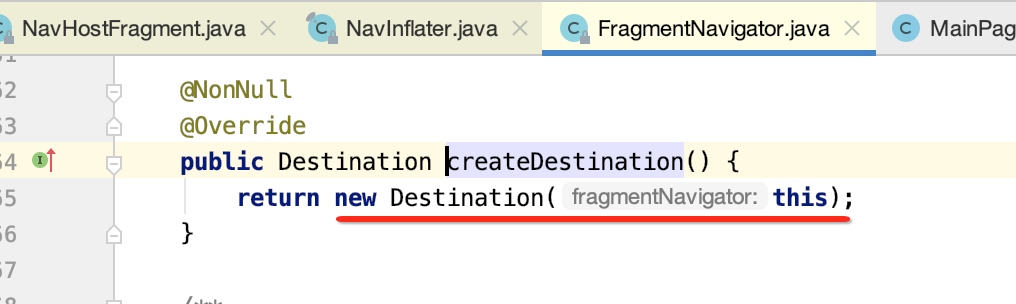
(2)createDestination方法,会调用FragmentNavigator的createDestination构建Destination对象。
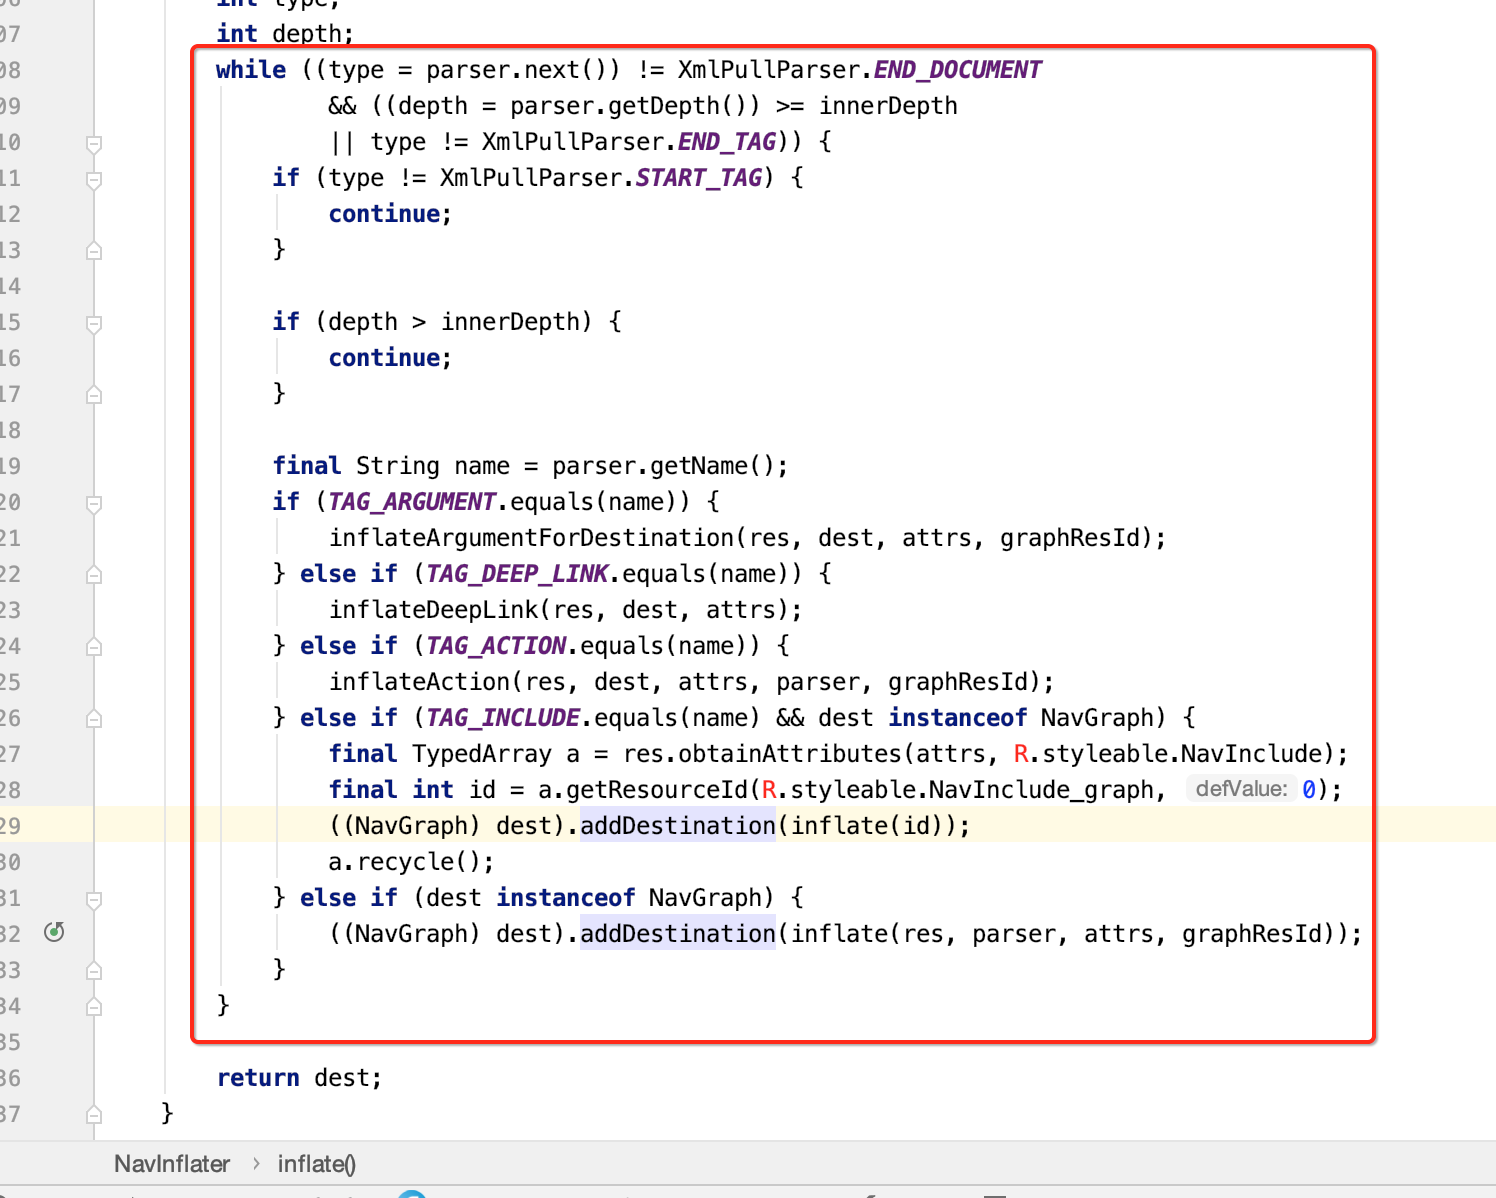
(3)onInflate方法,调用FragmentNavigator.Destination的方法获取设置的Fragment的类名。

(4)while循环内部通过递归构建导航图。
6.通过NavInflater类之后,解析了XML文件构建整个Graph之后,下面回到setGraph方法主流程上来,在解析完XML后会调用setGraph方法。
(1)popBackStackInternal方法将旧的导航图全部出栈。


(2)调用onGraphCreated主要是显示一个导航Fragment视图。

7.onGraphCreated方法
(1)恢复之前的导航状态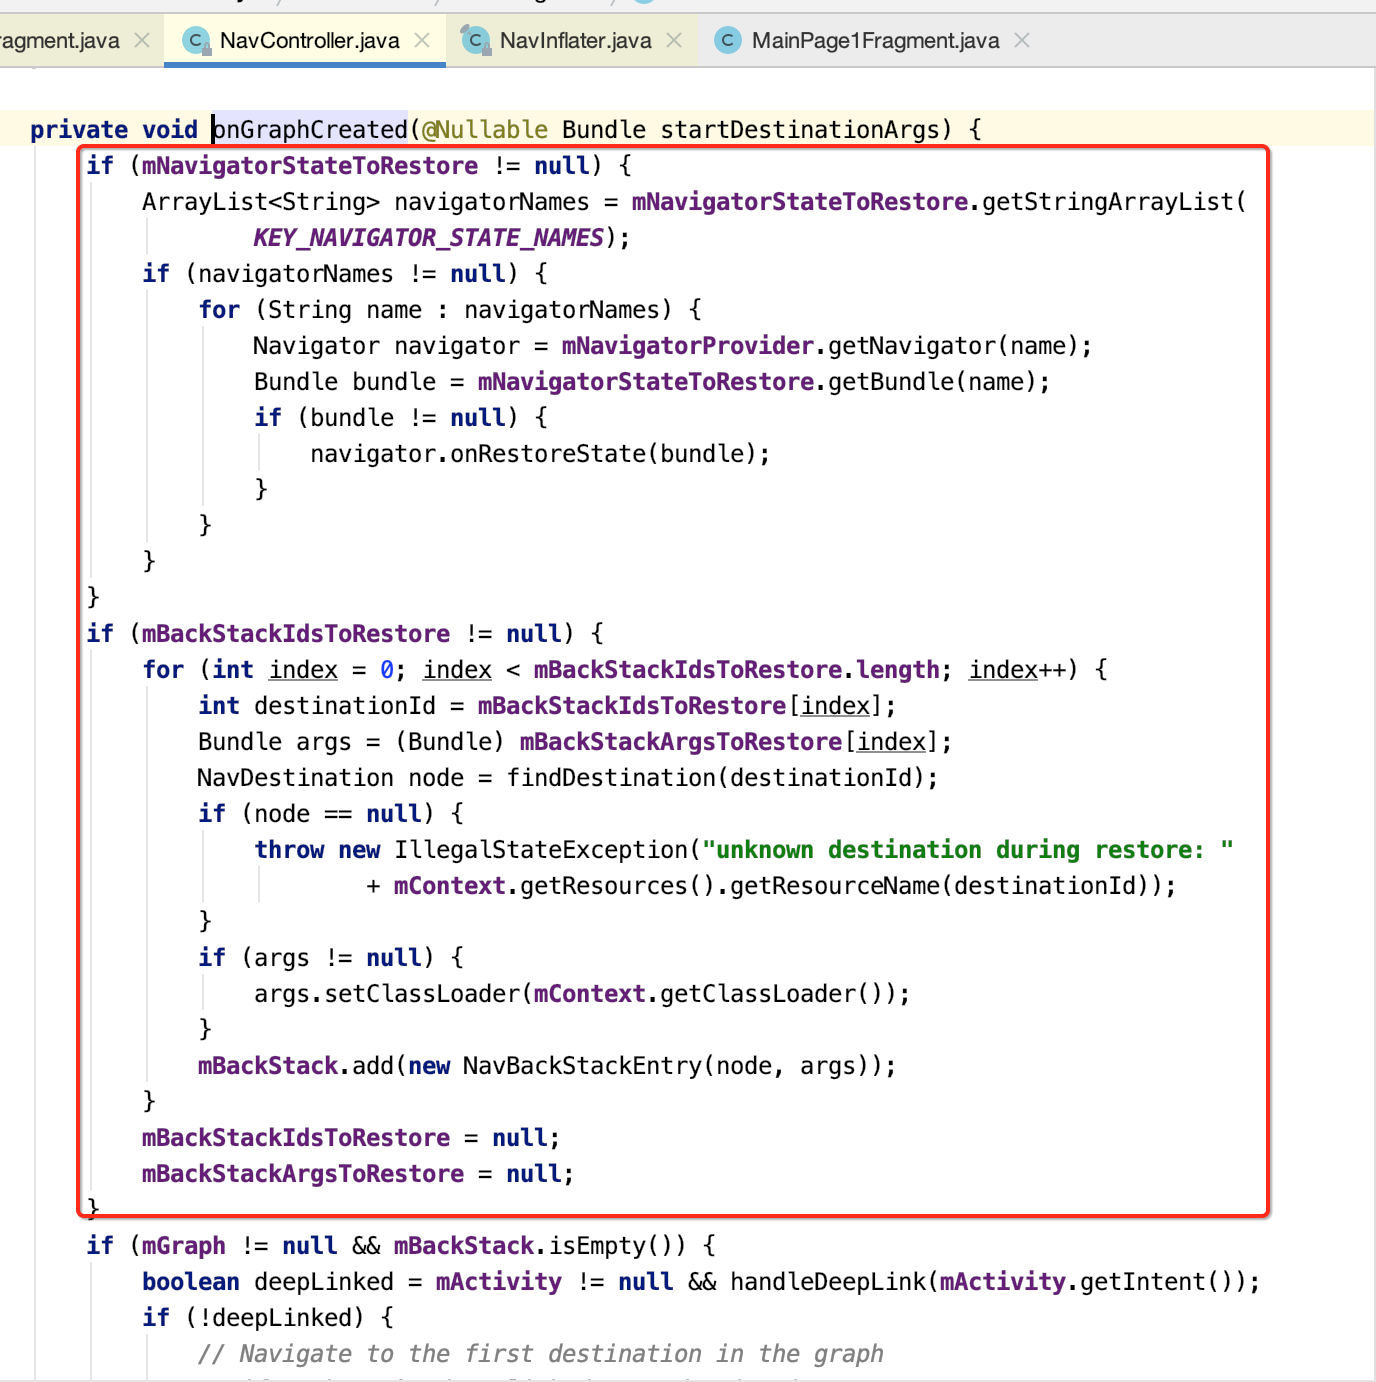
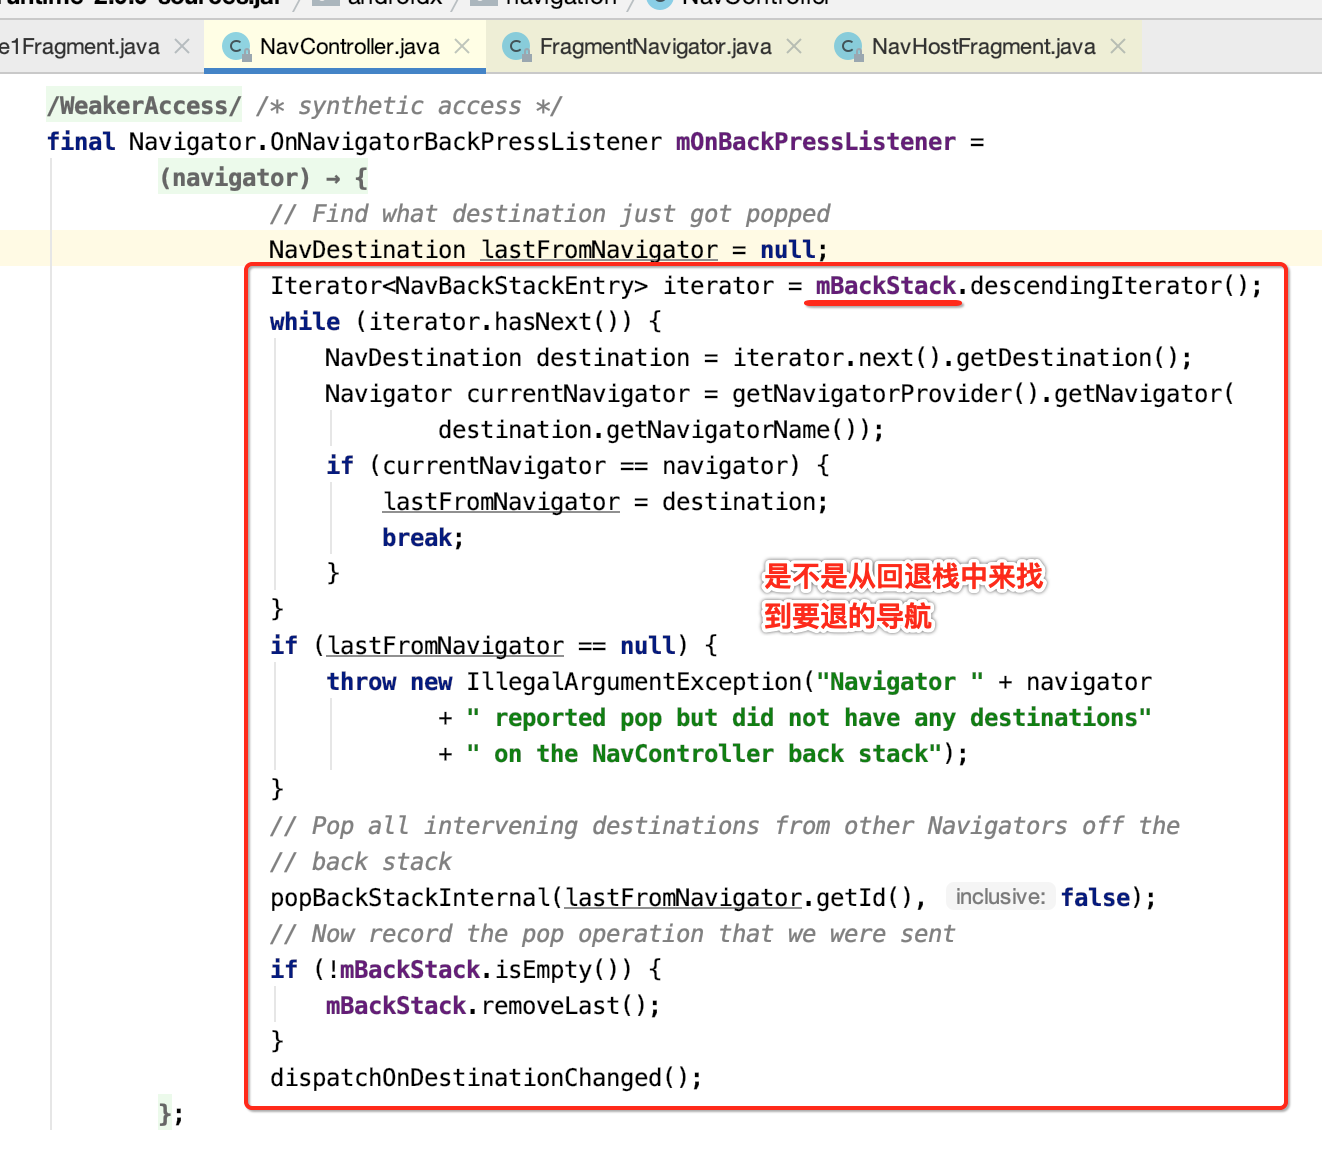
其中可以看到将目标对象放到了一个回退栈当中了:
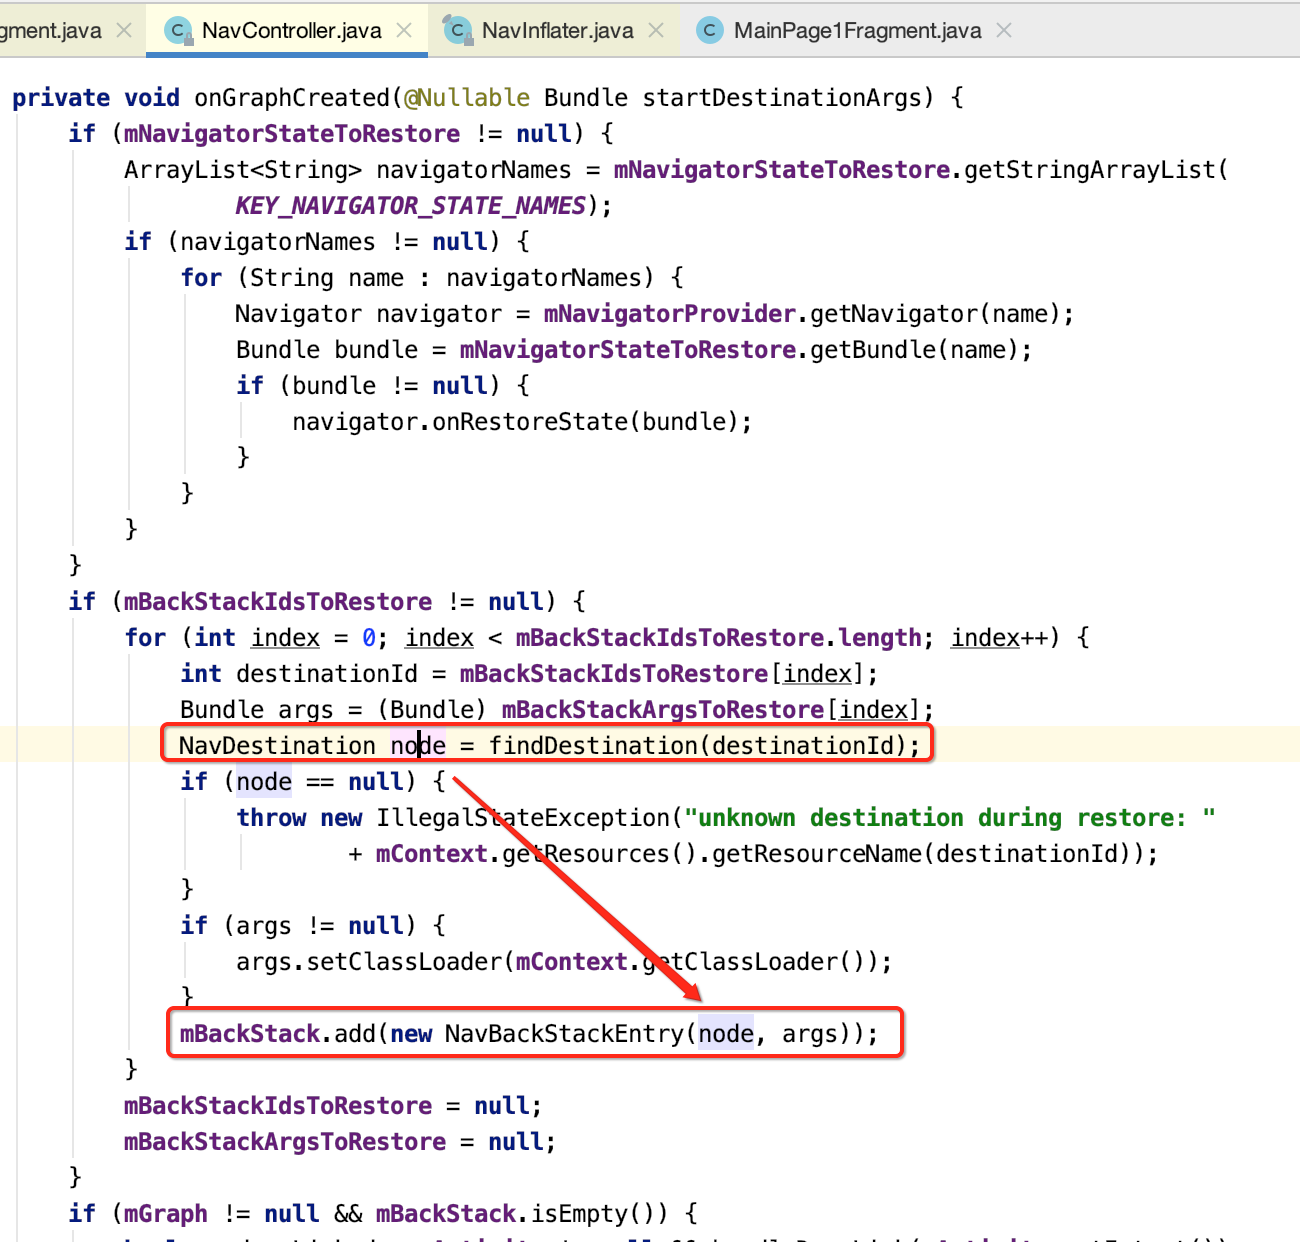
这点就是一个非常核心的导航思想了,也就是都会根据这个回退栈来进行导航处理。
(2)调用navigate方法,显示第一个Fragment。即在Navigation文件里,属性app:startDestination的Fragment。所以最终都会走到navigate导航方法。

最终导航的细节下面则会详细分析。
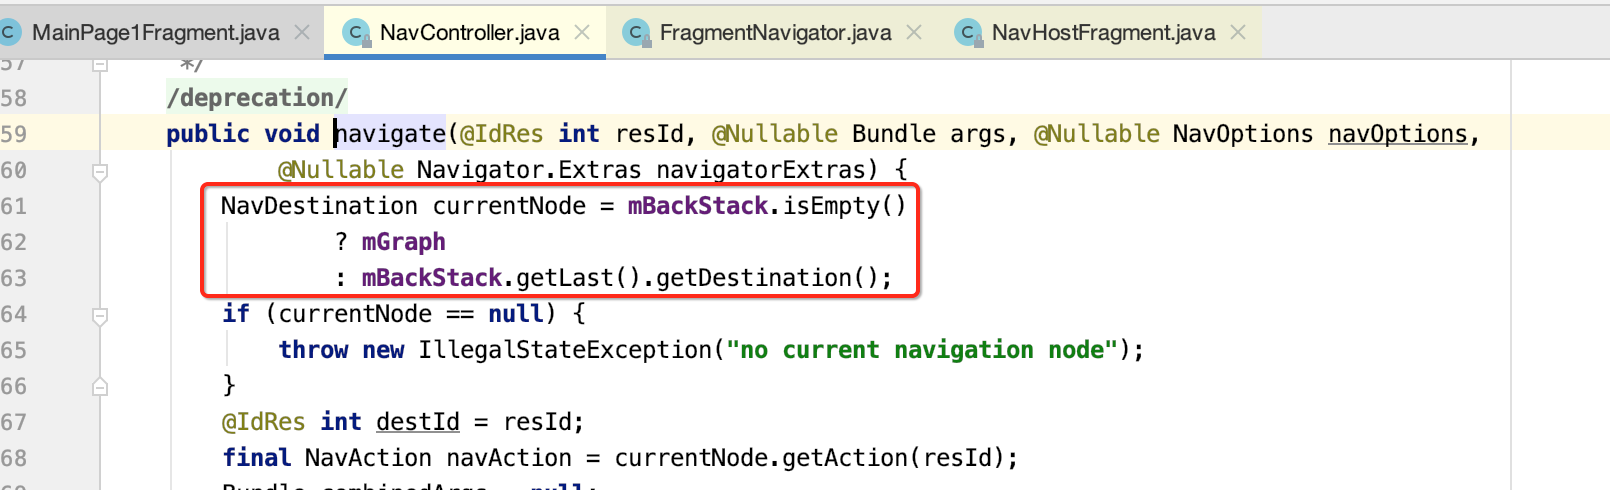
导航 navigate():
1.在构建和获取到NavController对象以及NavGraph之后,下面是使用它来实现真正的导航了。下面从navigate开始分析。在navigate方法内部会查询到NavDestination,然后根据不同的Navigator实现页面导航。

下面来分析一下这个导航的细节:
(1)如果回退栈为null返回NavGraph,不为null返回回退栈中的最后一项。
(2)根据id,获取对应的NavAction。然后在通过NavAction获取目的地id。
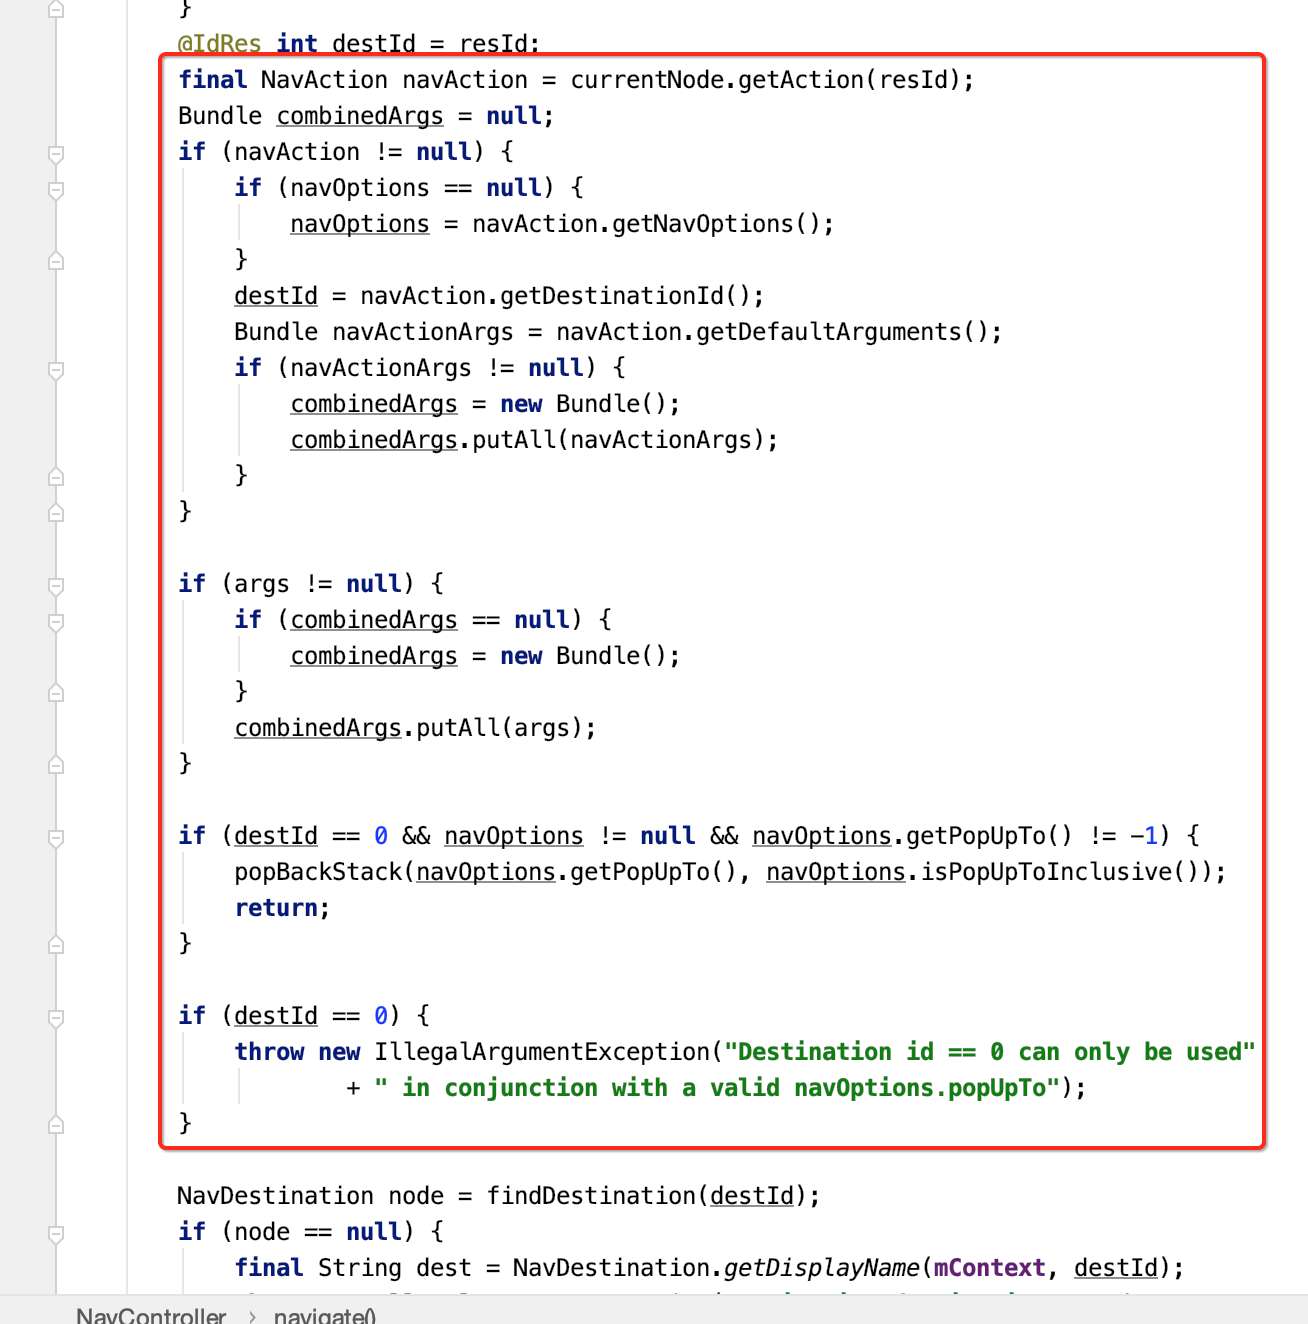
(4)利用目的地ID属性,通过findDestination方法,找到准备导航的目的地。
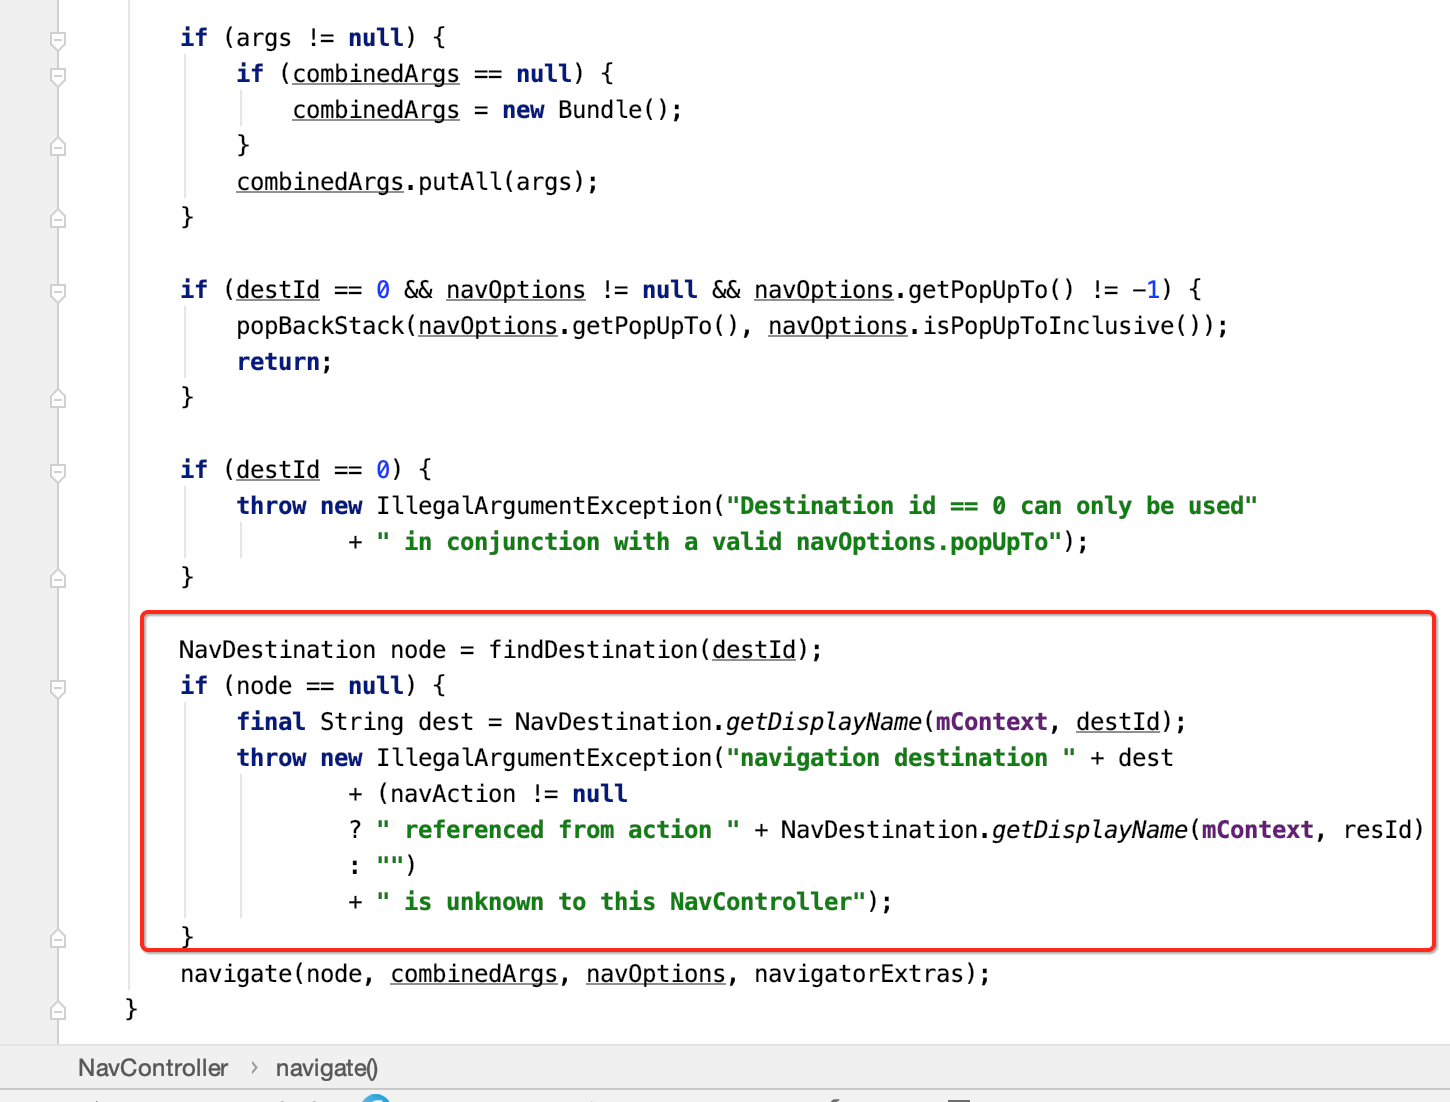
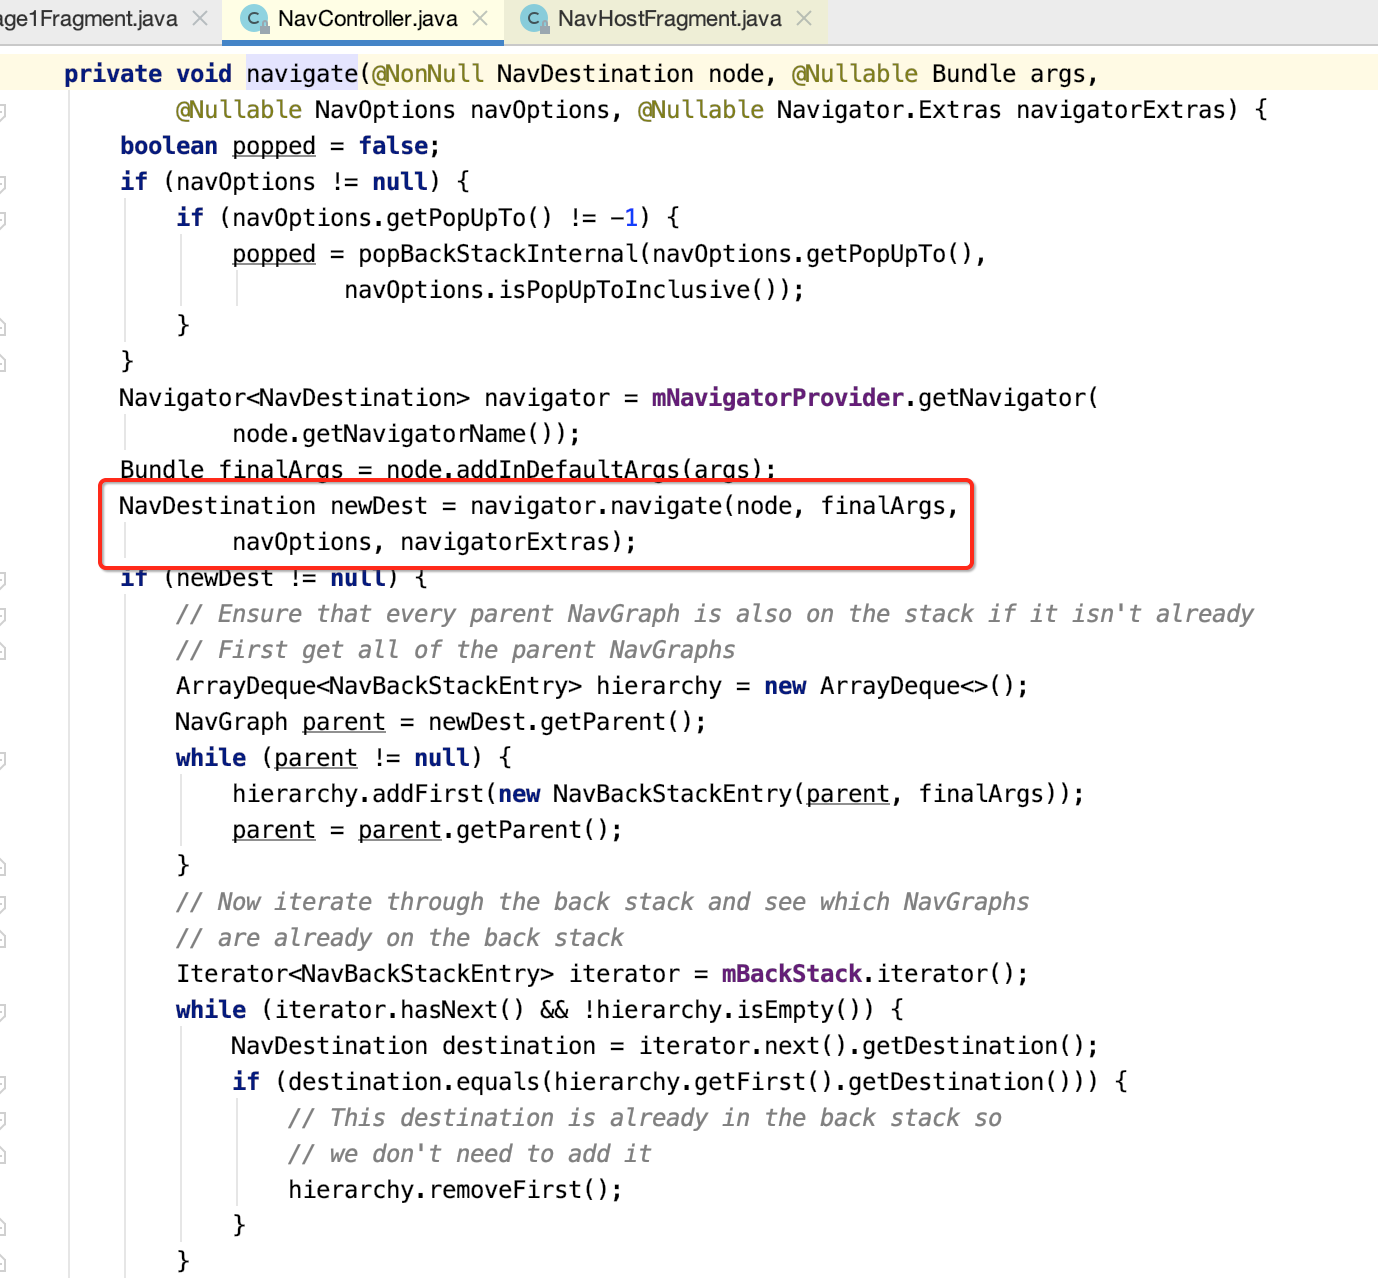
最终会调用到这个navigate方法():
(5)根据导航目的地的名字,调用getNavigator方法,获取Navigator对象。这里对应的是FragmentNavigator。
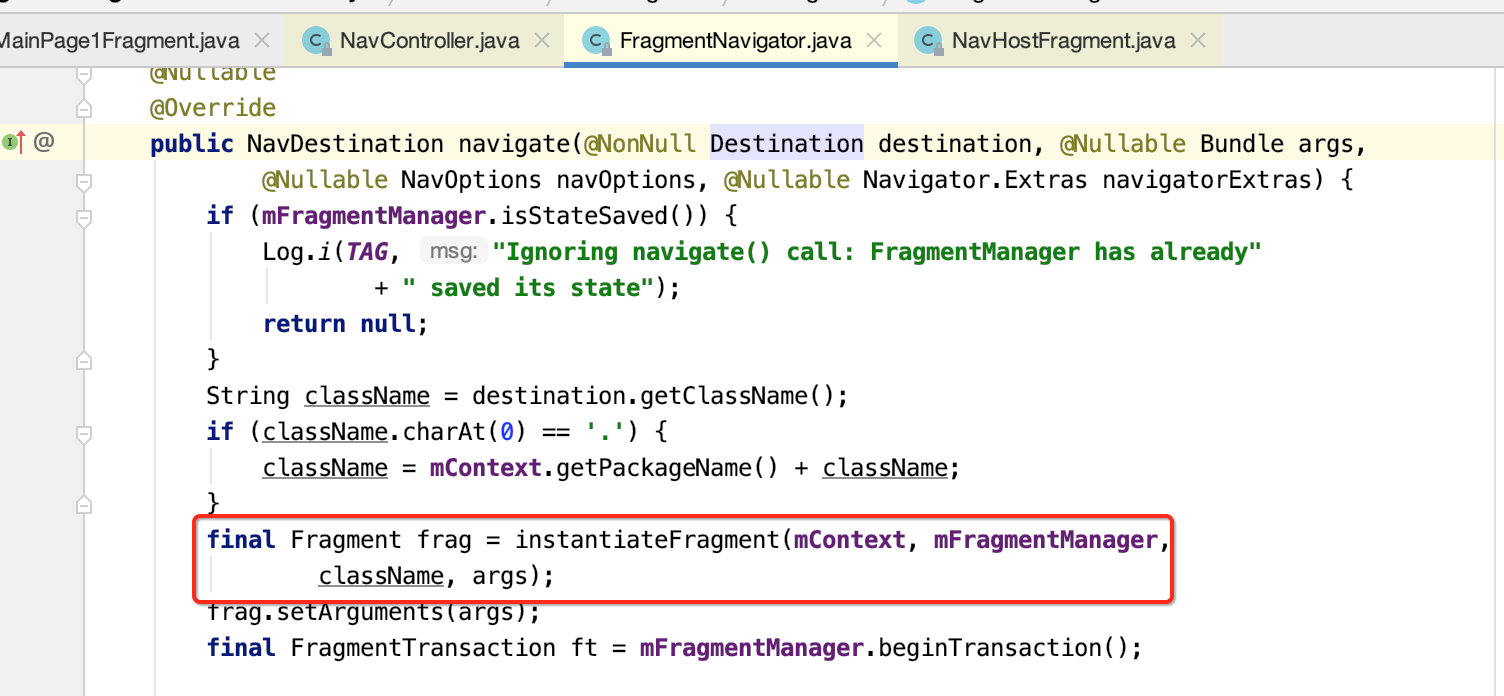
2.FragmentNavigator的实现
通过以上的分析,又来到了Navigator 的子类FragmentNavigator类。下面来看看FragmentNavigator.navigate的方法。
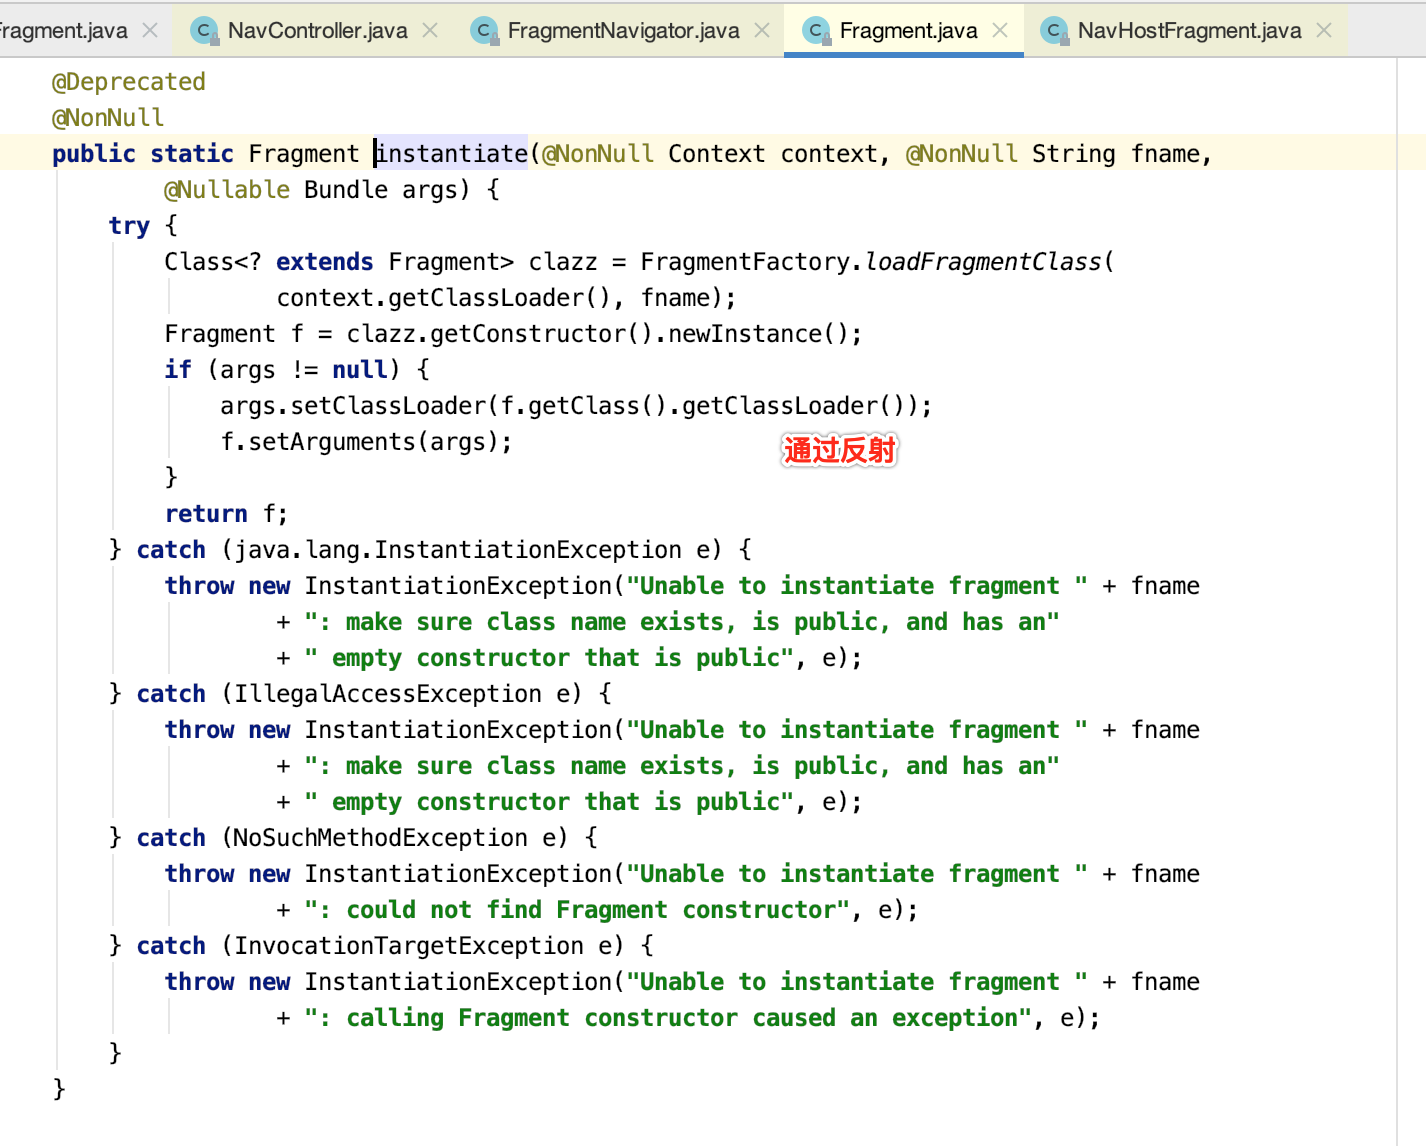
(1)调用instantiateFragment,通过反射机制构建Fragment实例

(2)处理进出场等动画逻辑
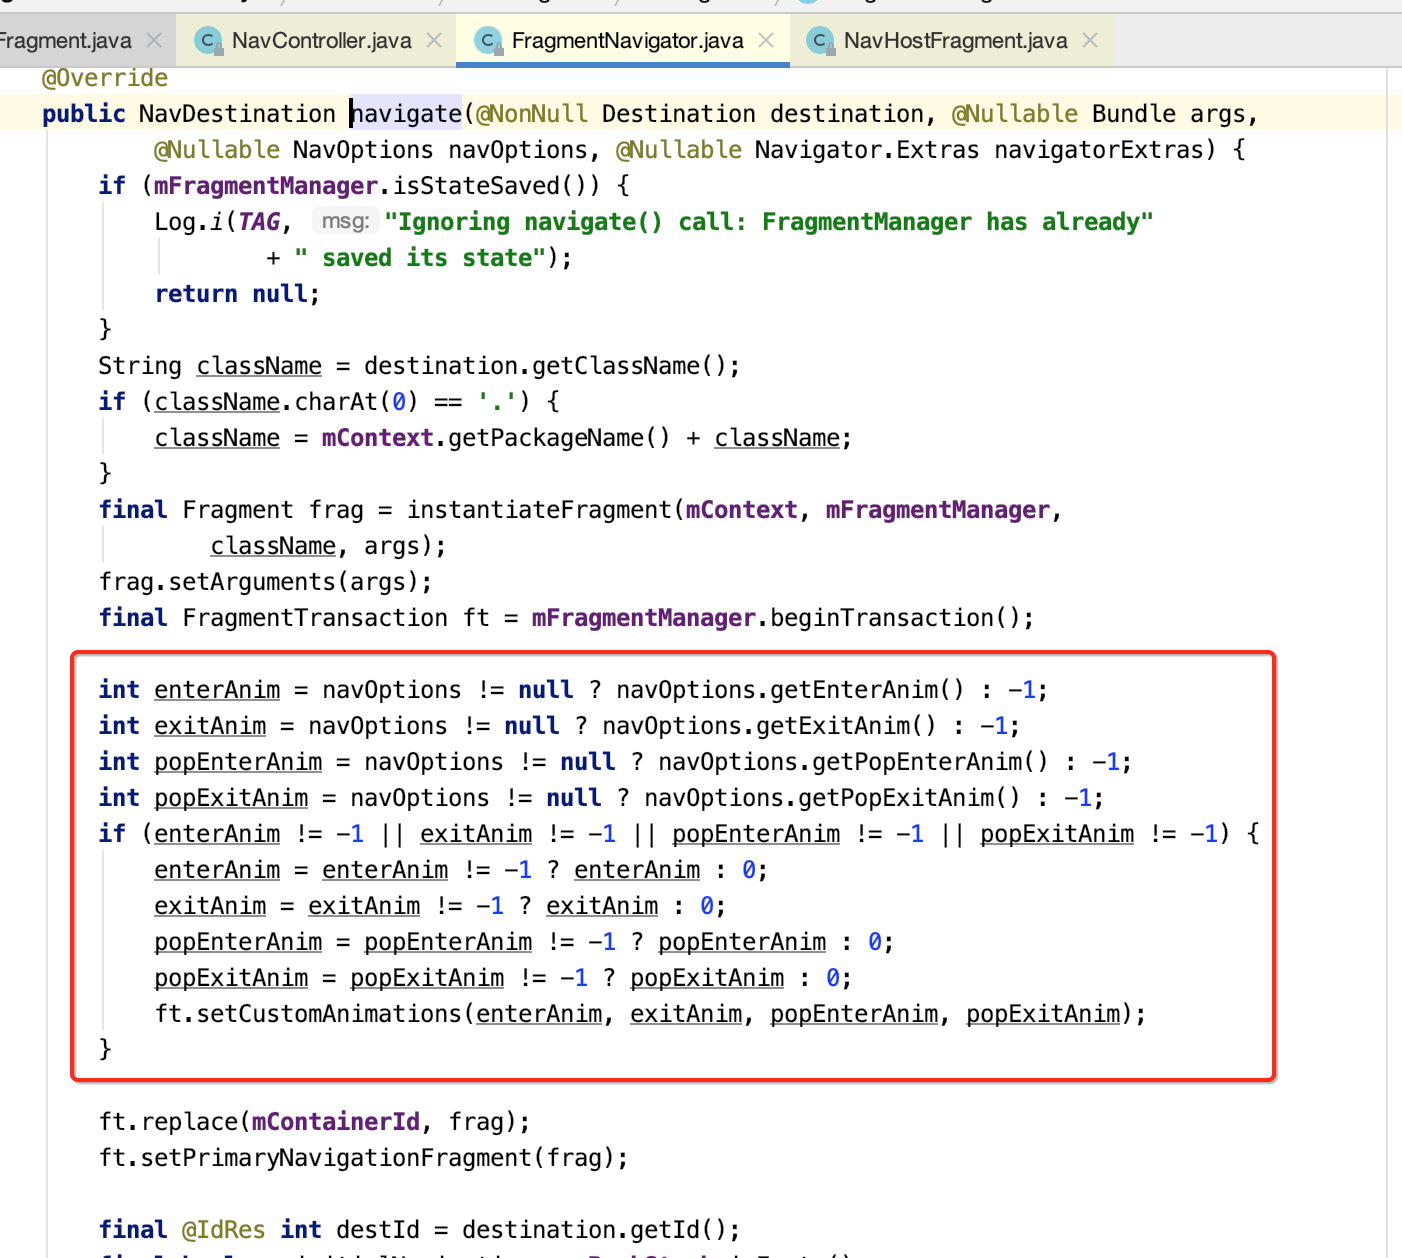
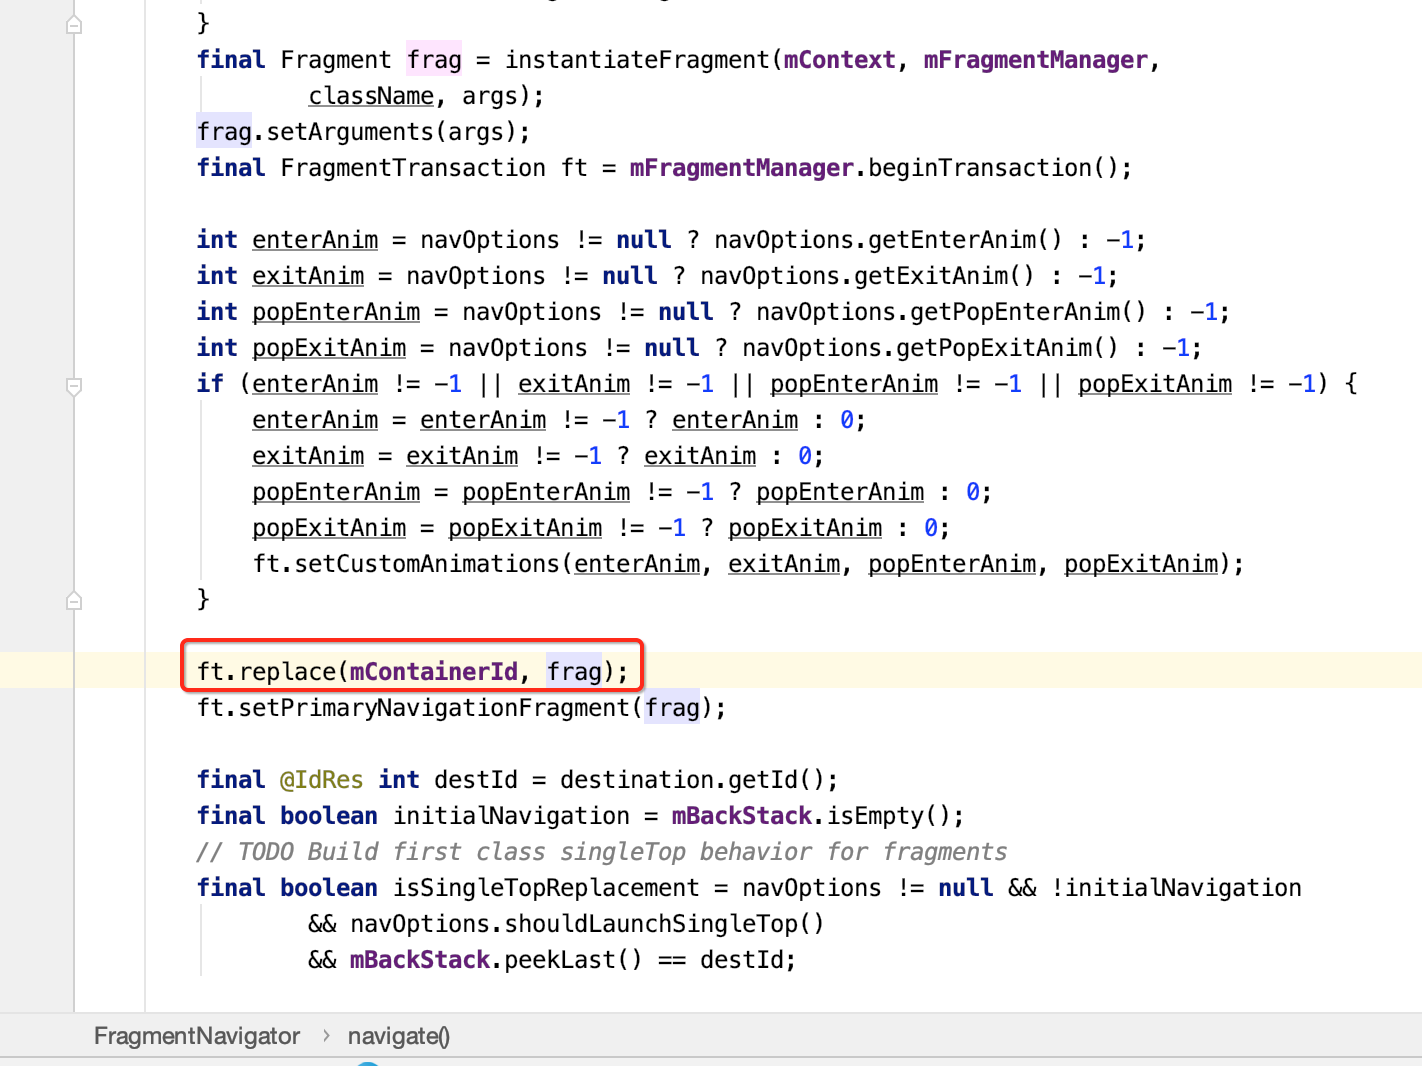
(3)最终调用FragmentManager来处理导航逻辑。
back退栈的处理:
实现原理总结:
(1)NavHostFragment 作为导航载体,在Activity的layout文件里被引用(或者在代码中动态),并且持有导航控制类NavController引用。
(2)NavController 将导航任务委托给Navigator类,Navigator类有两个重要的子类FragmentNavigator和ActivityNavigator子类。NavController类持有NavInflater类引用。
(3)NavInflater 负责解析Navgation文件,负责构建NavGraph导航图。
(4)NavDestination 存有各个目的地信息,在FragmentNavigator和ActivityNavigator内部分别对应一个Destination类,该类继承NavDestination。
(5)在页面导航时,fragment的操作还是交由FragmentManager在操作,activity交由startActivity执行。
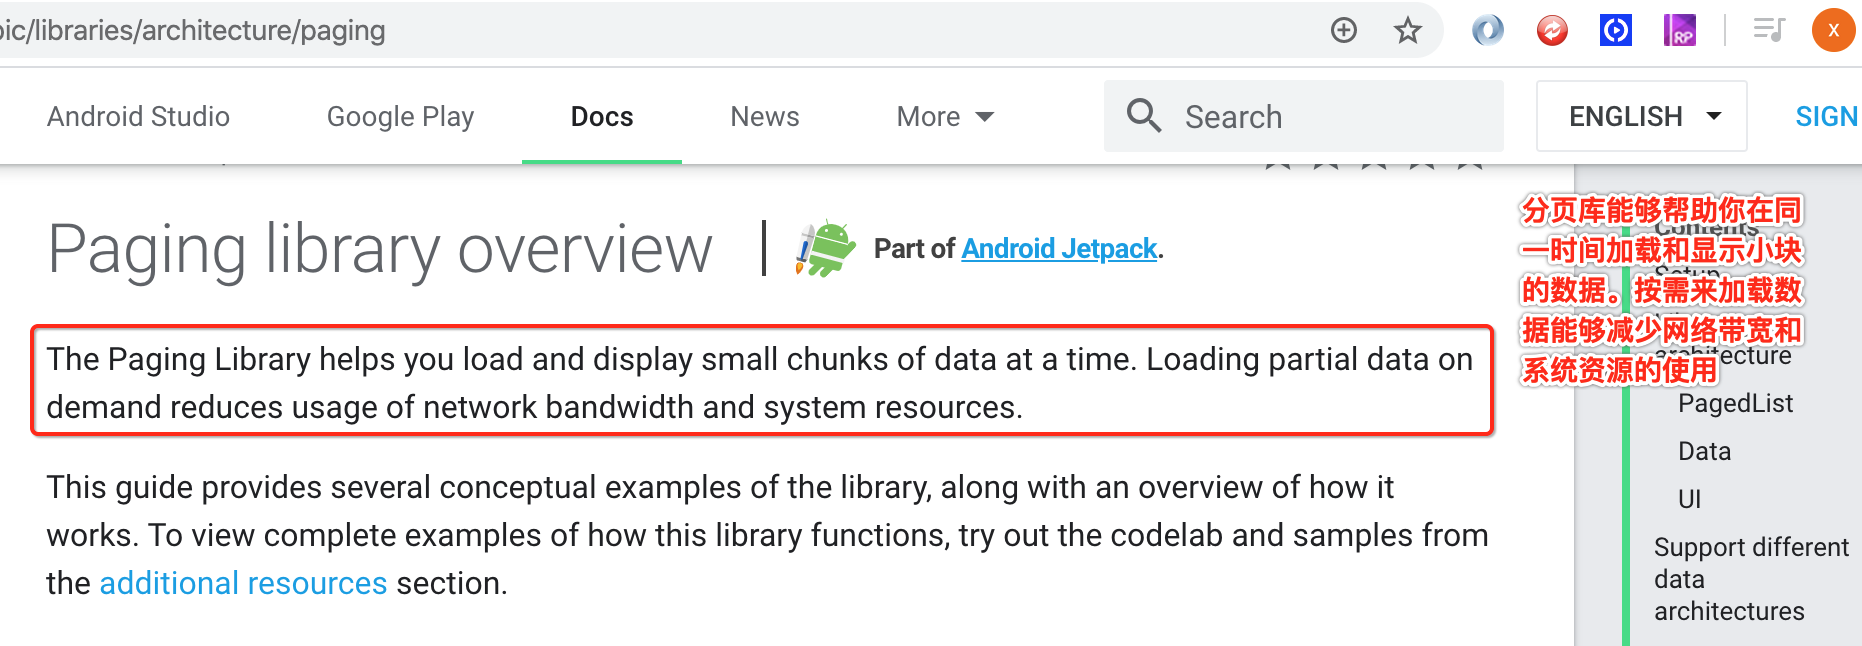
Paging入门:
了解:
基本使用:
这里用它来实现一个很常见的RecycleView下拉自动分页加载数据的功能,看用了Paging框架之后使用跟我们平常使用有啥区别:
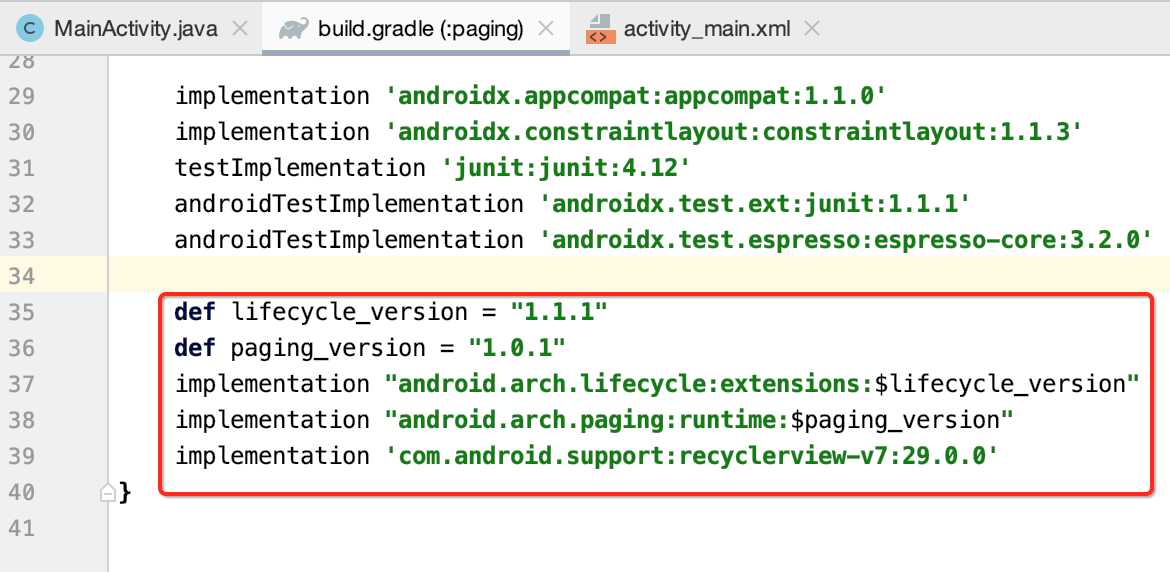
先添加依赖:
package com.android.paging;

import android.os.Bundle;

import androidx.appcompat.app.AppCompatActivity;
import androidx.recyclerview.widget.RecyclerView;

public class MainActivity extends AppCompatActivity {

    private RecyclerView recyclerView;

    @Override
    protected void onCreate(Bundle savedInstanceState) {
        super.onCreate(savedInstanceState);
        setContentView(R.layout.activity_main);
        recyclerView = findViewById(R.id.recyclerView);
    }
}
<?xml version="1.0" encoding="utf-8"?>
<androidx.constraintlayout.widget.ConstraintLayout xmlns:android="http://schemas.android.com/apk/res/android"
    xmlns:app="http://schemas.android.com/apk/res-auto"
    xmlns:tools="http://schemas.android.com/tools"
    android:layout_width="match_parent"
    android:layout_height="match_parent"
    tools:context=".MainActivity">

    <androidx.recyclerview.widget.RecyclerView
        android:id="@+id/recyclerView"
        android:layout_width="match_parent"
        android:layout_height="match_parent"
        app:layout_constraintBottom_toBottomOf="parent"
        app:layout_constraintLeft_toLeftOf="parent"
        app:layout_constraintRight_toRightOf="parent"
        app:layout_constraintTop_toTopOf="parent" />

</androidx.constraintlayout.widget.ConstraintLayout>
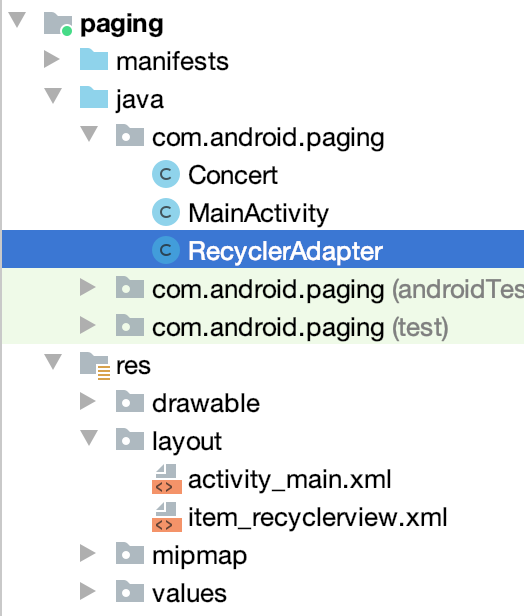
接下来则新建一个实体:

package com.android.paging;

import java.util.Objects;

public class Concert {
    private String title;
    private String content;

    private String author;

    public String getTitle() {
        return title;
    }

    public void setTitle(String title) {
        this.title = title;
    }

    public String getContent() {
        return content;
    }

    public void setContent(String content) {
        this.content = content;
    }

    public String getAuthor() {
        return author;
    }

    public void setAuthor(String author) {
        this.author = author;
    }

    @Override
    public boolean equals(Object obj) {
        if (this == obj) {
            return true;
        }
        if (obj == null) {
            return false;
        }
        if (this.getClass() == obj.getClass()) {
            return true;
        }
        Concert concert = (Concert) obj;
        return Objects.equals(title, concert.title) && Objects.equals(content, concert.content) && Objects.equals(author, concert.author);
    }

    @Override
    public int hashCode() {
        return Objects.hash(title, content, author);
    }
}
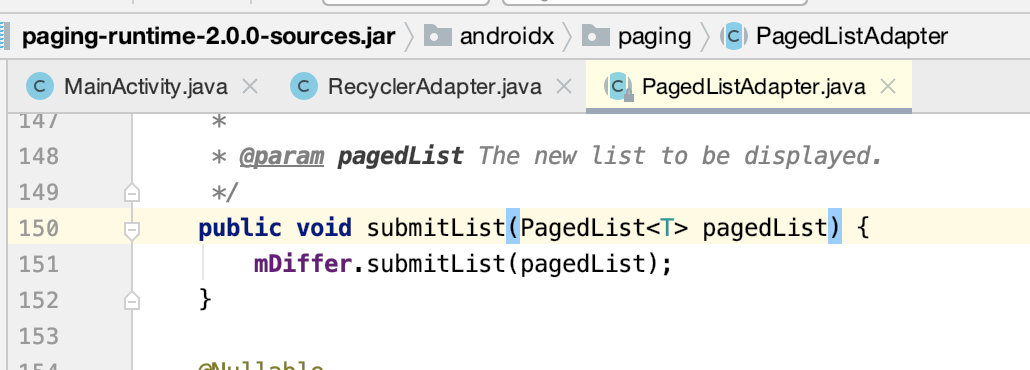
然后这里定义一个Adapter,此时当然得要用Paging相关的Adapter了,用普通的怎么可能能实现分页呢?代码如下:
package com.android.paging;


import android.view.LayoutInflater;
import android.view.View;
import android.view.ViewGroup;
import android.widget.TextView;

import androidx.annotation.NonNull;
import androidx.paging.PagedListAdapter;
import androidx.recyclerview.widget.DiffUtil;
import androidx.recyclerview.widget.RecyclerView;

/**
 * PagedListAdapter:这个Adapter就是一个RecyclerView的Adapter。
 * 不过我们在使用paging实现RecyclerView的分页加载效果,
 * 不能直接继承RecyclerView的Adapter,而是需要继承PagedListAdapter。
 */
public class RecyclerAdapter extends PagedListAdapter<Concert, RecyclerAdapter.RecyclerViewHolder> {


    protected RecyclerAdapter() {
        super(DIFF_CALLBACK);
    }

    @NonNull
    @Override
    public RecyclerViewHolder onCreateViewHolder(@NonNull ViewGroup parent, int viewType) {
        View view = LayoutInflater.from(parent.getContext()).inflate(R.layout.item_recyclerview, parent, false);
        return new RecyclerViewHolder(view);
    }

    @Override
    public void onBindViewHolder(@NonNull RecyclerViewHolder holder, int position) {
        Concert concert = getItem(position);
        if (concert != null) {
            holder.mTitleTextView.setText(concert.getTitle());
            holder.mAuthorTextView.setText(concert.getAuthor());
            holder.mContentTextView.setText(concert.getContent());
        }
    }

    public static class RecyclerViewHolder extends RecyclerView.ViewHolder {

        TextView mTitleTextView;
        TextView mAuthorTextView;
        TextView mContentTextView;


        public RecyclerViewHolder(View itemView) {
            super(itemView);
            mTitleTextView = itemView.findViewById(R.id.title);
            mAuthorTextView = itemView.findViewById(R.id.author);
            mContentTextView = itemView.findViewById(R.id.content);
        }
    }

    //需要oldConcert与新 newConcert 比较才能得出变化的数据
    private static DiffUtil.ItemCallback<Concert> DIFF_CALLBACK =
            new DiffUtil.ItemCallback<Concert>() {
                // 判断Item是否已经存在
                @Override
                public boolean areItemsTheSame(Concert oldConcert, Concert newConcert) {
                    return oldConcert.getTitle().equals(newConcert.getTitle());
                }

                // 如果Item已经存在则会调用此方法,判断Item的内容是否一致
                @Override
                public boolean areContentsTheSame(Concert oldConcert,
                                                  Concert newConcert) {
                    return oldConcert.equals(newConcert);
                }
            };
}
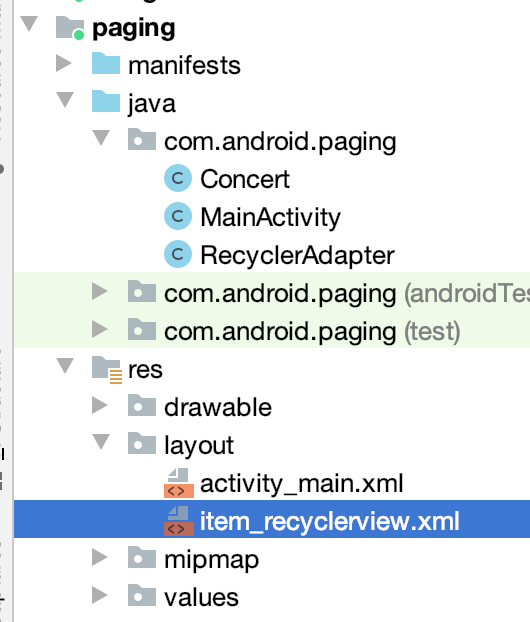
<?xml version="1.0" encoding="utf-8"?>
<LinearLayout xmlns:android="http://schemas.android.com/apk/res/android"
    android:layout_width="match_parent"
    android:layout_height="wrap_content">

    <TextView
        android:id="@+id/title"
        android:layout_width="wrap_content"
        android:layout_height="wrap_content"
        android:gravity="center"
        android:textSize="20sp" />

    <TextView
        android:id="@+id/author"
        android:layout_width="wrap_content"
        android:layout_height="wrap_content"
        android:gravity="center"
        android:textSize="16sp" />

    <TextView
        android:id="@+id/content"
        android:layout_width="wrap_content"
        android:layout_height="wrap_content"
        android:textSize="25sp" />
</LinearLayout>
其中标红处则是有别于平常的Adapter的,接下来则需要绑定数据了:
接下来则需要初始化列表数据呀,怎么往这个Adapter中添加数据呢,其它它里面有一个api:
具体数据这块看一下用法,这里也不深入开展了,主要是对它有一个直观的了解,待之后有需要再进一步分析,写法会有些怪,但熟能生巧的事:
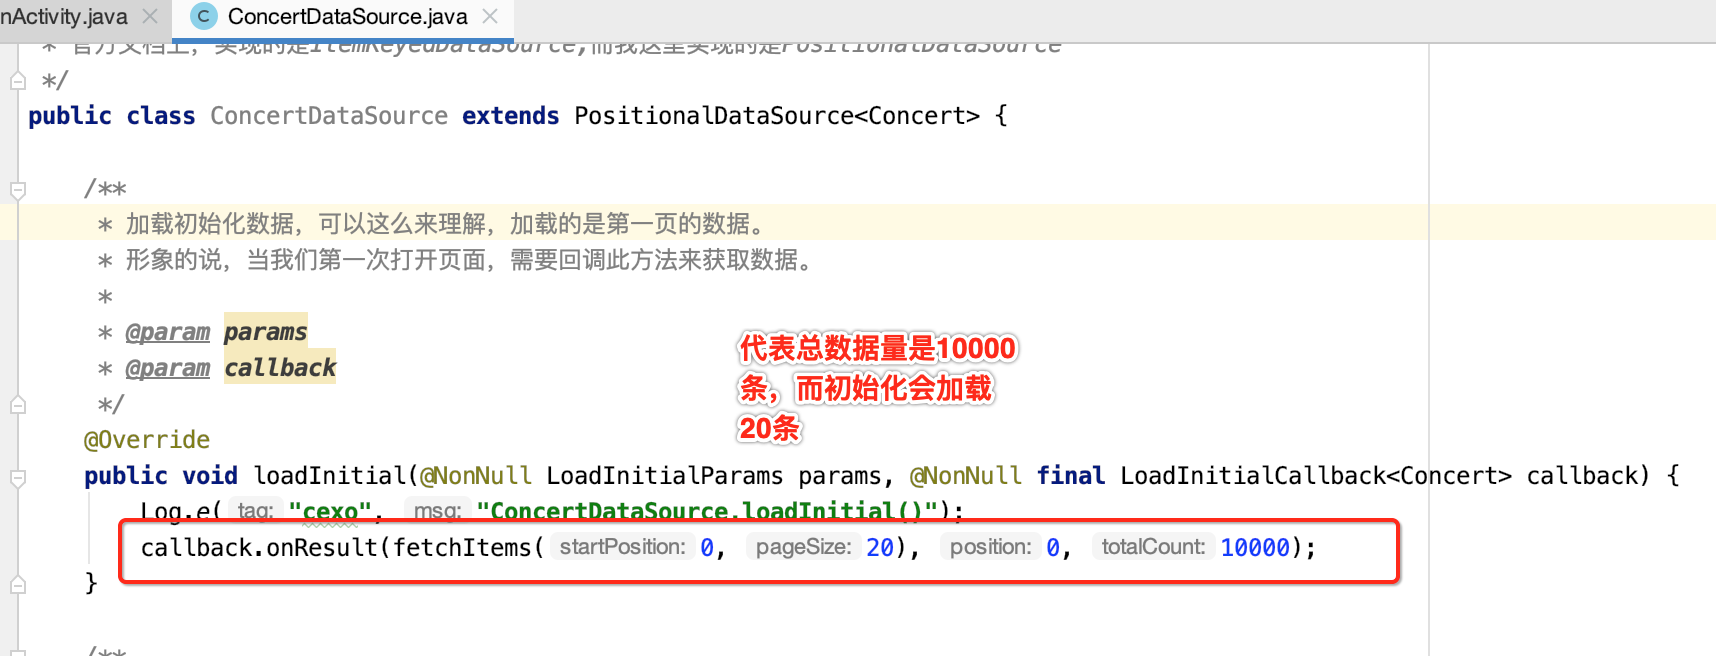
先来建立一个数据源:
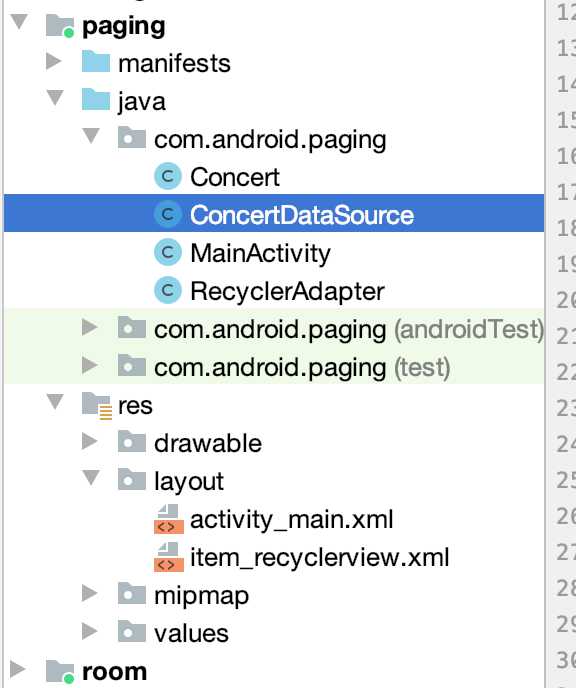
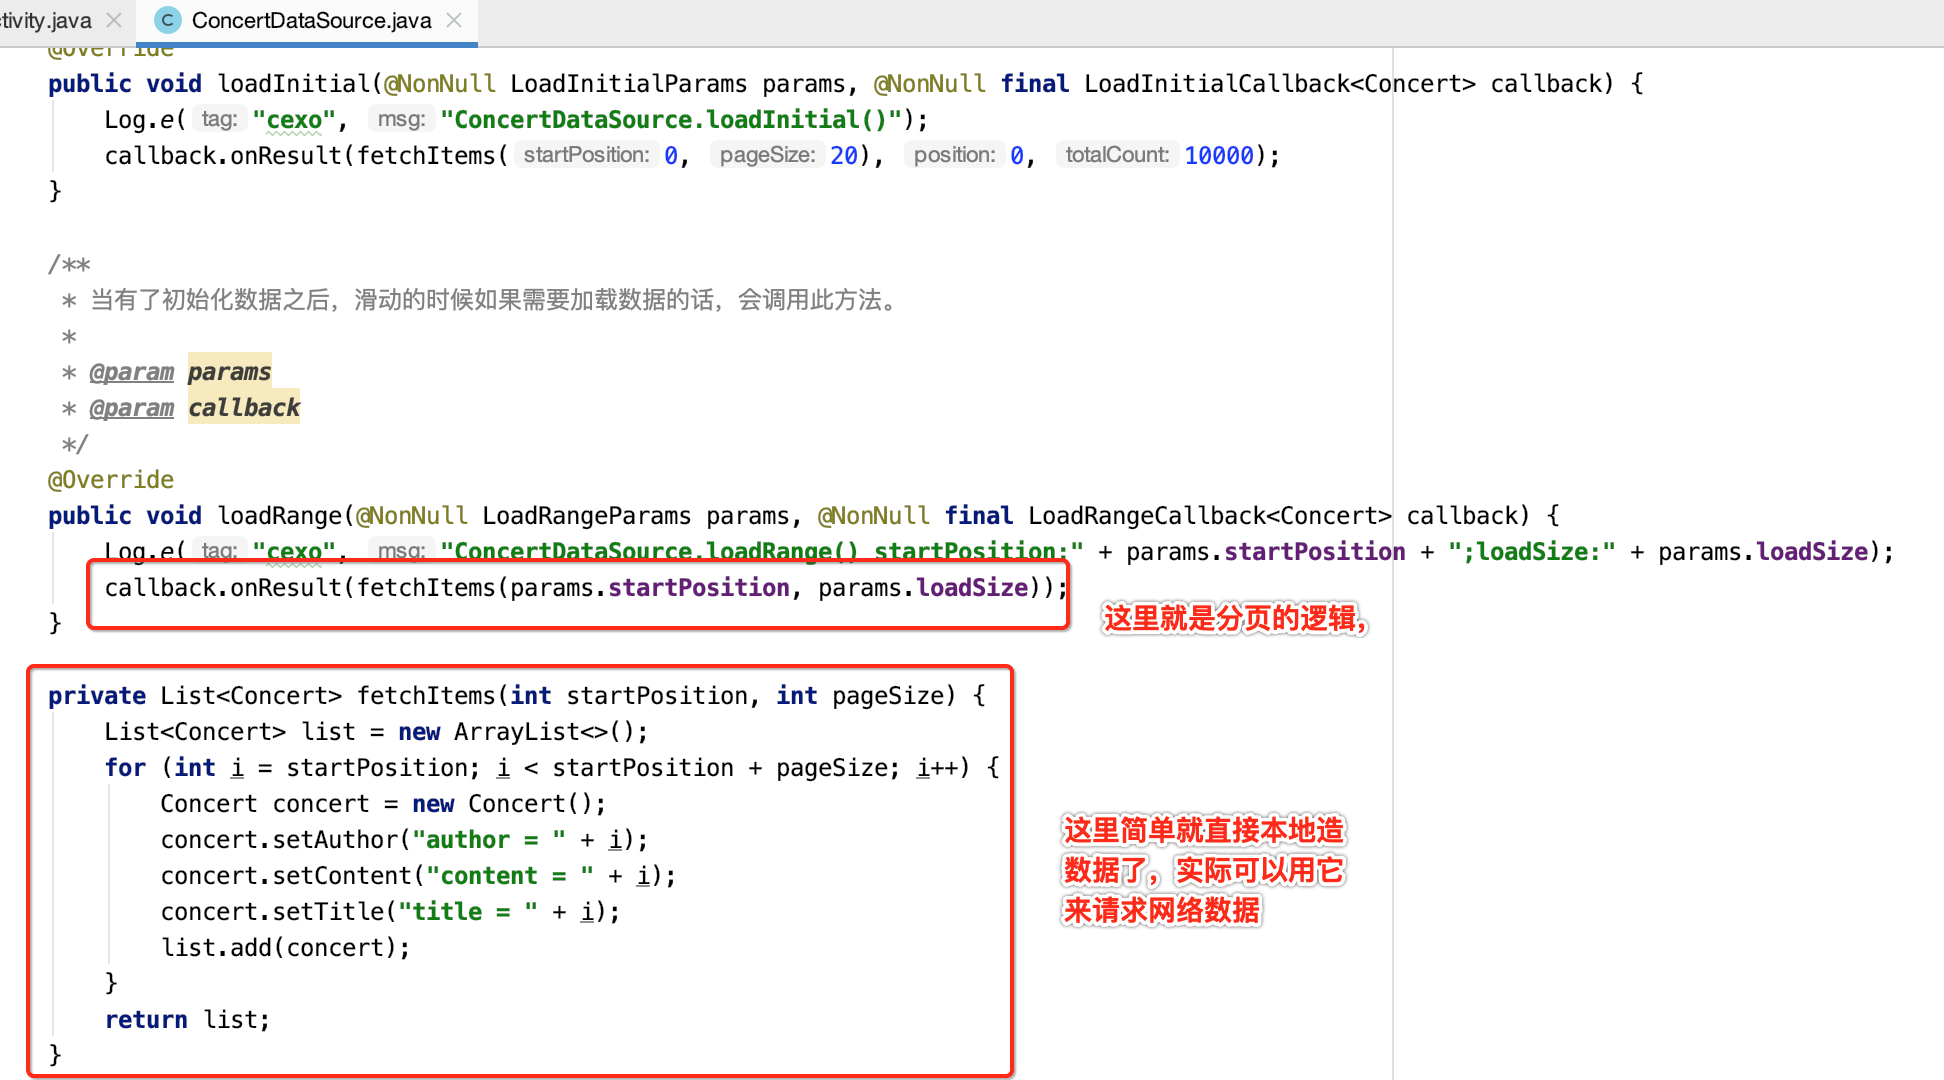
package com.android.paging;


import android.util.Log;

import androidx.annotation.NonNull;
import androidx.paging.PositionalDataSource;

import java.util.ArrayList;
import java.util.List;

/**
 * DataSource:顾名思义,数据源,获取数据是通过它实现的。
 * 官方文档上,实现的是ItemKeyedDataSource,而我这里实现的是PositionalDataSource
 */
public class ConcertDataSource extends PositionalDataSource<Concert> {

    /**
     * 加载初始化数据,可以这么来理解,加载的是第一页的数据。
     * 形象的说,当我们第一次打开页面,需要回调此方法来获取数据。
     *
     * @param params
     * @param callback
     */
    @Override
    public void loadInitial(@NonNull LoadInitialParams params, @NonNull final LoadInitialCallback<Concert> callback) {
        Log.e("cexo", "ConcertDataSource.loadInitial()");
        callback.onResult(fetchItems(0, 20), 0, 10000);
    }

    /**
     * 当有了初始化数据之后,滑动的时候如果需要加载数据的话,会调用此方法。
     *
     * @param params
     * @param callback
     */
    @Override
    public void loadRange(@NonNull LoadRangeParams params, @NonNull final LoadRangeCallback<Concert> callback) {
        Log.e("cexo", "ConcertDataSource.loadRange() startPosition:" + params.startPosition + ";loadSize:" + params.loadSize);
        callback.onResult(fetchItems(params.startPosition, params.loadSize));
    }

    private List<Concert> fetchItems(int startPosition, int pageSize) {
        List<Concert> list = new ArrayList<>();
        for (int i = startPosition; i < startPosition + pageSize; i++) {
            Concert concert = new Concert();
            concert.setAuthor("author = " + i);
            concert.setContent("content = " + i);
            concert.setTitle("title = " + i);
            list.add(concert);
        }
        return list;
    }

}
这里稍加解释一下,也是第一次用:
那定义了数据源了怎么用呢?需要一个工厂来创建这些数据:
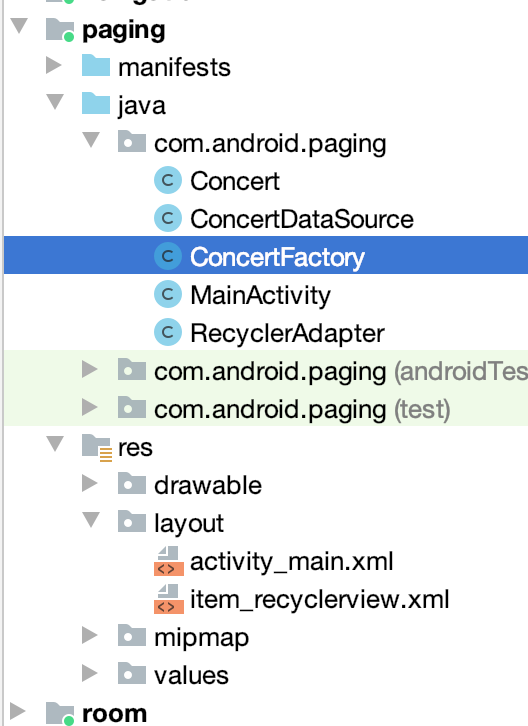
package com.android.paging;


import androidx.lifecycle.MutableLiveData;
import androidx.paging.DataSource;

public class ConcertFactory extends DataSource.Factory<Integer, Concert> {

    private MutableLiveData<ConcertDataSource> mSourceLiveData =
            new MutableLiveData<>();

    @Override
    public DataSource<Integer, Concert> create() {
        ConcertDataSource concertDataSource = new ConcertDataSource();
        mSourceLiveData.postValue(concertDataSource);
        return concertDataSource;
    }
}
其中看到没,用LiveData保存的,那如果数据源有更新肯定也会及时收到通知的,接下来这工厂则在ViewModel中来使用了,如下:
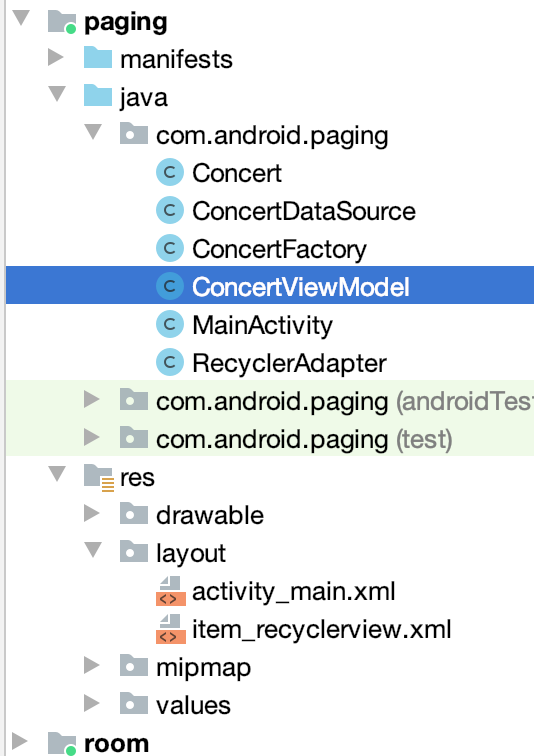
package com.android.paging;


import androidx.lifecycle.LiveData;
import androidx.lifecycle.ViewModel;
import androidx.paging.DataSource;
import androidx.paging.LivePagedListBuilder;
import androidx.paging.PagedList;

/**
 * PagedList: 数据源获取的数据最终靠PagedList来承载。
 * 对于PagedList,我们可以这样来理解,它就是一页数据的集合。
 * 每请求一页,就是新的一个PagedList对象。
 */
public class ConcertViewModel extends ViewModel {

    private final LiveData<PagedList<Concert>> convertList;
    private DataSource<Integer, Concert> concertDataSource;

    public ConcertViewModel() {
        ConcertFactory concertFactory = new ConcertFactory();
        concertDataSource = concertFactory.create();
        convertList = new LivePagedListBuilder<>(concertFactory, 20).build();
    }

    public void invalidateDataSource() {
        concertDataSource.invalidate();
    }

    public LiveData<PagedList<Concert>> getConvertList() {
        return convertList;
    }
}
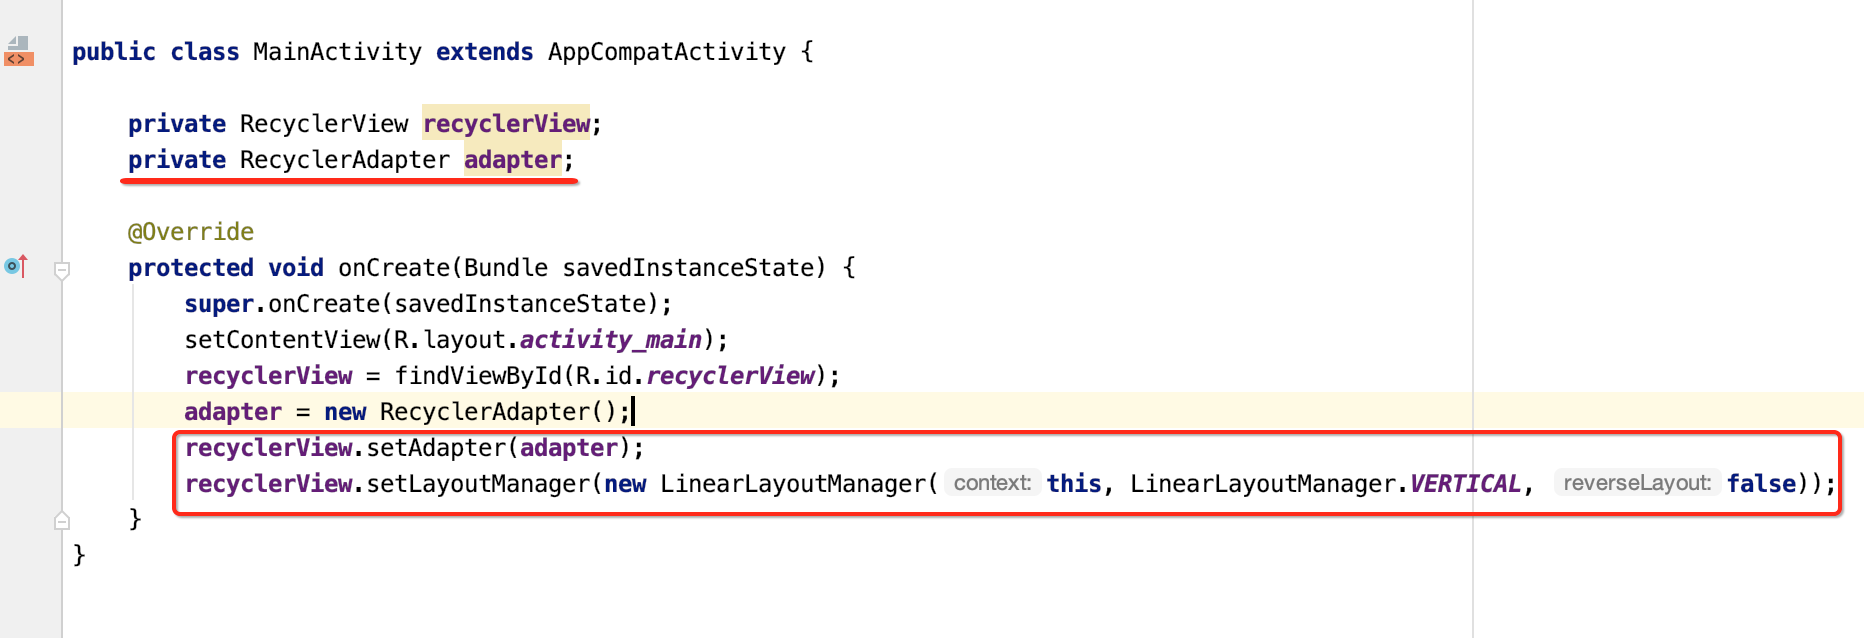
最终咱们就可以在Activity来调用了,如下:
package com.android.paging;

import android.os.Bundle;
import android.util.Log;

import androidx.annotation.Nullable;
import androidx.appcompat.app.AppCompatActivity;
import androidx.lifecycle.Observer;
import androidx.lifecycle.ViewModelProviders;
import androidx.paging.PagedList;
import androidx.recyclerview.widget.LinearLayoutManager;
import androidx.recyclerview.widget.RecyclerView;

public class MainActivity extends AppCompatActivity {

    private RecyclerView recyclerView;
    private RecyclerAdapter adapter;

    @Override
    protected void onCreate(Bundle savedInstanceState) {
        super.onCreate(savedInstanceState);
        setContentView(R.layout.activity_main);
        recyclerView = findViewById(R.id.recyclerView);
        adapter = new RecyclerAdapter();
        ConcertViewModel viewModel =
                ViewModelProviders.of(this).get(ConcertViewModel.class);
        viewModel.getConvertList().observe(this, new Observer<PagedList<Concert>>() {
            @Override
            public void onChanged(@Nullable PagedList<Concert> concerts) {
                adapter.submitList(concerts);
                Log.i("cexo", "数据更新了");
            }
        });

        recyclerView.setAdapter(adapter);
        recyclerView.setLayoutManager(new LinearLayoutManager(this, LinearLayoutManager.VERTICAL, false));
    }
}
好,下面来运行一下:
而什么分页容错处理我们完全不用客,我们只需管数据源如何加载,如何将数据显示在页面上,相当的简单,关于它的原理这块就不分析了,待之后在实际工作中用到它了到时再深入探究。