
一、Rancher部署
| 功能 | 硬件 | 操作系统 | 主机IP | 主机名 |
|---|---|---|---|---|
| rancher | CPU 4,MEM 8G,DISK 100G | CentOS7.6 | 192.168.244.128 | rancher |
| master | CPU 4,MEM 8G,DISK 100G | CentOS7.6 | 192.168.244.129 | master |
| node1 | CPU 4,MEM 8G,DISK 100G | CentOS7.6 | 192.168.244.130 | node1 |
设置主机名称
[root@localhost ~]# hostnamectl set-hostname XXX
XXX修改为rancher、master、node1
修改静态ip地址
cd /etc/sysconfig/network-scripts/

cat ifcfg-ens33
TYPE="Ethernet"
PROXY_METHOD="none"
BROWSER_ONLY="no"
BOOTPROTO="static"    #修改为static
DEFROUTE="yes"
IPV4_FAILURE_FATAL="no"
IPV6INIT="yes"
IPV6_AUTOCONF="yes"
IPV6_DEFROUTE="yes"
IPV6_FAILURE_FATAL="no"
IPV6_ADDR_GEN_MODE="stable-privacy"
NAME="ens33"
UUID="d24eb2bb-0de1-44d2-882f-9bbada2ad398"
DEVICE="ens33"
ONBOOT="yes"

IPADDR="192.168.244.128"    #修改为想要访问的固定静态ip地址
NETMASK="255.255.255.0"     #子网掩码,固定写法
GATEWAY="192.168.244.2"     #见虚拟机NAT设置中网关IP
DNS1="192.168.244.2"        #cat /etc/resolv.conf
步骤一:

步骤2:

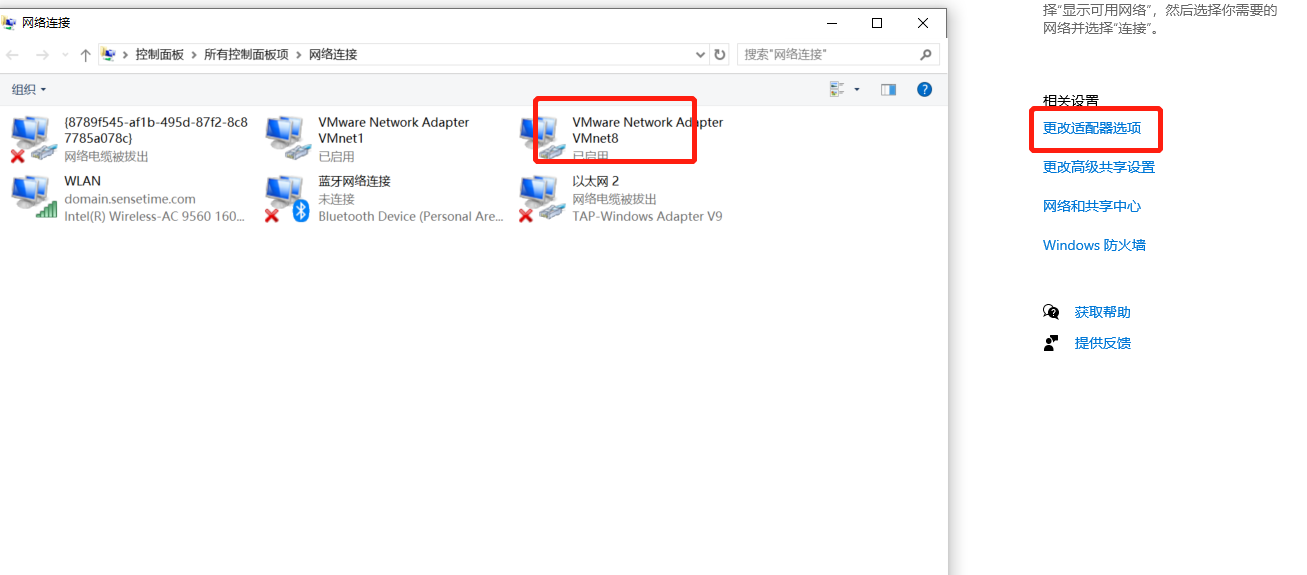
步骤3:更改适网络配器

修改后重启一下网络服务即可 systemctl restart network
systemctl restart network
[root@localhost ~]# cat /etc/hosts

127.0.0.1   localhost localhost.localdomain localhost4 localhost4.localdomain4

::1         localhost localhost.localdomain localhost6 localhost6.localdomain6

192.168.244.128 rancher

192.168.244.129 master

192.168.244.130 node
关闭firewalld
[root@localhost ~]# systemctl disable firewalld
[root@localhost ~]# systemctl stop firewalld
[root@localhost ~]# firewall-cmd --state
not running

# 关闭swap
swapoff -a  # 临时
sed -ri 's/.*swap.*/#&/' /etc/fstab    # 永久
SELinux
[root@localhost ~]# cat /etc/selinux/config

# This file controls the state of SELinux on the system.
# SELINUX= can take one of these three values:
#     enforcing - SELinux security policy is enforced.
#     permissive - SELinux prints warnings instead of enforcing.
#     disabled - No SELinux policy is loaded.
SELINUX=disabled
# SELINUXTYPE= can take one of three values:
#     targeted - Targeted processes are protected,
#     minimum - Modification of targeted policy. Only selected processes are protected.
#     mls - Multi Level Security protection.
SELINUXTYPE=targeted
修改完SELinux配置后,需要重新启动系统
reboot
节点时间同步
crontab -l
显示no crontab for root,解决办法:
在 root 用户下输入 crontab -e,按ESC,然后:wq回车。
再次输入crontab命令就行了,原因是服务器重装完系统没生成对应的文件,初始化一下就行。
[root@localhost ~]# crontab -l0 */1 * * * ntpdate time1.aliyun.com
安装需要的软件包, yum-util 提供yum-config-manager功能,另外两个是devicemapper驱动依赖的
yum update -y
sudo yum install -y yum-utils device-mapper-persistent-data lvm2
使用设置yum源为阿里云,阿里云yum源安装要快
#sudo yum-config-manager --add-repo http://mirrors.aliyun.com/docker-ce/linux/centos/docker-ce.repo
3.安装docker
sudo yum install -y docker-ce
启动docker
$ sudo systemctl start docker
开机启动:
systemctl enable docker
配置镜像加速器针对Docker客户端版本大于 1.10.0 的用户
您可以通过修改daemon配置文件/etc/docker/daemon.json来使用加速器
sudo mkdir -p /etc/docker
sudo tee /etc/docker/daemon.json <<-'EOF'
{
  "registry-mirrors": ["https://v46187f2.mirror.aliyuncs.com"]
}
EOF
sudo systemctl daemon-reload
sudo systemctl restart docker
[root@rancher ~]# docker pull rancher/rancher
运行rancher容器
[root@rancher ~]# sudo docker run --privileged -d --restart=unless-stopped -p 80:80 -p 443:443 rancher/rancher

[root@master ~]# docker pull rancher/rancher-agent:v2.5.5
[root@node ~]# docker pull rancher/rancher-agent:v2.5.5
Cluster health check failed: cluster agent is not ready
最后安装集群时再执行开启一般rancher-agent代理服务,再次执行上面的命令,先安装master,再安装node节点
YUM源准备
[aidocker@rnode2 ~]$ sudo vim /etc/yum.repos.d/k8s.repo
[kubernetes]
name=Kubernetes
baseurl=https://mirrors.aliyun.com/kubernetes/yum/repos/kubernetes-el7-x86_64/
enabled=1
gpgcheck=1
repo_gpgcheck=1
gpgkey=https://mirrors.aliyun.com/kubernetes/yum/doc/yum-key.gpg https://mirrors.aliyun.com/kubernetes/yum/doc/rpm-package-key.gpg
安装kubectl
[root@rancher ~]$ sudo yum -y install kubectl
[root@rnode1 ~]# mkdir .kube
[root@rnode1 ~]# cd .kube/
[root@rnode1 .kube]# touch config
二、helm安装
https://helm.sh/docs/intro/quickstart/
heml下载地址https://github.com/helm/helm/releases
-
-
打开包装(
tar -zxvf helm-v3.0.0-linux-amd64.tar.gz) -
helm在解压后的目录中找到二进制文件,然后将其移至所需的目标位置(mv linux-amd64/helm /usr/local/bin/helm)
从那里,你应该能够运行客户端,并 添加稳定回购: helm help。
Tiller已经被删除了
配置国内chart仓库
添加存储库
helm repo add stable https://kubernetes.oss-cn-hangzhou.aliyuncs.com/charts
helm repo add aliyuncs https://apphub.aliyuncs.com
helm repo update
查看配置的存储仓库
helm repo list
查找想要安装的软件程序
docker search repo 程序名
例:helm search repo nginx 查找 nginx 程序都有哪些版本的应用
安装aliyun 的nginx :helm install nginx nginx/aliyuncs
查看访问的 SVC 映射端口:kubectl get svc --namespace default -w nginx
访问该 nginx 的 web 页面:curl -I 192.168.168.11:30367
要跟踪发布的状态或重新读取配置信息,可以使用 helm status +应用名
查看helm生成应用、卸载应用
helm list 查看集群中有哪些 helm 应用
helm uninstall +应用名 卸载应用
创建一个Helm Chart
helm create hello-helm
helm install rousing /root/hello-helm
helm install 部署名称 路径
相对路径
helm install web hello-helm/
helm install web2 hello-helm
helm uninstall web
helm uninstall 应用名称
删除方式二:
http://www.mydlq.club/article/51/#wow6
helm delete web
helm install --dry-run --debug webs mychart/
helm list -n te-space-staging
helm list -n app-dev
helm install --dry-run --debug -n test-web webs webdemo/
debug调试
helm install --set image.repository="registry.aliyun.com.com/image/demo-web" --set image.tag="v1.1.0" app-web webdemo/ -n dev-test
helm uninstall demo-web -n app-dev
helm delete demo-web -n app-dev
三、Helmfile
helmfile安装:
参考文档:https://guoxudong.io/post/helmfile-quick-start/
1、下载安装包:https://github.com/roboll/helmfile/releases
cd /usr/local/bin/
ln -s /home/weihu/helmfile_linux_amd64 helmfile
chmod +x helmfile