转自:https://www.cnblogs.com/lyj-gyq/p/9117339.html
为了更好的理解披萨订购应用,再做一个小的Demo。
一、Spring Web Flow 2.0新特性
-
-
与 Spring MVC 深度整合
Spring Web Flow 1.x 是个自成体系的框架,可与 Spring Web MVC 、 Struts 、 JSF 等 Web 框架整合。最新的 Spring Web Flow 2.0 则明确声明是基于 Spring Web MVC 的一个扩展。
-
提供了处理 Ajax 事件的能力
Ajax 事件的处理与 Web Flow 事件的处理相一致,在处理完成后, flow 即可刷新客户端相关界面代码。
-
与 JSF 整合
通过将 JSF 层层包装,最终可在 Spring Framework 和 Spring Web Flow 中使用 JSF 的各种组件。
-
与 Spring Security (原 Acegi Security )整合
只需将某个 flow 声明为“ secured ”,即 可利用 Spring Security 来确定当前用户是否有权限运行 flow 、激发事件等等。
-
更简洁的配置
官方的数据说同一个 flow , 2.0 版的配置比 1.x 版的配置少 50% 的 XML 代码。
-
重用更方便
Spring Web Flow 2.0 提供了 flow 的继承,重用即有的 flow 代码更加容易。
-
二、Spring Web Flow的基本元素
Flow 可看作是客户端与服务器的一次对话( conversation )。 Flow 的完成要由分多个步骤来实现,在 Spring Web Flow 的语义中,步骤指的就是 state 。 Spring Web Flow 提供了五种 state ,分别是 Action State 、 View State 、 Subflow State 、 Decision State 、 End State ,这些 state 可用于定义 flow 执行过程中的各个步骤。除了 End State 外,其他 state 都可以转换到别的 state ,一般通过在 state 中定义 transition 来实现到其他 state 的转换,转换的发生一般由事件( event )来触发。
三、Spring Web Flow所能解决的技术问题
(一)Web应用程序的三种范围
Java Servlet 规范为 Web 应用程序中用到的各种对象规定了三种范围( scope ),分别是 request 范围、 session 范围和 application 范围。
-
-
-
- request 范围中的对象是跟客户的请求绑定在一起的,每次请求结束都会销毁对象,而新的请求过来时又会重新创建对象。 request 范围适合存放数据量较大的临时数据。
- session 范围中的对象是跟会话( session )绑定在一起的,每次会话结束会销毁这些对象,而新的会话中又会重新创建。 HTTP 协议本身是无状态的,服务器和客户端要实现会话的管理,只能借助于一些辅助的手段,如在协议的数据包中加一些隐藏的记号,等等。 session 范围适合存放本次会话需要保留的数据。
- application 范围的对象是跟应用程序本身绑定在一起,从 Servlet API 的角度来讲,就是存放在 ServletContext 中的对象,它们随着 Servlet 的启动而创建, Servlet 关闭时才会销毁。 application 范围适合存放那些与应用程序全局相关的数据。
-
-
把大量数据放入 session 会导致严重的效率问题,所以需要一种比 request 范围要长,但又比 session 范围要短的这么一种有效范围。
(二)Spring Web Flow的解决方案
针对 Java Servlet 规范中的这个缺陷, Spring Web Flow 2.0 中提供了以下两种范围:
-
-
-
- flow 范围。此范围内的对象在 flow 开始时创建, flow 结束时销毁,在 flow 定义文件中可通过“ flowScope ”变量名来访问。
- conversation 范围。此范围内的对象与 flow 范围对象基本相似,唯一不同在于 conversation 范围内的对象所在的 flow 如果调用了其他 subflow ,那么在 subflow 中也可访问该对象。
-
-
由于 flow 是由开发人员自己定义的,可根据业务的需求自由改变, flow 范围和 conversation 范围的使用也就突破了 Java Servlet 规范中 session 范围和 request范围的局限,真正做到了自由定制。
四、何时使用Spring Web Flow?
| 解决方案 | 何时使用 |
| Spring MVC Controller |
某个单独的、只需较少业务逻辑就可创建的页面,同时该页面不是 flow 的一部分 |
| Spring MVC SimpleFormController |
某个只涉及表单提交的页面,如一个搜索框 |
| Spring MVC AbstractWizardFormController | 由一系列导航页面组成的业务过程 |
| Spring Web Flow | 任何比较复杂的、有状态的、需要在多个页面之间跳转的业务过程 |
五、配置Spring Web Flow 2.0的基础
(一)FlowRegisty
FlowRegistry 是存放 flow 的仓库,每个定义 flow 的 XML 文档被解析后,都会被分配一个唯一的 id ,并以 FlowDefinition 对象的形式存放在 FlowResigtry 中。
(二)FlowExecutor
FlowExecutor 是 Spring Web Flow 的一个核心接口,启动某个 flow ,都要通过这个接口来进行。从配置角度来说,只要保证有个 FlowExecutor 就可以了, Spring Web Flow 的默认行为已经足够。
1 <webflow:flow-executor id="flowExecutor" />
(三)执行哪个flow?
FlowRegistry 中注册的 flow 可能会有多个,但每个 flow 都会有 id ,没有配置的,也会有个默认值, FlowExecutor 就是通过 id 来找出要执行的flow 。至于这个 id ,则是要由用户来指定的。在默认配置情况下,如果客户端发送了如下URL请求:
1 http://localhost:8080/CartApp/spring/shopping
则从 Spring Web Flow 的角度来看,这个 URL 就表示客户想要执行一个 id 为“ shopping ”的 flow ,于是就会在 FlowRegistry 中查找名为“ shopping ”的 flow,由FlowExecutor负责执行。
(四)Spring Web Flow如何与Spring Web MVC整合在一起?
客户端发送的请求,先会由 servlet 容器(本教程示例中即为 Tomcat )接收, servlet 容器会找到相应的应用程序,再根据 web.xml 的配置找到出符合映射条件的 servlet 来处理。 Spring Web MVC 中处理请求的 servlet 是 DispatcherServlet ,如果请求的路径满足 DispatcherServlet 的映射条件,则 DispatcherServlet 会找出 Spring IoC 容器中所有的 HandlerMapping ,根据这些 HandlerMapping 中匹配最好的 handler (一般情况下都是 controller ,即控制器)来处理请求。当 Controller 处理完毕,一般都会返回一个 view (视图)的名字,DispatcherServlet再根据这个view的名字找到相应的视图资源返回给客户端。
搞清楚 Spring Web MVC 处理请求的流程后,基本上就可以明白要整合 Spring Web MVC 与 Spring Web Flow 所需要的配置了。为了让客户端的请求变成执行某个 flow 的请求,要解决以下几个问题:
-
-
-
- 需要在某个 HandlerMapping 中配置负责处理 flow 请求的 handler (或 controller )
- 该handler (或 controller )要负责启动指定的 flow
- flow 执行过程中以及执行完成后所涉及的视图应呈现给客户端
-
-
(五)FlowHandler和FlowController
现在,需要一种接收执行 flow 的请求,然后根据请求来启动相应 flow的handler (处理器), Spring Web Flow 2.0 提供了两种方案可供选择。第一种方案是自己编写实现了 FlowHandler 接口的类,让这个类来实现这个功能。第二种方案是使用一个现成的叫做 FlowController 的控制器。第一种方案灵活性比较大,在许多场合可能也是唯一的选择,但对每个 flow 都需要编写相应的 FlowHandler 。FlowController 其实是个适配器,一般来讲,我们只要明白 FlowController 可根据客户端请求的结尾部分,找出相应的 flow 来执行。配置 FlowController只需指定FlowExecutor即可,另外还需在 HandlerMapping 中指明 /shopping.do 请求由 flowController 来处理。
1     <bean id="flowController" class="org.springframework.webflow.mvc.servlet.FlowController">
2         <property name="flowExecutor" ref="flowExecutor" />
3     </bean>

 1     <bean id="viewMappings"
 2         class="org.springframework.web.servlet.handler.SimpleUrlHandlerMapping">
 3         <!-- /shopping.do 请求由 flowController 来处理 -->
 4         <property name="mappings">
 5             <value> /shopping.do=flowController </value>
 6         </property>
 7         <property name="defaultHandler">
 8             <!-- UrlFilenameViewController 会将 "/index" 这样的请求映射成名为 "index" 的视图 -->
 9             <bean class="org.springframework.web.servlet.mvc.UrlFilenameViewController" />
10         </property>
11     </bean>
(六)FlowBuilder Services
flow-builder-services 属性的配置指明了在这个 flow-registry “仓库”里的 flow 的一些基本特性,例如,是用 Unified EL 还是 OGNL 、 model (模型)对象中的数据在显示之前是否需要先作转换,等等。在本示例中,我们需要在 flow-builder-services 属性中指明 Spring Web Flow 中所用到的 view ,由 Spring Web MVC 的“ View Resolver ”来查找,由 Spring Web MVC 的“ View Class”来解析,最后呈现给客户。
1 <!--Web Flow 中的视图通过 MVC 框架的视图技术来呈现 -->
2     <webflow:flow-builder-services id="flowBuilderServices"
3     view-factory-creator="mvcViewFactoryCreator" />
4     <!-- 指明 MVC 框架的 view resolver ,用于通过 view 名查找资源 -->
5     <bean id="mvcViewFactoryCreator"
6         class="org.springframework.webflow.mvc.builder.MvcViewFactoryCreator">
7         <property name="viewResolvers" ref="viewResolver" />
8     </bean>
六、Spring Web MVC+Spring Web Flow 2.0的应用
(一)应用说明:购物车实例
1.创建Web应用的目录结构(使用maven)

2.导入依赖
  1 <dependencies>
  2         <dependency>
  3             <groupId>junit</groupId>
  4             <artifactId>junit</artifactId>
  5             <version>3.8.1</version>
  6             <scope>test</scope>
  7         </dependency>
  8         <!--SpringMVC所需要的依赖 -->
  9         <dependency>
 10             <groupId>org.springframework</groupId>
 11             <artifactId>spring-beans</artifactId>
 12             <version>4.3.7.RELEASE</version>
 13         </dependency>
 14
 15         <dependency>
 16             <groupId>org.springframework</groupId>
 17             <artifactId>spring-context</artifactId>
 18             <version>4.3.7.RELEASE</version>
 19         </dependency>
 20
 21         <dependency>
 22             <groupId>org.springframework</groupId>
 23             <artifactId>spring-core</artifactId>
 24             <version>4.3.7.RELEASE</version>
 25         </dependency>
 26
 27         <dependency>
 28             <groupId>org.springframework</groupId>
 29             <artifactId>spring-web</artifactId>
 30             <version>4.3.7.RELEASE</version>
 31         </dependency>
 32
 33         <dependency>
 34             <groupId>org.springframework</groupId>
 35             <artifactId>spring-webmvc</artifactId>
 36             <version>4.3.7.RELEASE</version>
 37         </dependency>
 38
 39         <dependency>
 40             <groupId>org.springframework</groupId>
 41             <artifactId>spring-expression</artifactId>
 42             <version>4.3.7.RELEASE</version>
 43         </dependency>
 44         <!-- https://mvnrepository.com/artifact/log4j/log4j -->
 45         <dependency>
 46             <groupId>log4j</groupId>
 47             <artifactId>log4j</artifactId>
 48             <version>1.2.17</version>
 49         </dependency>
 50         <!-- https://mvnrepository.com/artifact/org.apache.commons/commons-lang3 -->
 51         <dependency>
 52             <groupId>org.apache.commons</groupId>
 53             <artifactId>commons-lang3</artifactId>
 54             <version>3.7</version>
 55         </dependency>
 56         <!--Spring Web Flow所需要的依赖 -->
 57         <dependency>
 58             <groupId>org.springframework.webflow</groupId>
 59             <artifactId>spring-binding</artifactId>
 60             <version>2.4.4.RELEASE</version>
 61         </dependency>
 62
 63         <dependency>
 64             <groupId>org.springframework.webflow</groupId>
 65             <artifactId>spring-faces</artifactId>
 66             <version>2.4.4.RELEASE</version>
 67         </dependency>
 68
 69         <dependency>
 70             <groupId>org.springframework.webflow</groupId>
 71             <artifactId>spring-js</artifactId>
 72             <version>2.4.4.RELEASE</version>
 73         </dependency>
 74
 75         <dependency>
 76             <groupId>org.springframework.webflow</groupId>
 77             <artifactId>spring-js-resources</artifactId>
 78             <version>2.4.4.RELEASE</version>
 79         </dependency>
 80
 81         <dependency>
 82             <groupId>org.springframework.webflow</groupId>
 83             <artifactId>spring-webflow</artifactId>
 84             <version>2.4.4.RELEASE</version>
 85         </dependency>
 86
 87         <dependency>
 88             <groupId>javax.servlet</groupId>
 89             <artifactId>servlet-api</artifactId>
 90             <version>2.5</version>
 91         </dependency>
 92
 93         <dependency>
 94             <groupId>javax.servlet</groupId>
 95             <artifactId>jstl</artifactId>
 96             <version>1.2</version>
 97         </dependency>
 98         <!-- https://mvnrepository.com/artifact/org.aspectj/aspectjrt -->
 99         <!-- https://mvnrepository.com/artifact/org.springframework/spring-aspects -->
100         <dependency>
101             <groupId>org.springframework</groupId>
102             <artifactId>spring-aspects</artifactId>
103             <version>2.5</version>
104         </dependency>
105     </dependencies>
(二)配置Spring Web MVC
1.在web.xml中声明DispatchServlet并指定配置文件
 1     <servlet>
 2         <servlet-name>CartServlet</servlet-name>
 3         <servlet-class>
 4             org.springframework.web.servlet.DispatcherServlet
 5         </servlet-class>
 6         <init-param>
 7             <param-name>contextConfigLocation</param-name>
 8             <param-value>
 9                 /WEB-INF/config/web-application-config.xml
10             </param-value>
11         </init-param>
12         <load-on-startup>1</load-on-startup>
13     </servlet>
2.在web.xml中添加DispatchServlet映射(*)
1     <servlet-mapping>
2         <servlet-name>CartServlet</servlet-name>
3         <url-pattern>/spring/*</url-pattern>
4     </servlet-mapping>
3.创建web-application-config.xml
开发基于 Spring Web Flow 的应用往往会有大量的配置,这些配置全放在一个文件中是不合适的。本示例参考 Spring Web Flow 2.0 自带示例,将不同功能的配置文件分开。其中 web-application-config.xml 用于配置与 Web 应用全局相关的内容, Spring Web MVC 的相关配置放在 webmvc-config.xml 中,后面要添加的 Spring Web Flow 的配置则放在 webflow-config.xml 中。在 web-application-config.xml 中用 import 元素导入其他的配置文件。 web-application-config.xml的内容如下:
 1 <?xml version="1.0" encoding="utf-8"?>
 2 <beans
 3   xmlns="http://www.springframework.org/schema/beans"
 4   xmlns:xsi="http://www.w3.org/2001/XMLSchema-instance"
 5   xmlns:context="http://www.springframework.org/schema/context"
 6   xsi:schemaLocation="http://www.springframework.org/schema/beans
 7     http://www.springframework.org/schema/beans/spring-beans-2.5.xsd
 8     http://www.springframework.org/schema/context
 9     http://www.springframework.org/schema/context/spring-context-2.5.xsd">
10     <!-- 搜索 samples.webflow 包里的 @Component 注解,并将其部署到容器中 -->
11     <context:component-scan base-package="samples.webflow" />
12     <!-- 启用基于注解的配置 -->
13     <context:annotation-config />
14     <import resource="webmvc-config.xml"/>
15 </beans>
4.创建webmvc-config.xml
webmvc-config.xml 主要用于配置 Spring Web MVC 。所要做的就是添加一个 view resolver (视图解析器),用于将视图名解析成真实的视图资源。另外,再配置好 URL 请求的 handler (处理器),用于将 URL 请求定向到某个控制器,在本例中,用到的是 UrlFilenameViewController。
 1 <?xml version="1.0" encoding="UTF-8"?>
 2 <beans
 3   xmlns="http://www.springframework.org/schema/beans"
 4   xmlns:xsi="http://www.w3.org/2001/XMLSchema-instance"
 5   xsi:schemaLocation="http://www.springframework.org/schema/beans
 6     http://www.springframework.org/schema/beans/spring-beans.xsd">
 7   <bean
 8     id="viewResolver"
 9     class="org.springframework.web.servlet.view.InternalResourceViewResolver">
10     <property name="viewClass" value="org.springframework.web.servlet.view.JstlView">
11     </property>
12     <property name="prefix" value="/WEB-INF/jsp/">
13     </property>
14     <property name="suffix" value=".jsp">
15     </property>
16   </bean>
17     <bean id="viewMappings"
18         class="org.springframework.web.servlet.handler.SimpleUrlHandlerMapping">
19         <property name="defaultHandler">
20             <!-- UrlFilenameViewController 会将 "/index" 这样的请求映射成名为 "index" 的视图 -->
21             <bean class="org.springframework.web.servlet.mvc.UrlFilenameViewController" />
22         </property>
23     </bean>
24 </beans>
(二)配置Spring Web Flow 2.0
1.在webmvc-config.xml中添加配置
 1 <?xml version="1.0" encoding="UTF-8"?>
 2 <beans
 3   xmlns="http://www.springframework.org/schema/beans"
 4   xmlns:xsi="http://www.w3.org/2001/XMLSchema-instance"
 5   xsi:schemaLocation="http://www.springframework.org/schema/beans
 6     http://www.springframework.org/schema/beans/spring-beans.xsd">
 7   <bean
 8     id="viewResolver"
 9     class="org.springframework.web.servlet.view.InternalResourceViewResolver">
10     <property name="viewClass" value="org.springframework.web.servlet.view.JstlView">
11     </property>
12     <property name="prefix" value="/WEB-INF/jsp/">
13     </property>
14     <property name="suffix" value=".jsp">
15     </property>
16   </bean>
17     <bean id="viewMappings"
18         class="org.springframework.web.servlet.handler.SimpleUrlHandlerMapping">
19         <!-- /shopping.do 请求由 flowController 来处理 -->
20         <property name="mappings">
21             <value> /shopping.do=flowController </value>
22         </property>
23         <property name="defaultHandler">
24             <!-- UrlFilenameViewController 会将 "/index" 这样的请求映射成名为 "index" 的视图 -->
25             <bean class="org.springframework.web.servlet.mvc.UrlFilenameViewController" />
26         </property>
27     </bean>
28     <bean id="flowController" class="org.springframework.webflow.mvc.servlet.FlowController">
29         <property name="flowExecutor" ref="flowExecutor" />
30     </bean>
31 </beans>
2.添加配置文件webflow-config.xml
 1 <?xml version="1.0" encoding="UTF-8"?>
 2 <beans xmlns="http://www.springframework.org/schema/beans"
 3     xmlns:xsi="http://www.w3.org/2001/XMLSchema-instance" xmlns:webflow="http://www.springframework.org/schema/webflow-config"
 4     xsi:schemaLocation=" http://www.springframework.org/schema/beans
 5     http://www.springframework.org/schema/beans/spring-beans-2.5.xsd
 6     http://www.springframework.org/schema/webflow-config
 7     http://www.springframework.org/schema/webflow-config/spring-webflow-config.xsd">
 8
 9     <webflow:flow-executor id="flowExecutor" />
10     <!-- 所有 flow 定义文件位置在此配置, flow-builder-services 用于配置 flow 的特性 -->
11     <webflow:flow-registry id="flowRegistry"
12         flow-builder-services="flowBuilderServices">
13         <webflow:flow-location path="/WEB-INF/flows/shopping.xml"
14             id="shopping" />
15         <webflow:flow-location path="/WEB-INF/flows/addToCart.xml"
16             id="addToCart" />
17     </webflow:flow-registry>
18     <!--Web Flow 中的视图通过 MVC 框架的视图技术来呈现 -->
19     <webflow:flow-builder-services id="flowBuilderServices"
20     view-factory-creator="mvcViewFactoryCreator" />
21     <!-- 指明 MVC 框架的 view resolver ,用于通过 view 名查找资源 -->
22     <bean id="mvcViewFactoryCreator"
23         class="org.springframework.webflow.mvc.builder.MvcViewFactoryCreator">
24         <property name="viewResolvers" ref="viewResolver" />
25     </bean>
26 </beans>
3.添加flow定义文件shopping.xml
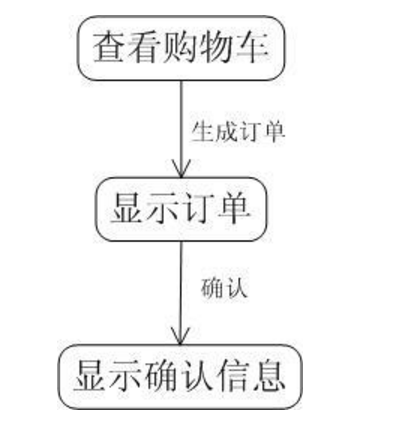
 1 <?xml version="1.0" encoding="UTF-8"?>
 2 <flow xmlns="http://www.springframework.org/schema/webflow"
 3     xmlns:xsi="http://www.w3.org/2001/XMLSchema-instance"
 4     xsi:schemaLocation="http://www.springframework.org/schema/webflow
 5  http://www.springframework.org/schema/webflow/spring-webflow-2.0.xsd">
 6     <view-state id="viewCart" view="viewCart">
 7         <transition on="submit" to="viewOrder">
 8         </transition>
 9     </view-state>
10     <view-state id="viewOrder" view="viewOrder">
11         <transition on="confirm" to="orderConfirmed">
12         </transition>
13     </view-state>
14     <view-state id="orderConfirmed" view="orderConfirmed">
15         <transition on="returnToIndex" to="returnToIndex">
16         </transition>
17     </view-state>
18     <end-state id="returnToIndex" view="externalRedirect:servletRelative:/index.jsp">
19     </end-state>
20 </flow>
4.添加三个JSP页面
在 /WEB-INF/jsp 目录下创建三个 flow 所需的视图资源。以下清单只给出 jsp 页面中 body 元素以内的代码,其余省略。
viewCart.jsp
1 <h1>View Cart</h1>
2 <a href="${flowExecutionUrl}&_eventId=submit">Submit</a>
viewOrder.jsp
1 <h1>Order</h1>
2 <a href="${flowExecutionUrl}&_eventId=confirm">Confirm</a>
orderConfirmed.jsp
1 <h1>Order Confirmed</h1>
2 <a href="${flowExecutionUrl}&_eventId=returnToIndex">Return to index</a>
5.修改index.jsp页面
在 index.jsp 页面中添加启动 flow 的链接,从 webmvc-config.xml 配置文件中可以看出,要启动 flow ,只需提供 /shopping.do 链接即可。
需要注意的是,现在的页面跳转涉及到两种,首先是Spring MVC启动的index.jsp页面,然后就是进入index.jsp页面后,通过超链接启动flow。所以在web.xml中servlet-mapping的匹配内容需要增加,即如下所示:
1     <servlet-mapping>
2         <servlet-name>CartServlet</servlet-name>
3         <url-pattern>/spring/*</url-pattern>
4         <url-pattern>*.do</url-pattern>
5     </servlet-mapping>
6.运行结果
七、用Unified EL实现业务逻辑
(一)业务逻辑代码在什么时候被调用?
在 Spring Web Flow 中,业务逻辑代码的执行可由以下三种情形来触发:
-
-
-
-
- 客户端请求中包含了 _eventId 参数
- 执行到框架自定义的切入点
- 执行到 <action-state> 元素
-
-
-
1.客户端请求中包含了_eventId参数
种方式一般用在 state 之间的 transition ,通过指定 _eventId 参数的值,表明了客户的行为,从而导致相应事件的发生,在 Spring Web Flow 的定义文件中可以通过 evaluate 元素来指定要处理的业务逻辑
2.执行到框架自定义的切入点
Spring Web Flow 定义了 5 个切入点,通过 flow 定义文件的配置,可在这 5 个切入点插入相关业务逻辑代码。
| 切入点名称 | XML 元素名称 | 触发时刻 |
|---|---|---|
| flow start | on-start | flow 执行之前 |
| state entry | on-entry | 进入某个 state 之后,做其他事情之前 |
| view render | on-render | 在进入 view 的 render 流程之后,在 view 真正 render出来之前 |
| state exit | on-exit | 在退出 state 之前 |
| flow end | on-end | flow 执行结束之后 |
3.执行到<action-state>元素
Spring Web Flow 中的这个 <action-state> 是专为执行业务逻辑而设的 state 。如果某个应用的业务逻辑代码即不适合放在 transition 中由客户端来触发,也不适合放在 Spring Web Flow 自定义的切入点,那么就可以考虑添加 <action-state> 元素专用于该业务逻辑的执行。
(二)业务逻辑代码在调用后得到的数据如何保存、传递?
Spring Web Flow 的定义中可直接使用表达式语言( Expression Language ),Spring Web Flow 提供了一些固定名称的变量,用于数据的保存、传递。在前边已经提到 Spring Web Flow 所着力解决的问题即是数据存取范围的问题,为此, Spring Web Flow 提供了两种比较重要的范围,一是 flow 范围,另一个是 conversation 范围。通过 flowScope 和 conversationScope 这两个变量, Spring Web Flow 提供了在这两种范围里存取数据的方法。下面的代码展示了如何将业务逻辑代码执行的结果存放到flow范围中。
Spring Web Flow 还提供了大量其他的变量,以方便数据的存取。如 viewScope 范围即是从进入 view-state 至退出 view-state 结束, requestScope 即和一般的 request 范围没什么区别,等等。另外还有一些用于获取 flow 以外数据的变量,如 requestParameters 、 messageContext 等等。
(三)添加商品功能的实现
1.添加Product类
Product 类是个普通的 JavaBean ,用于定义商品( Product )的一般属性,同时也提供了构造方法。由于会把 Product 存放于 conversationScope 中, Product 实现了 Serializable 接口。
 1 package samples.webflow;
 2
 3 import java.io.Serializable;
 4
 5 public class Product implements Serializable {
 6     private static final long serialVersionUID = 1951520003958305899L;
 7     private int id;
 8     private String description;
 9     private int price;
10
11     public Product(int id, String description, int price) {
12         this.id = id;
13         this.description = description;
14         this.price = price;
15     }
16
17     public int getId() {
18         return id;
19     }
20
21     public void setId(int id) {
22         this.id = id;
23     }
24
25     public String getDescription() {
26         return description;
27     }
28
29     public void setDescription(String description) {
30         this.description = description;
31     }
32
33     public int getPrice() {
34         return price;
35     }
36
37     public void setPrice(int price) {
38         this.price = price;
39     }
40 }
2.添加ProductService类
ProductService 主要提供商品列表,并能根据商品的 id 查找出该商品,由于示例较简单,这里只添加了三条纪录。
*Service 注解表示 Spring IoC 容器会初始化一个名为 productService 的 Bean ,这个 Bean 可在 Spring Web Flow 的定义中直接访问。
 1 package samples.webflow;
 2
 3 import java.util.ArrayList;
 4 import java.util.HashMap;
 5 import java.util.List;
 6 import java.util.Map;
 7
 8 import org.springframework.stereotype.Service;
 9
10 @Service("productService")
11 public class ProductService {
12     private Map<Integer, Product> products = new HashMap<Integer, Product>();
13
14     public ProductService() {
15         products.put(1, new Product(0, "Bulldog", 1000));
16         products.put(2, new Product(1, "Bulldogs", 1200));
17         products.put(3, new Product(2, "Bulldogss", 1300));
18     }
19
20     public List<Product> getProducts() {
21         return new ArrayList<Product>(products.values());
22     }
23
24     public Product getProduct(int productId) {
25         return getProducts().get(productId);
26     }
27 }
3.修改shopping.xml
要在 viewCart 页面中显示商品,只需在 view-state 元素的 on-render 切入点调用 productService 的 getProducts 方法,并将所得结果保存到 viewScope 中即可。如下所示:
1 <view-state id="viewCart" view="viewCart" >
2   <on-render>
3     <evaluate expression="productService.getProducts()" result="viewScope.products"/>
4   </on-render>
5   <transition on="submit" to="viewOrder"> </transition>
6 </view-state>
4.修改viewCart.jsp页面
上边代码的作用是使用 productService 的 getProducts 方法获取商品信息,并将所得的结果存放在 viewScope 中名为 products 的变量中, jsp 页面的代码可直接访问该变量。如下所示:
 1 <%@ taglib prefix="c" uri="http://java.sun.com/jsp/jstl/core"%>
 2 <!DOCTYPE html PUBLIC "-//W3C//DTD XHTML 1.0 Transitional//EN"
 3   "http://www.w3.org/TR/xhtml1/DTD/xhtml1-transitional.dtd">
 4 <html xmlns="http://www.w3.org/1999/xhtml">
 5 <head>
 6 <meta http-equiv="Content-Type" content="text/html; charset=utf-8" />
 7 <title>View Cart</title>
 8 </head>
 9 <body>
10     <h1>View Cart</h1>
11     <h2>Items in Your Cart</h2>
12     <a href="${flowExecutionUrl}&_eventId=submit">Submit</a>
13     <h2>Products for Your Choice</h2>
14     <table>
15         <c:forEach var="product" items="${products}">
16             <tr>
17                 <td>${product.description}</td>
18                 <td>${product.price}</td>
19             </tr>
20         </c:forEach>
21     </table>
22 </body>
23 </html>
八、用subflow实现添加商品到购物车功能
1.实现Cart和CartItem两个业务类
CartItem 表示存放于购物车中的条目,主要记录相应商品及商品数量,除去相应的属性外, CartItem 可根据商品的数量算出该商品的总价格( getTotalPrice ),也可通过 increaseQuantity 增加商品数量。如下所示:
CartItem类:
 1 package samples.webflow;
 2
 3 import java.io.Serializable;
 4
 5 public class CartItem implements Serializable {
 6     private static final long serialVersionUID = 8388627124326126637L;
 7     private Product product;
 8     private int quantity;
 9
10     public CartItem(Product product, int quantity) {
11         this.product = product;
12         this.quantity = quantity;
13     }
14
15     public int getTotalPrice() {
16         return this.quantity * this.product.getPrice();
17     }
18
19     public void increaseQuantity() {
20         this.quantity++;
21     }
22
23     public Product getProduct() {
24         return product;
25     }
26
27     public void setProduct(Product product) {
28         this.product = product;
29     }
30
31     public int getQuantity() {
32         return quantity;
33     }
34
35     public void setQuantity(int quantity) {
36         this.quantity = quantity;
37     }
38 }
Cart类:
Cart 是购物车的实现类,但它没有像 ProductService 一样成为由 Spring IoC 容器管理的 Bean ,每个客户的购物车是不同的,因此不能使用 Spring IoC 容器默认的 Singleton 模式。Cart 主要实现三个业务函数, getItems 用于获取当前购物车里的物品, addItem 用于向购物车添加商品, getTotalPrice 用于获取购物车里所有商品的总价格。如下所示:
 1 package samples.webflow;
 2
 3 import java.io.Serializable;
 4 import java.util.ArrayList;
 5 import java.util.HashMap;
 6 import java.util.List;
 7 import java.util.Map;
 8
 9 public class Cart implements Serializable {
10     private static final long serialVersionUID = 7901330827203016310L;
11     private Map<Integer, CartItem> map = new HashMap<Integer, CartItem>();
12
13     public List<CartItem> getItems() {
14         return new ArrayList<CartItem>(map.values());
15     }
16
17     public void addItem(Product product) {
18         int id = product.getId();
19         CartItem item = map.get(id);
20         if (item != null)
21             item.increaseQuantity();
22         else
23             map.put(id, new CartItem(product, 1));
24     }
25
26     public int getTotalPrice() {
27         int total = 0;
28         for (CartItem item : map.values())
29             total += item.getProduct().getPrice() * item.getQuantity();
30         return total;
31     }
32 }
2.在shopping.xml中添加配置
在 shopping flow 开始时必须分配一个 Cart 对象,由于要调用 subflow ,这个 Cart 对象应存放于 conversationScope 中。同时要添加一个 subflow-state 用于执行添加商品到购物车的任务。其中 subflow-state 元素的 subflow 属性即指明了这个被调用的 flow 的 id 为“ addToCart ”。
 1     <var name="mycart" class="samples.webflow.Cart" />
 2     <on-start>
 3         <set name="conversationScope.cart" value="mycart"></set>
 4     </on-start>
 5     <view-state id="viewCart" view="viewCart">
 6         <on-render>
 7             <evaluate expression="productService.getProducts()" result="viewScope.products" />
 8         </on-render>
 9         <transition on="submit" to="viewOrder">
10         </transition>
11         <transition on="addToCart" to="addProductToCart"></transition>
12     </view-state>
13     <subflow-state id="addProductToCart" subflow="addToCart">
14         <transition on="productAdded" to="viewCart" />
15     </subflow-state>
3.添加流程addToCart.xml
addToCart flow 主要由一个 action-state 构成,完成添加商品到购物车的功能, addToCart flow 的实现需要有输入参数,即 productId 。在本示例中是通过请求参数来传递,通过 requestParameters 来获取该数值。这里还要注意到下面代码中的 end-state 的 id 为“ productAdded ”,与上面代码中subflow-state 中的 transition元素的on属性的名称是对应的。
 1 <?xml version="1.0" encoding="UTF-8"?>
 2 <flow xmlns="http://www.springframework.org/schema/webflow"
 3     xmlns:xsi="http://www.w3.org/2001/XMLSchema-instance"
 4     xsi:schemaLocation="http://www.springframework.org/schema/webflow
 5     http://www.springframework.org/schema/webflow/spring-webflow-2.0.xsd">
 6     <on-start>
 7         <set name="requestScope.productId" value="requestParameters.productId" />
 8     </on-start>
 9     <action-state id="addToCart">
10         <evaluate expression="cart.addItem(productService.getProduct(productId))" />
11         <transition to="productAdded" />
12     </action-state>
13     <end-state id="productAdded" />
14 </flow>
4.在webflow-config.xml中添加addToCart.xml的位置
新增加的 flow 要在 flow-registry 中注册。
1     <webflow:flow-registry id="flowRegistry"
2         flow-builder-services="flowBuilderServices">
3         <webflow:flow-location path="/WEB-INF/flows/shopping.xml"
4             id="shopping" />
5         <webflow:flow-location path="/WEB-INF/flows/addToCart.xml"
6             id="addToCart" />
7     </webflow:flow-registry>
5.修改viewCart.jsp页面
 1 <%@ page language="java" import="java.util.*" pageEncoding="UTF-8"%>
 2 <%@ taglib prefix="c" uri="http://java.sun.com/jsp/jstl/core"%>
 3 <%
 4     String path = request.getContextPath();
 5     String basePath = request.getScheme() + "://" + request.getServerName() + ":" + request.getServerPort()
 6             + path + "/";
 7 %>
 8
 9 <!DOCTYPE HTML PUBLIC "-//W3C//DTD HTML 4.01 Transitional//EN">
10 <html>
11 <head>
12 <base href="<%=basePath%>">
13
14 <title>My JSP 'viewCart.jsp' starting page</title>
15
16 <meta http-equiv="pragma" content="no-cache">
17 <meta http-equiv="cache-control" content="no-cache">
18 <meta http-equiv="expires" content="0">
19 <meta http-equiv="keywords" content="keyword1,keyword2,keyword3">
20 <meta http-equiv="description" content="This is my page">
21 <!--
22     <link rel="stylesheet" type="text/css" href="styles.css">
23     -->
24
25 </head>
26
27 <body>
28     <h1>View Cart</h1>
29     <h2>Items in Your Cart</h2>
30     <c:choose>
31         <c:when test="${empty cart.items}">
32             <p>Your cart is empty.</p>
33         </c:when>
34         <c:otherwise>
35             <table border="1" cellspacing="0">
36                 <tr>
37                     <th>Item</th>
38                     <th>Quantity</th>
39                     <th>Unit Price</th>
40                     <th>Total</th>
41                 </tr>
42
43                 <c:forEach var="item" items="${cart.items}">
44                     <tr>
45                         <td>${item.product.description}</td>
46                         <td>${item.quantity}</td>
47                         <td>${item.product.price}</td>
48                         <td>${item.totalPrice}</td>
49                     </tr>
50                 </c:forEach>
51
52                 <tr>
53                     <td>TOTAL:</td>
54                     <td></td>
55                     <td></td>
56                     <td>${cart.totalPrice}</td>
57                 </tr>
58             </table>
59         </c:otherwise>
60     </c:choose>
61
62     <a href="${flowExecutionUrl}&_eventId=submit">Submit</a>
63     <h2>Products for Your Choice</h2>
64
65     <table>
66         <c:forEach var="product" items="${products}">
67             <tr>
68                 <td>${product.description}</td>
69                 <td>${product.price}</td>
70
71
72                 <td><a
73                     href="${flowExecutionUrl}&_eventId=addToCart&productId=${product.id}">[add
74                         to cart]</a></td>
75
76
77             </tr>
78         </c:forEach>
79
80     </table>
81 </body>
82 </html>
6.运行结果

九、global transition简介
global transition 是一种全局的 transition ,可在 flow 执行的各个 state 中被触发。
1     <global-transitions>
2         <transition on="cancelShopping" to="returnToIndex" />
3     </global-transitions>
十、代码下载
https://github.com/lyj8330328/Spring-Web-Flow-Demo.git
十一、补充知识
1.Serializable接口
实现java.io.Serializable 接口的类是可序列化的。没有实现此接口的类将不能使它们的任一状态被序列化或逆序列化。
序列化类的所有子类本身都是可序列化的。这个序列化接口没有任何方法和域,仅用于标识序列化的语意。允许非序列化类的子类型序列化,子类型可以假定负责保存和恢复父类型的公有的、保护的和(如果可访问)包的域的状态。只要该类(扩展)有一个无参构造子,可初始化它的状态,那么子类型就可承担上述职责。在这种情况下申明一个可序列化的类是一个错误。此错误将在运行时被检测。就是可以把对象存到字节流,然后可以恢复!
例如:Integer实现了Serializable,所以可以把一个Integer的对象用IO写到文件里,之后再可以从文件里读出,如你开始写入的时候那个对象的intValue() 是5的话,那读出来之后也是5。这一点体现了用序化类的作用,即用来传送类的对象。
所谓的Serializable,就是java提供的通用数据保存和读取的接口。至于从什么地方读出来和保存到哪里去都被隐藏在函数参数的背后了。这样子,任何类型只要实现了Serializable接口,就可以被保存到文件中,或者作为数据流通过网络发送到别的地方。也可以用管道来传输到系统的其他程序中。这样子极大的简化了类的设计。只要设计一个保存一个读取功能就能解决上面说得所有问题。
作用:
1、将对象的状态保存在存储媒体中以便可以在以后重新创建出完全相同的副本;
2、按值将对象从一个应用程序域发送至另一个应用程序域。
2.enum类型
创建枚举类型要使用 enum 关键字,隐含了所创建的类型都是 java.lang.Enum 类的子类(java.lang.Enum 是一个抽象类)。枚举类型符合通用模式 Class Enum<E extends Enum<E>>,而 E 表示枚举类型的名称。枚举类型的每一个值都将映射到 protected Enum(String name, int ordinal) 构造函数中,在这里,每个值的名称都被转换成一个字符串,并且序数设置表示了此设置被创建的顺序。
示例代码:
1.创建枚举类型day.java
 1 import java.util.Arrays;
 2 import java.util.List;
 3
 4 public enum day {
 5     MON, TUE, WED, THU, FRI, SAT, SUN;
 6
 7     public static List<day> asList() {
 8         day[] allDays = day.values();
 9         return Arrays.asList(allDays);
10     }
11 }
2.测试EnumTest.java
 1 import java.util.HashMap;
 2 import java.util.List;
 3 import java.util.Map;
 4 import java.util.Random;
 5
 6 public class EnumTest {
 7
 8     public static void main(String[] args) {
 9         // TODO Auto-generated method stub
10         for (day day : day.values()) {
11             System.out.println(day.toString());
12         }
13         System.out.println("-------------分割线------------");
14
15         day testDay = day.TUE;
16         switch (testDay) {
17         case MON:
18             System.out.println("今天星期一");
19             break;
20         case TUE:
21             System.out.println("今天星期二");
22             break;
23         default:
24             System.out.println(testDay);
25             break;
26         }
27         System.out.println("-------------分割线------------");
28         List<day> testDays = day.asList();
29         for (int i = 0; i < testDays.size(); i++) {
30             System.out.println(testDays.get(i));
31         }
32         System.out.println("-------------分割线------------");
33         Map<day, String> testMap = new HashMap<day, String>();
34         testMap.put(day.MON, "星期一");
35         testMap.put(day.TUE, "星期二");
36         testMap.put(day.WED, "星期三");
37         testMap.put(day.THU, "星期四");
38         testMap.put(day.FRI, "星期五");
39         testMap.put(day.SAT, "星期六");
40         testMap.put(day.SUN, "星期日");
41
42         System.out.println(testMap.get(day.MON));
43
44         Random random = new Random();
45         int i = random.nextInt(7);
46         System.out.println(testMap.get(testDays.get(i)));
47     }
48
49 }