4.1.5.springboot核心特性及设计思想【上】
时长:55min
5.1.springboot注解驱动
5.1.1.spring4.X版本注解驱动
主要是注解装饰功能的一个完善。提供条件注解装配,即@Conditional注解使用。
5.1.1.1.什么是条件化装配?
其实,它是对是否进行bean装配的一个条件限制,如果条件返回true,刚允许装配。否则,不允许。
下面通过示例代码来,说明条件装配的应用。
1.定义一个配置类
首先,创建一个springboot项目。然后创建配置类:
package com.wf.demo.springbootdemo.condition;

import org.springframework.context.annotation.Bean;
import org.springframework.context.annotation.Conditional;
import org.springframework.context.annotation.Configuration;

/**
 * @ClassName SpringConfiguration
 * @Description 统一的配置类
 * @Author wf
 * @Date 2020/7/6 18:09
 * @Version 1.0
 */
@Configuration
public class SpringConfiguration {
    /**
     * 在某个环境下不装载
     * 或不满足某个条件不装载
     * 或者已经装载过了,不要重复装载
     * @return
     */
    @Conditional(MyCondition.class)
    @Bean
    public DemoService demoService(){
        return new DemoService();
    }
}
说明:
配置类中,通过@Bean进行bean装配。然而加上@Conditional注解,就能实现条件装配。
@Conditional注解,传参为Condition接口子类Class对象,可以传参多个子类对象,多个对象之间是且的关系。
2.定义Condition子类
package com.wf.demo.springbootdemo.condition;

import org.springframework.context.annotation.Condition;
import org.springframework.context.annotation.ConditionContext;
import org.springframework.core.type.AnnotatedTypeMetadata;

/**
 * @ClassName MyCondition
 * @Description 实现条件子类
 * @Author wf
 * @Date 2020/7/6 18:14
 * @Version 1.0
 */
public class MyCondition implements Condition {
    @Override
    public boolean matches(ConditionContext conditionContext, AnnotatedTypeMetadata annotatedTypeMetadata) {
        //TODO 这里可以写对应的判断逻辑
        return false;
    }
}
说明:
子类中实现match方法,进行条件判断,如果返回false,则不允许bean装配。
3.bean定义
package com.wf.demo.springbootdemo.condition;

/**
 * @ClassName DemoService
 * @Description service bean类
 * @Author wf
 * @Date 2020/7/6 18:10
 * @Version 1.0
 */
public class DemoService {
}
4.测试bean实例获取
package com.wf.demo.springbootdemo.condition;

import org.springframework.context.ApplicationContext;
import org.springframework.context.annotation.AnnotationConfigApplicationContext;

/**
 * @ClassName ConditionMain
 * @Description 测试类
 * @Author wf
 * @Date 2020/7/6 18:17
 * @Version 1.0
 */
public class ConditionMain {
    public static void main(String[] args) {
        ApplicationContext context = new AnnotationConfigApplicationContext(SpringConfiguration.class);
        DemoService bean = context.getBean(DemoService.class);
        System.out.println(bean);
    }
}
测试结果如下:
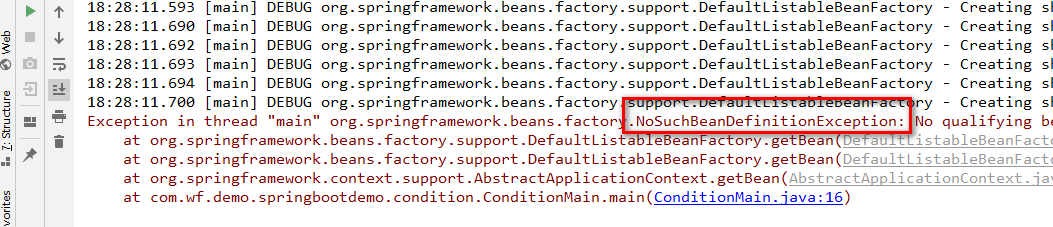
结果抛出异常,因为条件返回false,不允许装配。
下面修改match方法,返回true,如下所示:

再次运行测试,成功装配,如下所示:

5.1.2.spring5.X版本注解驱动
引入@Indexed注解。是用来提升性能的。当项目文件目录很多时,扫描@Component,@Service。。。这些注解时,
就会很耗时,而@Indexed注解,可以提升注解扫描的性能。
总结:
spring的注解驱动的发展,是为了bean装配更加简单。
下面通过springboot中整合redis来说明,注解驱动的简便性。
5.1.2.1.springboot整合redis示例
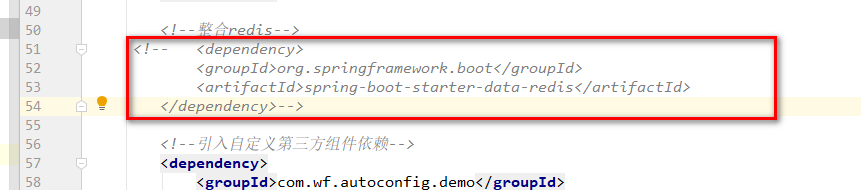
1.pom.xml中引入redis依赖
 <!--整合redis-->
        <dependency>
            <groupId>org.springframework.boot</groupId>
            <artifactId>spring-boot-starter-data-redis</artifactId>
        </dependency>
版本由springboot-parent来管理。
2.redis服务安装
在生产中会有专门的redis服务安装redis服务。而学习环境下,一般是在虚拟机上安装redis应用服务器。
3.controller中引用redis代码
package com.wf.demo.springbootdemo.web;

import com.wf.demo.springbootdemo.dao.pojo.User;
import com.wf.demo.springbootdemo.service.IUserService;
import org.springframework.beans.factory.annotation.Autowired;
import org.springframework.beans.factory.annotation.Value;
import org.springframework.data.redis.core.RedisTemplate;
import org.springframework.web.bind.annotation.GetMapping;
import org.springframework.web.bind.annotation.RestController;

/**
 * @ClassName HelloController
 * @Description 测试controller
 * @Author wf
 * @Date 2020/7/6 11:27
 * @Version 1.0
 */
@RestController
public class HelloController {
    @Autowired
    private RedisTemplate<String,String> redisTemplate;

    //配置文件注入
//    @Value("Mic")
//    private String name;
    @Autowired
    private IUserService userService;

    @GetMapping("hello")
    public String test(){
        User user = new User();
        user.setId(18);
        user.setName("MIc");
        userService.insert(user);
        return "success";
    }

    @GetMapping("/say")
    public String say(){
        return redisTemplate.opsForValue().get("name");
    }
}
说明:
springboot已经为了我们使用redis封装了客户端工具类RedisTemplate。
只有使用它的api即可。
4.配置redis连接参数
spring.redis.host=192.168.216.128
#redis.port=6379默认
5.运行项目,测试
只需要启动main,浏览器端访问controller接口即可。
说明:
我们可以看到,springboot整合redis是如此之简单。
这里RedisTemplate实例,能够直接引用,说明spring IOC容器中已经完成bean的装配。
但是,我们是没有做这部分工作的,而是由springboot进行了装配。
【1】回顾spring4.X中bean装配方式
》xml配置
》@Configuration注解装配
》@Enable装配
现在,springboot提供了自动装配的功能。
5.2.springboot自动装配
自动装配的原理是什么?是如何实现的呢?
5.2.1.spring动态Bean的装配方案
主要有两种:
ImportSelector:
Registator
所谓动态装载,即根据上下文,或某些条件去装载一些配置类。
下面通过代码示例,来说明springboot实现批量扫描配置类的原理。
所谓批量扫描,就是一次性扫描所有jar包中的配置类。示例代码中以分包的形式,来模拟不同jar包的扫描。
5.2.1.1.实现ImportSelector的方式
1.在demo2包下创建redis配置类
package com.wf.demo.springbootdemo.demo2;

/**
 * @ClassName RedisConfiguration
 * @Description redis配置类
 * @Author wf
 * @Date 2020/7/6 19:25
 * @Version 1.0
 */

import org.springframework.context.annotation.Bean;
import org.springframework.context.annotation.Configuration;

@Configuration
public class RedisConfiguration {
    @Bean
    public MyRedisTemplate myRedisTemplate(){
        return new MyRedisTemplate();
    }
}
package com.wf.demo.springbootdemo.demo2;

/**
 * @ClassName MyRedisTemplate
 * @Description 自定义redis模板类
 * @Author wf
 * @Date 2020/7/6 19:25
 * @Version 1.0
 */
public class MyRedisTemplate {
}
2.在demo3包下创建Mybatis配置类
package com.wf.demo.springbootdemo.demo3;

/**
 * @ClassName MySqlSessionFactory
 * @Description bean
 * @Author wf
 * @Date 2020/7/7 9:44
 * @Version 1.0
 */
public class MySqlSessionFactory {
}
package com.wf.demo.springbootdemo.demo3;

/**
 * @ClassName MybatisConfiguration
 * @Description redis配置类
 * @Author wf
 * @Date 2020/7/6 19:25
 * @Version 1.0
 */

import com.wf.demo.springbootdemo.demo2.MyRedisTemplate;
import org.springframework.context.annotation.Bean;
import org.springframework.context.annotation.Configuration;

@Configuration
public class MybatisConfiguration {
    @Bean
    MySqlSessionFactory mySqlSessionFactory(){
        return new MySqlSessionFactory();
    }
}
3.scan包下进行springboot批量扫描处理
【1】定义一个Selector子类实现
package com.wf.demo.springbootdemo.scan;

import com.wf.demo.springbootdemo.demo2.RedisConfiguration;
import com.wf.demo.springbootdemo.demo3.MybatisConfiguration;
import org.springframework.context.annotation.ImportSelector;
import org.springframework.core.type.AnnotationMetadata;

/**
 * @ClassName MyImportSelector
 * @Description 子类实现
 * @Author wf
 * @Date 2020/7/6 19:30
 * @Version 1.0
 */
public class MyImportSelector implements ImportSelector {
    @Override
    public String[] selectImports(AnnotationMetadata annotationMetadata) {
        return new String[]{MybatisConfiguration.class.getName(), RedisConfiguration.class.getName()};
    }
}
说明:
实现子类中返回了多个配置类的全路径类名。【即可获取配置类的位置】
【2】定义Enable注解,来扫描Selector实现子类
package com.wf.demo.springbootdemo.scan;

import org.springframework.context.annotation.Import;

import java.lang.annotation.ElementType;
import java.lang.annotation.Retention;
import java.lang.annotation.RetentionPolicy;
import java.lang.annotation.Target;

@Retention(RetentionPolicy.RUNTIME)
@Target(ElementType.TYPE)
@Import(MyImportSelector.class)
public @interface EnableConfiguration {
}
【3】springboot启动入口main中bean获取测试
package com.wf.demo.springbootdemo;

import com.wf.demo.example.demo2.MyRedisTemplate;
import com.wf.demo.example.demo3.MySqlSessionFactory;
import com.wf.demo.example.scan.EnableConfiguration;
import org.springframework.boot.SpringApplication;
import org.springframework.boot.autoconfigure.SpringBootApplication;
import org.springframework.context.ConfigurableApplicationContext;

//@EnableConfiguration
@SpringBootApplication
public class SpringBootDemoApplication {

    public static void main(String[] args) {
        ConfigurableApplicationContext ca = SpringApplication.run(SpringBootDemoApplication.class, args);
        System.out.println(ca.getBean(MyRedisTemplate.class));
        System.out.println(ca.getBean(MySqlSessionFactory.class));
    }

}
说明:
这里先注释掉@EnableConfiguration注解,测试结果,肯定会报错。如下所示:

然后,放开注解。bean注入成功,如下所示:

再次运行测试,结果如下:

总结:
为什么加上@EnableConfiguration注解,就能扫描到所有的配置类了呢?
因为这个注解里面,使用@Import注解,告知了spring所有配置类的位置所在。
其实是ImportSelector接口实现子类中,重写selectImports方法,告诉了spring要扫描的配置类的位置在哪里。
4.selectImports方法的实现
上面的实现中,传递的是配置类的全路径类名,其实也可以直接传递要装配bean的全路径类名。
方法实现修改示例如下:

然后,启动main,测试结果如下:

思考:
现在,已经基本弄清楚,批量扫描配置类的底层原理了。那么,就需要进行功能扩展,现在,只是通过传参两个类名,
然后就可以扫描两个配置类了。
如果有很多的第三方组件需要批量扫描,总不能一个个传参类名吧,这么做显然是不合理的。
所以,在selectImports方法中,一定可以通过某种机制去完成指定路径的配置类的扫描。
这里的某种机制,也体现了springboot 约定优于配置的设计思想。我们可以想到,第三方starter组件由不同团队进行开发,组件的名称
和包路径肯定是不一样的。
因此,springboot 就做出统一约定【定个标准】,你们第三方去开发starter组件,需要把配置类的说明【在某个路径下的全类名】要告诉
springboot引擎。
定义的标准是:
每一个starter组件,都需要定义路径classpath:META-INF/spring.factories文件【每一个jar包里面都要有】。有了这个文件,springboot
就很好处理了。只需要扫描并解析classpath*:META-INF/spring.factories文件,就可以获得相关配置类的全路径类名,然后传递到数组里面就可以了。
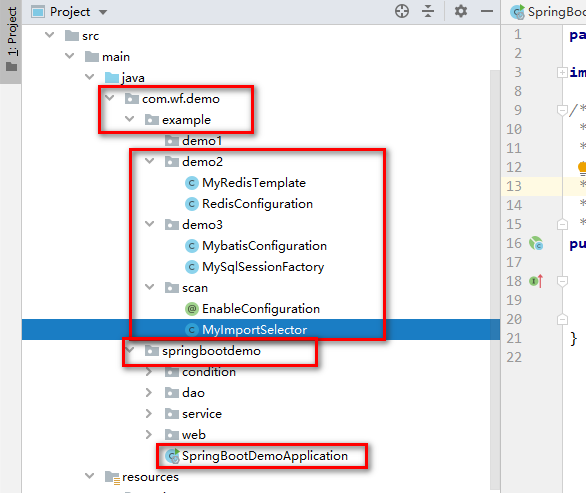
注意:
当我写完代码之后,针对包结构,做了如下调整:
5.2.2.springboot源码验证自动装配-批量实现原理
5.2.2.1.SpringBootApplication注解开始分析
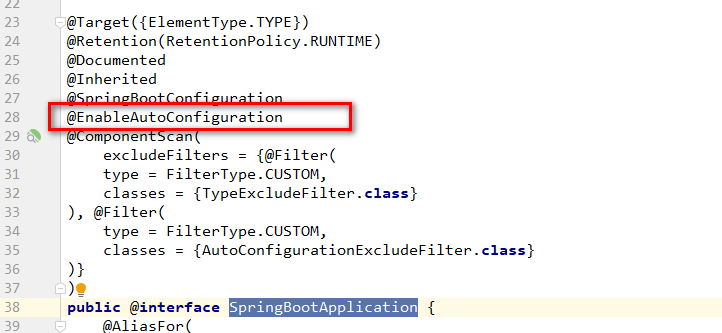
通过注解类的定义,注解上引用@EnableAutoConfiguration注解,应该就是自动装配的作用。
1.分析@EnableAutoConfiguration注解
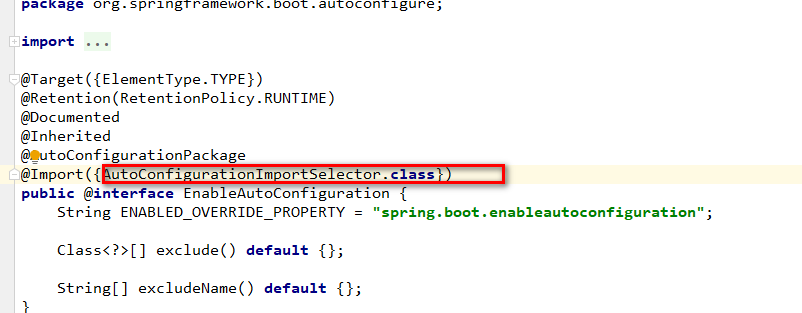
可以看到通过@Import注解,引入Selector接口的实现,下面实现子类的代码逻辑:
2.分析AutoConfigurationImportSelector动态装配实现逻辑
public class AutoConfigurationImportSelector implements DeferredImportSelector
public String[] selectImports(AnnotationMetadata annotationMetadata) {
    if (!this.isEnabled(annotationMetadata)) {
        return NO_IMPORTS;
    } else {
        AutoConfigurationImportSelector.AutoConfigurationEntry autoConfigurationEntry = this.getAutoConfigurationEntry(annotationMetadata);
        return StringUtils.toStringArray(autoConfigurationEntry.getConfigurations());
    }
}
跟踪this.getAutoConfigurationEntry方法:
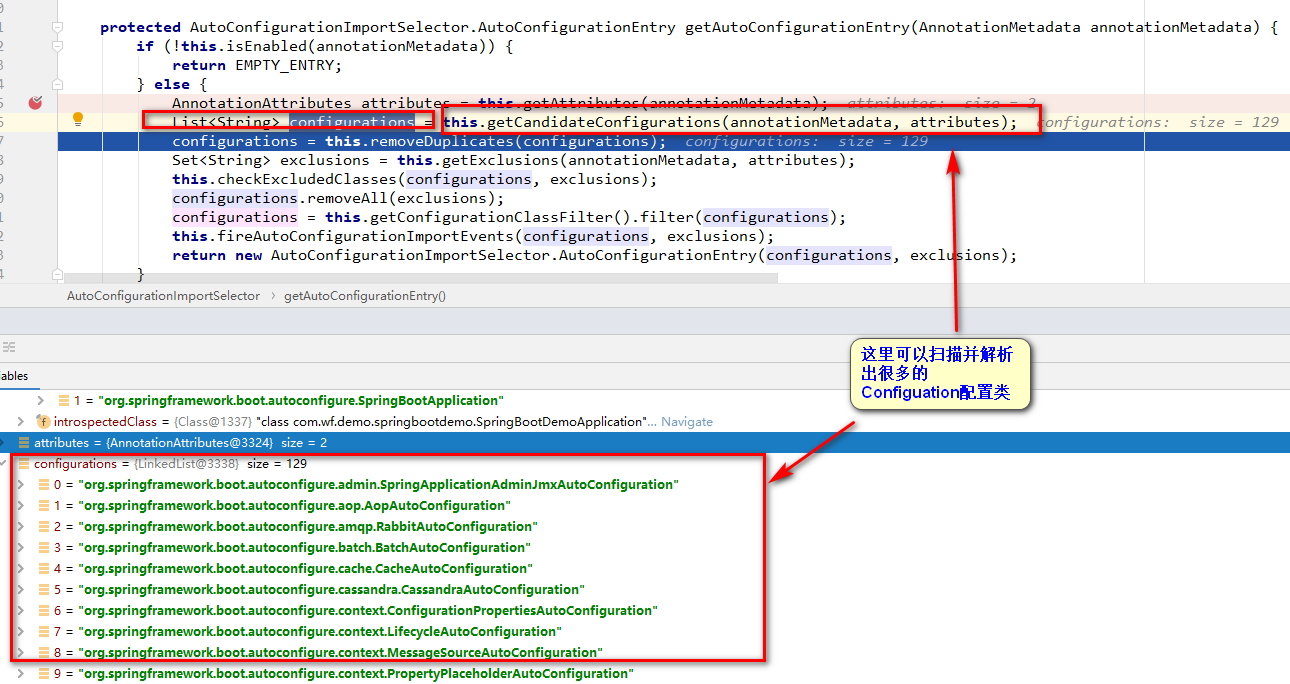
通过debug启动main入口程序,进入断点处,可以获取到配置类的全路径类名。
再次跟踪getCandidateConfigurations方法:


显然,就是在解析classpath下META-INF/spring.factories文件。
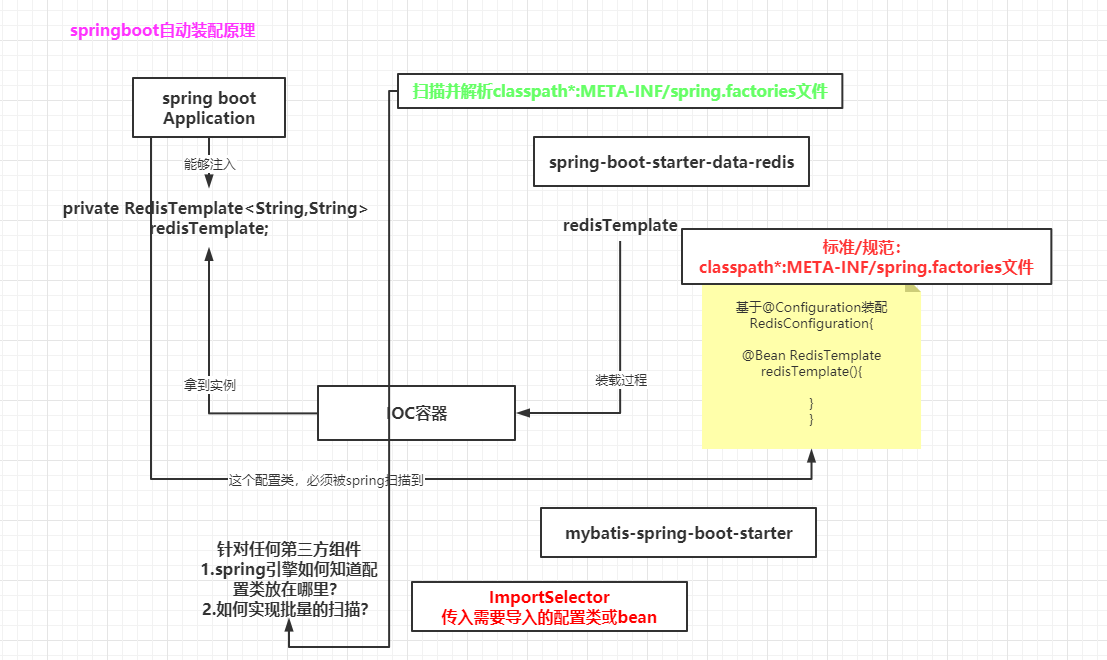
5.2.2.2.springboot自动装配原理图解
如下图所示 :
4.1.6.springboot核心特性及设计思想【下】
5.2.3.springboot扫描并解析classpath下META-INF/spring.factories文件的具体实现
通过上面的源码分析,定位到getCandidateConfigurations方法。
org.springframework.boot.autoconfigure.AutoConfigurationImportSelector#getCandidateConfigurations
protected List<String> getCandidateConfigurations(AnnotationMetadata metadata, AnnotationAttributes attributes) {
        List<String> configurations = SpringFactoriesLoader.loadFactoryNames(this.getSpringFactoriesLoaderFactoryClass(), this.getBeanClassLoader());
        Assert.notEmpty(configurations, "No auto configuration classes found in META-INF/spring.factories. If you are using a custom packaging, make sure that file is correct.");
        return configurations;
    }
方法实现逻辑中,调用SpringFactoriesLoader工具类。
5.2.3.1.SpringFactoriesLoader工具类
根据定义类名,就是加载spring.factories文件。这里调用SpringFactoriesLoader.loadFactoryNames()方法
public static List<String> loadFactoryNames(Class<?> factoryType, @Nullable ClassLoader classLoader) {
        String factoryTypeName = factoryType.getName();
        return (List)loadSpringFactories(classLoader).getOrDefault(factoryTypeName, Collections.emptyList());
    }
返回一个List,再次调用 loadSpringFactories()方法,如下所示:
private static Map<String, List<String>> loadSpringFactories(@Nullable ClassLoader classLoader) {
        MultiValueMap<String, String> result = (MultiValueMap)cache.get(classLoader); //先从缓存中获取
        if (result != null) {
            return result;  //缓存中有数据,直接返回
        } else {
            try {//这里会有多个jar包,就对应多个文件
                Enumeration<URL> urls = classLoader != null ? classLoader.getResources("META-INF/spring.factories") : ClassLoader.getSystemResources("META-INF/spring.factories");
                LinkedMultiValueMap result = new LinkedMultiValueMap();

                while(urls.hasMoreElements()) {
                    URL url = (URL)urls.nextElement();
                    UrlResource resource = new UrlResource(url); //得到文件资源路径
                    Properties properties = PropertiesLoaderUtils.loadProperties(resource);
                    Iterator var6 = properties.entrySet().iterator();

                    while(var6.hasNext()) {
                        Entry<?, ?> entry = (Entry)var6.next();
                        String factoryTypeName = ((String)entry.getKey()).trim();
                        String[] var9 = StringUtils.commaDelimitedListToStringArray((String)entry.getValue());
                        int var10 = var9.length;

                        for(int var11 = 0; var11 < var10; ++var11) {
                            String factoryImplementationName = var9[var11];
                            result.add(factoryTypeName, factoryImplementationName.trim());
                        }
                    }
                }

                cache.put(classLoader, result);
                return result;
            } catch (IOException var13) {
                throw new IllegalArgumentException("Unable to load factories from location [META-INF/spring.factories]", var13);
            }
        }
    }
下面来看一个spring.factories文件是什么样子的,在springboot项目中,全局搜索spring.factories,如下所示:
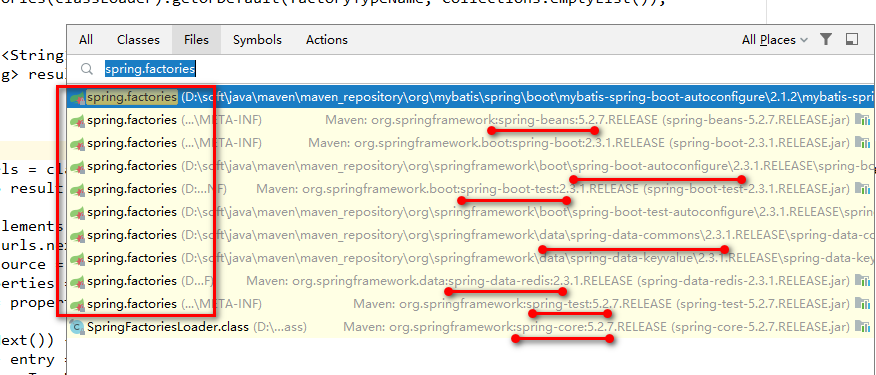
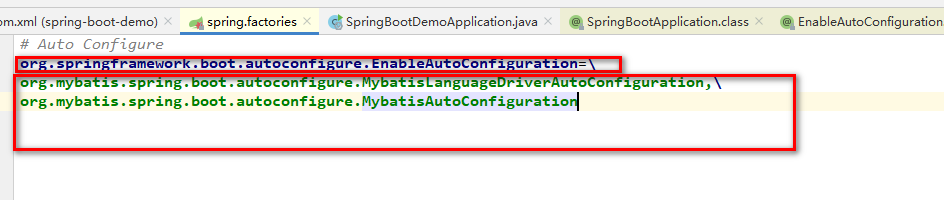
然后,任意打开一个文件,如下所示:
# Auto Configure
org.springframework.boot.autoconfigure.EnableAutoConfiguration=
org.mybatis.spring.boot.autoconfigure.MybatisLanguageDriverAutoConfiguration,
org.mybatis.spring.boot.autoconfigure.MybatisAutoConfiguration
可以看到,和properties文件很像,数据存储中key/value形式。
key为:org.springframework.boot.autoconfigure.EnableAutoConfiguration
value为:配置类全路径类名,通过,拼接成字符串
注意:
spring.factory文件可能是存储其他配置的,并不全是自动装配的配置。举例如下:

它是作为starter定义的配置文件。
5.2.3.2.SPI机制
Service provider interface【简称SPI】,这是一 种什么样的机制呢?它的核心思想是什么?
我们以java中数据库连接为例。jdk定义数据库连接的接口。但没有定义实现。而是数据库厂商提供实现方案。
如:mysql连接,我们会引入一个mysql的驱动包。【这就是一种实现方案】
然后,我在项目上下文环境,一般是application.properties文件中定义数据库连接参数。 如:jdbc.url/username/password...
在jdk环境中,提供对这些配置参数的解析。
当获得这些配置参数,这可以引用驱动包的服务, 建立通信。这就是一种扩展机制。这种扩展点设计,不是为了分隔接口定义
与实现分离,而是为功能的扩展。从而,提升框架的扩展性和灵活性。
下面以springboot中spring.factories文件,作为SPI机制的运用来加以说明:
每一个组件,打成一个jar包。在jar包中都会有一个spring.factories文件,对于自动装配来说,这个文件定义自动装配类的
实现。key代表着自动装配的定义,如下所示:
下面以示例代码来说明,这样一种SPI机制是什么样的。
1.创建一个maven项目,模拟jdk定义数据库连接的接口
项目结构如下所示:
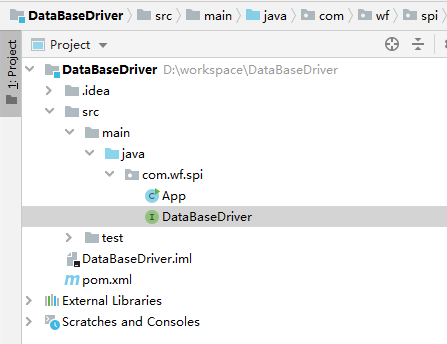
【1】定义一个建立连接的接口
因为我们是站在框架设计的角度,我们没有具体的实现,不知道它的具体实现是什么样子的。
但是,我们可以定义一种规范,提供spi扩展点,让实现方根据我们定义的规范来做具体的实现。
代码如下所示:
package com.wf.spi;

/**
 * @ClassName DataBaseDriver
 * @Description 驱动接口定义
 * @Author wf
 * @Date 2020/7/7 14:12
 * @Version 1.0
 */
public interface DataBaseDriver {
    String buildConnect(String host);
}
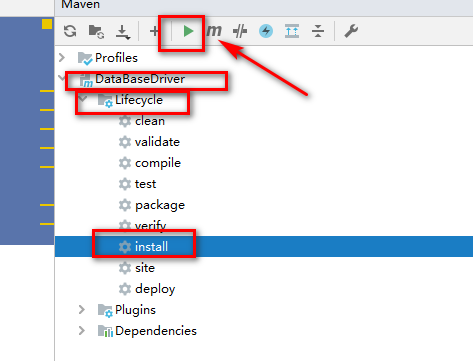
【2】使用maven install命令打成一个jar包
2.创建第二个maven项目,模拟mysql实现驱动包
【1】实现项目中引入接口项目的jar包依赖
修改pom.xml,如下所示:
 <dependency>
      <groupId>com.wf.spi</groupId>
      <artifactId>DataBaseDriver</artifactId>
      <version>1.0-SNAPSHOT</version>
    </dependency>
【2】实现驱动服务
package com.wf.spi.mysql;

import com.wf.spi.DataBaseDriver;

/**
 * @ClassName MysqlDriver
 * @Description mysql驱动服务实现
 * @Author wf
 * @Date 2020/7/7 14:31
 * @Version 1.0
 */
public class MysqlDriver implements DataBaseDriver {
    @Override
    public String buildConnect(String url) {
        return "mysql的驱动实现:"+url;
    }
}
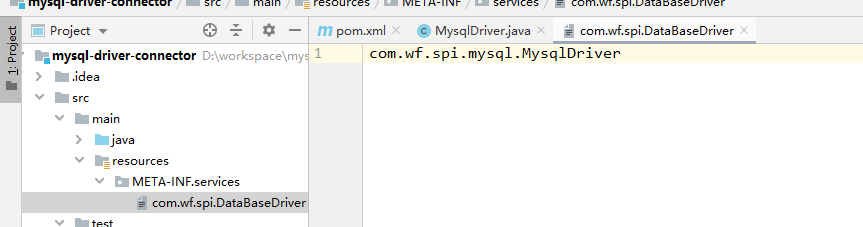
【3】定义扩展点
完成了这样一个mysql驱动实现,我怎么去使用它呢?
就需要定义规范,通常是由配置文件,进行相关规范定义。
这里,就需要创建resources资源文件夹,下面创建META-INF目录。再目录下创建services目录,
然后在services目录下创建text文件,文件命名为
驱动接口的全路径类名。文件的内容也配置为接口实现类的全路径类名。如下所示:
注意:
这个是针对所有jar包规范。必须按此规范配置。
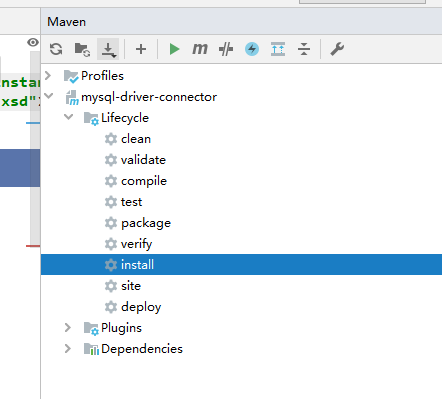
【4】项目完成后,打包。
3.创建第三个maven项目,模拟用户使用jdk连接mysql
[1]pom.xml中引入接口包和实现包
<dependency>
      <groupId>com.wf.spi</groupId>
      <artifactId>DataBaseDriver</artifactId>
      <version>1.0-SNAPSHOT</version>
    </dependency>

    <dependency>
      <groupId>com.wf.spi.mysql</groupId>
      <artifactId>mysql-driver-connector</artifactId>
      <version>1.0-SNAPSHOT</version>
    </dependency>
【2】创建测试代码
package com.wf.spi.use;

import com.wf.spi.DataBaseDriver;

import java.util.ServiceLoader;

public class App
{
    public static void main( String[] args )
    {   //加载实现
        ServiceLoader<DataBaseDriver> serviceLoader = ServiceLoader.load(DataBaseDriver.class);
        for (DataBaseDriver driver : serviceLoader) {
            System.out.println(driver.buildConnect("Test"));
        }
    }
}
测试结果如下所示:
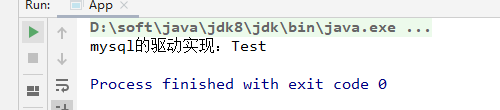
说明:
这就是jdk底层的SPI机制应用。这里使用jdk提供的ServiceLoader工具类,加载实现类。
4.java中SPI规范
java中要想实现SPI扩展,需要满足几个条件:
》需要在classpath下创建目录META-INF/services【必须完全一致】
》在该目录扩展点【定义接口】的text文件,文件名为定义接口全路径类名。
》文件内容,配置接口实现类的全类名。如果有多个实现,换行配置多个
》文件编码格式为UTF-8
》实现方式:使用jdk提供ServiceLoader工具类,加载实现类。
5.2.4.再了解springboot条件装配
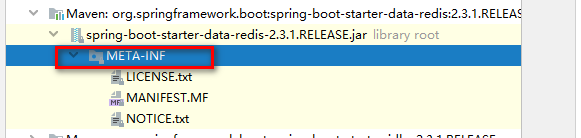
我们发现有一个奇怪的现象:spring-boot与redis整合的starter包中没有spring.factories文件,如下所示:
同样,整合jdbc的starter包中,也没有,如下所示:
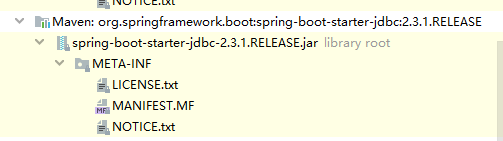
这到底是为什么呢?这就涉及到springboot官方定义starter包的规范问题。
5.2.4.1.springboot官方定义starter包的规范
springboot官方定义的starter包,存在一些规范:
》官方包命名规范,如:spring-boot-starter-XXX.jar
》第三方包命名规范,如:xxx-spring-boot-starter.jar
如:mybatis定义starter命名,mybatis-spring-boot-starter
springboot官方包,不存放配置类,而是专门定义自动装配的包,如下所示:
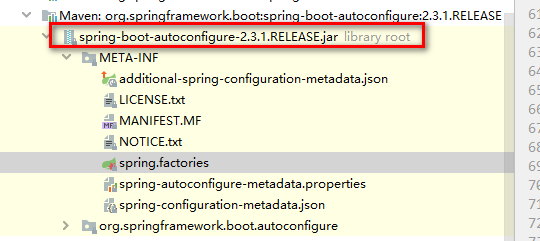
这个包里,会把springboot提供的所有自动装配的配置类信息,进行统一配置在spring.factories文件中。
这是一种违反常规的设计,那么,spring-boot是如何实现自动装配的呢?与常规的装配方式有什么区别吗?
下面以redis自动装配为例,来进行说明:
5.2.4.2.springboot自动装配再理解
以redis自动装配为例,搜索redis自动装配配置类RedisAutoConfiguration,代码实现如下:
@Configuration(
    proxyBeanMethods = false
)
@ConditionalOnClass({RedisOperations.class})
@EnableConfigurationProperties({RedisProperties.class})
@Import({LettuceConnectionConfiguration.class, JedisConnectionConfiguration.class})
public class RedisAutoConfiguration {
    public RedisAutoConfiguration() {
    }

    @Bean
    @ConditionalOnMissingBean(
        name = {"redisTemplate"}
    )
    public RedisTemplate<Object, Object> redisTemplate(RedisConnectionFactory redisConnectionFactory) throws UnknownHostException {
        RedisTemplate<Object, Object> template = new RedisTemplate();
        template.setConnectionFactory(redisConnectionFactory);
        return template;
    }

    @Bean
    @ConditionalOnMissingBean
    public StringRedisTemplate stringRedisTemplate(RedisConnectionFactory redisConnectionFactory) throws UnknownHostException {
        StringRedisTemplate template = new StringRedisTemplate();
        template.setConnectionFactory(redisConnectionFactory);
        return template;
    }
}
1.@ConditionalOnClass({RedisOperations.class})
可以看到配置类上,声明@ConditionalOnClass({RedisOperations.class})注解,它有什么作用呢?
该注解,传入参数为RedisOperations类的class对象,这个类是定义在spring-data-redis整合包中的。定义如下所示:
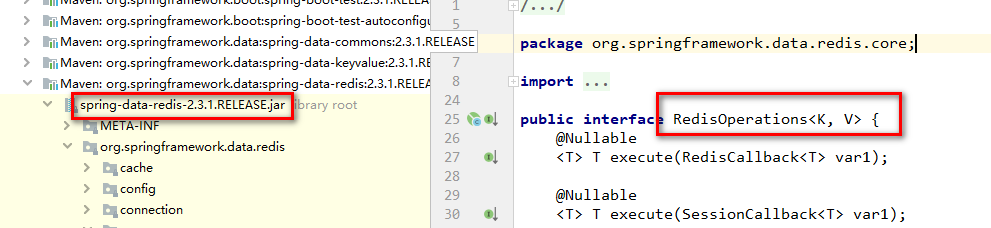
这个注解的含义是:
如果传入参数所在包,未引入,导致条件不满足,就不允许装配。
所以,springboot官方starter包,其实是一种条件装配,不需要引入配置类。
思考:
如果条件传参对象,所在包不存在,怎么办?
其实,这就涉及到maven依赖的传递依赖。所谓传递依赖,当前项目与依赖jar包如果不传递,当前项目未引入依赖时不会报错。
下面以一个demo示例,来说明springboot自动装配的过程。
5.2.4.3.spring自动装配示例demo
1.创建第一个maven,模拟第三方组件
【1】pom.xml中引入spring-context依赖
   <spring.version>5.2.7.RELEASE</spring.version>
<dependency>
      <groupId>org.springframework</groupId>
      <artifactId>spring-context</artifactId>
      <version>${spring.version}</version>
    </dependency>
【2】创建配置类
package com.wf.autoconfig.demo;

import org.springframework.context.annotation.Bean;
import org.springframework.context.annotation.Configuration;

/**
 * @ClassName MyConfiguration
 * @Description 配置类
 * @Author wf
 * @Date 2020/7/7 16:54
 * @Version 1.0
 */
@Configuration
public class MyConfiguration {
    @Bean
   public MyCore myCore(){
        return new MyCore();
   }
}
【3】创建bean类
package com.wf.autoconfig.demo;

/**
 * @ClassName MyCore
 * @Description 核心类
 * @Author wf
 * @Date 2020/7/7 16:52
 * @Version 1.0
 */
public class MyCore {
    public String study(){
        System.out.println("I'm learning p6 lesson");
        return "Gupaoedu.com";
    }
}
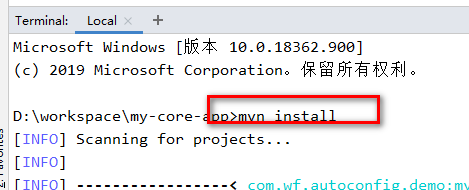
【4】打成一个jar包。
使用mvn install命令。
2.在springboot项目中使用自定义组件
【1】pom.xml中引入组件依赖
 <!--引入自定义第三方组件依赖-->
        <dependency>
            <groupId>com.wf.autoconfig.demo</groupId>
            <artifactId>my-core-app</artifactId>
            <version>1.0-SNAPSHOT</version>
        </dependency>
【2】使用第三方组件中bean
要想以spring注入的方式使用,显然需要先完成自动装配。先在main入口方法,测试一下bean能否获取。
代码如下所示:
package com.wf.demo.springbootdemo;

import com.wf.autoconfig.demo.MyCore;
import com.wf.demo.example.demo2.MyRedisTemplate;
import com.wf.demo.example.demo3.MySqlSessionFactory;
import com.wf.demo.example.scan.EnableConfiguration;
import org.springframework.boot.SpringApplication;
import org.springframework.boot.autoconfigure.SpringBootApplication;
import org.springframework.context.ConfigurableApplicationContext;

@EnableConfiguration
@SpringBootApplication
public class SpringBootDemoApplication {

    public static void main(String[] args) {
        ConfigurableApplicationContext ca = SpringApplication.run(SpringBootDemoApplication.class, args);
        System.out.println(ca.getBean(MyRedisTemplate.class));
        System.out.println(ca.getBean(MySqlSessionFactory.class));
        System.out.println(ca.getBean(MyCore.class));   //获取新定义第三方组件中bean实例
    }

}
然后,启动main,进行测试,显然,无法注入,会报错,如下所示:
3.修改组件,完成自动装配相关配置
这里基于SPI机制进行装配。
创建resources资源文件夹,然后创建META-INF目录,在目录创建spring.factories文件,文件配置如下:
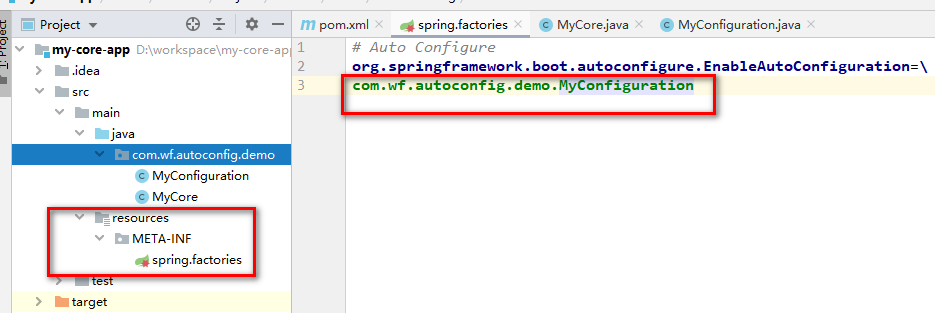
具体配置内容如下:
# Auto Configure
org.springframework.boot.autoconfigure.EnableAutoConfiguration=
com.wf.autoconfig.demo.MyConfiguration
然后,重新打包项目。
【1】再次在springboot项目中运行main
测试结果如下:

说明:
自定义第三方组件bean成功注入。
4.修改第三组件,实现条件注入
【1】引入springboot依赖starter包
因为@ConditionalOnClass注解是springboot特有注解。
<dependency>
      <groupId>org.springframework.boot</groupId>
      <artifactId>spring-boot-starter</artifactId>
      <version>2.3.1.RELEASE</version>
      <optional>true</optional>
    </dependency>
<!--RedisOperations类依赖包-->
 <dependency>
   <groupId>org.springframework.data</groupId>
   <artifactId>spring-data-redis</artifactId>
   <version>2.3.1.RELEASE</version>
   <optional>true</optional>
 </dependency>
【2】修改配置类,添加条件装配
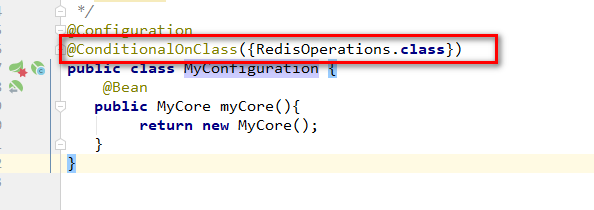
然后,重新打包项目。
【3】回到springboot项目,测试
注释掉spring-data-redis所在包依赖,如下所示:
说明:
因为未引入所依赖jar,就会导致条件不满足,无法进行bean装配。测试肯定会报错,如下所示:

反之,引入条件传参依赖包,条件满足,可完成自动装配。
5.修改自定义组件,使用第二种配置方式实现条件装配
在META-INF目录下,创建spring-autoconfigure-metadata.properties配置文件。如下所示:
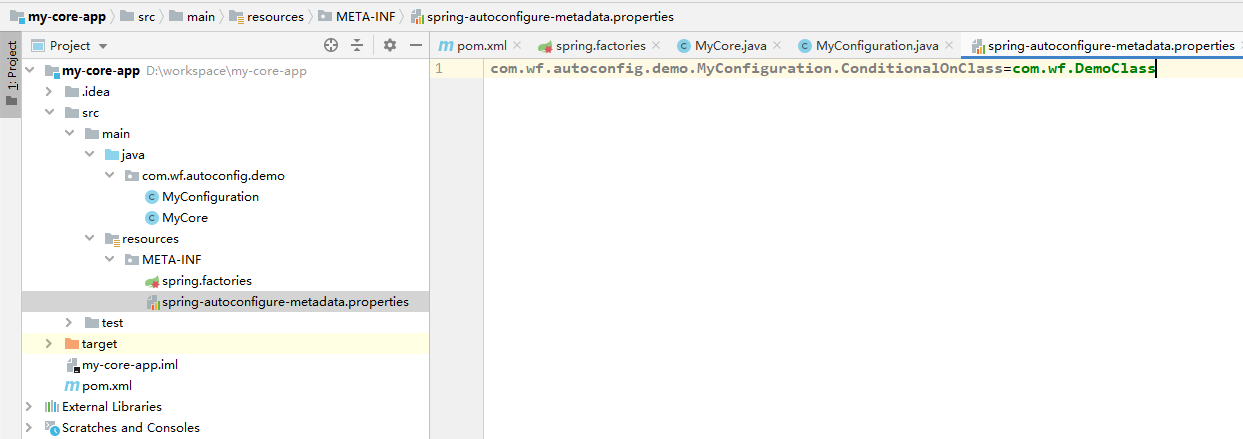
配置内容如下:
com.wf.autoconfig.demo.MyConfiguration.ConditionalOnClass=com.wf.DemoClass
这里,其实是以配置文件的方式来完成条件注入。而上面是以注解的方式完成条件注入。
不同的是,这种配置文件的方式注入,如果在组件中能找到com.wf.DemoClass就表示条件满足,
可以在springboot项目中完成自动装配。
这里先不定义这个DemoClass类,让条件不满足,然后打包项目。
【1】回到springboot项目,测试bean获取
显然,是无法自动装配的。报错如下所示:

【2】修改自定义组件,定义条件类
如下所示:
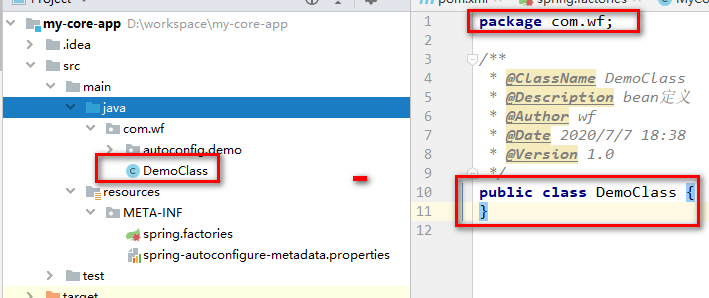
然后,重新打包,回到springboot项目进行测试,如下所示:
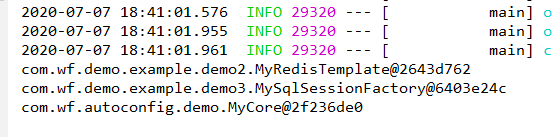
总结:
使用配置文件实现条件装配,更为简单。不需要引入springboot的依赖包。
也不需要springboot项目是否导包来设置条件。