什么是Swagger?
swagger是一个在线文档工具,在前后端分离的情况下作用愈加突出,使用swagger我们可以针对我们在后端的接口做一个在线测试。
简单地使用swagger2只需要三步。
第一步,配置pom文件。在pom文件中引入swagger的相关依赖
     <dependency>
              <groupId>io.springfox</groupId>
              <artifactId>springfox-swagger2</artifactId>
              <version>2.9.2</version>
          </dependency>

          <!-- 这里使用 swagger-bootstrap-ui 替代了原有丑陋的ui,下面两个依赖二选一 -->
          <dependency>
              <groupId>com.github.xiaoymin</groupId>
              <artifactId>swagger-bootstrap-ui</artifactId>
              <version>1.9.2</version>
          </dependency>

          <dependency>
              <groupId>io.springfox</groupId>
              <artifactId>springfox-swagger-ui</artifactId>
              <version>2.9.2</version>
          </dependency>
如果使用swagger第三方ui:swagger-bootstrap-ui,访问url:http://localhost:8080/doc.html
如果使用springfox-swagger-ui,访问url:http://localhost:8080/swagger-ui.htm
第二步,构建swagger配置类,yml文件增加swagger:enable: true (注意格式)
import lombok.extern.slf4j.Slf4j;
import org.springframework.beans.factory.annotation.Value;
import org.springframework.context.annotation.Bean;
import org.springframework.context.annotation.Configuration;
import springfox.documentation.builders.ApiInfoBuilder;
import springfox.documentation.builders.PathSelectors;
import springfox.documentation.builders.RequestHandlerSelectors;
import springfox.documentation.service.ApiInfo;
import springfox.documentation.spi.DocumentationType;
import springfox.documentation.spring.web.plugins.Docket;
import springfox.documentation.swagger2.annotations.EnableSwagger2;

/**
 * swagger 配置
 */
@Slf4j
@Configuration
@EnableSwagger2
public class SwaggerConfig {

    @Value("${swagger.enable}")
    private boolean enable;

    @Bean
    public Docket createRestApi() {

        return new Docket(DocumentationType.SWAGGER_2)
                .enable(enable)
                .apiInfo(apiInfo())
                .select()
                ////扫描该包下面的API注解,接口使用@ApiIgnore,该接口就不会暴露在 swagger2 的页面下
                .apis(RequestHandlerSelectors.basePackage("com"))
                .paths(PathSelectors.any())
                .build();
    }

    private ApiInfo apiInfo() {
        return new ApiInfoBuilder()
                .title("接口服务文档")
                .description("接口文档")
                .termsOfServiceUrl("https://home.cnblogs.com/u/wffzk")//这里配置的是服务网站,我写的是我的博客园站点~欢迎关注~
                .version("1.0")
                .build();
    }

}
第三步:通过注解来完成API文档,一般用前三个注解就可以,用在类 /方法 /参数上
1. @Api
| 注解名称 | 注解属性 | 作用域 | 属性作用 |
|---|---|---|---|
@Api |
tags | 类 | 说明该类的作用 |
| value | 类 | 说明该类的作用 |
举个例子:
@Api(value = "用户类控制器",tags="用户类控制器")
public class UserController {
...
}

2. @ApiOperation
| 注解名称 | 注解属性 | 作用域 | 属性作用 |
|---|---|---|---|
@ApiOperation() |
value | 方法 | 描述方法作用 |
| notes | 方法 | 提示内容 | |
| tags | 方法 | 分组 |
举个例子:
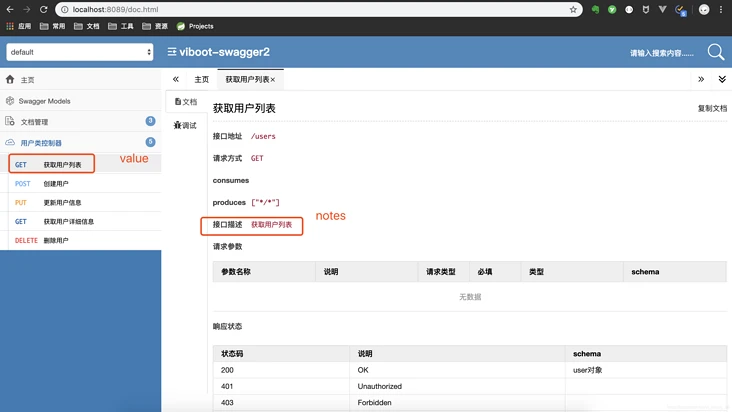
    @ApiOperation(value = "获取用户列表",notes = "获取用户列表")
    public List<User> get() {
         ...
    }
3. @ApiParam
| 注解名称 | 注解属性 | 作用域 | 属性作用 |
|---|---|---|---|
@ApiParam() |
name | 方法参数 | 参数名 |
| value | 方法参数 | 参数说明 | |
| required | 方法参数 | 是否必填 |
举个例子:
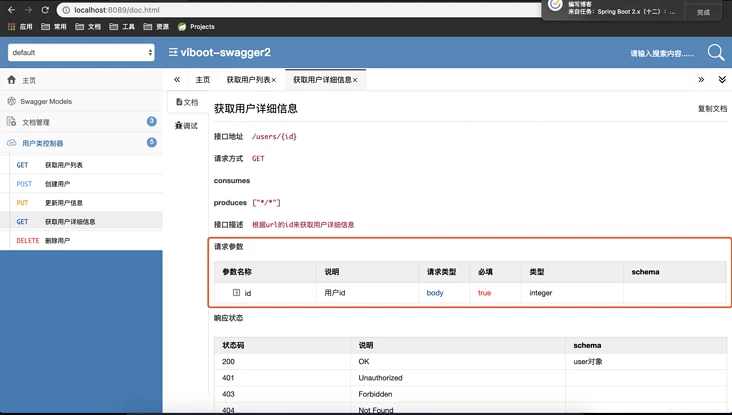
    @ApiOperation(value="获取用户详细信息", notes="根据url的id来获取用户详细信息")
    public User get(@ApiParam(name="id",value="用户id",required=true) Long id) {
        return userService.getById(id);
    }
4. @ApiModel && @ApiModelProperty
| 注解名称 | 注解属性 | 作用域 | 属性作用 |
|---|---|---|---|
@ApiModel() |
value | 类 | 对象名 |
| description | 类 | 描述 | |
@ApiModelProperty() |
value | 方法 | 字段说明 |
| name | 方法 | 属性名 | |
| dataType | 方法 | 属性类型 | |
| required | 方法 | 是否必填 | |
| example | 方法 | 举例 | |
| hidden | 方法 | 隐藏 |
举个例子:
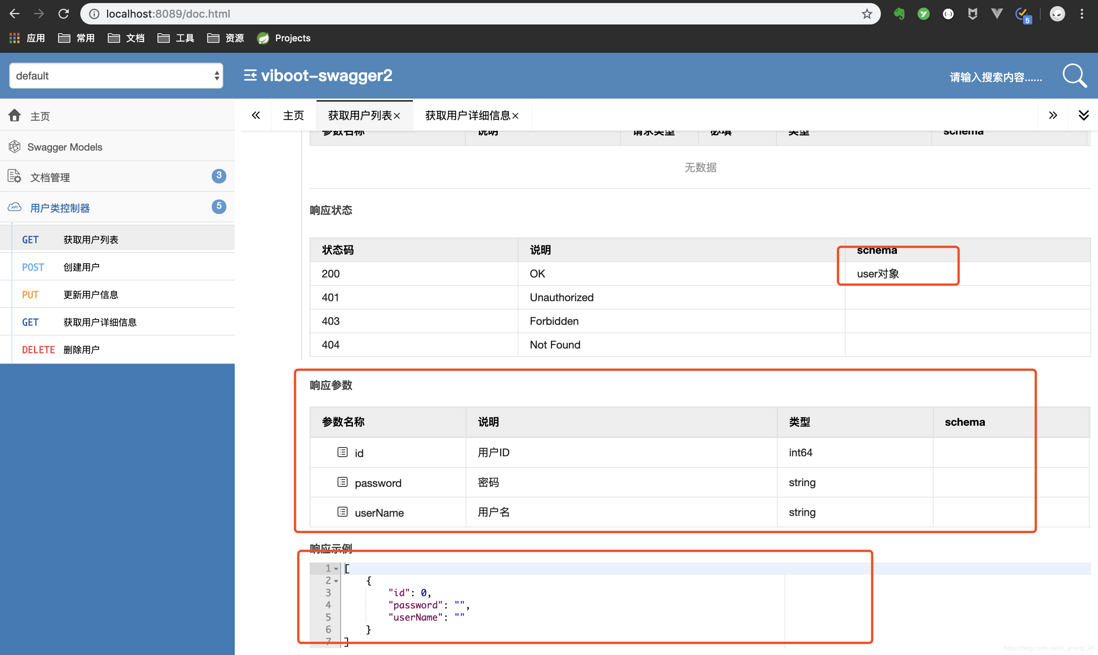
@ApiModel(value="user对象",description="用户对象user")
public class User implements Serializable {

    private static final long serialVersionUID = 1L;

    @TableId(value = "id", type = IdType.AUTO)
    @ApiModelProperty(value = "用户ID",example = "1000001",hidden=true)
    private Long id;

    @ApiModelProperty(value="用户名",required = true,dataType = "String")
    private String userName;

    @ApiModelProperty(value = "密码")
    private String password;
}
5. @ApiImplicitParam && @ApiImplicitParams
@ApiImplicitParam`可以单个用于方法之上,多个参数的话可以把`@ApiImplicitParam`放到`@ApiImplicitParams`中,这里只罗列`@ApiImplicitParam`的属性:
| 注解名称 | 注解属性 | 作用域 | 属性作用 |
|---|---|---|---|
@ApiImplicitParam() |
value | 方法 | 参数说明 |
| name | 方法 | 参数名 | |
| dataType | 方法 | 数据类型 | |
| paramType | 方法 | 参数类型 | |
| example | 方法 | 举例 |
举个例子:
   @ApiImplicitParams({
           @ApiImplicitParam(name = "user", value = "用户实体user", required = true, dataType = "User")
    })
    public void put(User user) {
        userService.updateById(user);
    }
这里需要注意一点,我们并没有在注解中写图中圈中的两个参数,这个是去读取了我们刚刚为User类的注解,并将用户名设置为必填!
6.@ApiResposne && @ApiResponses
| 注解名称 | 注解属性 | 作用域 | 属性作用 |
|---|---|---|---|
@ApiResponse() |
response | 方法 | 返回类 |
| code | 方法 | 返回码 | |
| message | 方法 | 返回信息 | |
| examples | 方法 | 例子 |
 最后再聊聊这个UI
 最后再聊聊这个UI
先贴几张spring-fox的ui(正是我们所熟知的那一套)
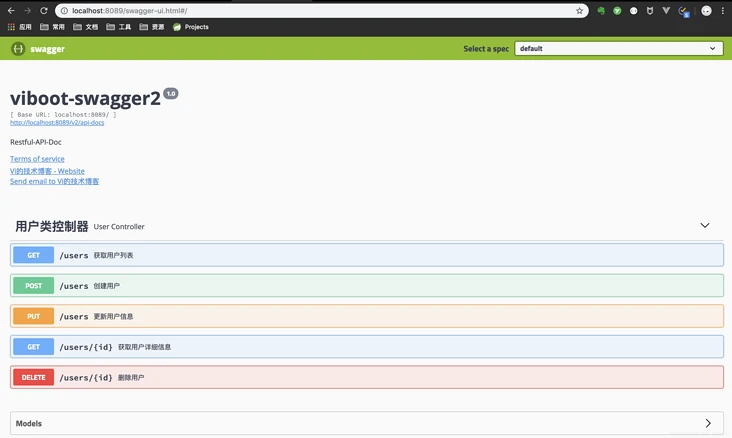
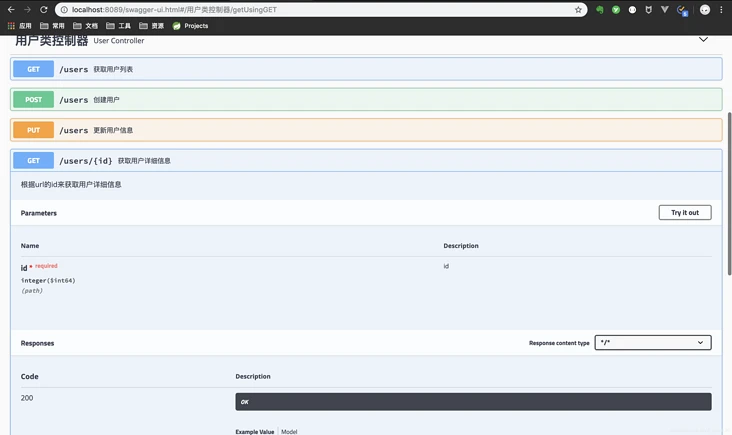
看到这里,大家对于这两套UI的选择应该有个答案了,当然bootstrap风格的ui不仅好看,还有各种强大的功能~
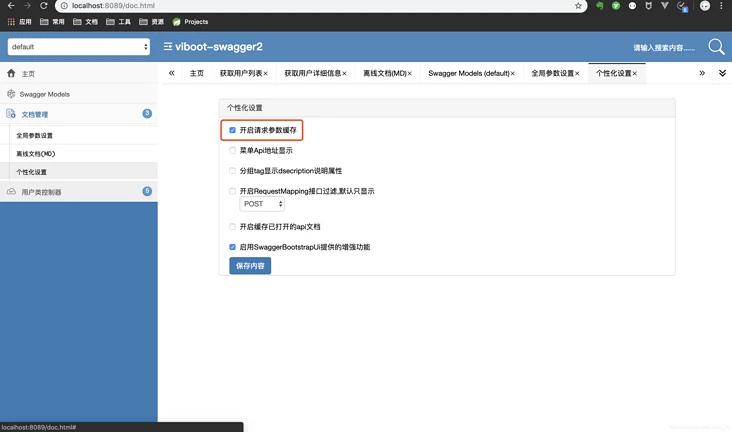
1.导出md文档

2.参数缓存