在进入正题前小弟希望阅读者能了解最基本ASP.NET MVC 路由模板 ,小弟不会从服务器(如:IIS)最低层的请求如何到达你的WebApplication进程进行说明,这个网上资料有很多如果想了解推荐http://www.cnblogs.com/lumnm/archive/2009/08/08/1541901.html这篇清晰易懂。这里只讲解ASP.NET MVC管道的http请求如何到达控制器操作。
- 创建实例
在说明之前首先我们创建一个默认的MVC项目(相信大家都会创建,这里就不演示了),打开根目录下Global.asax.cs文件
在此文件下项目自动生成了一些代码如下:
 1  public class MvcApplication : System.Web.HttpApplication
 2     {
 3         protected void Application_Start()
 4         {
 5             AreaRegistration.RegisterAllAreas(); //配置区域路由 目的在大型复杂网站下方便管理路由
 6             FilterConfig.RegisterGlobalFilters(GlobalFilters.Filters);  //配置过滤特性
 7             RouteConfig.RegisterRoutes(RouteTable.Routes);  //配置传统路由
 8             BundleConfig.RegisterBundles(BundleTable.Bundles); //配置捆绑缩减的JS和css文件
 9
10         }
11
12     }
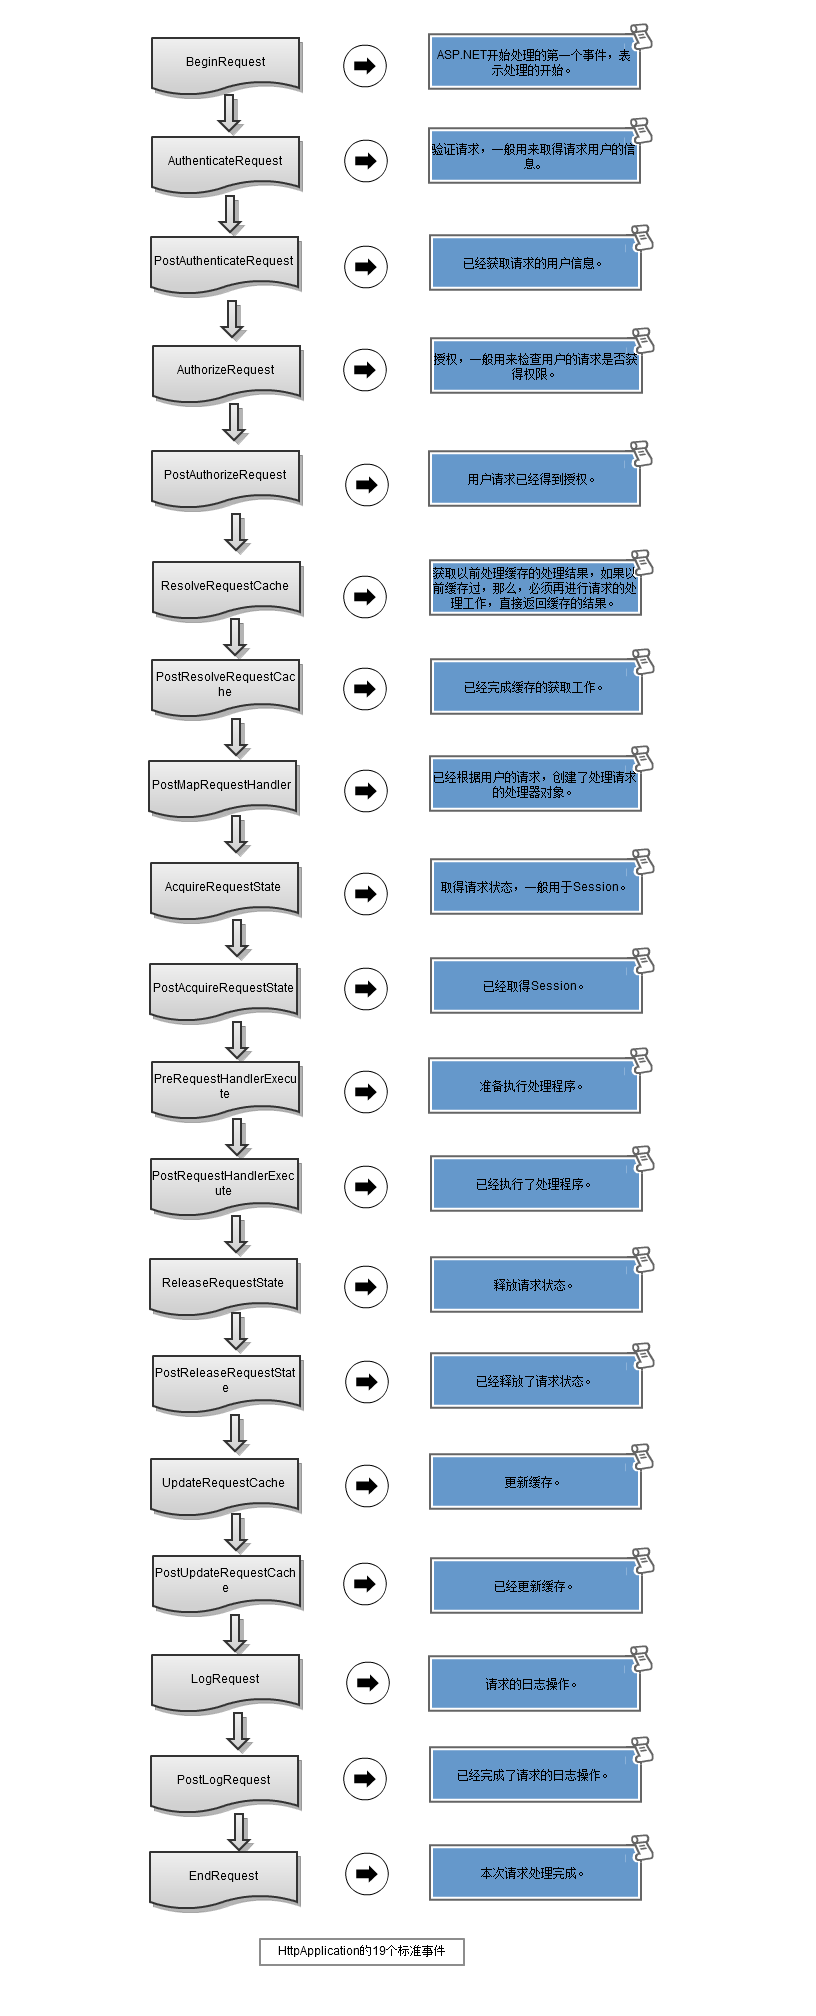
上面代码中MVCApplication类的Application_Start()是整个程序的入口,在这里可以配置整个web程序的全局属性,而且我们的MvcApplication 继承至HttpApplication,服务器(如IIS)的请求都要经过HttpApplication的处理管道,管道内的处理过程是固定的,在服务器处理请求的各个阶段,依次触发对应的事件,便于程序员在不同的阶段完成自定义的处理工作。查看HttpApplication的元数据(鼠标右键转到定义)发现有24个事件,但是我们一般关心是如下19个管道事件:
(注:图片转至 木宛城主的博客:http://www.cnblogs.com/OceanEyes/p/thinking-in-asp-net-mvc-apply-asp-net-identity-authentication.html)

在MVC里处理请求的是UrlRoutingModule类,它是一个实现了IHttpModule接口的类,那这个接口的作用是什么呢?只要继承至IHttpModule接口的类就可以订阅HttpApplication生命周期的各个事件。下面是IHttpModule接口的代码:(非常简单)
1  public interface IHttpModule
2  {
3       void Dispose();
4       void Init(HttpApplication context);
5  }
Init方法是实现HttpModule功能的主要方法,它有一个HttpApplication类型的context参数,这个参数允许访问当前HttpApplication的环境以此来订阅注册处理请求过程中不同的事件,为了更好的理解UrlRoutingModule类的运行机制,我写个小例子,该例修改http输出流,在每个输出流加上请求时间和请求处理完毕时间。在你自己随意位置(如:/Models或重新创建一个类库项目)下添加一个类,然后让它继承IHttpModule接口并实现。代码如下:
1  public class MyModule : IHttpModule
 2     {
 3
 4         private HttpApplication _application = null;
 5
 6         public void Init(HttpApplication context)
 7         {
 8
 9             _application = context;
10
11             string reqTime = string.Empty; //请求时间
12             string resTime = string.Empty; //请求完毕时间
13
14             // //通过订阅HttpApplication的BeginRequest事件,这个事件在收到一个http请求时发生
15             _application.BeginRequest += (obj, e) =>
16             {
17                reqTime = string.Format("请求时间:{0}", DateTime.Now.ToString());
18             };
19
20             //通过订阅HttpApplication的EndRequest事件,这个事件会在把响应内容发送给客户端前触发
21             _application.EndRequest += (obj, e) =>
22             {
23                 resTime = string.Format("请求处理后时间:{0}", DateTime.Now.ToString());
24
25                  _appliction.Context.Response.Write(reqTime+"<br/>"+resTime); //在每个响应内容流里写入当前请求的时间
26
27             };
28         }
29     }
为了使用这个模块,我们要在请求处理管道上包含该模块。为此我们配置web.config文件使其包含它一个引用。在web.config文件的<httpModules>节点下添加:
<add name="ClassName" type="NameSpace.ClassName,AssemblyName" />
我的例子ClassName是MyModule,命名空间是MvcDemo.Models,所以我的节点如下
<httpModules>
<add name="MyModule" type="MvcDemo.Models.MyMoule,MvcDemo" />
</httpModules>
然后按F5运行你就会发现每个页面多了2排分别表示请求和请求完毕的时间的文字

现在你应该大概了解UrlRoutingModule类的功能了,路由机制就是利用这个原理,它通过注册HttpApplication事件参与到管道处理请求中,具体是订阅HttpApplication某个阶段的事件。UrlRoutingModule订阅了PostResolveRequestCache 事件,实现url的映射。为什么是该事件呢?因为该事件的下一步就要完成请求和物理文件的映射,所以必须要此之前进行拦截。
细心的朋友可能发现在 <httpModules>节点下并没有添加 UrlRoutingModule类的引用啊,其实web.config配置可以分为本站和全局,全局的配置在C:WindowsMicrosoft.NETFrameworkv版本号Configweb.config文件里

在了解了UrlRoutingModule类的功能下,我们继续查看它如何映射到控制器操作的,核心源代码如下:
public  class  UrlRoutingModule : IHttpModule
     {
         protected  virtual  void  Init(HttpApplication application)
         {
             if  (application.Context.Items[_contextKey] ==  null )
             {
                 application.Context.Items[_contextKey] = _contextKey;<br>
                 //注册订阅HttpApplication对象的PostResolveRequestCache事件
                 application.PostResolveRequestCache +=  new  EventHandler( this .OnApplicationPostResolveRequestCache); //事件触发时会执行下面的方法
             }
         }

         private  void  OnApplicationPostResolveRequestCache( object  sender, EventArgs e)
         {
             HttpContextBase context =  new  HttpContextWrapper(((HttpApplication)sender).Context);
             this .PostResolveRequestCache(context);
         }
     }
从源码看出UrlRoutingModule其实跟我们上面那例子差不多都是通过注册事件来执行相应的代码功能的。
在了解更多源码之前,我们先来了解下路由的基本知识,路由其实并非是ASP.NET MVC的一个特性,其实它仅在MVC1.0的前期阶段是MVC独有的,但是后面ASP.NET团队把它变成了独立的项目,所以它并不依赖于MVC,这是个题外话。我们现在要做的是依然打开根目录下Global.asax.cs文件
public class MvcApplication : System.Web.HttpApplication
    {
        protected void Application_Start()
        {

           //这里就是我们配置路由的代码方法
            RouteConfig.RegisterRoutes(RouteTable.Routes);  //配置传统路由

        }
    }


//方法的代码在/App_Start文件目录下的RouteConfig.cs文件
public class RouteConfig
    {
        public static void RegisterRoutes(RouteCollection routes)
        {

            routes.MapMvcAttributeRoutes(); //开启特性理由


            routes.IgnoreRoute("{resource}.axd/{*pathInfo}");//忽略映射文件

            routes.MapRoute(
                name: "Default1",
                url: "{controller}/{action}/{id}",
                defaults: new { controller = "Home", action = "Index", id = UrlParameter.Optional }
            );

            routes.MapRoute(
               name: "Default2",
               url: "Side/{Year}/{Month}/{Day}",
               defaults: new { controller = "Home", action = "Index", id = UrlParameter.Optional }
           );
        }
    }
这里的路由知识我不说明,因为我相信阅读者都能看懂上面的代码,它就是添加了2个传统路由的路由模板,我们关注的对象是传进给RegisterRoutes方法的RouteTable.Routes参数,RouteTable其实就是一个封装成全局对象的路由集合源代码如下(非常简单)
 public class RouteTable
    {
        private static RouteCollection _instance = new RouteCollection();

        public static RouteCollection Routes =>
            _instance;
    }
可以看见RouteTable.Routes参数其实就是一个全局的RouteCollection对象,这样你的路由集合保证了全局唯一性,调用也方便。通过RouteCollection集合对象我们可以通过它的Add添加Reute对象。
 1  routes.MapRoute(
 2                 name: "Default1",
 3                 url: "{controller}/{action}/{id}",
 4                 defaults: new { controller = "Home", action = "Index", id = UrlParameter.Optional }
 5             );
 6
 7
 8  public static Route MapRoute(this RouteCollection routes, string name, string url, object defaults, object constraints, string[] namespaces)
 9         {
10
11             Route route = new Route(url, new MvcRouteHandler()) {
12                 Defaults = CreateRouteValueDictionaryUncached(defaults),
13                 Constraints = CreateRouteValueDictionaryUncached(constraints),
14                 DataTokens = new RouteValueDictionary()
15             };

16             ConstraintValidation.Validate(route);
17             if ((namespaces != null) && (namespaces.Length > 0))
18             {

19                 route.DataTokens["Namespaces"] = namespaces;
20             }
21             routes.Add(name, route);
22             return route;
23         }
