1.新建了一个SpringBoot项目:只引用需要用到的spring boot相关的jar包,除此之外没有任何的配置
启动application.java报错:
***************************
不用数据库相关的东西 就不要在pom中引入相关依赖。

2.新建一个小项目,springboot使用1.5.16,项目启动类使用注解@SpringBootApplication,controller使用注解@Controller,浏览器输入ip地址报错:
Whitelabel Error Page
This application has no explicit mapping for /error, so you are seeing this as a fallback.
 控制器的URL路径没有找到
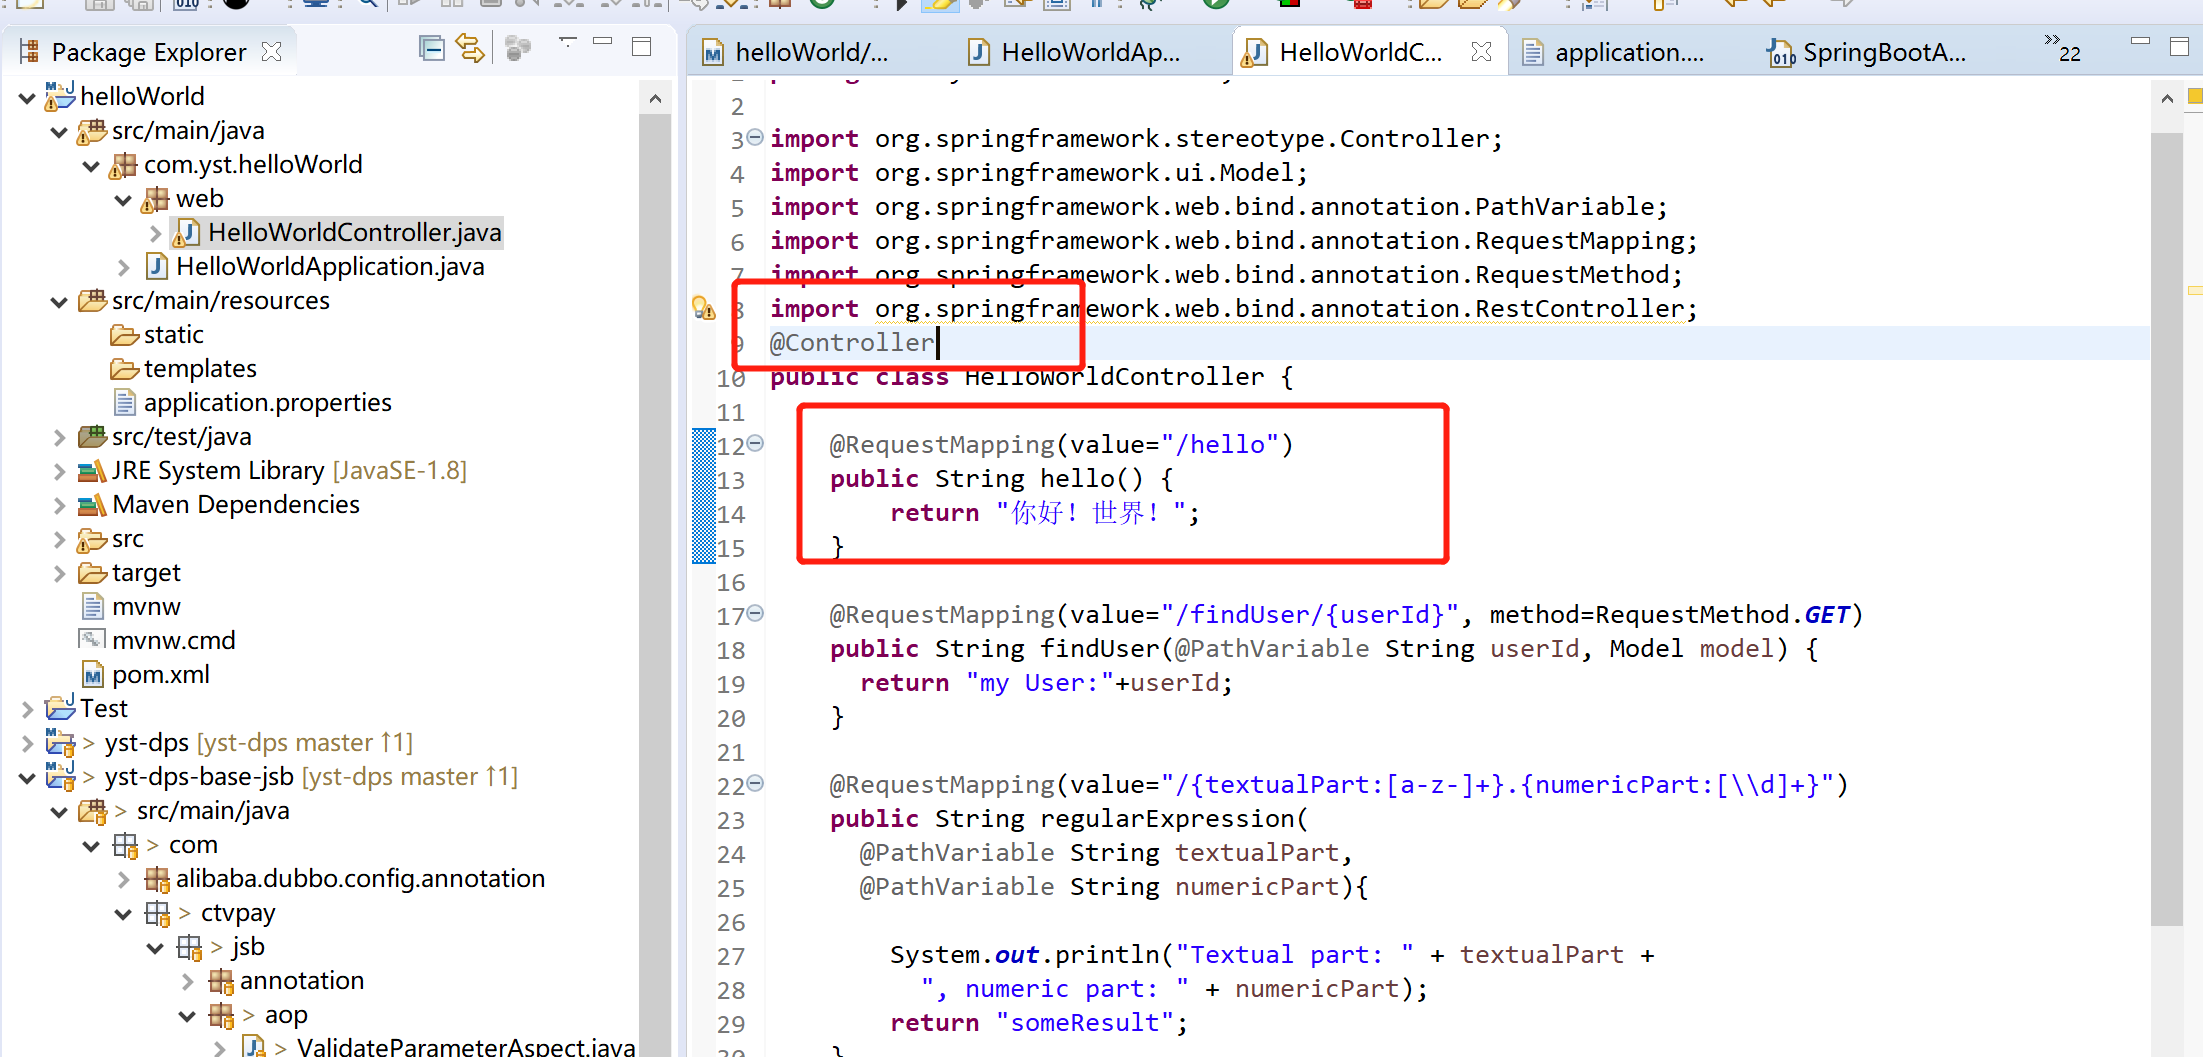
@controller改成@RestController页面可正常显示
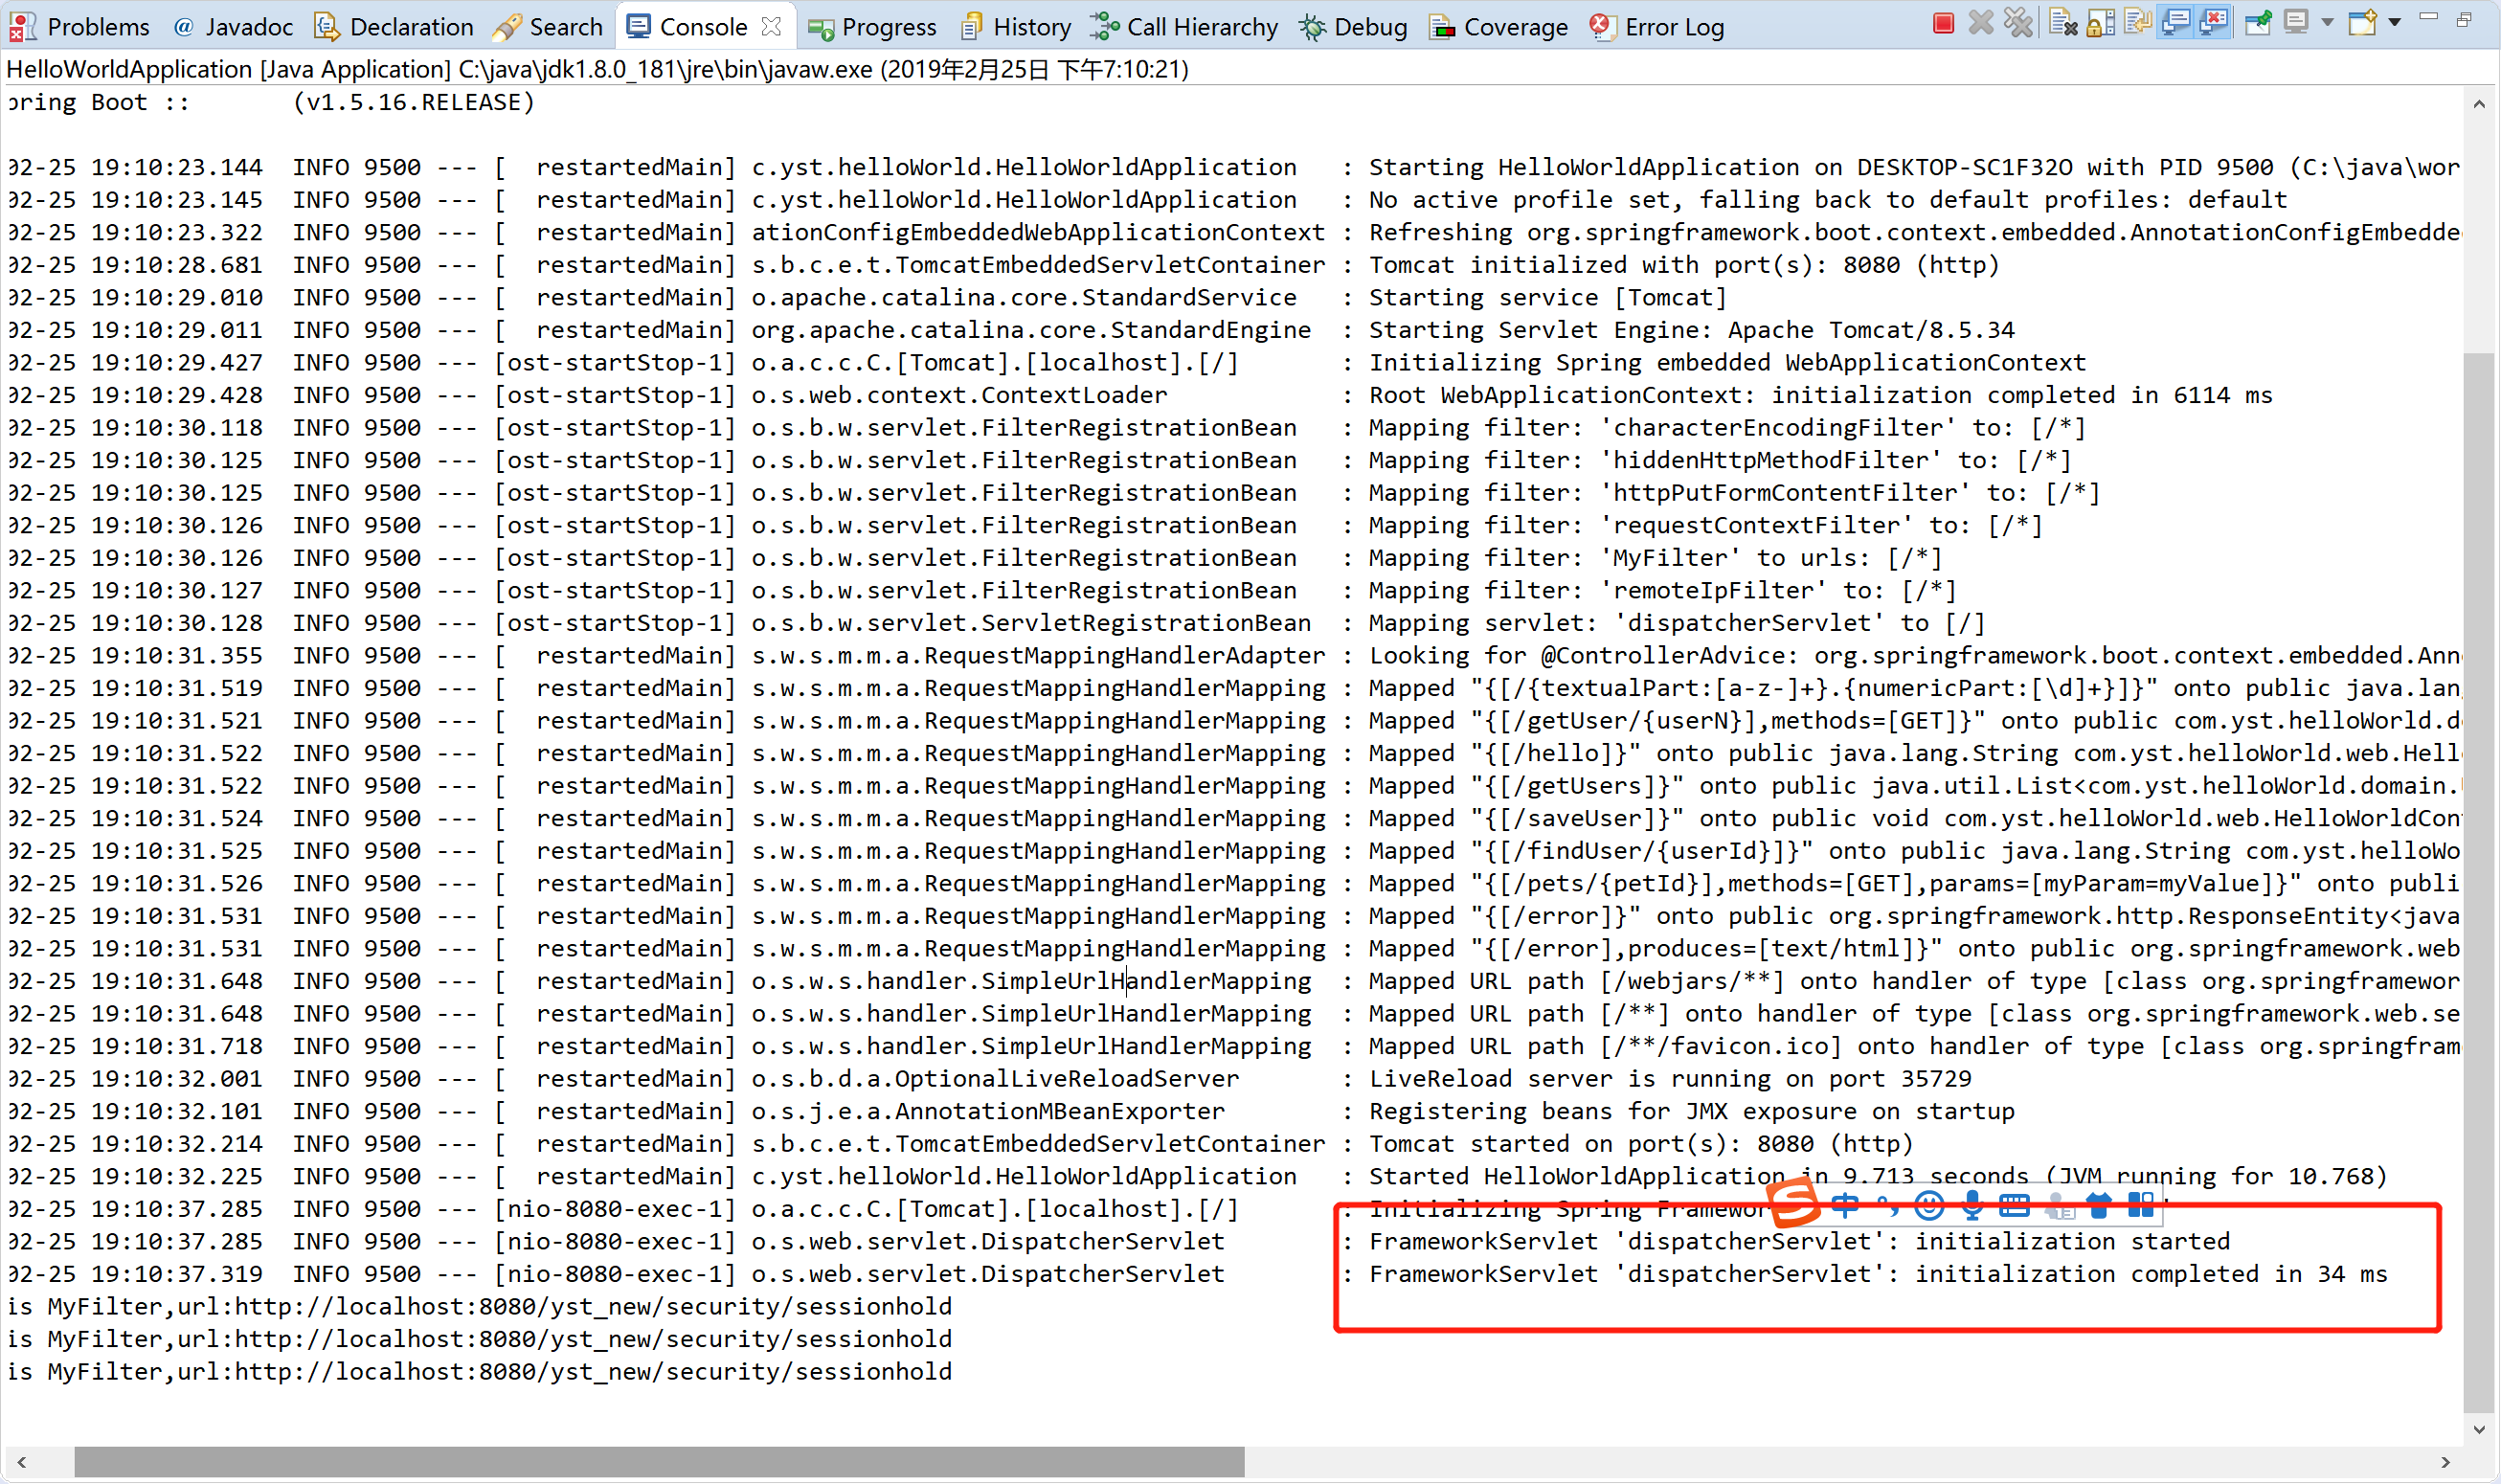
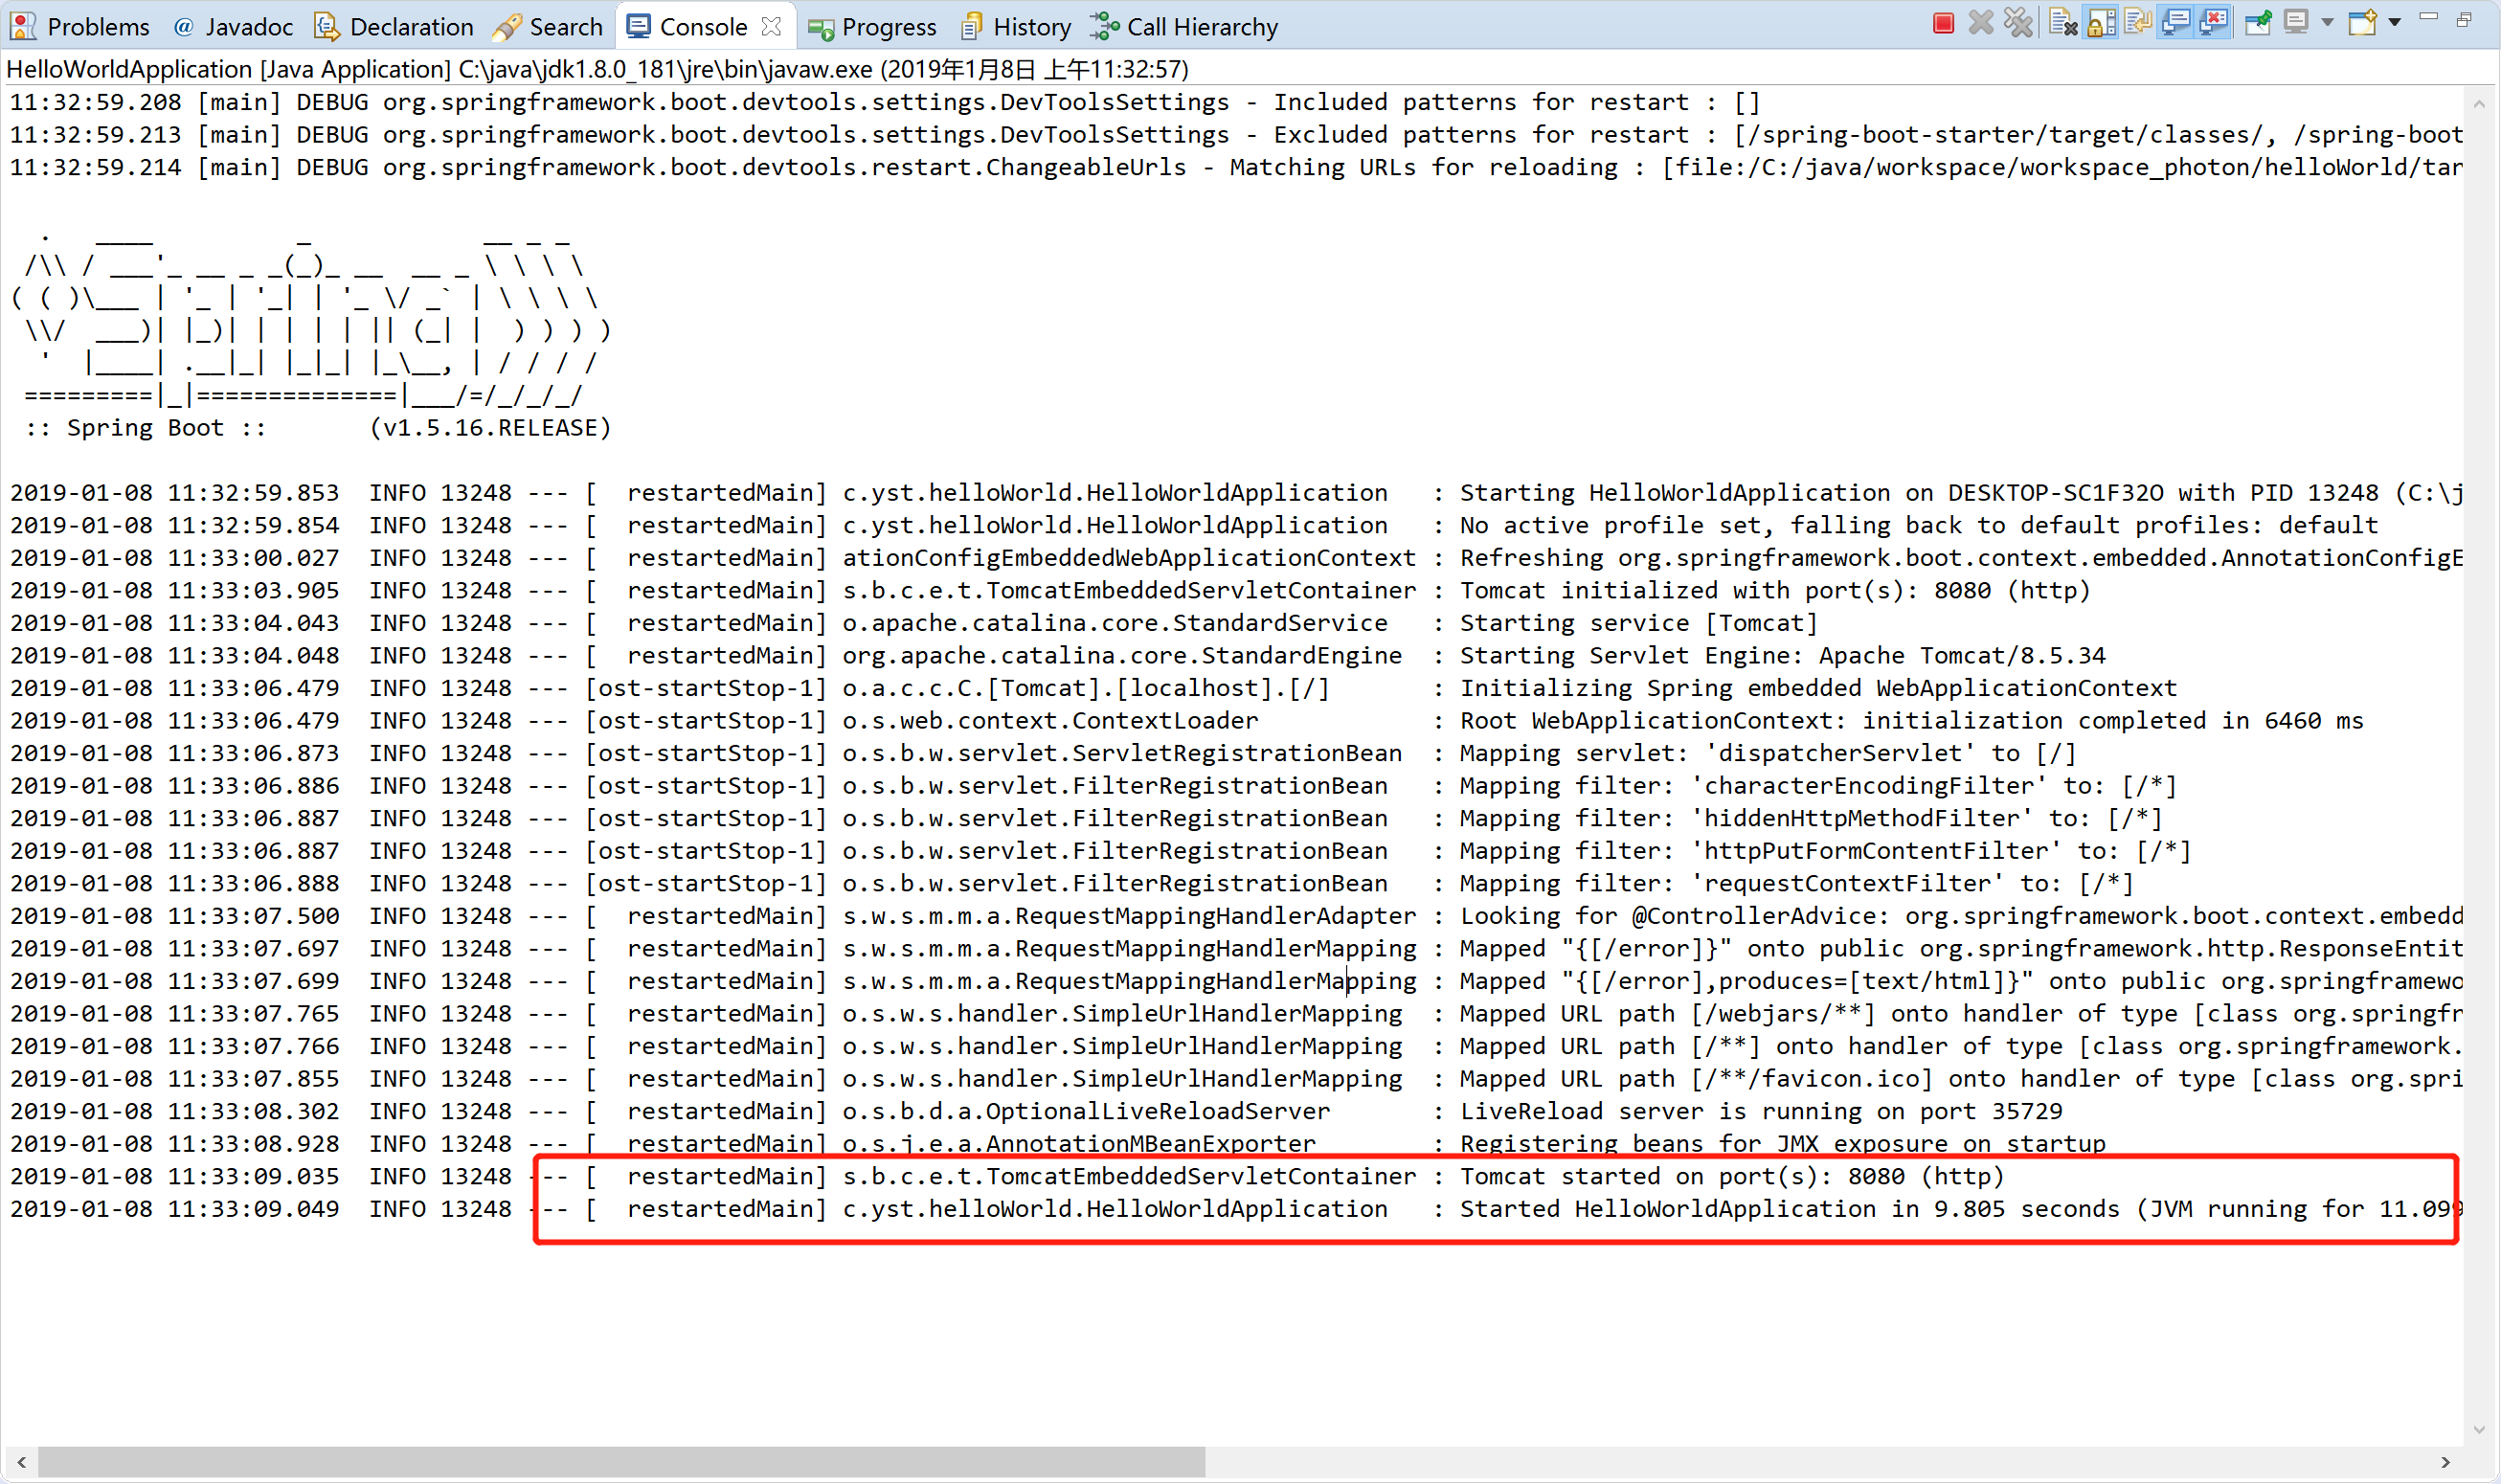
3.pom.xml中配置了热启动,但是修改controller后没有重新加载,console控制台也没有加载新的内容-》热启动没有生效
查找原因:热部署依赖于项目的自动编译功能:Project->Build Automatically(自动编译)是否已经勾选,若没勾选,则需要勾选,否则热启动无用
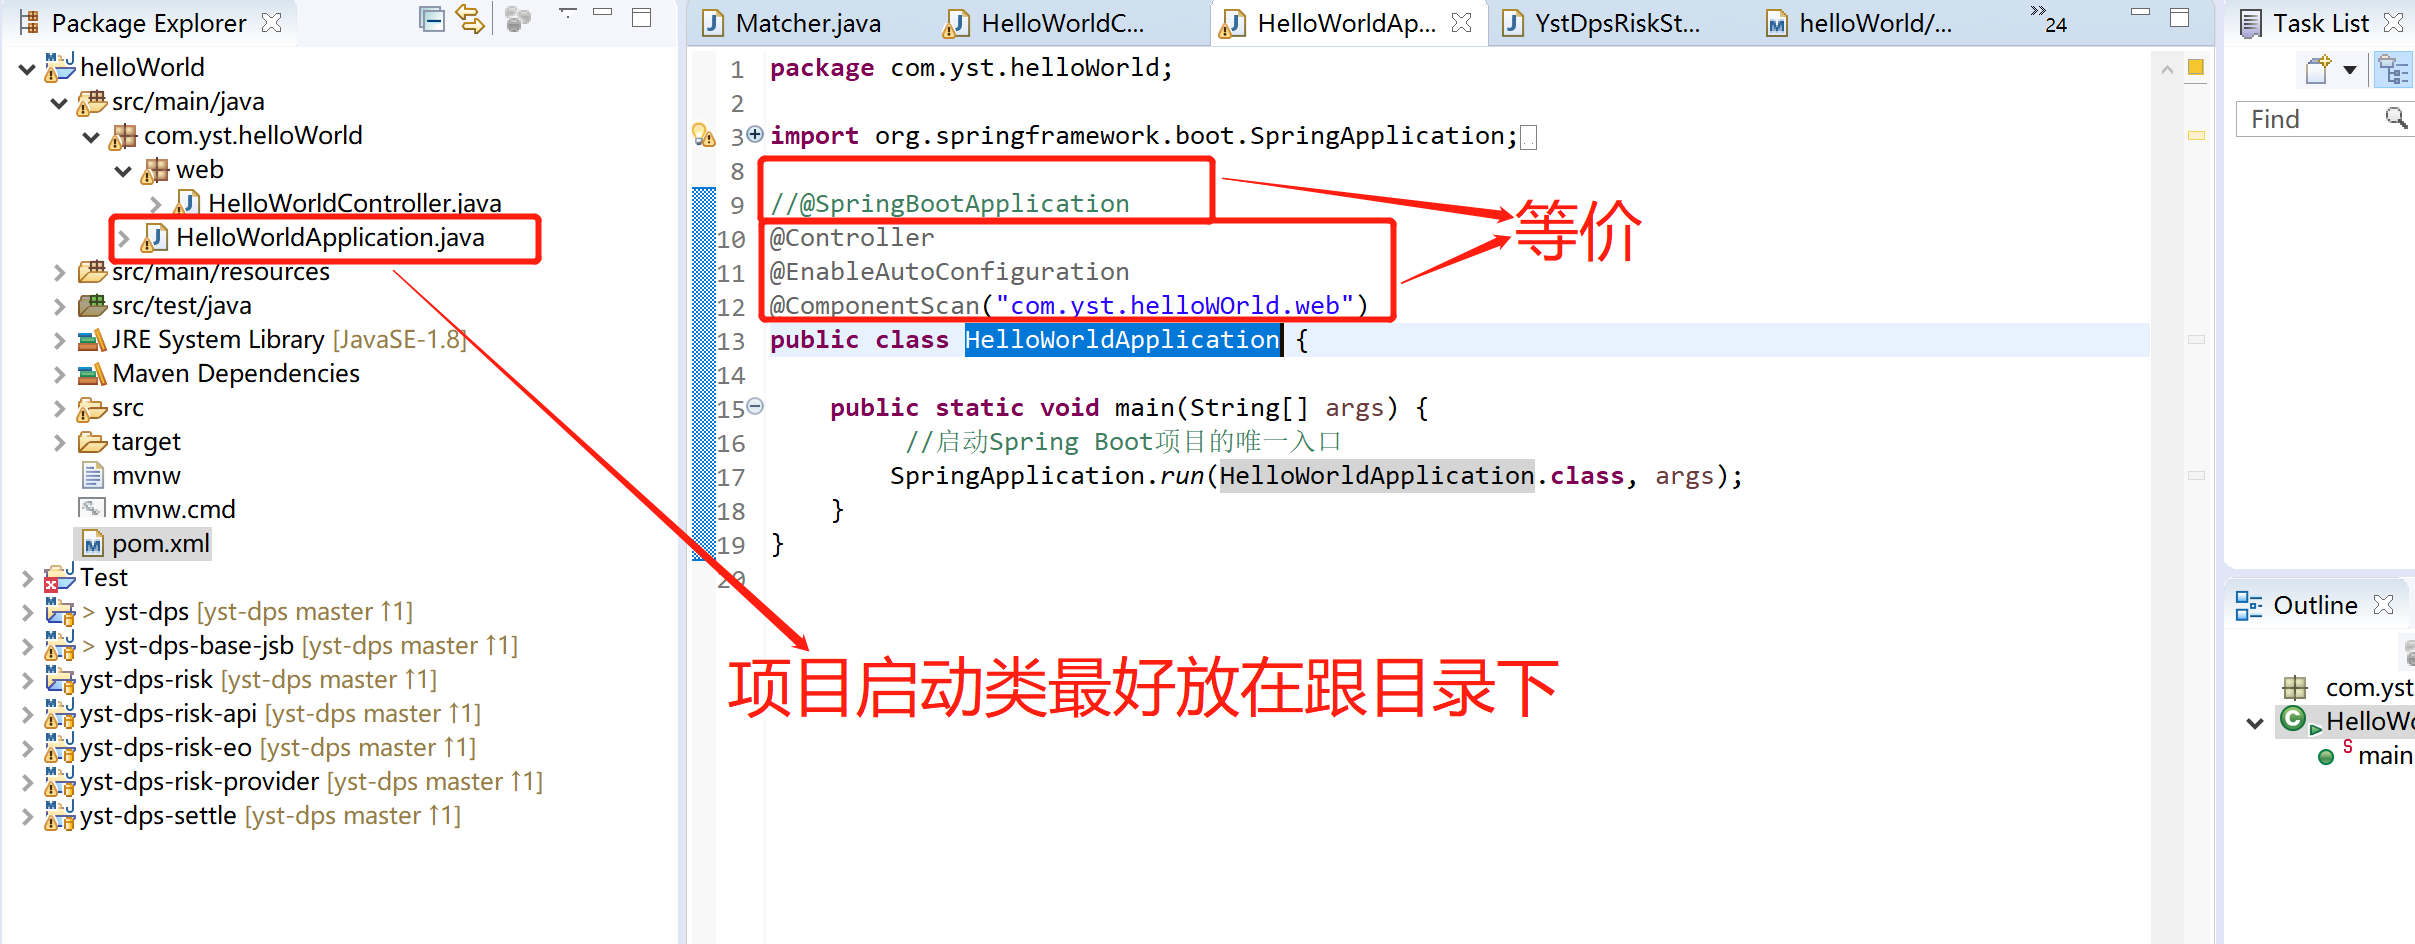
4.SpringBoot项目启动类*Application.java:SpringBoot项目只能有一个main方法:
其中:@SpringBootApplication 等价于
@Controller
@EnableAutoConfiguration
@ComponentScan("com.yst.helloWOrld.web")
5.Junit单元测试使用MockMvc做controller接口测试
(51)直接返回字符串中含有中文---》中文乱码
JunitTest代码为:
 1 package com.yst.helloWorld;
 2
 3 import org.junit.Before;
 4 import org.junit.Test;
 5 import org.springframework.boot.test.context.SpringBootTest;
 6 import org.springframework.test.web.servlet.MockMvc;
 7 import org.springframework.test.web.servlet.MvcResult;
 8 import org.springframework.test.web.servlet.ResultHandler;
 9 import org.springframework.test.web.servlet.request.MockMvcRequestBuilders;
10 import org.springframework.test.web.servlet.setup.MockMvcBuilders;
11 import com.yst.helloWorld.web.HelloWorldController;
12
13 @SpringBootTest
14 public class HelloWorldApplicationTests {
15     //使用MockMvc做controller接口测试
16     private MockMvc mockMvc;
17
18     @Before //这个方法在每个方法执行之前都会执行一遍
19     public void setUp() throws Exception {
20         mockMvc = MockMvcBuilders.standaloneSetup(new HelloWorldController()).build();
21     }
22     @Test
23     public void getHello() throws Exception  {
24         mockMvc.perform(MockMvcRequestBuilders.post("/hello")//请求的url,请求的方法是post
25 //                .contentType(MediaType.APPLICATION_FORM_URLENCODED)
26 //                .param("name", "value")//添加参数
27         ).andDo(new ResultHandler() {
28             @Override
29             public void handle(MvcResult result) throws Exception {
30                 result.getResponse().setCharacterEncoding("UTF-8");
31                 System.out.println("结果:"+result.getResponse().getContentAsString());//result.getResponse().getContentAsString()不支持中文格式
32                 System.out.println("请求状态码:"+result.getResponse().getStatus());//result.getResponse().getContentAsString()不支持中文格式
33             }
34         });
35     }
36
37 //    @Test
38 //    public void hello() {
39 //        System.out.println("hello");
40 //    }
41 //    @Test
42 //    public void contextLoads() {
43 //    }
44
45 }
controller代码:
 1 package com.yst.helloWorld.web;
 2
 3 import org.springframework.stereotype.Controller;
 4 import org.springframework.ui.Model;
 5 import org.springframework.web.bind.annotation.PathVariable;
 6 import org.springframework.web.bind.annotation.RequestMapping;
 7 import org.springframework.web.bind.annotation.RequestMethod;
 8 import org.springframework.web.bind.annotation.RestController;
 9 @RestController
10 //@Controller
11 public class HelloWorldController {
12
13     @RequestMapping(value="/hello")
14     public String hello() {
15         return "hello my world! 我的世界";
16     }
17
18     @RequestMapping(value="/findUser/{userId}")
19     public String findUser(@PathVariable String userId, Model model) {
20       return "my User:"+userId;
21     }
22
23     @RequestMapping(value="/{textualPart:[a-z-]+}.{numericPart:[\d]+}")
24     public String regularExpression(
25       @PathVariable String textualPart,
26       @PathVariable String numericPart){
27
28         System.out.println("Textual part: " + textualPart +
29           ", numeric part: " + numericPart);
30         return "someResult";
31     }
32
33       @RequestMapping(value = "/pets/{petId}", method = RequestMethod.GET, params="myParam=myValue")
34       public void findPet(@PathVariable String ownerId, @PathVariable String petId, Model model) {
35         // implementation omitted
36       }
37
38
39 }
执行结果为:
结果:hello my world! ???? ----------》中文显示正常
请求状态码:200
---》解决方式:暂时未解决
(52)返回对象或集合:对象字段含有中文--》返回结果正常显示
controller代码:
 1 package com.yst.helloWorld.web;
 2
 3 import org.springframework.ui.Model;
 4 import org.springframework.web.bind.annotation.PathVariable;
 5 import org.springframework.web.bind.annotation.RequestMapping;
 6 import org.springframework.web.bind.annotation.RequestMethod;
 7 import org.springframework.web.bind.annotation.RestController;
 8
 9 import com.yst.helloWorld.domain.User;
10 @RestController
11 public class HelloWorldController {
12
13     @RequestMapping("/getUser")
14     public User getUser() {
15         User user = new User();
16         user.setName("王火火");
17         user.setAge(18);
18         user.setPass("123456");
19         return user;
20
21     }

22 }
JunitTest代码:
 1 package com.yst.helloWorld;
 2
 3 import org.junit.Before;
 4 import org.junit.Test;
 5 import org.springframework.boot.test.context.SpringBootTest;
 6 import org.springframework.test.web.servlet.MockMvc;
 7 import org.springframework.test.web.servlet.MvcResult;
 8 import org.springframework.test.web.servlet.ResultHandler;
 9 import org.springframework.test.web.servlet.request.MockMvcRequestBuilders;
10 import org.springframework.test.web.servlet.setup.MockMvcBuilders;
11 import com.yst.helloWorld.web.HelloWorldController;
12
13 @SpringBootTest
14 public class HelloWorldApplicationTests {
15     //使用MockMvc做controller接口测试
16     private MockMvc mockMvc;
17
18     @Before //这个方法在每个方法执行之前都会执行一遍
19     public void setUp() throws Exception {
20         mockMvc = MockMvcBuilders.standaloneSetup(new HelloWorldController()).build();
21     }
22
23     @Test
24     public void getUser() throws Exception  {
25         mockMvc.perform(MockMvcRequestBuilders.post("/getUser"))//请求的url,请求的方法是post
26         .andDo(new ResultHandler() {
27             @Override
28             public void handle(MvcResult result) throws Exception {
29 //                result.getResponse().setCharacterEncoding("UTF-8");
30                 System.out.println("结果:"+result.getResponse().getContentAsString());//
31                 System.out.println("请求状态码:"+result.getResponse().getStatus());//
32             }
33         });
34     }
35
36
37
38 }
结果为:
结果:{"name":"王火火","age":18,"pass":"123456"} ------》说明SpringBoot自动将对象转换为Json进行返回
请求状态码:200
若返回集合,代码如下:
 1 @RequestMapping("/getUsers")
 2     public List<User> getUsers() {
 3         List<User> users = new ArrayList<User>();
 4         User u1 = new User();
 5         u1.setName("王火火");
 6         u1.setAge(18);
 7         u1.setPass("123456");
 8         users.add(u1);
 9         User u2 = new User();
10         u2.setName("张明");
11         u2.setAge(18);
12         u2.setPass("123");
13         users.add(u2);
14         return users;
15
16 }
添加测试方法进行测试,返回内容为:
结果:[{"name":"王火火","age":18,"pass":"123456"},{"name":"张明","age":18,"pass":"123"}]
请求状态码:200
so,这说明不管对象/集合/嵌套对象,SpringBoot均可以将其转换为Json字符串,Spring天然对Json支持;
特别适用于给其他系统提供接口。
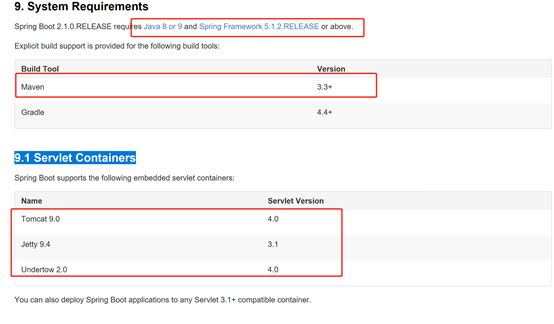
6.查看SpringBoot匹配的环境版本:
Spring官网:https://spring.io/--->projects--->Spring boot--->Learn--->选取一个版本,点击Reference Doc. --->往下拉:查看:
9.System Requirements 和 9.1 Servlet Containers
如图:
7.限制请求方式:@RequestMapping(method=RequestMethod.POST)
1 @RequestMapping(name = "/getUser",method=RequestMethod.POST)//为安全,只允许post请求访问
2     public User getUser() {
3         User user = new User();
4         user.setName("王火火");
5         user.setAge(18);
6         user.setPass("123456");
7         return user;
8 }
若以get方式请求,会返回:org.springframework.web.HttpRequestMethodNotSupportedException: Request method 'GET' not supported]
8.传参方式
(1)使用对象接收:适用于从页面获取值:页面中只要是属于User的属性都会被自动填充到该对象中
@RequestMapping(name = "/getUser",method=RequestMethod.POST)//
public User getUser(User user) {
    return user;
}
(2)适用url进行传参:@PathVariable(import org.springframework.web.bind.annotation.PathVariable;)
(
注意两个区别
- @PathVariable是获取url上数据的。
- @RequestParam获取请求参数的(包括post表单提交)
)
1 //注意url模板中的占位符的值必须和@PathVariable中的值相同才能完成绑定
2     @RequestMapping(name = "/getUser/{useName}",method=RequestMethod.GET)//
3     public User getUser(@PathVariable  String useName) {
4         User user = new User();
5         user.setName(useName);
6         user.setAge(18);
7         return user;
8 }
然后在浏览器输入地址:http://localhost:8080/getUser/whh ,结果竟然报错:
报错:
Whitelabel Error Page
This application has no explicit mapping for /error, so you are seeing this as a fallback.
1 @RequestMapping(name = "/getUser/{userN}",method=RequestMethod.GET)//
2     public User getUser(@PathVariable("userN") @Valid  String useName) {
3         User user = new User();
4         user.setName(useName);
5         user.setAge(18);
6         return user;
7 }
---->最后终于找到了原因:竟是因为RequestMapping的参数问题:不小心把value写成了name。 改成value后,浏览器页面返回:
{"name":"whh","age":18,"pass":null}
查看下面源码可知:name:Assign a name to this mapping.(给这个mapping分配一个名称),没有实质性的作用;
类似于注释,对程序没什么影响,但是对人友好,因为有些url是拼音的,隔了几个月没有注释的话可能不知道这个url干吗的
所以,RequestMapping地址进行映射:只能用value或path,不能使用name.
 1 @Target({ElementType.METHOD, ElementType.TYPE})
 2 @Retention(RetentionPolicy.RUNTIME)
 3 @Documented
 4 @Mapping
 5 public @interface RequestMapping {
 6
 7     /**
 8      * Assign a name to this mapping.
 9      * <p><b>Supported at the type level as well as at the method level!</b>
10      * When used on both levels, a combined name is derived by concatenation
11      * with "#" as separator.
12      * @see org.springframework.web.servlet.mvc.method.annotation.MvcUriComponentsBuilder
13      * @see org.springframework.web.servlet.handler.HandlerMethodMappingNamingStrategy
14      */
15     String name() default "";
16
17     /**
18      * The primary mapping expressed by this annotation.
19      * <p>In a Servlet environment this is an alias for {@link #path}.
20      * For example {@code @RequestMapping("/foo")} is equivalent to
21      * {@code @RequestMapping(path="/foo")}.
22      * <p>In a Portlet environment this is the mapped portlet modes
23      * (i.e. "EDIT", "VIEW", "HELP" or any custom modes).
24      * <p><b>Supported at the type level as well as at the method level!</b>
25      * When used at the type level, all method-level mappings inherit
26      * this primary mapping, narrowing it for a specific handler method.
27      */
28     @AliasFor("path")
29     String[] value() default {};
30
31     /**
32      * In a Servlet environment only: the path mapping URIs (e.g. "/myPath.do").
33      * Ant-style path patterns are also supported (e.g. "/myPath/*.do").
34      * At the method level, relative paths (e.g. "edit.do") are supported
35      * within the primary mapping expressed at the type level.
36      * Path mapping URIs may contain placeholders (e.g. "/${connect}").
37      * <p><b>Supported at the type level as well as at the method level!</b>
38      * When used at the type level, all method-level mappings inherit
39      * this primary mapping, narrowing it for a specific handler method.
40      * @see org.springframework.web.bind.annotation.ValueConstants#DEFAULT_NONE
41      * @since 4.2
42      */
43     @AliasFor("value")
44     String[] path() default {};
45
46     /**
47      * The HTTP request methods to map to, narrowing the primary mapping:
48      * GET, POST, HEAD, OPTIONS, PUT, PATCH, DELETE, TRACE.
49      * <p><b>Supported at the type level as well as at the method level!</b>
50      * When used at the type level, all method-level mappings inherit
51      * this HTTP method restriction (i.e. the type-level restriction
52      * gets checked before the handler method is even resolved).
53      * <p>Supported for Servlet environments as well as Portlet 2.0 environments.
54      */
55     RequestMethod[] method() default {};
56
57
58
59 }
9.参数校验依赖于hibernate-validator:见下图
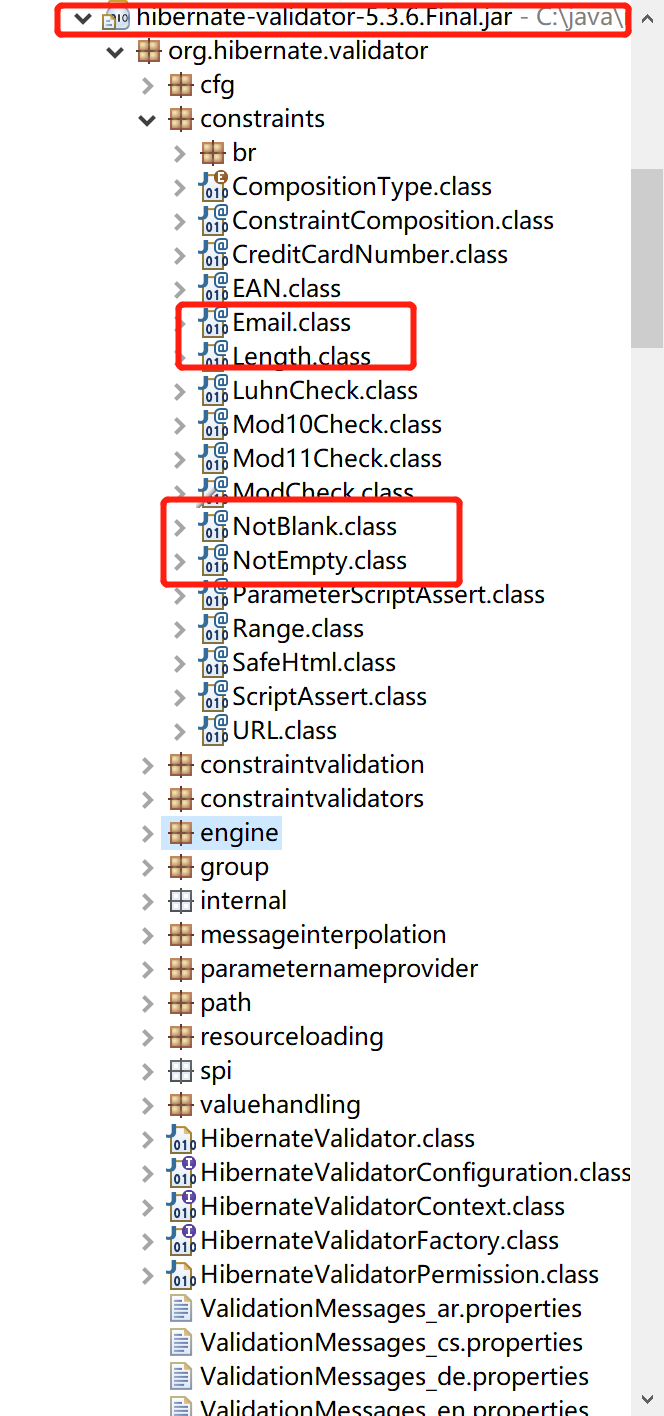
SpringBoot使用:@Valid(package javax.validation;属于validation-api-1.1.0.Final.jar)+BindingResult进行参数校验:代码如下:
User类:
 1 package com.yst.helloWorld.domain;
 2
 3 import javax.validation.constraints.Max;
 4 import javax.validation.constraints.Min;
 5
 6 import org.hibernate.validator.constraints.Length;
 7 import org.hibernate.validator.constraints.NotEmpty;
 8
 9 public class User {
10     @NotEmpty(message="姓名不能为空")
11     private String name;
12     @Max(value=100,message="年龄不能大于 100 岁")
13     @Min(value=18,message="必须年满 18 岁")
14     private int age;
15     @NotEmpty(message="密码不能为空|")
16     @Length(min=6,message="密码长度不能小于6位")
17     private String pass;
18     //...
19
20
21 }
controller方法:
 1 /**
 2      * 参数校验@Valid+BindingResult
 3      * 打印错误信息
 4      * @param user
 5      * @param result
 6      */
 7     @RequestMapping("/saveUser")
 8     public void saveUser(@Valid User user,BindingResult result) {
 9         System.out.println("user:"+user);
10         if(result.hasErrors()) {
11             List<ObjectError> list = result.getAllErrors();
12             for (ObjectError error : list) {
13                 System.out.println(error.getCode()+"-"+error.getDefaultMessage());
14             }
15         }
16     }
测试方法:
 1 @Test
 2     public void saveUser() throws Exception  {
 3         mockMvc.perform(MockMvcRequestBuilders.post("/saveUser")//请求的url,请求的方法是post
 4                 .param("name", "")//添加参数
 5                 .param("age", "222")//添加参数
 6                 .param("pass", "123")//添加参数
 7         ).andDo(new ResultHandler() {
 8             @Override
 9             public void handle(MvcResult result) throws Exception {
10                 System.out.println("结果:"+result.getResponse().getContentAsString());
11                 System.out.println("请求状态码:"+result.getResponse().getStatus());
12             }
13         });
14     }
结果返回:
user:com.yst.helloWorld.domain.User@119cbf96
Max-年龄不能大于 100 岁
NotEmpty-姓名不能为空
Length-密码长度不能小于6位
结果显示已经触发了校验规则,返回了错误信息。实际项目开发中可以对错误信息进行包装,返回前端页面展示。
10.自定义资源文件Property:代码如下
application.properties:
1 #application.properties
2 com.whh.title=whh
3 com.whh.description=分享技术和生活
自定义配置类:
 1 package com.yst.helloWorld.domain;
 2
 3 import org.springframework.beans.factory.annotation.Value;
 4 import org.springframework.stereotype.Component;
 5 @Component
 6 public class WhhProperties {
 7     @Value("${com.whh.title}")
 8     private String title;
 9     @Value("${com.whh.description}")
10     private String description;
11     public String getTitle() {
12         return title;
13     }
14     public void setTitle(String title) {
15         this.title = title;
16     }
17     public String getDescription() {
18         return description;
19     }
20     public void setDescription(String description) {
21         this.description = description;
22     }
23
24
25
26 }
单元测试代码:
 1 package com.yst.helloWorld;
 2
 3 import javax.annotation.Resource;
 4
 5 import org.junit.Test;
 6 import org.junit.runner.RunWith;
 7 import org.springframework.boot.test.context.SpringBootTest;
 8 import org.springframework.test.context.junit4.SpringJUnit4ClassRunner;
 9 import org.springframework.test.context.junit4.SpringRunner;
10 import com.yst.helloWorld.domain.WhhProperties;
11 //@RunWith:运行器,让测试运行于Spring环境;
12 //@RunWith(SpringRunner.class)=@RunWith(SpringJUnit4ClassRunnerRunner.class);SpringRunner extends SpringJUnit4ClassRunner
13 @RunWith(SpringRunner.class)
14 @SpringBootTest
15 public class PropertiesTest {
16     @Resource
17     private WhhProperties whhProperties;
18
19     @Test
20     public void testProperties() throws Exception {
21         System.out.println("title:"+whhProperties.getTitle());
22         System.out.println("description:"+whhProperties.getDescription());
23     }
24
25 }
运行结果:
title:whh
description:å享ææ¯åçæ´»
------》出现中文乱码,暂时未解决
11.Spring Data Jpa数据库连接:
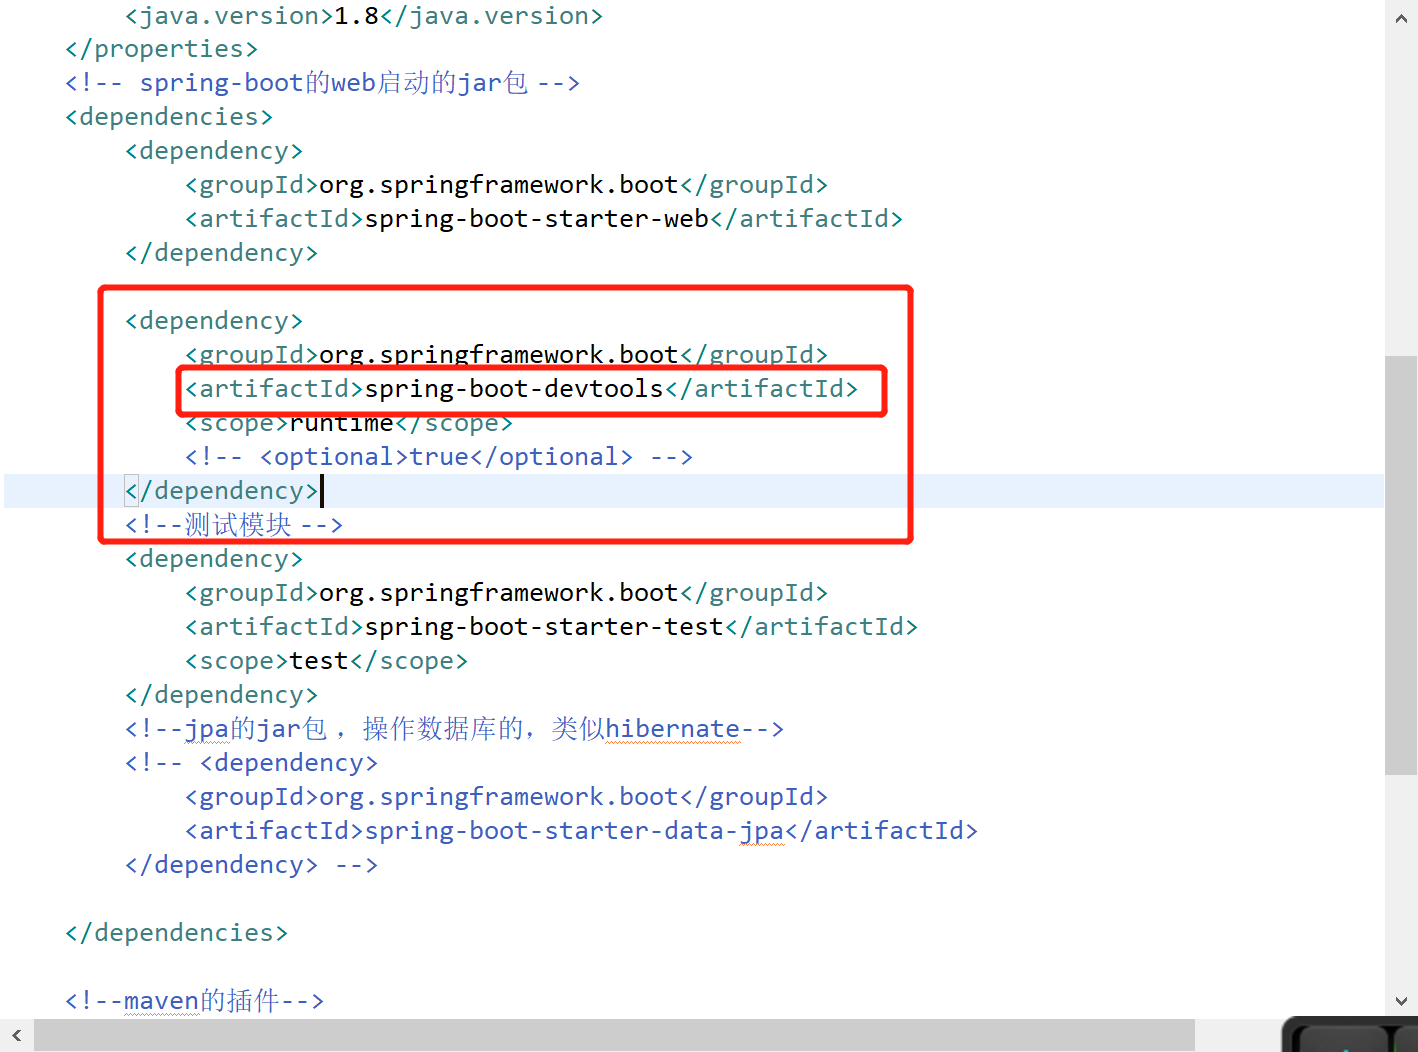
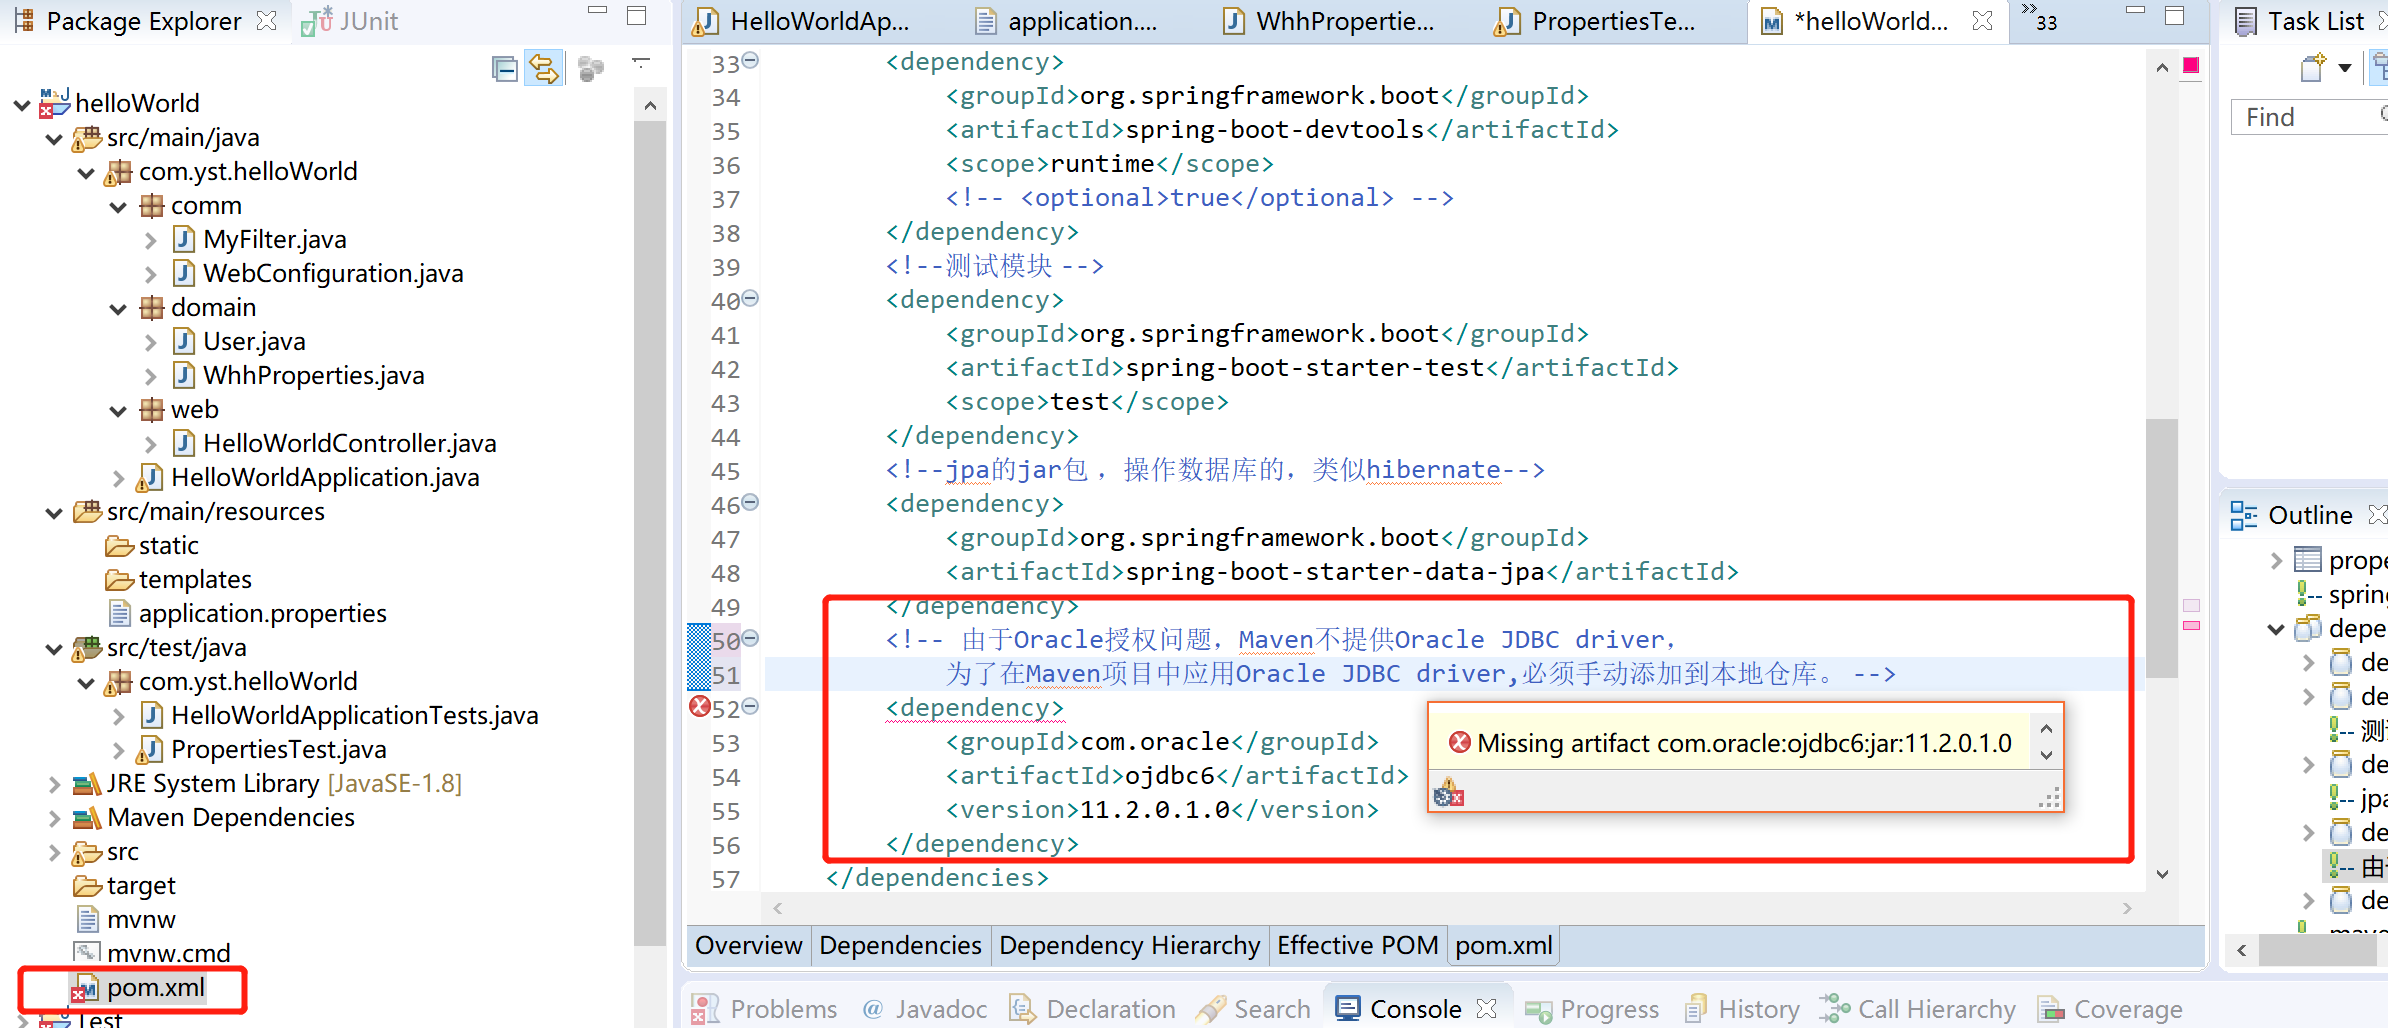
(1)添加依赖:
 1      <!--jpa的jar包 ,操作数据库的,类似hibernate-->
 2         <dependency>
 3             <groupId>org.springframework.boot</groupId>
 4             <artifactId>spring-boot-starter-data-jpa</artifactId>
 5         </dependency>
 6         <!-- 由于Oracle授权问题,Maven不提供Oracle JDBC driver,
 7          为了在Maven项目中应用Oracle JDBC driver,必须手动添加到本地仓库。 -->
 8     <!-- oracle数据库驱动 -->
 9     <dependency>
10             <groupId>com.oracle</groupId>
11             <artifactId>ojdbc6</artifactId>
12             <version>11.2.0.1.0</version>
13     </dependency>
由于Oracle授权问题,Maven不提供Oracle JDBC driver,所以maven的中央仓库中没有这个资源(所以会报错:Missing artifact com.oracle:ojdbc6:jar:11.2.0.1.0,如下图),
为了在Maven项目中应用Oracle JDBC driver,必须手动添加到本地仓库
(2)将ojdbc6.jar添加到本地仓库:
首先,oracle版本11.2.0,需要在--appproduct11.2.0dbhome_1jdbclib路径下找到ojdbc6.jar,也可以到官网下载。
然后将
然后将ojdbc6.jar 放在某目录:然后cmd--命令行:在该目录下输入:
mvn install:install-file -DgroupId=com.oracle -DartifactId=ojdbc6 -Dversion=11.2.0.1.0 -Dpackaging=jar -Dfile=ojdbc6.jar

执行成功。
然后右击项目-》maven-》update Project-》OK
更新项目后pom.xml就不会报错了
(3)添加配置文件
新建properties文件:点击:src/main/resources目录---》点击File菜单---》new ---》FIle--》FIle name:datasource.properties---》finish。完成资源文件的创建
(4)备注整理在springboot的application.properties中,配置各种数据库的方法:
转载自:http://blog.chinaunix.net/uid-24648266-id-5758602.html
mysql
- spring.jpa.database=MYSQL
- spring.jpa.properties.hibernate.dialect=org.hibernate.dialect.MySQL5Dialect
- spring.datasource.driver-class-name=com.mysql.jdbc.Driver
- spring.datasource.url=jdbc:mysql://127.0.0.1:3306/mydbname?useSSL=false
- spring.datasource.username=user1
- spring.datasource.password=user1
- <dependency>
-
<groupId>mysql</groupId>
-
<artifactId>mysql-connector-java</artifactId>
-
<version>5.1.34</version>
- </dependency>
oracle
- spring.jpa.database = oracle
- spring.jpa.properties.hibernate.dialect = org.hibernate.dialect.Oracle10gDialect
- spring.datasource.driverClassName=oracle.jdbc.driver.OracleDriver
- spring.datasource.url=jdbc:oracle:thin:@127.0.0.1:1521:xe
- spring.datasource.username=user1
- spring.datasource.password=user1
-
<dependency>
-
<groupId>com.oracle</groupId>
-
<artifactId>ojdbc7</artifactId>
-
<version>12.1.0.2.0</version>
-
</dependency>
sqlserver
- spring.jpa.database = sql_server
- spring.jpa.properties.hibernate.dialect = org.hibernate.dialect.SQLServerDialect
- spring.datasource.driverClassName=com.microsoft.sqlserver.jdbc.SQLServerDriver
- spring.datasource.url=jdbc:sqlserver://127.0.0.1:1433;databaseName=mydbname
- spring.datasource.username=user1
-
spring.datasource.password=user1
-
<dependency>
-
<groupId>com.microsoft.sqlserver</groupId>
-
<artifactId>mssql-jdbc</artifactId>
-
<version>6.1.0.jre8</version>
- </dependency>
(5)启动项目报错:Cannot determine embedded database driver class for database type NONE
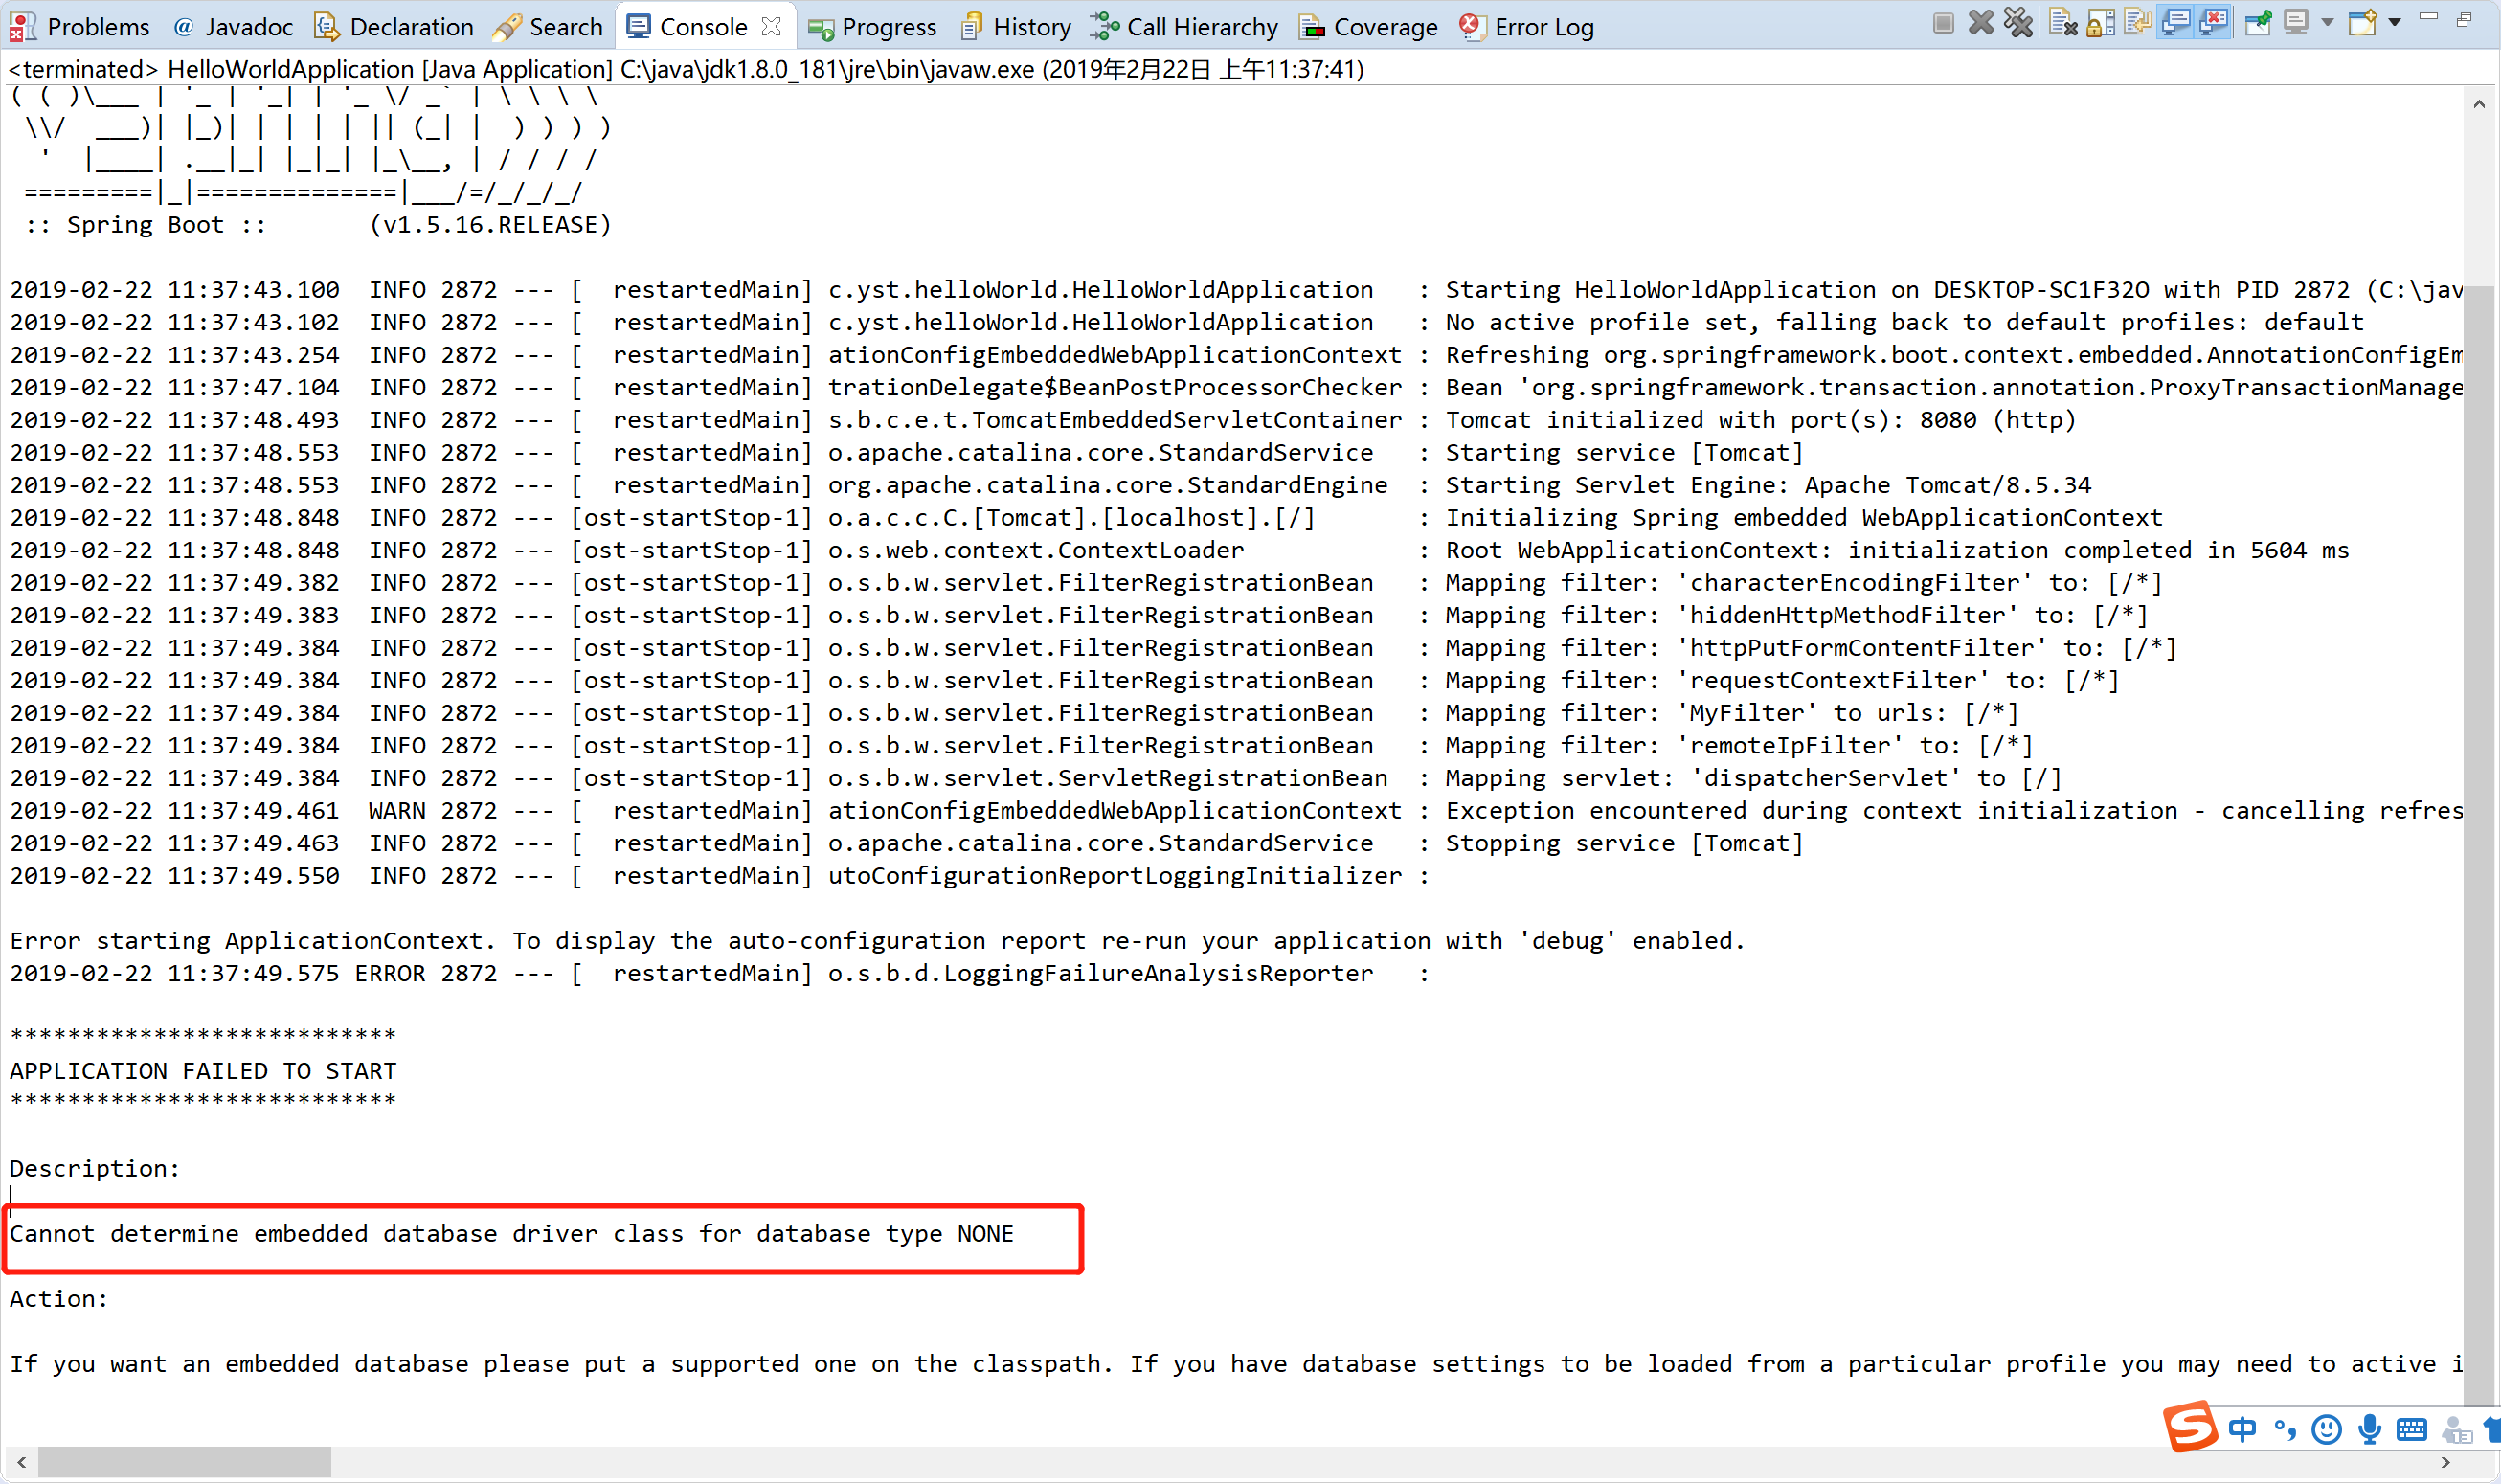
(51)问题分析:
If you want an embedded database please put a supported one on the classpath. If you have database settings to be loaded from a particular profile you may need to active it (no profiles are currently active).
这是因为spring boot默认会加载org.springframework.boot.autoconfigure.jdbc.DataSourceAutoConfiguration类,DataSourceAutoConfiguration类使用了@Configuration注解向spring注入了dataSource bean。因为工程中没有关于dataSource相关的配置信息,当spring创建dataSource bean因缺少相关的信息就会报错。所以阻止spring boot自动注入dataSource bean
因为我仅仅只是使用spring boot来写一些很简单的例子来学习它,在Application类上增加@EnableAutoConfiguration(exclude={DataSourceAutoConfiguration.class})
代码如下:
 1 package com.yst.helloWorld;
 2
 3 import org.springframework.boot.SpringApplication;
 4 import org.springframework.boot.autoconfigure.EnableAutoConfiguration;
 5 import org.springframework.boot.autoconfigure.SpringBootApplication;
 6 import org.springframework.boot.autoconfigure.jdbc.DataSourceAutoConfiguration;
 7 import org.springframework.boot.autoconfigure.orm.jpa.HibernateJpaAutoConfiguration;
 8 import org.springframework.context.annotation.ComponentScan;
 9 import org.springframework.stereotype.Controller;
10
11 @SpringBootApplication
12 //@Controller
13 //@EnableAutoConfiguration
14 //@ComponentScan("com.yst.helloWOrld.web")
15 @EnableAutoConfiguration(exclude={DataSourceAutoConfiguration.class})
16 public class HelloWorldApplication {
17
18     public static void main(String[] args) {
19          //启动Spring Boot项目的唯一入口
20         SpringApplication.run(HelloWorldApplication.class, args);
21     }
22 }
但是重新启动还是报错:错误如下:

原因:@SpringBootApplication = (默认属性)@Configuration + @EnableAutoConfiguration + @ComponentScan。springboot会自动注入数据源,而你却没有配,所以他就抛出该异常。
这说明刚才的@SpringBootApplication(exclude={DataSourceAutoConfiguration.class})并没有起到不注入数据源的作用,是哪里出错了吗?
查资料好像应该是配置这个:@SpringBootApplication(exclude={DataSourceAutoConfiguration.class,HibernateJpaAutoConfiguration.class})
代码如下
 1 package com.yst.helloWorld;
 2
 3 import org.springframework.boot.SpringApplication;
 4 import org.springframework.boot.autoconfigure.EnableAutoConfiguration;
 5 import org.springframework.boot.autoconfigure.SpringBootApplication;
 6 import org.springframework.boot.autoconfigure.jdbc.DataSourceAutoConfiguration;
 7 import org.springframework.boot.autoconfigure.orm.jpa.HibernateJpaAutoConfiguration;
 8 import org.springframework.context.annotation.ComponentScan;
 9 import org.springframework.stereotype.Controller;
10
11 @SpringBootApplication
12 //@Controller
13 //@EnableAutoConfiguration
14 //@ComponentScan("com.yst.helloWOrld.web")
15 @EnableAutoConfiguration(exclude={DataSourceAutoConfiguration.class,HibernateJpaAutoConfiguration.class})
16 public class HelloWorldApplication {
17
18     public static void main(String[] args) {
19          //启动Spring Boot项目的唯一入口
20         SpringApplication.run(HelloWorldApplication.class, args);
21     }
22 }
启动,报错:
org.apache.catalina.LifecycleException: Failed to start component [Connector[HTTP/1.1-8080]]
    at org.apache.catalina.util.LifecycleBase.start(LifecycleBase.java:167) ~[tomcat-embed-core-8.5.34.jar:8.5.34]
    at org.apache.catalina.core.StandardService.addConnector(StandardService.java:225) ~[tomcat-embed-core-8.5.34.jar:8.5.34]
    at org.springframework.boot.context.embedded.tomcat.TomcatEmbeddedServletContainer.addPreviouslyRemovedConnectors(TomcatEmbeddedServletContainer.java:265) [spring-boot-1.5.16.RELEASE.jar:1.5.16.RELEASE]
    at org.springframework.boot.context.embedded.tomcat.TomcatEmbeddedServletContainer.start(TomcatEmbeddedServletContainer.java:208) [spring-boot-1.5.16.RELEASE.jar:1.5.16.RELEASE]
    at org.springframework.boot.context.embedded.EmbeddedWebApplicationContext.startEmbeddedServletContainer(EmbeddedWebApplicationContext.java:297) [spring-boot-1.5.16.RELEASE.jar:1.5.16.RELEASE]
    at org.springframework.boot.context.embedded.EmbeddedWebApplicationContext.finishRefresh(EmbeddedWebApplicationContext.java:145) [spring-boot-1.5.16.RELEASE.jar:1.5.16.RELEASE]
    at org.springframework.context.support.AbstractApplicationContext.refresh(AbstractApplicationContext.java:546) [spring-context-4.3.19.RELEASE.jar:4.3.19.RELEASE]
    at org.springframework.boot.context.embedded.EmbeddedWebApplicationContext.refresh(EmbeddedWebApplicationContext.java:122) [spring-boot-1.5.16.RELEASE.jar:1.5.16.RELEASE]
    at org.springframework.boot.SpringApplication.refresh(SpringApplication.java:693) [spring-boot-1.5.16.RELEASE.jar:1.5.16.RELEASE]
    at org.springframework.boot.SpringApplication.refreshContext(SpringApplication.java:360) [spring-boot-1.5.16.RELEASE.jar:1.5.16.RELEASE]
    at org.springframework.boot.SpringApplication.run(SpringApplication.java:303) [spring-boot-1.5.16.RELEASE.jar:1.5.16.RELEASE]
    at org.springframework.boot.SpringApplication.run(SpringApplication.java:1118) [spring-boot-1.5.16.RELEASE.jar:1.5.16.RELEASE]
    at org.springframework.boot.SpringApplication.run(SpringApplication.java:1107) [spring-boot-1.5.16.RELEASE.jar:1.5.16.RELEASE]
    at com.yst.helloWorld.HelloWorldApplication.main(HelloWorldApplication.java:20) [classes/:na]
    at sun.reflect.NativeMethodAccessorImpl.invoke0(Native Method) ~[na:1.8.0_181]
    at sun.reflect.NativeMethodAccessorImpl.invoke(NativeMethodAccessorImpl.java:62) ~[na:1.8.0_181]
    at sun.reflect.DelegatingMethodAccessorImpl.invoke(DelegatingMethodAccessorImpl.java:43) ~[na:1.8.0_181]
    at java.lang.reflect.Method.invoke(Method.java:498) ~[na:1.8.0_181]
    at org.springframework.boot.devtools.restart.RestartLauncher.run(RestartLauncher.java:49) [spring-boot-devtools-1.5.16.RELEASE.jar:1.5.16.RELEASE]
Caused by: org.apache.catalina.LifecycleException: Protocol handler start failed
    at org.apache.catalina.connector.Connector.startInternal(Connector.java:1020) ~[tomcat-embed-core-8.5.34.jar:8.5.34]
    at org.apache.catalina.util.LifecycleBase.start(LifecycleBase.java:150) ~[tomcat-embed-core-8.5.34.jar:8.5.34]
    ... 18 common frames omitted
Caused by: java.net.BindException: Address already in use: bind
    at sun.nio.ch.Net.bind0(Native Method) ~[na:1.8.0_181]
    at sun.nio.ch.Net.bind(Net.java:433) ~[na:1.8.0_181]
    at sun.nio.ch.Net.bind(Net.java:425) ~[na:1.8.0_181]
    at sun.nio.ch.ServerSocketChannelImpl.bind(ServerSocketChannelImpl.java:223) ~[na:1.8.0_181]
    at sun.nio.ch.ServerSocketAdaptor.bind(ServerSocketAdaptor.java:74) ~[na:1.8.0_181]
    at org.apache.tomcat.util.net.NioEndpoint.bind(NioEndpoint.java:219) ~[tomcat-embed-core-8.5.34.jar:8.5.34]
    at org.apache.tomcat.util.net.AbstractEndpoint.start(AbstractEndpoint.java:1151) ~[tomcat-embed-core-8.5.34.jar:8.5.34]
    at org.apache.coyote.AbstractProtocol.start(AbstractProtocol.java:591) ~[tomcat-embed-core-8.5.34.jar:8.5.34]
    at org.apache.catalina.connector.Connector.startInternal(Connector.java:1018) ~[tomcat-embed-core-8.5.34.jar:8.5.34]
    ... 19 common frames omitted

2019-02-25 18:38:49.873  INFO 9852 --- [  restartedMain] o.apache.catalina.core.StandardService   : Stopping service [Tomcat]
2019-02-25 18:38:49.973  INFO 9852 --- [  restartedMain] utoConfigurationReportLoggingInitializer :

Error starting ApplicationContext. To display the auto-configuration report re-run your application with 'debug' enabled.
2019-02-25 18:38:50.009 ERROR 9852 --- [  restartedMain] o.s.b.d.LoggingFailureAnalysisReporter   :

***************************
APPLICATION FAILED TO START
***************************

Description:

The Tomcat connector configured to listen on port 8080 failed to start. The port may already be in use or the connector may be misconfigured.

Action:

Verify the connector's configuration, identify and stop any process that's listening on port 8080, or configure this application to listen on another port.
原来是8080端口被占用:
解决步骤:打开cmd命令窗口 输入指令:netstat -ano 查看所有端口和PID,如下图所示:
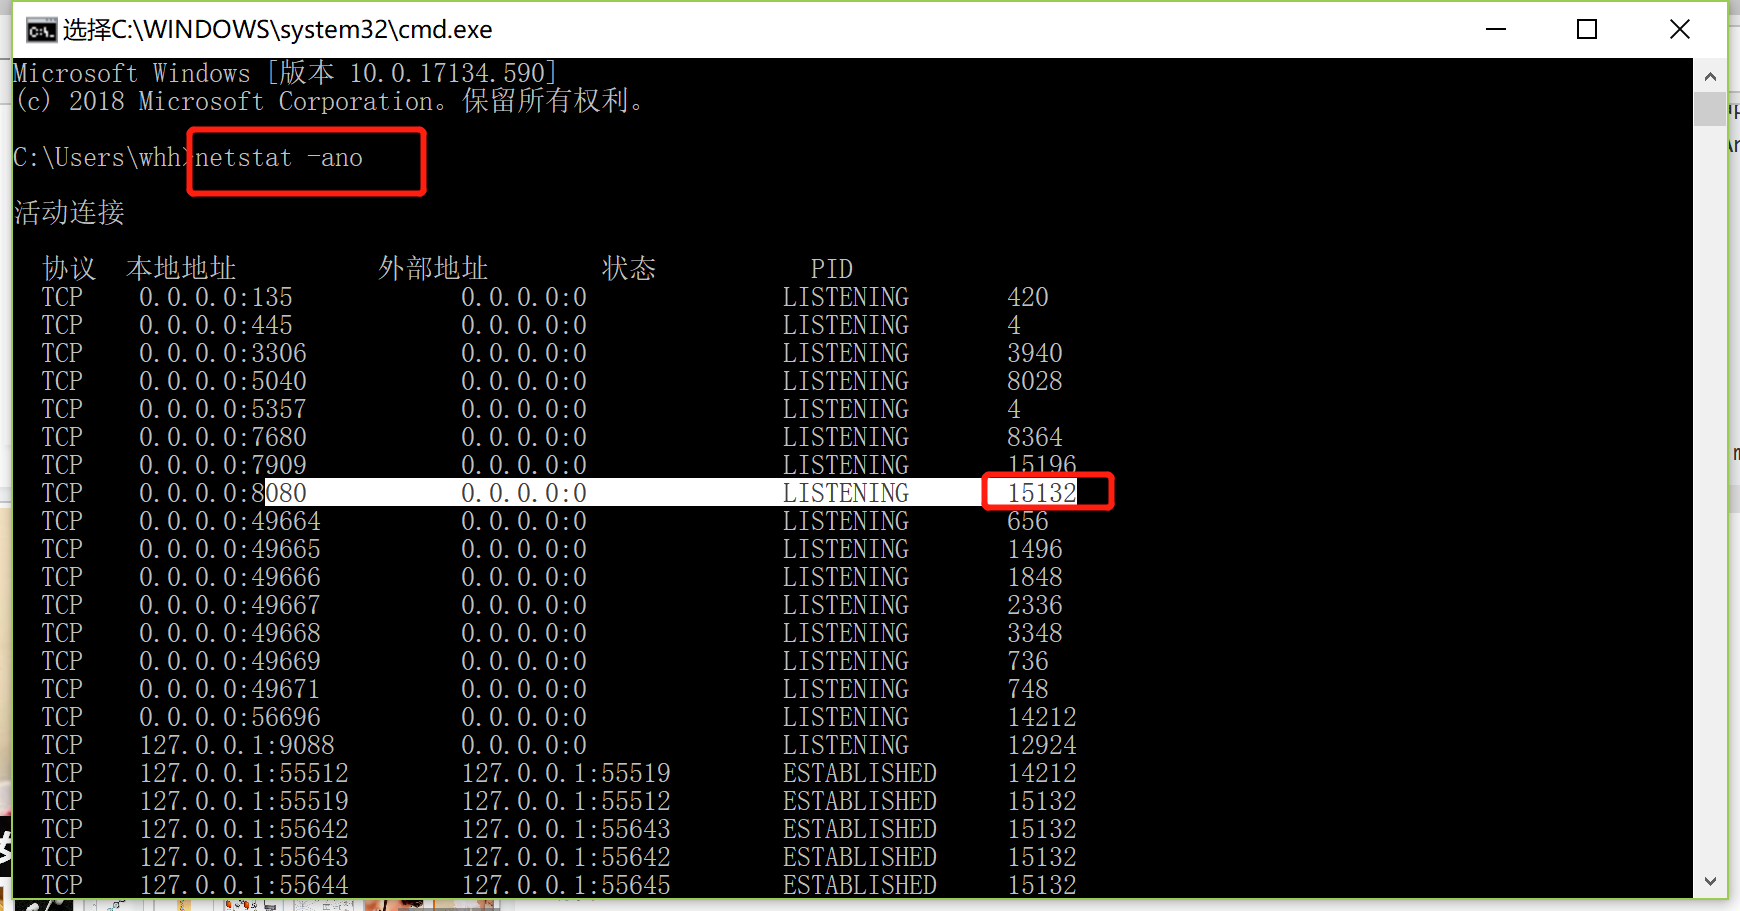
然后找到对应的端口对应的PID 输入指令: tasklist | findstr "15132" 找到对应的进程;输入 命令:taskkill /f /t /im javaw.exe 杀掉该进程就可以啦(杀进程也可以使用kill命令:kill xxx,常用::kill -9 pid)

重新启动,启动成功:如图: