系列教程目录
(一) 连接阿里云IOT
(二) 设置委托事件
(三) 上报属性
(四) SDK文档 属性、方法、委托、类
http://pan.whuanle.cn/index.php?dir=uploads/阿里云IOT/AliIOTXFclient-dll类库&response
下载三个库,头部引入 即可使用
using AliIOTXFClient;
示例下载地址
http://pan.whuanle.cn/index.php?dir=uploads/阿里云IOT/demo示例
本章示例 AliIOTXF.Three
定义产品模型-属性
打开阿里云IOT控制台 https://iot.console.aliyun.com/product
点击产品,打开 --功能定义,然后新建自定义功能
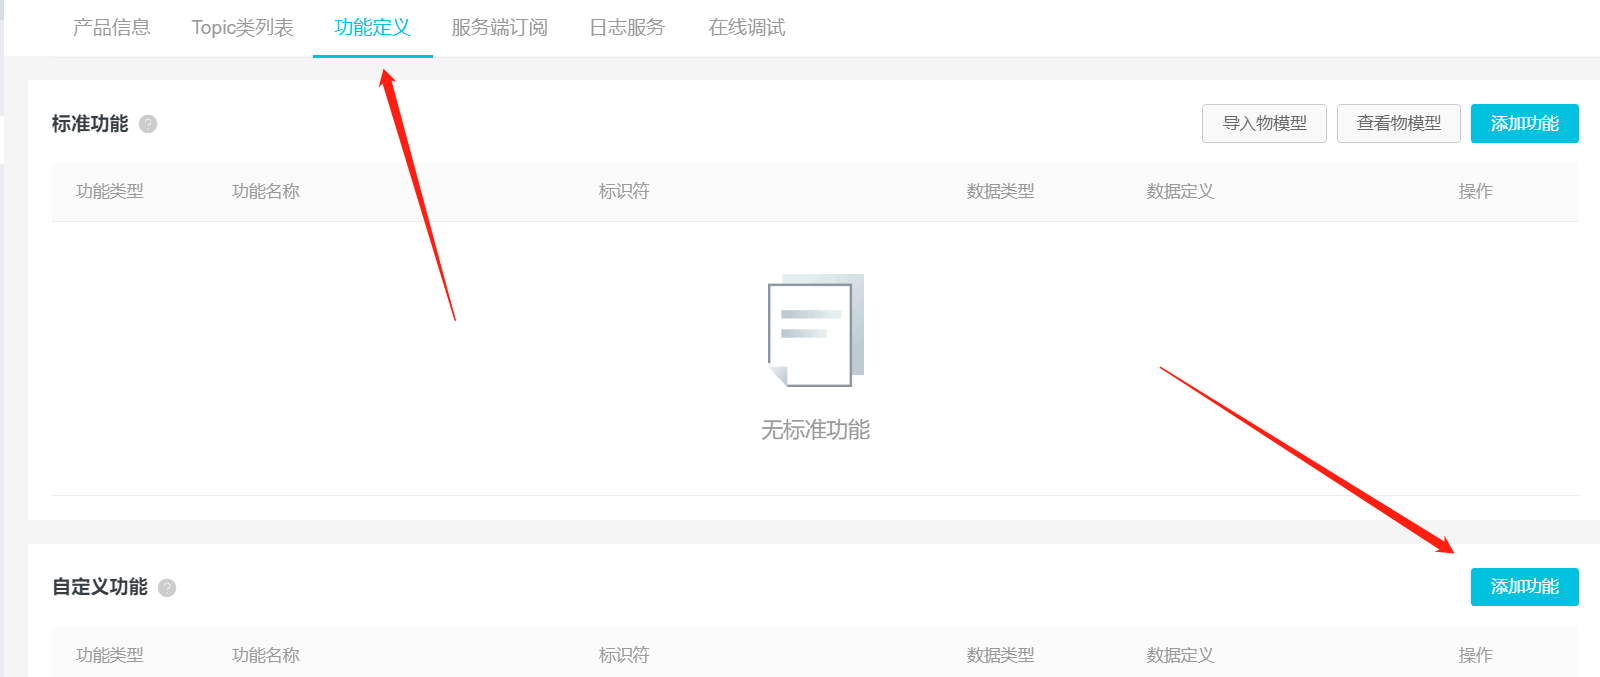
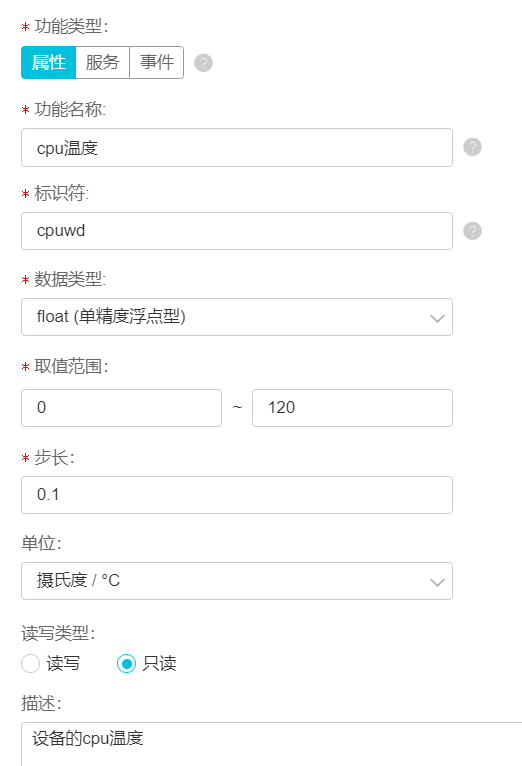
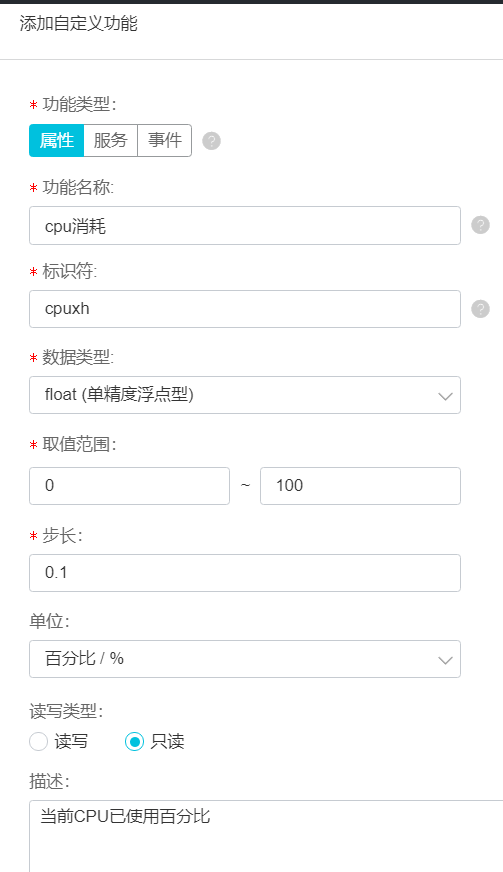
定义两个属性
注意都用小写,注意都用小写!透传数据和Json上传,都是区分大小写的。应当统一小写,避免命名冲突。尤其使用模型存储数据,有些字段会与关键字冲突,可以把字段部分大写,上传时转化为 json,字符全部转小写即可。
读写权限,只读,表示只能从客户端发送属性数据到服务器,可读可写表示服务器可以向客户端设置此属性的值。
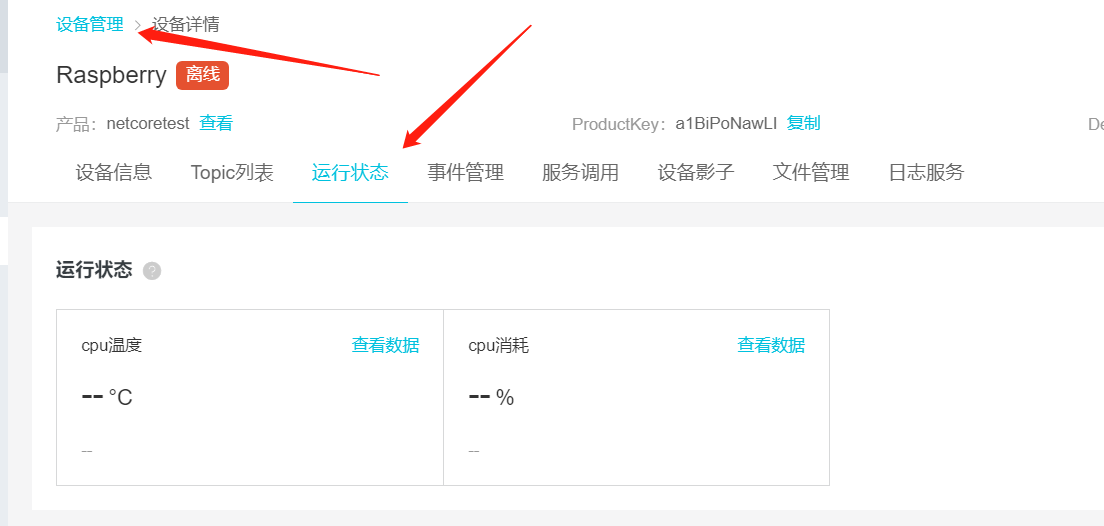
查看属性
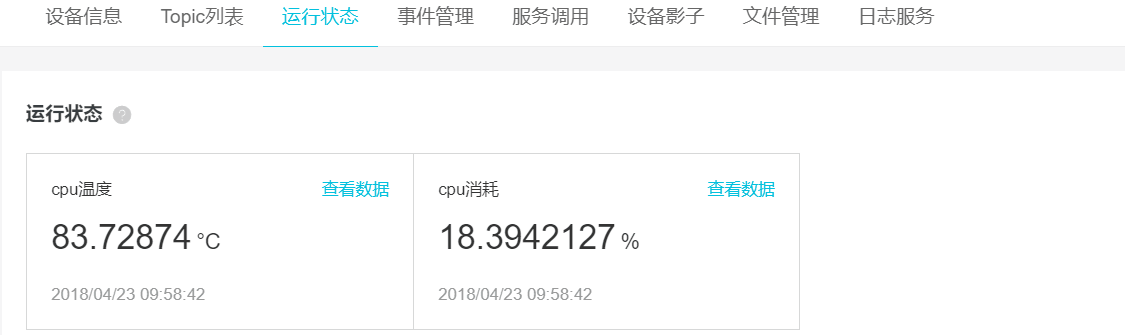
添加好的属性,打开设备-运行状态可以看到
编写客户端设备模型
阿里云官方文档 属性、事件、服务 https://help.aliyun.com/document_detail/89301.html?spm=5176.11065259.1996646101.searchclickresult.5d587dafQbHe20
这里主要说Json上传,透传比较麻烦,但是 XF SDK 是支持的,后面补充透传方法。
设备属性上传JSON格式
{
  "id": "123",
  "version": "1.0",
  "params": {
    "属性1": {
      "value": "on",
      "time": 1524448722000
    },
    "属性2": {
      "value": 23.6,
      "time": 1524448722000
    }
  },
  "method": "thing.event.property.post"
}
params 里面,放置属性,属性有两个参数,value:值,time:时间
在下面里添加一个新文件 TestModel.cs
文件内容:
 public class TestModel
    {
        public string id { get; set; }
        public string version { get; set; }

        public Params paramS { get; set; }
        public TestModel()
        {
            paramS = new Params();
        }

        public class Params
        {
            public Cpuwd cpuwd { get; set; }
            public Cpuxh cpuxh { get; set; }
            public Params()
            {
                cpuwd = new Cpuwd();
                cpuxh = new Cpuxh();
            }
            public class Cpuwd
            {
                public float value { get; set; }
                public long time { get; set; }
            }
            public class Cpuxh
            {
                public float value { get; set; }
                public long time { get; set; }
            }
        }
        public string methoD { get; set; }
    }
上面就是定义的模型,后面转为Json即可上传数据。模型根据实际情况自定义。
上一章使用的最后完整代码,我们继续使用此项目代码:


    class Program
    {
        static void Main(string[] args)
        {
            // 创建连接对象
            XFMQTT client = new XFMQTT("a1BiPoNawLI", "Raspberry");
            // 初始化客户端配置
            client.Init("2NOaBeqXcIzLQEhlJFEfKbWeug0o3m0c", "cn-shanghai");
            // 要订阅的Topic
            string[] topic = { client.CombineHeadTopic("PubData") };

            // 使用自定义的委托事件
            事件类 事件 = new 事件类();
            client.PubEventHandler += 事件.收到消息;
            client.PubedEventHandler += 事件.重复收到消息;
            client.SubedEventHandler += 事件.发布消息时;
            client.UnSubedEventHandler += 事件.发送失败;
            client.ConnectionClosedEventHandler += 事件.断开连接;
            //client.add
            // 连接服务器
            client.ConnectMqtt(topic);

            while (true)
            {
                string str = Console.ReadLine();

                // 推送内容到特定的 Topic
                client.Subscribe(client.CombineHeadTopic("SubData"), str);
            }

            Console.ReadKey();
        }
    }
    public class 事件类
    {
        public  void 收到消息(object sender, MqttMsgPublishEventArgs e)
        {
            Console.WriteLine("topic名称:" + e.Topic);
            Console.WriteLine("接收时间:" + DateTime.Now.ToLongDateString());
            Console.WriteLine("消息内容:
" + Encoding.ASCII.GetString(e.Message));
        }
        public  void 重复收到消息(object sender, MqttMsgPublishedEventArgs e)
        {
            Console.WriteLine("接收时间: " + DateTime.Now.ToLongTimeString());
            Console.WriteLine("消息id: " + e.MessageId + "    Is Published: " + e.IsPublished);
        }
        public void 发布消息时(object sender, MqttMsgSubscribedEventArgs e)
        {
            Console.WriteLine("向服务器发送了消息");
            Console.WriteLine("发送时间: " + DateTime.Now.ToLongTimeString());
            Console.WriteLine("消息id: " + e.MessageId);
            Console.WriteLine("QOS 为 :    " + Encoding.UTF8.GetString(e.GrantedQoSLevels));
        }
        public void 发送失败(object sender, MqttMsgUnsubscribedEventArgs e)
        {
            Console.WriteLine("消息发送失败 ");
            Console.WriteLine("时间: " + DateTime.Now.ToLongTimeString());
            Console.WriteLine("失败的消息 MessageId:    " + e.MessageId);
        }
        public  void 断开连接(object sender, EventArgs e)
        {
            Console.WriteLine("日。。。连接断开了: " + DateTime.Now.ToLongTimeString());
        }
    }
删除这一行
            // 使用默认事件方法
            client.UseDefaultEventHandler();
上报属性
删除 while(true) 语句内的代码
改成
   Thread.Sleep(1000);

                //模拟数据
                // cpu温度
                float cpuwd = (float)(new Random()).Next(0, 120) + (float)(new Random()).NextDouble();
                // cpu消耗
                float cpuxh = (float)(new Random()).Next(0, 99) + (float)(new Random()).NextDouble();

                // 模型对象
                TestModel model = new TestModel
                {
                    id = "123456",      //自定义
                    version = "1.0",    //固定!
                    methoD = "thing.event.property.post",    //固定!
                };

                // 数据和时间戳
                model.paramS.cpuwd.value = cpuwd;
                model.paramS.cpuwd.time = 1524448722000;
                model.paramS.cpuxh.value = cpuxh;
                model.paramS.cpuxh.time = 1524448722000;

                // 推送内容到特定的 Topic
                client.Thing_Property_Post<TestModel>(model, true);
然后运行程序,查看阿里云IOT--设备--运行状态--数据变化
如果你有留意,会发现时间不是实时的。
增加一个方法获取时间戳的方法(偷别人的)
        /// <summary>
        /// 将c# DateTime时间格式转换为Unix时间戳格式
        /// </summary>
        /// <param name="time">时间</param>
        /// <returns>long</returns>
        public static long ConvertDateTimeToInt()
        {
            System.DateTime time = DateTime.Now;
            System.DateTime startTime = TimeZone.CurrentTimeZone.ToLocalTime(new System.DateTime(1970, 1, 1, 0, 0, 0, 0));
            long t = (time.Ticks - startTime.Ticks) / 10000;   //除10000调整为13位
            return t;
        }
把 while(true)的代码修改
 while (true)
            {
                Thread.Sleep(1000);

                //模拟数据
                // cpu温度
                float cpuwd = (float)(new Random()).Next(0, 120) + (float)(new Random()).NextDouble();
                // cpu消耗
                float cpuxh = (float)(new Random()).Next(0, 99) + (float)(new Random()).NextDouble();

                // 模型对象
                TestModel model = new TestModel
                {
                    id = "123456",      //自定义
                    version = "1.0",    //固定!
                    methoD = "thing.event.property.post",    //固定!
                };

                // 数据和时间戳
                model.paramS.cpuwd.value = cpuwd;
                model.paramS.cpuwd.time = ConvertDateTimeToInt();
                model.paramS.cpuxh.value = cpuxh;
                model.paramS.cpuxh.time = ConvertDateTimeToInt();

                // 推送内容到特定的 Topic
                client.Thing_Property_Post<TestModel>(model, true);
            }
再次查看数据

由于使用随机数的范围比较大,波动太大了,不太符合常规,所以数据报表不好看。这个要根据实际情况自己调整一下范围。
笔者把cpu消耗调到 40-50

完整代码如下
    class Program
    {
        static void Main(string[] args)
        {
            // 创建连接对象
            XFMQTT client = new XFMQTT("a1BiPoNawLI", "Raspberry");
            // 初始化客户端配置
            client.Init("2NOaBeqXcIzLQEhlJFEfKbWeug0o3m0c", "cn-shanghai");
            // 要订阅的Topic
            string[] topic = { client.CombineHeadTopic("PubData")};

            // 使用自定义的委托事件
            事件类 事件 = new 事件类();
            client.PubEventHandler += 事件.收到消息;
            client.PubedEventHandler += 事件.重复收到消息;
            client.SubedEventHandler += 事件.发布消息时;
            client.UnSubedEventHandler += 事件.发送失败;
            client.ConnectionClosedEventHandler += 事件.断开连接;
            //client.add
            // 连接服务器
            client.ConnectMqtt(topic);

            while (true)
            {
                Thread.Sleep(1000);

                //模拟数据
                // cpu温度
                float cpuwd = (float)(new Random()).Next(40, 60) + (float)(new Random()).NextDouble();
                // cpu消耗
                float cpuxh = (float)(new Random()).Next(30, 40) + (float)(new Random()).NextDouble();

                // 模型对象
                TestModel model = new TestModel
                {
                    id = "123456",      //自定义
                    version = "1.0",    //固定!
                    methoD = "thing.event.property.post",    //固定!
                };

                // 数据和时间戳
                model.paramS.cpuwd.value = cpuwd;
                model.paramS.cpuwd.time = ConvertDateTimeToInt();
                model.paramS.cpuxh.value = cpuxh;
                model.paramS.cpuxh.time = ConvertDateTimeToInt();

                // 推送内容到特定的 Topic
                client.Thing_Property_Post<TestModel>(model, true);
            }

            Console.ReadKey();
        }
        /// <summary>
        /// 将c# DateTime时间格式转换为Unix时间戳格式
        /// </summary>
        /// <param name="time">时间</param>
        /// <returns>long</returns>
        public static long ConvertDateTimeToInt()
        {
            System.DateTime time = DateTime.Now;
            System.DateTime startTime = TimeZone.CurrentTimeZone.ToLocalTime(new System.DateTime(1970, 1, 1, 0, 0, 0, 0));
            long t = (time.Ticks - startTime.Ticks) / 10000;   //除10000调整为13位
            return t;
        }
    }
    public class 事件类
    {
        public void 收到消息(object sender, MqttMsgPublishEventArgs e)
        {
            Console.WriteLine("topic名称:" + e.Topic);
            Console.WriteLine("接收时间:" + DateTime.Now.ToLongDateString());
            Console.WriteLine("消息内容:
" + Encoding.ASCII.GetString(e.Message));
        }
        public void 重复收到消息(object sender, MqttMsgPublishedEventArgs e)
        {
            Console.WriteLine("接收时间: " + DateTime.Now.ToLongTimeString());
            Console.WriteLine("消息id: " + e.MessageId + "    Is Published: " + e.IsPublished);
        }
        public void 发布消息时(object sender, MqttMsgSubscribedEventArgs e)
        {
            Console.WriteLine("向服务器发送了消息");
            Console.WriteLine("发送时间: " + DateTime.Now.ToLongTimeString());
            Console.WriteLine("消息id: " + e.MessageId);
            Console.WriteLine("QOS 为 :    " + Encoding.UTF8.GetString(e.GrantedQoSLevels));
        }
        public void 发送失败(object sender, MqttMsgUnsubscribedEventArgs e)
        {
            Console.WriteLine("消息发送失败 ");
            Console.WriteLine("时间: " + DateTime.Now.ToLongTimeString());
            Console.WriteLine("失败的消息 MessageId:    " + e.MessageId);
        }
        public void 断开连接(object sender, EventArgs e)
        {
            Console.WriteLine("日。。。连接断开了: " + DateTime.Now.ToLongTimeString());
        }
    }
考虑到有些师弟在看~贴一下部分代码的解释
Random random = new Random();
int wd = random.Next(40,60);
简化写成
(new Random()).Next(40, 60)
.Next(,) 生成范围内的 int 类型数值, .NextDouble() 生成 0<=n<1 的数,double类型。
time是 long int 类型,要填写 13 位时间戳。不懂请点击 https://www.jb51.net/article/149152.htm
public int Thing_Property_Post<AlinkModel>(AlinkModel model, bool isToLower = true);
Thing_Property_Post() 方法可以把属性上传到服务器,isToLwer 表示是否转为小写再上传。
注意:阿里云IOT json 区分大小写,所以建议控制台定义属性是,标识符使用小写,客户端上传json时,全部转为小写,避免出错。
三个重载方法
上传属性有三个重载方法
        public int Thing_Property_Post<AlinkModel>(AlinkModel model, bool isToLower = true);
        public int Thing_Property_Post(byte[] json);
        public int Thing_Property_Post(string json, bool isToLwer = true);
自定义属性模型,通过第一个方法可以直接转换上传,省略不必要操作。
把 json string 转byte[] ,可以通过第二个方法上传到服务器。必须注意byte[]进制问题!
如果只有json,不需要自定义模型,则使用第三种方法上传。
接收响应
根据协议,属性、事件、服务,上传或下发,另一方要进行响应。
上面的例子运行后,控制台并没有反应。
因为我们没有设置要接收响应。
修改一下订阅Topic
            // 要订阅的Topic
            string[] topic = { client.CombineHeadTopic("PubData"),client.thingModel.upTopic.post_reply };
client.thingModel.upTopic.post_reply ,一个Topic地址,由于接收发布属性后,接收服务器的响应消息。
thingModel 定义的设备属性服务事件,发送接收以及响应的Topic。这些下一章说。
服务器响应内容格式
{
  "id": "123",
  "code": 200,
  "data": {}
}
修改后的完整代码
    class Program
    {
        static void Main(string[] args)
        {
            // 创建连接对象
            XFMQTT client = new XFMQTT("a1BiPoNawLI", "Raspberry");
            // 初始化客户端配置
            client.Init("2NOaBeqXcIzLQEhlJFEfKbWeug0o3m0c", "cn-shanghai");
            // 要订阅的Topic
            string[] topic = { client.CombineHeadTopic("PubData"),client.thingModel.upTopic.post_reply };

            // 使用自定义的委托事件
            事件类 事件 = new 事件类();
            client.PubEventHandler += 事件.收到消息;
            client.PubedEventHandler += 事件.重复收到消息;
            client.SubedEventHandler += 事件.发布消息时;
            client.UnSubedEventHandler += 事件.发送失败;
            client.ConnectionClosedEventHandler += 事件.断开连接;
            //client.add
            // 连接服务器
            client.ConnectMqtt(topic);

            while (true)
            {
                Thread.Sleep(1000);

                //模拟数据
                // cpu温度
                float cpuwd = (float)(new Random()).Next(40, 60) + (float)(new Random()).NextDouble();
                // cpu消耗
                float cpuxh = (float)(new Random()).Next(30, 40) + (float)(new Random()).NextDouble();

                // 模型对象
                TestModel model = new TestModel
                {
                    id = "123456",      //自定义
                    version = "1.0",    //固定!
                    methoD = "thing.event.property.post",    //固定!
                };

                // 数据和时间戳
                model.paramS.cpuwd.value = cpuwd;
                model.paramS.cpuwd.time = ConvertDateTimeToInt();
                model.paramS.cpuxh.value = cpuxh;
                model.paramS.cpuxh.time = ConvertDateTimeToInt();

                // 推送内容到特定的 Topic
                client.Thing_Property_Post<TestModel>(model, true);
            }

            Console.ReadKey();
        }
        /// <summary>
        /// 将c# DateTime时间格式转换为Unix时间戳格式
        /// </summary>
        /// <param name="time">时间</param>
        /// <returns>long</returns>
        public static long ConvertDateTimeToInt()
        {
            System.DateTime time = DateTime.Now;
            System.DateTime startTime = TimeZone.CurrentTimeZone.ToLocalTime(new System.DateTime(1970, 1, 1, 0, 0, 0, 0));
            long t = (time.Ticks - startTime.Ticks) / 10000;   //除10000调整为13位
            return t;
        }
    }
    public class 事件类
    {
        public void 收到消息(object sender, MqttMsgPublishEventArgs e)
        {
            Console.WriteLine("topic名称:" + e.Topic);
            Console.WriteLine("接收时间:" + DateTime.Now.ToLongDateString());
            Console.WriteLine("消息内容:
" + Encoding.ASCII.GetString(e.Message));
        }
        public void 重复收到消息(object sender, MqttMsgPublishedEventArgs e)
        {
            Console.WriteLine("接收时间: " + DateTime.Now.ToLongTimeString());
            Console.WriteLine("消息id: " + e.MessageId + "    Is Published: " + e.IsPublished);
        }
        public void 发布消息时(object sender, MqttMsgSubscribedEventArgs e)
        {
            Console.WriteLine("向服务器发送了消息");
            Console.WriteLine("发送时间: " + DateTime.Now.ToLongTimeString());
            Console.WriteLine("消息id: " + e.MessageId);
            Console.WriteLine("QOS 为 :    " + Encoding.UTF8.GetString(e.GrantedQoSLevels));
        }
        public void 发送失败(object sender, MqttMsgUnsubscribedEventArgs e)
        {
            Console.WriteLine("消息发送失败 ");
            Console.WriteLine("时间: " + DateTime.Now.ToLongTimeString());
            Console.WriteLine("失败的消息 MessageId:    " + e.MessageId);
        }
        public void 断开连接(object sender, EventArgs e)
        {
            Console.WriteLine("日。。。连接断开了: " + DateTime.Now.ToLongTimeString());
        }
    }
运行程序可以发现控制台会接收到服务器响应提示
