在本篇文章中,我们将通过一个具体的实例来演示如何通过路由服务。在这个例子中,我们会创建连个简单的服务HelloServie和GoodbyeService。假设客户端不能直接调用这两个服务,需要使用到路由服务作为两者之间的中介。整个消息路由的场景如下图所示,中间的GreetingService.svc就是代表路由服务,而两个目标服务则通过HelloServie.svc和GoodbyeService.svc表示。路由服务使用的消息筛选器EndpointAddressMessageFilter,即根据包含在消息中的目标地址来决定应该将请求消息转发给HelloServie.svc还是GoodbyeService.svc。[源代码从这里下载]
步骤一、构建解决方案
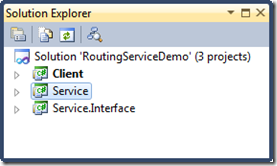
首先我们创建一个空的解决方案,并如下图所示添加三个项目并添加相应的引用。其中类库项目Service.Interface和Service分别用于定义服务契约和服务类型,而控制台项目Client用作为进行服务调用的客户端。
步骤二、定义服务
在Service.Interface项目中为两个服务创建服务契约接口:IHello和IGoodbye,两个接口定义如下。
1: using System.ServiceModel;
2: namespace Artech.RoutingServiceDemo.Service.Interface
3: {
4: [ServiceContract(Namespace="http://www.artech.com/")]
5: public interface IHello
6: {
7: [OperationContract]
8: string SayHello(string userName);
9: }
10: [ServiceContract(Namespace = "http://www.artech.com/")]
11: public interface IGoodbye
12: {
13: [OperationContract]
14: string SayGoodbye(string userName);
15: }
16: }
然后在Service项目中定义实现两个服务契约接口的服务类型:HelloService和GoodbyeService,具体定义如下。
1: using Artech.RoutingServiceDemo.Service.Interface;
2: namespace Service
3: {
4: public class HelloService: IHello
5: {
6: public string SayHello(string userName)
7: {
8: return string.Format("Hello, {0}", userName);
9: }
10: }
11: public class GoodbyeService : IGoodbye
12: {
13: public string SayGoodbye(string userName)
14: {
15: return string.Format("Goodbye, {0}", userName);
16: }
17: }
18: }
步骤三、寄宿目标服务和路由服务
我们将上面定义的两个服务HelloService和GoodbyeService,以及路由服务RoutingService寄宿在IIS下。为此,我们直接在IIS管理器中创建一个Web应用(起名为“RoutingServiceDemo”),其物理地址之上Service项目的根目录。然后,不要忘了将该项目的编译后的输出目录从默认的\bin\Debug\改为\bin。接下来在Service项目中添加一个Web.config, 并完成如下的配置。
1: <configuration>
2: <system.serviceModel>
3: <behaviors>
4: <serviceBehaviors>
5: <behavior name="routingBehavior">
6: <routing filterTableName="greetingFilterTable" routeOnHeadersOnly="true" soapProcessingEnabled="true" />
7: </behavior>
8: </serviceBehaviors>
9: </behaviors>
10: <services>
11: <service name="Service.HelloService">
12: <endpoint binding="ws2007HttpBinding" contract="Artech.RoutingServiceDemo.Service.Interface.IHello" />
13: </service>
14: <service name="Service.GoodbyeService">
15: <endpoint binding="ws2007HttpBinding" contract="Artech.RoutingServiceDemo.Service.Interface.IGoodbye" />
16: </service>
17: <service behaviorConfiguration="routingBehavior" name="System.ServiceModel.Routing.RoutingService">
18: <endpoint binding="ws2007HttpBinding" contract="System.ServiceModel.Routing.IRequestReplyRouter" />
19: </service>
20: </services>
21: <client>
22: <endpoint name="helloService" address="http://127.0.0.1/RoutingServiceDemo/HelloService.svc" binding="ws2007HttpBinding" contract="*"/>
23: <endpoint name="goodbyeService" address="http://127.0.0.1/RoutingServiceDemo/GoodbyeService.svc" binding="ws2007HttpBinding" contract="*"/>
24: </client>
25: <routing>
26: <filters>
27: <filter name ="Address4HelloService" filterType ="EndpointAddress" filterData="http://127.0.0.1/RoutingServiceDemo/HelloService.svc"/>
28: <filter name ="Address4GoodbyeService" filterType ="EndpointAddress" filterData="http://127.0.0.1/RoutingServiceDemo/GoodbyeService.svc"/>
29: </filters>
30: <filterTables>
31: <filterTable name="greetingFilterTable">
32: <add filterName="Address4HelloService" endpointName="helloService"/>
33: <add filterName="Address4GoodbyeService" endpointName="goodbyeService"/>
34: </filterTable>
35: </filterTables>
36: </routing>
37: <serviceHostingEnvironment>
38: <serviceActivations>
39: <add relativeAddress="HelloService.svc" service="Service.HelloService"/>
40: <add relativeAddress="GoodbyeService.svc" service="Service.GoodbyeService"/>
41: <add relativeAddress="GrettingService.svc" service="System.ServiceModel.Routing.RoutingService,
42: System.ServiceModel.Routing, Version=4.0.0.0, Culture=neutral, PublicKeyToken=31bf3856ad364e35"/>
43: </serviceActivations>
44: </serviceHostingEnvironment>
45: </system.serviceModel>
46: </configuration>
我们对上述的这段配置进行一下简单的分析。首先,我们按照“无.svc文件服务激活”方式(《标准终结点与无(.SVC)文件服务激活》)对服务HelloService、GoodbyeService和路由服务RoutingService进行寄宿,它们的相对地址分别为HelloService.svc、GoodbyeService.svc和GreetingService.svc。它们都具有一个唯一的基于WS2007HttpBinding的终结点。由于我们需要路由服务采用请求/回复模式进行消息路由,我们将契约指定为IRequestReplyRouter。
1: <configuration>
2: <system.serviceModel>
3: <services>
4: <service name="Service.HelloService">
5: <endpoint binding="ws2007HttpBinding" contract="Artech.RoutingServiceDemo.Service.Interface.IHello" />
6: </service>
7: <service name="Service.GoodbyeService">
8: <endpoint binding="ws2007HttpBinding" contract="Artech.RoutingServiceDemo.Service.Interface.IGoodbye" />
9: </service>
10: <service behaviorConfiguration="routingBehavior" name="System.ServiceModel.Routing.RoutingService">
11: <endpoint binding="ws2007HttpBinding" contract="System.ServiceModel.Routing.IRequestReplyRouter" />
12: </service>
13: </services>
14: <serviceHostingEnvironment>
15: <serviceActivations>
16: <add relativeAddress="HelloService.svc" service="Service.HelloService"/>
17: <add relativeAddress="GoodbyeService.svc" service="Service.GoodbyeService"/>
18: <add relativeAddress="GrettingService.svc" service="System.ServiceModel.Routing.RoutingService,
19: System.ServiceModel.Routing, Version=4.0.0.0, Culture=neutral, PublicKeyToken=31bf3856ad364e35"/>
20: </serviceActivations>
21: </serviceHostingEnvironment>
22: ...
23: </system.serviceModel>
24: </configuration>
路由服务上应用了服务行为RoutingBehavior,配置在该行为上名称为greetingFilterTable的筛选器表定义如下。该筛选器表它具有两个基于EndpointAddressMessageFilter的消息筛选器,配置名称分别为“Address4HelloService”和“Address4GoodbyeService”,它们分别将目标服务HelloService和GoodbyeService的地址作为筛选条件。而这两个筛选器对应着指向目标服务的客户端终结点“helloService”和“goodbyeService”。
1: <configuration>
2: <system.serviceModel>
3: <client>
4: <endpoint name="helloService" address="http://127.0.0.1/RoutingServiceDemo/HelloService.svc" binding="ws2007HttpBinding" contract="*"/>
5: <endpoint name="goodbyeService" address="http://127.0.0.1/RoutingServiceDemo/GoodbyeService.svc" binding="ws2007HttpBinding" contract="*"/>
6: </client>
7: <routing>
8: <filters>
9: <filter name ="Address4HelloService" filterType ="EndpointAddress" filterData="http://127.0.0.1/RoutingServiceDemo/HelloService.svc"/>
10: <filter name ="Address4GoodbyeService" filterType ="EndpointAddress" filterData="http://127.0.0.1/RoutingServiceDemo/GoodbyeService.svc"/>
11: </filters>
12: <filterTables>
13: <filterTable name="greetingFilterTable">
14: <add filterName="Address4HelloService" endpointName="helloService"/>
15: <add filterName="Address4GoodbyeService" endpointName="goodbyeService"/>
16: </filterTable>
17: </filterTables>
18: </routing>
19: </system.serviceModel>
20: </configuration>
对于上述的配置,细心的读者也许发现一个特殊之处:定义在<client>配置节下的被路由服务使用的终结点的契约被设置成“*”(contract=”*”)。照理说,这里的契约应该设置成路由服务实现的服务契约System.ServiceModel.Routing.IRequestReplyRouter才对。但是你真的进行了如此的设置,因为将路由服务使用的客户端终结点契约设置成“*”是个强制性的规定。
步骤四、服务调用
由于调用服务的消息需要通过路由服务这个中介才能抵达真正的目标服务,所以客户端我们需要将路由服务的地址作为消息发送的目标地址。在这里,我们通过ClientViaBehavior这个终结点行为实现了物理地址(消息真正发送的目标地址)和逻辑地址(终结点地址)的分离,将消息发送给路由服务的地址:http://127.0.0.1/RoutingServiceDemo/GrettingService.svc。下面的XML片断代表整个客户端的配置,而ClientViaBehavior被定义成默认的终结点行为。
1: <configuration>
2: <system.serviceModel>
3: <behaviors>
4: <endpointBehaviors>
5: <behavior>
6: <clientVia viaUri="http://127.0.0.1/RoutingServiceDemo/GrettingService.svc"/>
7: </behavior>
8: </endpointBehaviors>
9: </behaviors>
10: <client>
11: <endpoint name="helloService"
12: address="http://127.0.0.1/RoutingServiceDemo/HelloService.svc"
13: binding="ws2007HttpBinding"
14: contract="Artech.RoutingServiceDemo.Service.Interface.IHello"/>
15: <endpoint name="goodbyeService"
16: address="http://127.0.0.1/RoutingServiceDemo/GoodbyeService.svc"
17: binding="ws2007HttpBinding"
18: contract="Artech.RoutingServiceDemo.Service.Interface.IGoodbye"/>
19: </client>
20: </system.serviceModel>
21: </configuration>
借助于这样的配置,你可以按照传统的编程方式进行服务的调用,无需再考虑底层消息路由机制的存在。
1: using (ChannelFactory<IHello> channelFactoryHello = new ChannelFactory<IHello>("helloService"))
2: using (ChannelFactory<IGoodbye> channelFactoryGoodbye = new ChannelFactory<IGoodbye>("goodbyeService"))
3: {
4: IHello helloProxy = channelFactoryHello.CreateChannel();
5: IGoodbye goodbyeProxy = channelFactoryGoodbye.CreateChannel();
6: Console.WriteLine(helloProxy.SayHello("Zhang San"));
7: Console.WriteLine(goodbyeProxy.SayGoodbye("Li Si"));
8: }
输出结果:
1: Hello, Zhang San
2: Goodbye, Li Si

