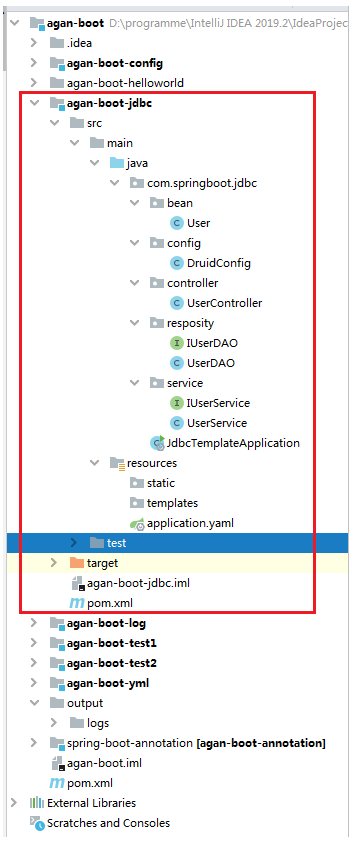
今天主要讲解一下SpringBoot如何整合JDBC,没啥理论好说的,直接上代码,看项目整体结构
查看对应的pom.xml(父节点)
<?xml version="1.0" encoding="UTF-8"?>
<project xmlns="http://maven.apache.org/POM/4.0.0" xmlns:xsi="http://www.w3.org/2001/XMLSchema-instance"
         xsi:schemaLocation="http://maven.apache.org/POM/4.0.0 https://maven.apache.org/xsd/maven-4.0.0.xsd">
    <modelVersion>4.0.0</modelVersion>
    <parent>
        <groupId>org.springframework.boot</groupId>
        <artifactId>spring-boot-starter-parent</artifactId>
        <version>2.2.6.RELEASE</version>
        <relativePath/> <!-- lookup parent from repository -->
    </parent>
    <groupId>com.agan.boot</groupId>
    <artifactId>agan-boot</artifactId>
    <version>1.0.0-SNAPSHOT</version>
    <name>agan-boot</name>
    <description>Demo project for Spring Boot</description>

    <properties>
        <java.version>1.8</java.version>
    </properties>

    <dependencies>

    </dependencies>

    <modules>
        <module>agan-boot-config</module>
        <module>agan-boot-test1</module>
        <module>agan-boot-yml</module>
        <module>agan-boot-log</module>
        <module>agan-boot-test2</module>
        <module>agan-boot-jdbc</module>
    </modules>
    <build>
        <plugins>
            <plugin>
                <groupId>org.springframework.boot</groupId>
                <artifactId>spring-boot-maven-plugin</artifactId>
            </plugin>
        </plugins>
    </build>

</project>
查看对应的pom.xml(子节点)
<?xml version="1.0" encoding="UTF-8"?>
<project xmlns="http://maven.apache.org/POM/4.0.0" xmlns:xsi="http://www.w3.org/2001/XMLSchema-instance"
         xsi:schemaLocation="http://maven.apache.org/POM/4.0.0 https://maven.apache.org/xsd/maven-4.0.0.xsd">
    <modelVersion>4.0.0</modelVersion>
    <parent>
        <groupId>com.agan.boot</groupId>
        <artifactId>agan-boot</artifactId>
        <version>1.0.0-SNAPSHOT</version>
    </parent>
    <groupId>com.agan.boot</groupId>
    <artifactId>agan-boot-jdbc</artifactId>
    <version>1.0.0-SNAPSHOT</version>

    <properties>
        <project.build.sourceEncoding>UTF-8</project.build.sourceEncoding>
        <project.reporting.outputEncoding>UTF-8</project.reporting.outputEncoding>
        <java.version>1.8</java.version>
    </properties>

    <dependencies>

        <dependency>
            <groupId>org.springframework.boot</groupId>
            <artifactId>spring-boot-starter-jdbc</artifactId>
        </dependency>

        <dependency>
            <groupId>mysql</groupId>
            <artifactId>mysql-connector-java</artifactId>
            <version>5.1.36</version>
            <scope>runtime</scope>
        </dependency>

        <!--阿里巴巴数据源-->
        <dependency>
            <groupId>com.alibaba</groupId>
            <artifactId>druid</artifactId>
            <version>1.1.5</version>
        </dependency>


       <dependency>
            <groupId>org.springframework.boot</groupId>
            <artifactId>spring-boot-starter-web</artifactId>
        </dependency>

        <dependency>
            <groupId>org.springframework.boot</groupId>
            <artifactId>spring-boot-starter-test</artifactId>
            <scope>test</scope>
            <exclusions>
                <exclusion>
                    <groupId>org.junit.vintage</groupId>
                    <artifactId>junit-vintage-engine</artifactId>
                </exclusion>
            </exclusions>
        </dependency>
    </dependencies>

    <build>
        <plugins>
            <plugin>
                <groupId>org.springframework.boot</groupId>
                <artifactId>spring-boot-maven-plugin</artifactId>
            </plugin>
        </plugins>
    </build>

</project>
定义User.java
package com.springboot.jdbc.bean;

import java.math.BigDecimal;

public class User {

    public User(Long id, String username) {
        super();
        this.id = id;
        this.username = username;
    }

    public User() {
        super();
    }

    private Long id;

    private String username;

    public Long getId() {
        return this.id;
    }

    public void setId(Long id) {
        this.id = id;
    }

    public String getUsername() {
        return this.username;
    }

    public void setUsername(String username) {
        this.username = username;
    }


}
定义数据源配置,这里使用druid,所以需要写一个配置类
package com.springboot.jdbc.config;

import java.sql.SQLException;
import javax.sql.DataSource;

import com.springboot.jdbc.resposity.UserDAO;
import org.slf4j.Logger;
import org.slf4j.LoggerFactory;
import org.springframework.beans.factory.annotation.Value;
import org.springframework.boot.web.servlet.FilterRegistrationBean;
import org.springframework.boot.web.servlet.ServletRegistrationBean;
import org.springframework.context.annotation.Bean;
import org.springframework.context.annotation.Configuration;
import org.springframework.context.annotation.Primary;
import com.alibaba.druid.pool.DruidDataSource;
import com.alibaba.druid.support.http.StatViewServlet;
import com.alibaba.druid.support.http.WebStatFilter;
/**
 * @Function druid配置
 */
@Configuration
public class DruidConfig {
    private static  final Logger log = (Logger) LoggerFactory.getLogger(UserDAO.class);

    @Value("${spring.datasource.url}")
    private String dbUrl;

    @Value("${spring.datasource.username}")
    private String username;

    @Value("${spring.datasource.password}")
    private String password;

    @Value("${spring.datasource.driver-class-name}")
    private String driverClassName;

    @Value("${spring.datasource.initialSize}")
    private int initialSize;

    @Value("${spring.datasource.minIdle}")
    private int minIdle;

    @Value("${spring.datasource.maxActive}")
    private int maxActive;

    @Value("${spring.datasource.maxWait}")
    private int maxWait;

    @Value("${spring.datasource.timeBetweenEvictionRunsMillis}")
    private int timeBetweenEvictionRunsMillis;

    @Value("${spring.datasource.minEvictableIdleTimeMillis}")
    private int minEvictableIdleTimeMillis;

    @Value("${spring.datasource.validationQuery}")
    private String validationQuery;

    @Value("${spring.datasource.testWhileIdle}")
    private boolean testWhileIdle;

    @Value("${spring.datasource.testOnBorrow}")
    private boolean testOnBorrow;

    @Value("${spring.datasource.testOnReturn}")
    private boolean testOnReturn;

    @Value("${spring.datasource.poolPreparedStatements}")
    private boolean poolPreparedStatements;

    @Value("${spring.datasource.filters}")
    private String filters;

    @Value("${spring.datasource.logSlowSql}")
    private String logSlowSql;

    @Bean
    @Primary //选择默认的数据源
    public DataSource dataSource(){
        //log.info("打桩 : 进入方法 dataSource ");

        DruidDataSource datasource = new DruidDataSource();
        datasource.setUrl(dbUrl);
        datasource.setUsername(username);
        datasource.setPassword(password);
        datasource.setDriverClassName(driverClassName);
        datasource.setInitialSize(initialSize);
        datasource.setMinIdle(minIdle);
        datasource.setMaxActive(maxActive);
        datasource.setMaxWait(maxWait);
        datasource.setTimeBetweenEvictionRunsMillis(timeBetweenEvictionRunsMillis);
        datasource.setMinEvictableIdleTimeMillis(minEvictableIdleTimeMillis);
        datasource.setValidationQuery(validationQuery);
        datasource.setTestWhileIdle(testWhileIdle);
        datasource.setTestOnBorrow(testOnBorrow);
        datasource.setTestOnReturn(testOnReturn);
        datasource.setPoolPreparedStatements(poolPreparedStatements);
        //log.info("打桩 : *1*");
        try {
            //log.info("打桩 : *2*");
            datasource.setFilters(filters);
            //log.info("打桩 : *3*");
        } catch (SQLException e) {

            e.printStackTrace();
        }

        //log.info("打桩 : 退出方法 dataSource ");
        return datasource;
    }

    /**
     *
     * @return 添加登录权限
     */
    @Bean
    public ServletRegistrationBean druidServlet() {
        ServletRegistrationBean reg = new ServletRegistrationBean();
        reg.setServlet(new StatViewServlet());
        reg.addUrlMappings("/druid/*");
        reg.addInitParameter("loginUsername", username);
        reg.addInitParameter("loginPassword", password);
        reg.addInitParameter("logSlowSql", logSlowSql);
        return reg;
    }

    /**
     * 过滤规则
     * @return
     */
    @Bean
    public FilterRegistrationBean filterRegistrationBean() {
        FilterRegistrationBean filterRegistrationBean = new FilterRegistrationBean();
        filterRegistrationBean.setFilter(new WebStatFilter());
        filterRegistrationBean.addUrlPatterns("/*");
        filterRegistrationBean.addInitParameter("exclusions", "*.js,*.gif,*.jpg,*.png,*.css,*.ico,/druid/*");
        filterRegistrationBean.addInitParameter("profileEnable", "true");
        return filterRegistrationBean;
    }
}
上面指定druid的属性配置,和用户登录的账号信息以及对应的过滤规则:
下面定义数据访问接口和对应的实现:
package com.springboot.jdbc.resposity;


import com.springboot.jdbc.bean.User;

public interface IUserDAO {
    User findUserById(long id);
}
package com.springboot.jdbc.resposity;
import com.springboot.jdbc.bean.User;
import org.springframework.beans.factory.annotation.Autowired;
import org.springframework.jdbc.core.BeanPropertyRowMapper;
import org.springframework.jdbc.core.JdbcTemplate;
import org.springframework.stereotype.Repository;
import java.util.List;
import org.slf4j.Logger;
import org.slf4j.LoggerFactory;

@Repository
public class UserDAO implements IUserDAO {
    private static  final Logger log = (Logger) LoggerFactory.getLogger(UserDAO.class);
    /*public UserDAO(){
        log.info("打桩 : 进入UserDAO的无参构造方法。");
    }*/
    @Autowired
    private JdbcTemplate jdbcTemplate; // 这个是系统自带的
    @Override
    public User findUserById(long id) {

        //log.info("进入findUserById");
        List<User> list = jdbcTemplate.query("select * from user where id = ?", new Object[]{id}, new BeanPropertyRowMapper(User.class));
        if(list!=null && list.size()>0){
            User account = list.get(0);
            return account;
        }else{
            return null;
        }

    }
}
数据访问层很简单,直接注入JdbcTemplate模板即可,下面再看对应的service和实现
package com.springboot.jdbc.service;


import com.springboot.jdbc.bean.User;

public interface IUserService {
    User findUser(long id);
}
package com.springboot.jdbc.service;


import com.springboot.jdbc.bean.User;
import com.springboot.jdbc.resposity.IUserDAO;
import org.springframework.beans.factory.annotation.Autowired;
import org.springframework.stereotype.Service;

@Service
public class UserService implements IUserService {
    @Autowired
    private IUserDAO userDAO;
    @Override
    public User findUser(long id) {
        return userDAO.findUserById(id);
    }
}
写一个测试的controller:
package com.springboot.jdbc.controller;


import com.springboot.jdbc.bean.User;
import com.springboot.jdbc.service.IUserService;
import org.springframework.beans.factory.annotation.Autowired;
import org.springframework.web.bind.annotation.GetMapping;
import org.springframework.web.bind.annotation.PathVariable;
import org.springframework.web.bind.annotation.RestController;


@RestController
public class UserController {
    @Autowired
    private IUserService userService;
    @GetMapping("/findUser/{id}")
    public User findUser(@PathVariable long id){
        return userService.findUser(id);
    }
}
对应的application.yaml配置文件
server:
  port: 8888

spring:
  datasource:
    driver-class-name: com.mysql.jdbc.Driver
    filters: stat、wall、log4j    (踩过的坑,不能写成 )
    initialSize: 5
    maxActive: 20
    maxOpenPreparedStatements: 20
    maxWait: 60000
    minEvictableIdleTimeMillis: 300000
    minIdle: 1
    password: 123
    poolPreparedStatements: true
    testOnBorrow: false
    testOnReturn: false
    testWhileIdle: true
    timeBetweenEvictionRunsMillis: 60000
    type: com.alibaba.druid.pool.DruidDataSource
    url: jdbc:mysql://127.0.0.1:3306/emp
    username: root
    validationQuery: select 'x'
    logSlowSql: true
filters: stat、wall、log4j (踩过的坑,不能写成 stat,wall,log4j , 用顿号,而不能用逗号)
写一个启动应用类:
package com.springboot.jdbc;

import org.springframework.boot.SpringApplication;
import org.springframework.boot.autoconfigure.SpringBootApplication;

@SpringBootApplication
public class JdbcTemplateApplication {
    public static void main(String[] args) {
        SpringApplication.run(JdbcTemplateApplication.class,args);
    }
}
到此为止代码和配置文件都讲解完了,接下来进行创建数据库和数据表:
-- ----------------------------
-- Table structure for `user`
-- ----------------------------
DROP TABLE IF EXISTS `user`;
CREATE TABLE `user` (
  `id` int(11) NOT NULL AUTO_INCREMENT,
  `username` varchar(255) DEFAULT NULL,
  UNIQUE KEY `id_x` (`id`) USING BTREE
) ENGINE=InnoDB AUTO_INCREMENT=5 DEFAULT CHARSET=utf8;

-- ----------------------------
-- Records of user
-- ----------------------------
INSERT INTO `user` VALUES ('1', 'jiahp');
INSERT INTO `user` VALUES ('2', 'wangli');
INSERT INTO `user` VALUES ('3', 'guoyanbin');
INSERT INTO `user` VALUES ('4', 'yaodong');
等应用成功启动成功之后,在浏览器端访问 http://localhost:8888/findUser/1 对应结果如下:

当然可以都访问几个id,然后再访问druid的监控页面 在浏览器端访问http://localhost:8888/druid/login.html
会弹出登录对话框,输入配置文件里面的用户名和密码就会登录成功,然后跳转到下面这样的页面
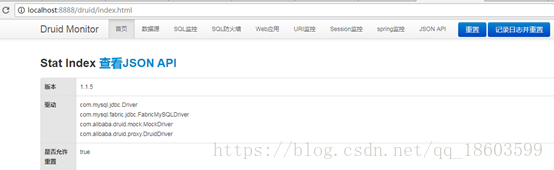
这上面的功能很多,比如sql监控:可以看到查询了哪些sql语句

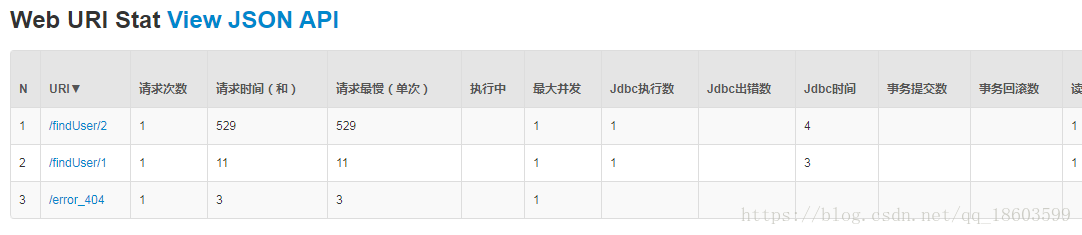
还有url监控 可以查询对应sql调用的api:
还有其他功能,可以自己都点点看,还是蛮强大的,好了到此为止springboot和jdbc的整合就介绍完了
代码路径 : https://files.cnblogs.com/files/william-dai/agan-boot.rar
参考文档: https://blog.csdn.net/qq_18603599/article/details/81169198