一. 基本环境配置
K8S官网:https://kubernetes.io/docs/setup/
最新版高可用安装:https://kubernetes.io/docs/setup/production-environment/tools/kubeadm/high-availability/
1.高可用Kubernetes集群规划
|
主机名 |
IP地址 |
说明 |
|
k8s-master01 ~ 03 |
10.0.0.50 ~ 52 |
master节点 * 3 |
|
k8s-master-lb |
10.0.0.0.99 |
keepalived虚拟IP |
|
k8s-node01 ~ 02 |
10.0.0.53 ~ 54 |
worker节点 * 2 |
|
配置信息 |
备注 |
|
系统版本 |
CentOS 7.9 |
|
Docker版本 |
19.03.x |
|
Pod网段 |
172.168.0.0/12 |
|
Service网段 |
10.96.0.0/12 |
- VIP(虚拟IP)不要和公司内网IP重复,首先去ping一下,不通才可用。VIP需要和主机在同一个局域网内!
2.所有节点配置hosts
修改/etc/hosts如下:
 # cat /etc/hosts
 10.0.0.50 k8s-master01
 10.0.0.51 k8s-master02
 10.0.0.52 k8s-master03
 10.0.0.99 k8s-master-lb # 如果不是高可用集群,该IP为Master01的IP
 10.0.0.53 k8s-node01
 10.0.0.54 k8s-node02
3.所有节点配置yum源
3.1配置系统源
# curl -o /etc/yum.repos.d/CentOS-Base.repo https://mirrors.aliyun.com/repo/Centos-7.repo
# sed -i -e '/mirrors.cloud.aliyuncs.com/d' -e '/mirrors.aliyuncs.com/d' /etc/yum.repos.d/CentOS-Base.repo
3.1配置docker源
#yum-config-manager --add-repo https://mirrors.aliyun.com/docker-ce/linux/centos/docker-ce.repo
3.3配置K8s源
# cat <<EOF > /etc/yum.repos.d/kubernetes.repo
> [kubernetes]
> name=Kubernetes
> baseurl=https://mirrors.aliyun.com/kubernetes/yum/repos/kubernetes-el7-x86_64/
> enabled=1
> gpgcheck=1
> repo_gpgcheck=1
> gpgkey=https://mirrors.aliyun.com/kubernetes/yum/doc/yum-key.gpg https://mirrors.aliyun.com/kubernetes/yum/doc/rpm-package-key.gpg
> EOF
4.必备工具安装
# yum install wget jq psmisc vim net-tools telnet yum-utils device-mapper-persistent-data lvm2 git -y
5.所有节点关闭防火墙、selinux、dnsmasq、NetworkManager、swap分区
配置如下:
#关闭防火墙、dnsmasq、NetworkManager

systemctl disable --now firewalld
systemctl disable --now dnsmasq
systemctl disable --now NetworkManager

#临时、永久关闭selinux

setenforce 0
sed -i 's#SELINUX=enforcing#SELINUX=disabled#g' /etc/sysconfig/selinux
sed -i 's#SELINUX=enforcing#SELINUX=disabled#g' /etc/selinux/config

#关闭swap分区

swapoff -a && sysctl -w vm.swappiness=0
sed -ri '/^[^#]*swap/s@^@#@' /etc/fstab
6.所有节点同步时间
6.1安装ntpdate
# rpm -ivh http://mirrors.wlnmp.com/centos/wlnmp-release-centos.noarch.rpm
# yum install ntpdate -y
6.2所有节点同步时间
时间同步配置如下:
# ln -sf /usr/share/zoneinfo/Asia/Shanghai /etc/localtime
# echo 'Asia/Shanghai' >/etc/timezone
# ntpdate time2.aliyun.com
6.3 加入任务计划
# crontab -l
*/5 * * * * /usr/sbin/ntpdate time2.aliyun.com
7.所有节点配置limit
# vim /etc/security/limits.conf
# 末尾添加如下内容
* soft nofile 655360
* hard nofile 131072
* soft nproc 655350
* hard nproc 655350
* soft memlock unlimited
* hard memlock unlimited
8.配置Master01节点免密钥登录其他节点
8.1在Master01上操作,生成密钥对
[root@k8s-master01 ~]# ssh-keygen -t rsa
Generating public/private rsa key pair.
Enter file in which to save the key (/root/.ssh/id_rsa):
Created directory '/root/.ssh'.
Enter passphrase (empty for no passphrase):
Enter same passphrase again:
Your identification has been saved in /root/.ssh/id_rsa.
Your public key has been saved in /root/.ssh/id_rsa.pub.
The key fingerprint is:
SHA256:sIXgoKGkS09cs/OREa+DBSQXrX5fa2bBATPOT2YSbjc root@k8s-master01
The key's randomart image is:
+---[RSA 2048]----+
|....oBoo.        |
|+o.o+.+o+=       |
|+. o.o++=.=      |
|..o  .=+o* E     |
|.  ....+S O o    |
|     . ..  =     |
|      . . . o    |
|         . =     |
|          +      |
+----[SHA256]-----+
[root@k8s-master01 ~]# ls  /root/.ssh/
id_rsa  id_rsa.pub
8.2将Master01上的公钥同步到其他节点
[root@k8s-master01 ~]# for i in k8s-master01 k8s-master02 k8s-master03 k8s-node01 k8s-node02;do ssh-copy-id -i .ssh/id_rsa.pub $i;done
- Master01节点免密钥登录其他节点,安装过程中生成配置文件和证书均在Master01上操作,集群管理也在Master01上操作,阿里云或者AWS上需要单独一台kubectl服务器
二、系统升级内核配置
1.所有节点系统升级并重启
#升级前系统版本

# cat /etc/redhat-release
CentOS Linux release 7.5.1804 (Core)

#所有节点升级系统并重启,此处升级没有升级内核

#yum update -y --exclude=kernel* && reboot

#升级后系统版本

# cat /etc/redhat-release
CentOS Linux release 7.9.2009 (Core)
2.内核升级
#升级前内核版本
# uname -a
Linux k8s-node01 3.10.0-862.3.2.el7.x86_64 #1 SMP Mon May 21 23:36:36 UTC 2018 x86_64 x86_64 x86_64 GNU/Linux

#在master01节点下载内核
[root@k8s-master01 ~]# wget http://193.49.22.109/elrepo/kernel/el7/x86_64/RPMS/kernel-ml-devel-4.19.12-1.el7.elrepo.x86_64.rpm
[root@k8s-master01 ~]# wget http://193.49.22.109/elrepo/kernel/el7/x86_64/RPMS/kernel-ml-4.19.12-1.el7.elrepo.x86_64.rpm

#从master01节点传到其他节点
[root@k8s-master01 ~]# for i in k8s-master02 k8s-master03 k8s-node01 k8s-node02;do scp kernel-ml-4.19.12-1.el7.elrepo.x86_64.rpm kernel-ml-devel-4.19.12-1.el7.elrepo.x86_64.rpm $i:/root/ ; done

#所有节点安装内核
#cd /root && yum localinstall -y kernel-ml*

#所有节点更改内核启动顺序
#grub2-set-default  0 && grub2-mkconfig -o /etc/grub2.cfg
#grubby --args="user_namespace.enable=1" --update-kernel="$(grubby --default-kernel)"

#检查默认内核是不是4.19
[root@k8s-master01 ~]# grubby --default-kernel
/boot/vmlinuz-4.19.12-1.el7.elrepo.x86_64

#所有节点重启,然后检查内核是不是4.19
[root@k8s-master01 ~]# uname -a
Linux k8s-master01 4.19.12-1.el7.elrepo.x86_64 #1 SMP Fri Dec 21 11:06:36 EST 2018 x86_64 x86_64 x86_64 GNU/Linux
3.所有节点配置ipvs模块
所有节点安装ipvsadm:
yum install ipvsadm ipset sysstat conntrack libseccomp -y
#vim /etc/modules-load.d/ipvs.conf
# 加入以下内容
ip_vs
ip_vs_lc
ip_vs_wlc
ip_vs_rr
ip_vs_wrr
ip_vs_lblc
ip_vs_lblcr
ip_vs_dh
ip_vs_sh
ip_vs_fo
ip_vs_nq
ip_vs_sed
ip_vs_ftp
ip_vs_sh
nf_conntrack
ip_tables
ip_set
xt_set
ipt_set
ipt_rpfilter
ipt_REJECT
ipip

#systemctl enable --now systemd-modules-load.service
- 注意:在内核4.19+版本nf_conntrack_ipv4已经改为nf_conntrack, 4.18以下使用nf_conntrack_ipv4即可
4.所有节点配置k8s内核
#开启一些k8s集群中必须的内核参数
#cat <<EOF > /etc/sysctl.d/k8s.conf
net.ipv4.ip_forward = 1
net.bridge.bridge-nf-call-iptables = 1
net.bridge.bridge-nf-call-ip6tables = 1
fs.may_detach_mounts = 1
vm.overcommit_memory=1
vm.panic_on_oom=0
fs.inotify.max_user_watches=89100
fs.file-max=52706963
fs.nr_open=52706963
net.netfilter.nf_conntrack_max=2310720

net.ipv4.tcp_keepalive_time = 600
net.ipv4.tcp_keepalive_probes = 3
net.ipv4.tcp_keepalive_intvl =15
net.ipv4.tcp_max_tw_buckets = 36000
net.ipv4.tcp_tw_reuse = 1
net.ipv4.tcp_max_orphans = 327680
net.ipv4.tcp_orphan_retries = 3
net.ipv4.tcp_syncookies = 1
net.ipv4.tcp_max_syn_backlog = 16384
net.ipv4.ip_conntrack_max = 65536
net.ipv4.tcp_max_syn_backlog = 16384
net.ipv4.tcp_timestamps = 0
net.core.somaxconn = 16384
EOF
#sysctl --system

#所有节点配置完内核后,重启服务器,保证重启后内核依旧加载
# lsmod | grep --color=auto -e ip_vs -e nf_conntrack
nf_conntrack_netlink    40960  0
nfnetlink              16384  3 nf_conntrack_netlink,ip_set
ip_vs_ftp              16384  0
nf_nat                 32768  2 nf_nat_ipv4,ip_vs_ftp
ip_vs_sed              16384  0
ip_vs_nq               16384  0
ip_vs_fo               16384  0
ip_vs_sh               16384  0
ip_vs_dh               16384  0
ip_vs_lblcr            16384  0
ip_vs_lblc             16384  0
ip_vs_wrr              16384  0
ip_vs_rr               16384  0
ip_vs_wlc              16384  0
ip_vs_lc               16384  0
ip_vs                 151552  24 ip_vs_wlc,ip_vs_rr,ip_vs_dh,ip_vs_lblcr,ip_vs_sh,ip_vs_fo,ip_vs_nq,ip_vs_lblc,ip_vs_wrr,ip_vs_lc,ip_vs_sed,ip_vs_ftp
nf_conntrack          143360  6 xt_conntrack,nf_nat,ipt_MASQUERADE,nf_nat_ipv4,nf_conntrack_netlink,ip_vs
nf_defrag_ipv6         20480  1 nf_conntrack
nf_defrag_ipv4         16384  1 nf_conntrack
libcrc32c              16384  4 nf_conntrack,nf_nat,xfs,ip_vs
三、基本组件安装
1.所有节点安装Docker
# 指定安装docker-ce-19.03

#yum install docker-ce-19.03.* -y

#由于新版kubelet建议使用systemd,所以可以把docker的CgroupDriver改成systemd

#mkdir /etc/docker
#cat > /etc/docker/daemon.json <<EOF
{
  "exec-opts": ["native.cgroupdriver=systemd"]
}
EOF

#所有节点设置开机自启动Docker

#systemctl daemon-reload && systemctl enable --now docker
2.所有节点安装最新版本kubeadm
#查看kubeadm版本
# yum list kubeadm.x86_64 --showduplicates | sort -r
# yum install kubeadm -y
正在安装:
 kubeadm                               x86_64                1.20.4-0                     kubernetes                8.3 M
为依赖而安装:
 conntrack-tools                       x86_64                1.4.4-7.el7                  base                      187 k
 cri-tools                             x86_64                1.13.0-0                     kubernetes                5.1 M
 kubectl                               x86_64                1.20.4-0                     kubernetes                8.5 M
 kubelet                               x86_64                1.20.4-0                     kubernetes                 20 M

#默认配置的pause镜像使用gcr.io仓库,国内可能无法访问,所以这里配置Kubelet使用阿里云的pause镜像:
#cat >/etc/sysconfig/kubelet<<EOF
KUBELET_EXTRA_ARGS="--cgroup-driver=systemd --pod-infra-container-image=registry.cn-hangzhou.aliyuncs.com/google_containers/pause-amd64:3.2"
EOF

#设置Kubelet开机自启动
#systemctl daemon-reload
#systemctl enable --now kubelet
四、高可用组件安装
1.所有Master节点通过yum安装HAProxy和KeepAlived
#yum install keepalived haproxy -y
2.所有Master节点配置HAProxy
所有Master节点的HAProxy配置相同:
# mkdir /etc/haproxy
# vim /etc/haproxy/haproxy.cfg
global
  maxconn  2000
  ulimit-n  16384
  log  127.0.0.1 local0 err
  stats timeout 30s

defaults
  log global
  mode  http
  option  httplog
  timeout connect 5000
  timeout client  50000
  timeout server  50000
  timeout http-request 15s
  timeout http-keep-alive 15s

frontend monitor-in
  bind *:33305
  mode http
  option httplog
  monitor-uri /monitor

frontend k8s-master
  bind 0.0.0.0:16443
  bind 127.0.0.1:16443
  mode tcp
  option tcplog
  tcp-request inspect-delay 5s
  default_backend k8s-master

backend k8s-master
  mode tcp
  option tcplog
  option tcp-check
  balance roundrobin
  default-server inter 10s downinter 5s rise 2 fall 2 slowstart 60s maxconn 250 maxqueue 256 weight 100
  server k8s-master01	10.0.0.50:6443  check
  server k8s-master02	10.0.0.51:6443  check
  server k8s-master03	10.0.0.52:6443  check
3.所有Master节点配置KeepAlived
配置不一样,注意区分 [root@k8s-master01 pki]# vim /etc/keepalived/keepalived.conf ,注意每个节点的IP和网卡(interface参数)
3.1 Master01节点的配置:
[root@k8s-master01 etc]# mkdir /etc/keepalived

[root@k8s-master01 ~]# vim /etc/keepalived/keepalived.conf
! Configuration File for keepalived
global_defs {
    router_id LVS_DEVEL
script_user root
    enable_script_security
}
vrrp_script chk_apiserver {
    script "/etc/keepalived/check_apiserver.sh"
    interval 5
    weight -5
    fall 2
rise 1
}
vrrp_instance VI_1 {
    state MASTER
    interface ens192
    mcast_src_ip 10.0.0.50
    virtual_router_id 51
    priority 101
    advert_int 2
    authentication {
        auth_type PASS
        auth_pass K8SHA_KA_AUTH
    }
    virtual_ipaddress {
        10.0.0.99
    }
    track_script {
       chk_apiserver
    }
}
3.2 Master02节点的配置:
! Configuration File for keepalived
global_defs {
    router_id LVS_DEVEL
script_user root
    enable_script_security
}
vrrp_script chk_apiserver {
    script "/etc/keepalived/check_apiserver.sh"
   interval 5
    weight -5
    fall 2
rise 1
}
vrrp_instance VI_1 {
    state BACKUP
    interface ens192
    mcast_src_ip 10.0.0.51
    virtual_router_id 51
    priority 100
    advert_int 2
    authentication {
        auth_type PASS
        auth_pass K8SHA_KA_AUTH
    }
    virtual_ipaddress {
        10.0.0.99
    }
    track_script {
       chk_apiserver
    }
}
3.3 Master03节点的配置:
! Configuration File for keepalived
global_defs {
    router_id LVS_DEVEL
script_user root
    enable_script_security
}
vrrp_script chk_apiserver {
    script "/etc/keepalived/check_apiserver.sh"
 interval 5
    weight -5
    fall 2
rise 1
}
vrrp_instance VI_1 {
    state BACKUP
    interface ens192
    mcast_src_ip 10.0.0.52
    virtual_router_id 51
    priority 100
    advert_int 2
    authentication {
        auth_type PASS
        auth_pass K8SHA_KA_AUTH
    }
    virtual_ipaddress {
        10.0.0.99
    }
    track_script {
       chk_apiserver
    }
}
4.所有Master节点配置KeepAlived健康检查文件
# vim /etc/keepalived/check_apiserver.sh
#!/bin/bash

err=0
for k in $(seq 1 3)
do
    check_code=$(pgrep haproxy)
    if [[ $check_code == "" ]]; then
        err=$(expr $err + 1)
        sleep 1
        continue
    else
        err=0
        break
    fi
done

if [[ $err != "0" ]]; then
    echo "systemctl stop keepalived"
    /usr/bin/systemctl stop keepalived
    exit 1
else
    exit 0
fi


#chmod +x /etc/keepalived/check_apiserver.sh
5.启动haproxy和keepalived
# systemctl daemon-reload
# systemctl enable --now haproxy
# systemctl enable --now keepalived
6.测试keepalived是否正常
#测试VIP

[root@k8s-master01 ~]# ping 10.0.0.99 -c 4
PING 10.0.0.99 (10.0.0.99) 56(84) bytes of data.
64 bytes from 10.0.0.99: icmp_seq=1 ttl=64 time=0.464 ms
64 bytes from 10.0.0.99: icmp_seq=2 ttl=64 time=0.063 ms
64 bytes from 10.0.0.99: icmp_seq=3 ttl=64 time=0.062 ms
64 bytes from 10.0.0.99: icmp_seq=4 ttl=64 time=0.063 ms

--- 10.0.0.99 ping statistics ---
4 packets transmitted, 4 received, 0% packet loss, time 3106ms
rtt min/avg/max/mdev = 0.062/0.163/0.464/0.173 ms

#[root@k8s-master01 ~]# telnet 10.0.0.99 16443
Trying 10.0.0.99...
Connected to 10.0.0.99.
Escape character is '^]'.
Connection closed by foreign host.
- 如果ping不通且telnet没有出现 ] ,则认为VIP不可以,不可在继续往下执行,需要排查keepalived的问题,比如防火墙和selinux,haproxy和keepalived的状态,监听端口等
- 所有节点查看防火墙状态必须为disable和inactive:systemctl status firewalld
- 所有节点查看selinux状态,必须为disable:getenforce
- master节点查看haproxy和keepalived状态:systemctl status keepalived haproxy
- master节点查看监听端口:netstat -lntp
五、集群初始化
1.所有节点创建kubeadm-config.yaml配置文件
#查看kubeadm的版本
[root@k8s-master01 ~]# kubeadm version
kubeadm version: &version.Info{Major:"1", Minor:"20", GitVersion:"v1.20.4", GitCommit:"e87da0bd6e03ec3fea7933c4b5263d151aafd07c", GitTreeState:"clean", BuildDate:"2021-02-18T16:09:38Z", GoVersion:"go1.15.8", Compiler:"gc", Platform:"linux/amd64"}

# 注意,如果不是高可用集群,10.0.0.99:16443改为master01的地址,16443改为apiserver的端口,默认是6443,注意更改自己服务器kubeadm的版本:kubeadm version)
#vim kubeadm-config.yaml
apiVersion: kubeadm.k8s.io/v1beta2
bootstrapTokens:
- groups:
  - system:bootstrappers:kubeadm:default-node-token
  token: 7t2weq.bjbawausm0jaxury
  ttl: 24h0m0s
  usages:
  - signing
  - authentication
kind: InitConfiguration
localAPIEndpoint:
  advertiseAddress: 10.0.0.50
  bindPort: 6443
nodeRegistration:
  criSocket: /var/run/dockershim.sock
  name: k8s-master01
  taints:
  - effect: NoSchedule
    key: node-role.kubernetes.io/master
---
apiServer:
  certSANs:
  - 10.0.0.99
  timeoutForControlPlane: 4m0s
apiVersion: kubeadm.k8s.io/v1beta2
certificatesDir: /etc/kubernetes/pki
clusterName: kubernetes
controlPlaneEndpoint: 10.0.0.99:16443
controllerManager: {}
dns:
  type: CoreDNS
etcd:
  local:
    dataDir: /var/lib/etcd
imageRepository: registry.cn-hangzhou.aliyuncs.com/google_containers
kind: ClusterConfiguration
kubernetesVersion: v1.20.4
networking:
  dnsDomain: cluster.local
  podSubnet: 172.168.0.0/12
  serviceSubnet: 10.96.0.0/12
scheduler: {}

#更新kubeadm文件
#kubeadm config migrate --old-config kubeadm-config.yaml --new-config new.yaml

#将new.yaml文件复制到其他master节点,之后所有Master节点提前下载镜像,可以节省初始化时间:
#kubeadm config images pull --config /root/new.yaml

#所有节点设置开机自启动kubelet
systemctl enable --now kubelet(如果启动失败无需管理,初始化成功以后即可启动)
2.Master01节点初始化
#Master01节点初始化,初始化以后会在/etc/kubernetes目录下生成对应的证书和配置文件,之后其他Master节点加入Master01即可
#[root@k8s-master01 ~]# kubeadm init --config /root/new.yaml  --upload-certs
[init] Using Kubernetes version: v1.20.4
[preflight] Running pre-flight checks
[preflight] Pulling images required for setting up a Kubernetes cluster
[preflight] This might take a minute or two, depending on the speed of your internet connection
[preflight] You can also perform this action in beforehand using 'kubeadm config images pull'
[certs] Using certificateDir folder "/etc/kubernetes/pki"
[certs] Generating "ca" certificate and key
[certs] Generating "apiserver" certificate and key
[certs] apiserver serving cert is signed for DNS names [k8s-master01 kubernetes kubernetes.default kubernetes.default.svc kubernetes.default.svc.cluster.local] and IPs [10.96.0.1 10.0.0.50 10.0.0.99]
[certs] Generating "apiserver-kubelet-client" certificate and key
[certs] Generating "front-proxy-ca" certificate and key
[certs] Generating "front-proxy-client" certificate and key
[certs] Generating "etcd/ca" certificate and key
[certs] Generating "etcd/server" certificate and key
[certs] etcd/server serving cert is signed for DNS names [k8s-master01 localhost] and IPs [10.0.0.50 127.0.0.1 ::1]
[certs] Generating "etcd/peer" certificate and key
[certs] etcd/peer serving cert is signed for DNS names [k8s-master01 localhost] and IPs [10.0.0.50 127.0.0.1 ::1]
[certs] Generating "etcd/healthcheck-client" certificate and key
[certs] Generating "apiserver-etcd-client" certificate and key
[certs] Generating "sa" key and public key
[kubeconfig] Using kubeconfig folder "/etc/kubernetes"
[endpoint] WARNING: port specified in controlPlaneEndpoint overrides bindPort in the controlplane address
[kubeconfig] Writing "admin.conf" kubeconfig file
[endpoint] WARNING: port specified in controlPlaneEndpoint overrides bindPort in the controlplane address
[kubeconfig] Writing "kubelet.conf" kubeconfig file
[endpoint] WARNING: port specified in controlPlaneEndpoint overrides bindPort in the controlplane address
[kubeconfig] Writing "controller-manager.conf" kubeconfig file
[endpoint] WARNING: port specified in controlPlaneEndpoint overrides bindPort in the controlplane address
[kubeconfig] Writing "scheduler.conf" kubeconfig file
[kubelet-start] Writing kubelet environment file with flags to file "/var/lib/kubelet/kubeadm-flags.env"
[kubelet-start] Writing kubelet configuration to file "/var/lib/kubelet/config.yaml"
[kubelet-start] Starting the kubelet
[control-plane] Using manifest folder "/etc/kubernetes/manifests"
[control-plane] Creating static Pod manifest for "kube-apiserver"
[control-plane] Creating static Pod manifest for "kube-controller-manager"
[control-plane] Creating static Pod manifest for "kube-scheduler"
[etcd] Creating static Pod manifest for local etcd in "/etc/kubernetes/manifests"
[wait-control-plane] Waiting for the kubelet to boot up the control plane as static Pods from directory "/etc/kubernetes/manifests". This can take up to 4m0s
[kubelet-check] Initial timeout of 40s passed.
[apiclient] All control plane components are healthy after 84.017926 seconds
[upload-config] Storing the configuration used in ConfigMap "kubeadm-config" in the "kube-system" Namespace
[kubelet] Creating a ConfigMap "kubelet-config-1.20" in namespace kube-system with the configuration for the kubelets in the cluster
[upload-certs] Storing the certificates in Secret "kubeadm-certs" in the "kube-system" Namespace
[upload-certs] Using certificate key:
c5ef69ca62484e6a91df8c6fa4bd1ea48f2a4ea70e961fe345b256f71ede5750
[mark-control-plane] Marking the node k8s-master01 as control-plane by adding the labels "node-role.kubernetes.io/master=''" and "node-role.kubernetes.io/control-plane='' (deprecated)"
[mark-control-plane] Marking the node k8s-master01 as control-plane by adding the taints [node-role.kubernetes.io/master:NoSchedule]
[bootstrap-token] Using token: 7t2weq.bjbawausm0jaxury
[bootstrap-token] Configuring bootstrap tokens, cluster-info ConfigMap, RBAC Roles
[bootstrap-token] configured RBAC rules to allow Node Bootstrap tokens to get nodes
[bootstrap-token] configured RBAC rules to allow Node Bootstrap tokens to post CSRs in order for nodes to get long term certificate credentials
[bootstrap-token] configured RBAC rules to allow the csrapprover controller automatically approve CSRs from a Node Bootstrap Token
[bootstrap-token] configured RBAC rules to allow certificate rotation for all node client certificates in the cluster
[bootstrap-token] Creating the "cluster-info" ConfigMap in the "kube-public" namespace
[kubelet-finalize] Updating "/etc/kubernetes/kubelet.conf" to point to a rotatable kubelet client certificate and key
[addons] Applied essential addon: CoreDNS
[endpoint] WARNING: port specified in controlPlaneEndpoint overrides bindPort in the controlplane address
[addons] Applied essential addon: kube-proxy

#[root@k8s-master01 ~]# ls /etc/kubernetes/manifests
etcd.yaml  kube-apiserver.yaml  kube-controller-manager.yaml  kube-scheduler.yaml

#如果初始化失败,重置后再次初始化,命令如下:
kubeadm reset -f ; ipvsadm --clear  ; rm -rf ~/.kube

#初始化成功以后,会产生Token值,用于其他节点加入时使用,因此要记录下初始化成功生成的token值(令牌值):

Your Kubernetes control-plane has initialized successfully!

To start using your cluster, you need to run the following as a regular user:

  mkdir -p $HOME/.kube
  sudo cp -i /etc/kubernetes/admin.conf $HOME/.kube/config
  sudo chown $(id -u):$(id -g) $HOME/.kube/config

Alternatively, if you are the root user, you can run:

  export KUBECONFIG=/etc/kubernetes/admin.conf

You should now deploy a pod network to the cluster.
Run "kubectl apply -f [podnetwork].yaml" with one of the options listed at:
  https://kubernetes.io/docs/concepts/cluster-administration/addons/

You can now join any number of the control-plane node running the following command on each as root:

  kubeadm join 10.0.0.99:16443 --token 7t2weq.bjbawausm0jaxury \
    --discovery-token-ca-cert-hash sha256:a9f6db2f88f14162d52e9041b9b7dc3b8f7c4363e0ec00d624cbddee4ea8a0b4 \
    --control-plane --certificate-key c5ef69ca62484e6a91df8c6fa4bd1ea48f2a4ea70e961fe345b256f71ede5750

Please note that the certificate-key gives access to cluster sensitive data, keep it secret!
As a safeguard, uploaded-certs will be deleted in two hours; If necessary, you can use
"kubeadm init phase upload-certs --upload-certs" to reload certs afterward.

Then you can join any number of worker nodes by running the following on each as root:

kubeadm join 10.0.0.99:16443 --token 7t2weq.bjbawausm0jaxury \
    --discovery-token-ca-cert-hash sha256:a9f6db2f88f14162d52e9041b9b7dc3b8f7c4363e0ec00d624cbddee4ea8a0b4

#Master01节点配置kubectl环境变量,用于访问Kubernetes集群,部署到任何一台都可以

[root@k8s-master01 ~]#
 cat <<EOF >> /root/.bashrc
 export KUBECONFIG=/etc/kubernetes/admin.conf
 EOF
[root@k8s-master01 ~]# source /root/.bashrc

#查看节点状态:
[root@k8s-master01 ~]# kubectl get node
NAME           STATUS     ROLES                  AGE     VERSION
k8s-master01   NotReady   control-plane,master   9m42s   v1.20.4

#采用初始化安装方式,所有的系统组件均以容器的方式运行并且在kube-system命名空间内,此时可以查看Pod状态:
[root@k8s-master01 ~]# kubectl get pods -n kube-system -o wide
NAME                                   READY   STATUS    RESTARTS   AGE   IP          NODE           NOMINATED NODE   READINESS GATES
coredns-54d67798b7-ljzt8               0/1     Pending   0          11m   <none>      <none>         <none>           <none>
coredns-54d67798b7-w9jd4               0/1     Pending   0          11m   <none>      <none>         <none>           <none>
etcd-k8s-master01                      1/1     Running   0          11m   10.0.0.50   k8s-master01   <none>           <none>
kube-apiserver-k8s-master01            1/1     Running   0          11m   10.0.0.50   k8s-master01   <none>           <none>
kube-controller-manager-k8s-master01   1/1     Running   0          11m   10.0.0.50   k8s-master01   <none>           <none>
kube-proxy-2n4mn                       1/1     Running   0          11m   10.0.0.50   k8s-master01   <none>           <none>
kube-scheduler-k8s-master01            1/1     Running   0          11m   10.0.0.50   k8s-master01   <none>           <none>
六、高可用Master及Node节点配置
1.初始化master2加入集群
#在master01产生的toekn
[root@k8s-master02 ~]# kubeadm join 10.0.0.99:16443 --token 7t2weq.bjbawausm0jaxury \
>     --discovery-token-ca-cert-hash sha256:a9f6db2f88f14162d52e9041b9b7dc3b8f7c4363e0ec00d624cbddee4ea8a0b4 \
>     --control-plane --certificate-key c5ef69ca62484e6a91df8c6fa4bd1ea48f2a4ea70e961fe345b256f71ede5750
[preflight] Running pre-flight checks
[preflight] Reading configuration from the cluster...
[preflight] FYI: You can look at this config file with 'kubectl -n kube-system get cm kubeadm-config -o yaml'
[preflight] Running pre-flight checks before initializing the new control plane instance
[preflight] Pulling images required for setting up a Kubernetes cluster
[preflight] This might take a minute or two, depending on the speed of your internet connection
[preflight] You can also perform this action in beforehand using 'kubeadm config images pull'
[download-certs] Downloading the certificates in Secret "kubeadm-certs" in the "kube-system" Namespace
[certs] Using certificateDir folder "/etc/kubernetes/pki"
[certs] Generating "apiserver-kubelet-client" certificate and key
[certs] Generating "apiserver" certificate and key
[certs] apiserver serving cert is signed for DNS names [k8s-master02 kubernetes kubernetes.default kubernetes.default.svc kubernetes.default.svc.cluster.local] and IPs [10.96.0.1 10.0.0.51 10.0.0.99]
[certs] Generating "front-proxy-client" certificate and key
[certs] Generating "etcd/server" certificate and key
[certs] etcd/server serving cert is signed for DNS names [k8s-master02 localhost] and IPs [10.0.0.51 127.0.0.1 ::1]
[certs] Generating "etcd/healthcheck-client" certificate and key
[certs] Generating "apiserver-etcd-client" certificate and key
[certs] Generating "etcd/peer" certificate and key
[certs] etcd/peer serving cert is signed for DNS names [k8s-master02 localhost] and IPs [10.0.0.51 127.0.0.1 ::1]
[certs] Valid certificates and keys now exist in "/etc/kubernetes/pki"
[certs] Using the existing "sa" key
[kubeconfig] Generating kubeconfig files
[kubeconfig] Using kubeconfig folder "/etc/kubernetes"
[endpoint] WARNING: port specified in controlPlaneEndpoint overrides bindPort in the controlplane address
[kubeconfig] Writing "admin.conf" kubeconfig file
[endpoint] WARNING: port specified in controlPlaneEndpoint overrides bindPort in the controlplane address
[kubeconfig] Writing "controller-manager.conf" kubeconfig file
[endpoint] WARNING: port specified in controlPlaneEndpoint overrides bindPort in the controlplane address
[kubeconfig] Writing "scheduler.conf" kubeconfig file
[control-plane] Using manifest folder "/etc/kubernetes/manifests"
[control-plane] Creating static Pod manifest for "kube-apiserver"
[control-plane] Creating static Pod manifest for "kube-controller-manager"
[control-plane] Creating static Pod manifest for "kube-scheduler"
[check-etcd] Checking that the etcd cluster is healthy
[kubelet-start] Writing kubelet configuration to file "/var/lib/kubelet/config.yaml"
[kubelet-start] Writing kubelet environment file with flags to file "/var/lib/kubelet/kubeadm-flags.env"
[kubelet-start] Starting the kubelet
[kubelet-start] Waiting for the kubelet to perform the TLS Bootstrap...
[etcd] Announced new etcd member joining to the existing etcd cluster
[etcd] Creating static Pod manifest for "etcd"
[etcd] Waiting for the new etcd member to join the cluster. This can take up to 40s
[upload-config] Storing the configuration used in ConfigMap "kubeadm-config" in the "kube-system" Namespace
[kubelet-check] Initial timeout of 40s passed.
[mark-control-plane] Marking the node k8s-master02 as control-plane by adding the labels "node-role.kubernetes.io/master=''" and "node-role.kubernetes.io/control-plane='' (deprecated)"
[mark-control-plane] Marking the node k8s-master02 as control-plane by adding the taints [node-role.kubernetes.io/master:NoSchedule]

This node has joined the cluster and a new control plane instance was created:

* Certificate signing request was sent to apiserver and approval was received.
* The Kubelet was informed of the new secure connection details.
* Control plane (master) label and taint were applied to the new node.
* The Kubernetes control plane instances scaled up.
* A new etcd member was added to the local/stacked etcd cluster.

To start administering your cluster from this node, you need to run the following as a regular user:

	mkdir -p $HOME/.kube
	sudo cp -i /etc/kubernetes/admin.conf $HOME/.kube/config
	sudo chown $(id -u):$(id -g) $HOME/.kube/config

Run 'kubectl get nodes' to see this node join the cluster.
#显示master02已加入
[root@k8s-master01 ~]# kubectl get node
NAME           STATUS     ROLES                  AGE     VERSION
k8s-master01   NotReady   control-plane,master   25m     v1.20.4
k8s-master02   NotReady   control-plane,master   2m41s   v1.20.4
2.Token过期后,扩容的Master怎么加入?
#在master01上执行
#Token过期后生成新的token
[root@k8s-master01 ~]# kubeadm token create --print-join-command
kubeadm join 10.0.0.99:16443 --token wsec2h.t6yspjqp39u8zxzv     --discovery-token-ca-cert-hash sha256:a9f6db2f88f14162d52e9041b9b7dc3b8f7c4363e0ec00d624cbddee4ea8a0b4

#Master需要生成--certificate-key
[root@k8s-master01 ~]# kubeadm init phase upload-certs  --upload-certs
[upload-certs] Storing the certificates in Secret "kubeadm-certs" in the "kube-system" Namespace
[upload-certs] Using certificate key:
4b4859355bc369ae6dc75cb821f793817cdab0880381570534057b6d5ca39f31


#用新生成的todken,把master03加入集群
[root@k8s-master03 ~]# kubeadm join 10.0.0.99:16443 --token wsec2h.t6yspjqp39u8zxzv     --discovery-token-ca-cert-hash sha256:a9f6db2f88f14162d52e9041b9b7dc3b8f7c4363e0ec00d624cbddee4ea8a0b4  \
>     --control-plane --certificate-key 4b4859355bc369ae6dc75cb821f793817cdab0880381570534057b6d5ca39f31

#显示master03也加入集群中
[root@k8s-master01 ~]# kubectl get nodes
NAME           STATUS     ROLES                  AGE    VERSION
k8s-master01   NotReady   control-plane,master   43m    v1.20.4
k8s-master02   NotReady   control-plane,master   20m    v1.20.4
k8s-master03   NotReady   control-plane,master   107s   v1.20.4

#查看token的配置
[root@k8s-master01 ~]# kubectl get secret -n kube-system
NAME                                             TYPE                                  DATA   AGE
attachdetach-controller-token-8f9pq              kubernetes.io/service-account-token   3      45m
bootstrap-signer-token-tx4rg                     kubernetes.io/service-account-token   3      45m
bootstrap-token-7t2weq                           bootstrap.kubernetes.io/token         6      45m
bootstrap-token-cregwg                           bootstrap.kubernetes.io/token         4      6m26s
bootstrap-token-lx0g6t                           bootstrap.kubernetes.io/token         4      45m
bootstrap-token-wsec2h                           bootstrap.kubernetes.io/token         6      7m49s

#expiration后边的值就是token过期时间,用base64加密
[root@k8s-master01 ~]# kubectl get secret -n kube-system bootstrap-token-wsec2h -oyaml
apiVersion: v1
data:
  auth-extra-groups: c3lzdGVtOmJvb3RzdHJhcHBlcnM6a3ViZWFkbTpkZWZhdWx0LW5vZGUtdG9rZW4=
  expiration: MjAyMS0wMi0yMlQxNToyMTowMSswODowMA==
  token-id: d3NlYzJo
  token-secret: dDZ5c3BqcXAzOXU4enh6dg==
  usage-bootstrap-authentication: dHJ1ZQ==
  usage-bootstrap-signing: dHJ1ZQ==

#显示token时间是24h后过期
[root@k8s-master01 ~]# echo "MjAyMS0wMi0yMlQxNToyMTowMSswODowMA=="|base64 -d
2021-02-22T15:21:01+08:00
[root@k8s-master01 ~]# date
2021年 02月 21日 星期日 15:32:52 CST
3.Node节点配置
[root@k8s-node01 ~]# kubeadm join 10.0.0.99:16443 --token 7t2weq.bjbawausm0jaxury \
>     --discovery-token-ca-cert-hash sha256:a9f6db2f88f14162d52e9041b9b7dc3b8f7c4363e0ec00d624cbddee4ea8a0b4

[root@k8s-node02 ~]# kubeadm join 10.0.0.99:16443 --token 7t2weq.bjbawausm0jaxury \
>     --discovery-token-ca-cert-hash sha256:a9f6db2f88f14162d52e9041b9b7dc3b8f7c4363e0ec00d624cbddee4ea8a0b4
[preflight] Running pre-flight checks
[preflight] Reading configuration from the cluster...
[preflight] FYI: You can look at this config file with 'kubectl -n kube-system get cm kubeadm-config -o yaml'
[kubelet-start] Writing kubelet configuration to file "/var/lib/kubelet/config.yaml"
[kubelet-start] Writing kubelet environment file with flags to file "/var/lib/kubelet/kubeadm-flags.env"
[kubelet-start] Starting the kubelet
[kubelet-start] Waiting for the kubelet to perform the TLS Bootstrap...

This node has joined the cluster:
* Certificate signing request was sent to apiserver and a response was received.
* The Kubelet was informed of the new secure connection details.

Run 'kubectl get nodes' on the control-plane to see this node join the cluster.

#两个node节点已加入
[root@k8s-master01 ~]# kubectl get node
NAME           STATUS     ROLES                  AGE   VERSION
k8s-master01   NotReady   control-plane,master   63m   v1.20.4
k8s-master02   NotReady   control-plane,master   40m   v1.20.4
k8s-master03   NotReady   control-plane,master   21m   v1.20.4
k8s-node01     NotReady   <none>                 13s   v1.20.4
k8s-node02     NotReady   <none>                 8s    v1.20.4
七、calico组件安装
#下载安装所有的源码文件:
[root@k8s-master01 ~]#cd /root/ ; git clone https://github.com/dotbalo/k8s-ha-install.git

#以下步骤只在master01执行
[root@k8s-master01 calico]# sed -i 's#etcd_endpoints: "http://<ETCD_IP>:<ETCD_PORT>"#etcd_endpoints: "https://10.0.0.50:2379,https://10.0.0.51:2379,https://10.0.0.52:2379"#g' calico-etcd.yaml
[root@k8s-master01 calico]# vi calico-etcd.yaml
[root@k8s-master01 calico]# ETCD_CA=`cat /etc/kubernetes/pki/etcd/ca.crt | base64 | tr -d '\n'`
[root@k8s-master01 calico]# ETCD_CERT=`cat /etc/kubernetes/pki/etcd/server.crt | base64 | tr -d '\n'`
[root@k8s-master01 calico]# ETCD_KEY=`cat /etc/kubernetes/pki/etcd/server.key | base64 | tr -d '\n'`
[root@k8s-master01 calico]# sed -i "s@# etcd-key: null@etcd-key: ${ETCD_KEY}@g; s@# etcd-cert: null@etcd-cert: ${ETCD_CERT}@g; s@# etcd-ca: null@etcd-ca: ${ETCD_CA}@g" calico-etcd.yaml
[root@k8s-master01 calico]# sed -i 's#etcd_ca: ""#etcd_ca: "/calico-secrets/etcd-ca"#g; s#etcd_cert: ""#etcd_cert: "/calico-secrets/etcd-cert"#g; s#etcd_key: "" #etcd_key: "/calico-secrets/etcd-key" #g' calico-etcd.yaml
[root@k8s-master01 calico]# POD_SUBNET=`cat /etc/kubernetes/manifests/kube-controller-manager.yaml | grep cluster-cidr= | awk -F= '{print $NF}'`
[root@k8s-master01 calico]# echo $POD_SUBNET
172.168.0.0/12
[root@k8s-master01 calico]# sed -i 's@# - name: CALICO_IPV4POOL_CIDR@- name: CALICO_IPV4POOL_CIDR@g; s@#   value: "192.168.0.0/16"@  value: '"${POD_SUBNET}"'@g' calico-etcd.yaml
修改calico-etcd.yaml的以下位置
sed -i 's#etcd_endpoints: "http://<ETCD_IP>:<ETCD_PORT>"#etcd_endpoints: "https://192.168.0.107:2379,https://192.168.0.108:2379,https://192.168.0.109:2379"#g' calico-etcd.yaml


ETCD_CA=`cat /etc/kubernetes/pki/etcd/ca.crt | base64 | tr -d '\n'`
ETCD_CERT=`cat /etc/kubernetes/pki/etcd/server.crt | base64 | tr -d '\n'`
ETCD_KEY=`cat /etc/kubernetes/pki/etcd/server.key | base64 | tr -d '\n'`
sed -i "s@# etcd-key: null@etcd-key: ${ETCD_KEY}@g; s@# etcd-cert: null@etcd-cert: ${ETCD_CERT}@g; s@# etcd-ca: null@etcd-ca: ${ETCD_CA}@g" calico-etcd.yaml


sed -i 's#etcd_ca: ""#etcd_ca: "/calico-secrets/etcd-ca"#g; s#etcd_cert: ""#etcd_cert: "/calico-secrets/etcd-cert"#g; s#etcd_key: "" #etcd_key: "/calico-secrets/etcd-key" #g' calico-etcd.yaml

POD_SUBNET=`cat /etc/kubernetes/manifests/kube-controller-manager.yaml | grep cluster-cidr= | awk -F= '{print $NF}'`

sed -i 's@# - name: CALICO_IPV4POOL_CIDR@- name: CALICO_IPV4POOL_CIDR@g; s@#   value: "192.168.0.0/16"@  value: '"${POD_SUBNET}"'@g' calico-etcd.yaml
[root@k8s-master01 calico]# kubectl apply -f calico-etcd.yaml
secret/calico-etcd-secrets created
configmap/calico-config created
clusterrole.rbac.authorization.k8s.io/calico-kube-controllers created
clusterrolebinding.rbac.authorization.k8s.io/calico-kube-controllers created
clusterrole.rbac.authorization.k8s.io/calico-node created
clusterrolebinding.rbac.authorization.k8s.io/calico-node created
daemonset.apps/calico-node created
serviceaccount/calico-node created
deployment.apps/calico-kube-controllers created
serviceaccount/calico-kube-controllers created
#查看pod状态
[root@k8s-master01 calico]#  kubectl  get po -n kube-system
NAME                                       READY   STATUS    RESTARTS   AGE
calico-kube-controllers-5f6d4b864b-rv4cj   1/1     Running   0          3m50s
calico-node-88lvk                          1/1     Running   0          3m50s
calico-node-h6vjm                          1/1     Running   0          3m50s
calico-node-sr6ck                          1/1     Running   0          3m50s
calico-node-t2zcj                          1/1     Running   0          3m50s
calico-node-tcxx5                          1/1     Running   0          3m50s
coredns-54d67798b7-ljzt8                   1/1     Running   0          91m
coredns-54d67798b7-w9jd4                   1/1     Running   0          91m
etcd-k8s-master01                          1/1     Running   0          91m
etcd-k8s-master02                          1/1     Running   0          68m
etcd-k8s-master03                          1/1     Running   0          49m
kube-apiserver-k8s-master01                1/1     Running   0          91m
kube-apiserver-k8s-master02                1/1     Running   0          68m
kube-apiserver-k8s-master03                1/1     Running   0          49m
kube-controller-manager-k8s-master01       1/1     Running   1          91m
kube-controller-manager-k8s-master02       1/1     Running   0          68m
kube-controller-manager-k8s-master03       1/1     Running   0          49m
kube-proxy-2n4mn                           1/1     Running   0          91m
kube-proxy-5zxnw                           1/1     Running   0          28m
kube-proxy-jlj2w                           1/1     Running   0          68m
kube-proxy-wfckx                           1/1     Running   0          28m
kube-proxy-xtt9k                           1/1     Running   0          49m
kube-scheduler-k8s-master01                1/1     Running   1          91m
kube-scheduler-k8s-master02                1/1     Running   0          68m
kube-scheduler-k8s-master03                1/1     Running   0          49m

[root@k8s-master01 calico]# kubectl get node
NAME           STATUS   ROLES                  AGE   VERSION
k8s-master01   Ready    control-plane,master   90m   v1.20.4
k8s-master02   Ready    control-plane,master   67m   v1.20.4
k8s-master03   Ready    control-plane,master   48m   v1.20.4
k8s-node01     Ready    <none>                 27m   v1.20.4
k8s-node02     Ready    <none>                 27m   v1.20.4
八、metrics部署
在新版的Kubernetes中系统资源的采集均使用Metrics-server,可以通过Metrics采集节点和Pod的内存、磁盘、CPU和网络的使用率。
#将Master01节点的front-proxy-ca.crt复制到所有Node节点
[root@k8s-master01 calico]# scp /etc/kubernetes/pki/front-proxy-ca.crt k8s-node01:/etc/kubernetes/pki/front-proxy-ca.crt
front-proxy-ca.crt                                                                      100% 1078     1.7MB/s   00:00
[root@k8s-master01 calico]# scp /etc/kubernetes/pki/front-proxy-ca.crt k8s-node02:/etc/kubernetes/pki/front-proxy-ca.crt
front-proxy-ca.crt

#安装metrics server

[root@k8s-master01 calico]# cd /root/k8s-ha-install/metrics-server-0.4.x-kubeadm/
[root@k8s-master01 metrics-server-0.4.x-kubeadm]# kubectl  create -f comp.yaml
serviceaccount/metrics-server created
clusterrole.rbac.authorization.k8s.io/system:aggregated-metrics-reader created
clusterrole.rbac.authorization.k8s.io/system:metrics-server created
rolebinding.rbac.authorization.k8s.io/metrics-server-auth-reader created
clusterrolebinding.rbac.authorization.k8s.io/metrics-server:system:auth-delegator created
clusterrolebinding.rbac.authorization.k8s.io/system:metrics-server created
service/metrics-server created
deployment.apps/metrics-server created
apiservice.apiregistration.k8s.io/v1beta1.metrics.k8s.io created

[root@k8s-master01 metrics-server-0.4.x-kubeadm]# kubectl get pod -A
NAMESPACE     NAME                                       READY   STATUS    RESTARTS   AGE
kube-system   calico-kube-controllers-5f6d4b864b-rv4cj   1/1     Running   0          24m
kube-system   calico-node-88lvk                          1/1     Running   0          24m
kube-system   calico-node-h6vjm                          1/1     Running   0          24m
kube-system   calico-node-sr6ck                          1/1     Running   0          24m
kube-system   calico-node-t2zcj                          1/1     Running   0          24m
kube-system   calico-node-tcxx5                          1/1     Running   0          24m
kube-system   coredns-54d67798b7-ljzt8                   1/1     Running   0          111m
kube-system   coredns-54d67798b7-w9jd4                   1/1     Running   0          111m
kube-system   etcd-k8s-master01                          1/1     Running   0          111m
kube-system   etcd-k8s-master02                          1/1     Running   0          88m
kube-system   etcd-k8s-master03                          1/1     Running   0          70m
kube-system   kube-apiserver-k8s-master01                1/1     Running   0          111m
kube-system   kube-apiserver-k8s-master02                1/1     Running   0          88m
kube-system   kube-apiserver-k8s-master03                1/1     Running   0          70m
kube-system   kube-controller-manager-k8s-master01       1/1     Running   1          111m
kube-system   kube-controller-manager-k8s-master02       1/1     Running   0          88m
kube-system   kube-controller-manager-k8s-master03       1/1     Running   0          70m
kube-system   kube-proxy-2n4mn                           1/1     Running   0          111m
kube-system   kube-proxy-5zxnw                           1/1     Running   0          48m
kube-system   kube-proxy-jlj2w                           1/1     Running   0          88m
kube-system   kube-proxy-wfckx                           1/1     Running   0          48m
kube-system   kube-proxy-xtt9k                           1/1     Running   0          70m
kube-system   kube-scheduler-k8s-master01                1/1     Running   1          111m
kube-system   kube-scheduler-k8s-master02                1/1     Running   0          88m
kube-system   kube-scheduler-k8s-master03                1/1     Running   0          70m
kube-system   metrics-server-545b8b99c6-2wgbs            1/1     Running   0          90s
#查看状态
[root@k8s-master01 metrics-server-0.4.x-kubeadm]# kubectl  top node
NAME           CPU(cores)   CPU%   MEMORY(bytes)   MEMORY%
k8s-master01   168m         8%     1306Mi          45%
k8s-master02   149m         7%     1170Mi          40%
k8s-master03   143m         7%     1196Mi          41%
k8s-node01     93m          4%     758Mi           40%
k8s-node02     75m          3%     635Mi           33%
九、Dashboard部署
Dashboard用于展示集群中的各类资源,同时也可以通过Dashboard实时查看Pod的日志和在容器中执行一些命令等。
1.安装指定版本dashboard
[root@k8s-master01 metrics-server-0.4.x-kubeadm]# cd /root/k8s-ha-install/dashboard/

[root@k8s-master01 dashboard]# kubectl  create -f .
serviceaccount/admin-user created
clusterrolebinding.rbac.authorization.k8s.io/admin-user created
namespace/kubernetes-dashboard created
serviceaccount/kubernetes-dashboard created
service/kubernetes-dashboard created
secret/kubernetes-dashboard-certs created
secret/kubernetes-dashboard-csrf created
secret/kubernetes-dashboard-key-holder created
configmap/kubernetes-dashboard-settings created
role.rbac.authorization.k8s.io/kubernetes-dashboard created
clusterrole.rbac.authorization.k8s.io/kubernetes-dashboard created
rolebinding.rbac.authorization.k8s.io/kubernetes-dashboard created
clusterrolebinding.rbac.authorization.k8s.io/kubernetes-dashboard created
deployment.apps/kubernetes-dashboard created
service/dashboard-metrics-scraper created
deployment.apps/dashboard-metrics-scraper created

[root@k8s-master01 dashboard]# kubectl get pod -A
NAMESPACE              NAME                                         READY   STATUS    RESTARTS   AGE
kube-system            calico-kube-controllers-5f6d4b864b-rv4cj     1/1     Running   0          31m
kube-system            calico-node-88lvk                            1/1     Running   0          31m
kube-system            calico-node-h6vjm                            1/1     Running   0          31m
kube-system            calico-node-sr6ck                            1/1     Running   0          31m
kube-system            calico-node-t2zcj                            1/1     Running   0          31m
kube-system            calico-node-tcxx5                            1/1     Running   0          31m
kube-system            coredns-54d67798b7-ljzt8                     1/1     Running   0          118m
kube-system            coredns-54d67798b7-w9jd4                     1/1     Running   0          118m
kube-system            etcd-k8s-master01                            1/1     Running   0          118m
kube-system            etcd-k8s-master02                            1/1     Running   0          95m
kube-system            etcd-k8s-master03                            1/1     Running   0          77m
kube-system            kube-apiserver-k8s-master01                  1/1     Running   0          118m
kube-system            kube-apiserver-k8s-master02                  1/1     Running   0          95m
kube-system            kube-apiserver-k8s-master03                  1/1     Running   0          77m
kube-system            kube-controller-manager-k8s-master01         1/1     Running   1          118m
kube-system            kube-controller-manager-k8s-master02         1/1     Running   0          95m
kube-system            kube-controller-manager-k8s-master03         1/1     Running   0          77m
kube-system            kube-proxy-2n4mn                             1/1     Running   0          118m
kube-system            kube-proxy-5zxnw                             1/1     Running   0          55m
kube-system            kube-proxy-jlj2w                             1/1     Running   0          95m
kube-system            kube-proxy-wfckx                             1/1     Running   0          55m
kube-system            kube-proxy-xtt9k                             1/1     Running   0          77m
kube-system            kube-scheduler-k8s-master01                  1/1     Running   1          118m
kube-system            kube-scheduler-k8s-master02                  1/1     Running   0          95m
kube-system            kube-scheduler-k8s-master03                  1/1     Running   0          77m
kube-system            metrics-server-545b8b99c6-2wgbs              1/1     Running   0          8m32s
kubernetes-dashboard   dashboard-metrics-scraper-7645f69d8c-pn8dl   1/1     Running   0          107s
kubernetes-dashboard   kubernetes-dashboard-78cb679857-ts28s        1/1     Running   0          107s
2.登录dashboard
2.1在谷歌浏览器(Chrome)启动文件中加入启动参数,用于解决无法访问Dashboard的问题,参考图1-1:
--test-type --ignore-certificate-errors
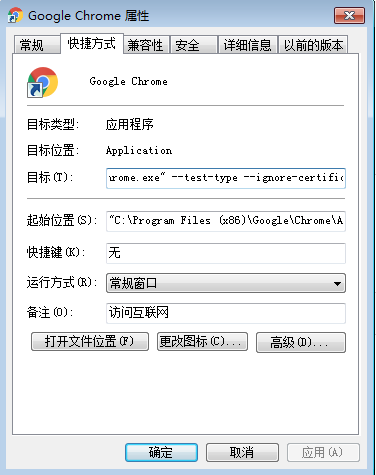
图1-1 谷歌浏览器 Chrome的配置
2.2更改dashboard的svc为NodePort
[root@k8s-master01 dashboard]# kubectl edit svc kubernetes-dashboard -n kubernetes-dashboard
#将ClusterIP更改为NodePort(如果已经为NodePort忽略此步骤)
 clusterIP: 10.104.98.233
  clusterIPs:
  - 10.104.98.233
  ports:
  - port: 443
    protocol: TCP
    targetPort: 8443
  selector:
    k8s-app: kubernetes-dashboard
  sessionAffinity: None
#  type: ClusterIP
  type: NodePort

#查看端口号
[root@k8s-master01 dashboard]# kubectl get svc kubernetes-dashboard -n kubernetes-dashboard
NAME                   TYPE       CLUSTER-IP      EXTERNAL-IP   PORT(S)         AGE
kubernetes-dashboard   NodePort   10.104.98.233   <none>        443:31936/TCP   15m

#根据自己的实例端口号,通过任意安装了kube-proxy的宿主机或者VIP的IP+端口即可访问到dashboard:
2.3访问dashboard
1.访问Dashboard:https://10.0.0.99:31936(请更改31936为自己的端口),选择登录方式为令牌(即token方式),参考图1-2
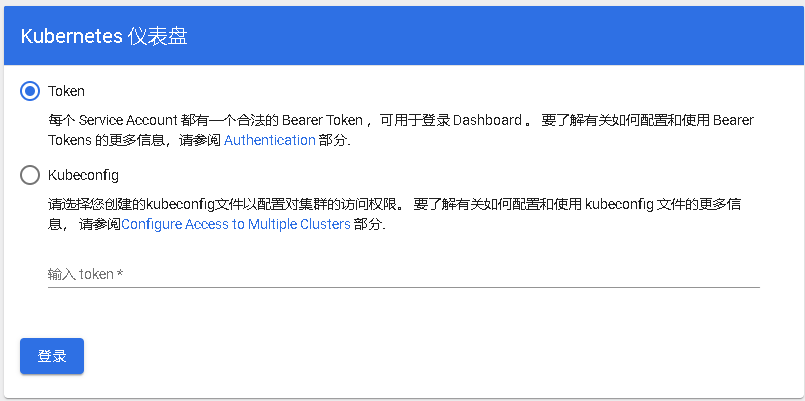
图1-2 Dashboard登录方式
2.查看token值:
[root@k8s-master01 dashboard]# kubectl -n kube-system describe secret $(kubectl -n kube-system get secret | grep admin-user | awk '{print $1}')
Name:         admin-user-token-zmthw
Namespace:    kube-system
Labels:       <none>
Annotations:  kubernetes.io/service-account.name: admin-user
              kubernetes.io/service-account.uid: ee4b45e9-8cfb-4098-a7e3-d1ab669de5f3

Type:  kubernetes.io/service-account-token

Data
====
ca.crt:     1066 bytes
namespace:  11 bytes
token:      eyJhbGciOiJSUzI1NiIsImtpZCI6Img5bmhMdldzV2xILVM3YWN5UHlsSkEzbVlkVlhqSkVsaFVZNWU5U0UzcFEifQ.eyJpc3MiOiJrdWJlcm5ldGVzL3NlcnZpY2VhY2NvdW50Iiwia3ViZXJuZXRlcy5pby9zZXJ2aWNlYWNjb3VudC9uYW1lc3BhY2UiOiJrdWJlLXN5c3RlbSIsImt1YmVybmV0ZXMuaW8vc2VydmljZWFjY291bnQvc2VjcmV0Lm5hbWUiOiJhZG1pbi11c2VyLXRva2VuLXptdGh3Iiwia3ViZXJuZXRlcy5pby9zZXJ2aWNlYWNjb3VudC9zZXJ2aWNlLWFjY291bnQubmFtZSI6ImFkbWluLXVzZXIiLCJrdWJlcm5ldGVzLmlvL3NlcnZpY2VhY2NvdW50L3NlcnZpY2UtYWNjb3VudC51aWQiOiJlZTRiNDVlOS04Y2ZiLTQwOTgtYTdlMy1kMWFiNjY5ZGU1ZjMiLCJzdWIiOiJzeXN0ZW06c2VydmljZWFjY291bnQ6a3ViZS1zeXN0ZW06YWRtaW4tdXNlciJ9.dgtbOf5YFovzlvqtaSz-gV0yA-wx4tKlWYEU5vH6ba9UeidB0wzuK8jkznnM3s7yirKgLTRrAzf3iR0lv9sZ9DXc6SS_RidbEsC9uNaak6P7HizJ9-FTnDpeZP1p15_ihFNVrkhpf-fbqQMSLTW3LeST6X189Tff9ZLkaJ0eU-3s_H9NHr28dFCjxfIGdUMUPx184efadcM03lfpGoFMxjnoeHYOSuh_DMxyJq5AkxA2_t8TRmOz2VYZBuy3v_BCRHS5BU45TkISpfj2cLxucPNOH7-CRTE6qX-pkOQ1QjZJhHtpH6EPhyoYNU6t3ExCsM2CEkKgDk5jcx9W9poKqA
3.将token值输入到令牌后,单击登录即可访问Dashboard,参考图1-3:

图1-3 Dashboard页面
3.一些必须的配置更改
将Kube-proxy改为ipvs模式,因为在初始化集群的时候注释了ipvs配置,所以需要自行修改一下:
#在master01节点执行
[root@k8s-master01 ~]# kubectl edit cm kube-proxy -n kube-system

      syncPeriod: 0s
    ipvs:
      excludeCIDRs: null
      minSyncPeriod: 0s
      scheduler: ""
      strictARP: false
      syncPeriod: 0s
      tcpFinTimeout: 0s
      tcpTimeout: 0s
      udpTimeout: 0s
    kind: KubeProxyConfiguration
    metricsBindAddress: ""
    mode: "ipvs"
[root@k8s-master01 ~]# kubectl edit cm kube-proxy -n kube-system
configmap/kube-proxy edited

#更新Kube-Proxy的Pod
[root@k8s-master01 ~]# kubectl patch daemonset kube-proxy -p "{\"spec\":{\"template\":{\"metadata\":{\"annotations\":{\"date\":\"`date +'%s'`\"}}}}}" -n kube-system
daemonset.apps/kube-proxy patched

#验证Kube-Proxy模式
[root@k8s-master01 ~]# curl 127.0.0.1:10249/proxyMode
ipvs
十、注意事项
- kubeadm安装的集群,证书有效期默认是一年。master节点的kube-apiserver、kube-scheduler、kube-controller-manager、etcd都是以容器运行的。可以通过kubectl get po -n kube-system查看。
- 启动和二进制不同的是:kubelet的配置文件在/etc/sysconfig/kubelet和/var/lib/kubelet/config.yaml其他组件的配置文件在/etc/Kubernetes/manifests目录下,比如kube-apiserver.yaml,该yaml文件更改后,kubelet会自动刷新配置,也就是会重启pod,不能再次创建该文件。
- Kubeadm安装后,master节点默认不允许部署pod,可以通过以下方式打开:
#查看Taints:
[root@k8s-master01 ~]# kubectl  describe node -l node-role.kubernetes.io/master=  | grep Taints
Taints:             node-role.kubernetes.io/master:NoSchedule
Taints:             node-role.kubernetes.io/master:NoSchedule
Taints:             node-role.kubernetes.io/master:NoSchedule

#删除Taint:
[root@k8s-master01 ~]# kubectl  taint node  -l node-role.kubernetes.io/master node-role.kubernetes.io/master:NoSchedule-
node/k8s-master01 untainted
node/k8s-master02 untainted
node/k8s-master03 untainted
[root@k8s-master01 ~]# kubectl  describe node -l node-role.kubernetes.io/master=  | grep Taints
Taints:             <none>
Taints:             <none>
Taints:             <none>