在.NET Core 中 依赖注入Dependency-Injection)作为基础知识,在.Net Core中无处不在;这么重要的知识接下来就了解和在.Net Core中使用。
一、依赖注入
说到依赖注入(Dependency Injection,以下简称DI),就必须说IoC(Inverse of Control);这两个概念很容易搞混。
IoC:主要体现了这样一种设计思想:通过将一组通用流程的控制从应用转移到框架之中以实现对流程的复用,同时采用“好莱坞原则”是应用程序以被动的方式实现对流程的定制。
DI:服务的消费者利用一个独立的容器(Container)来获取所需的服务对象,容器自身在提供服务对象的过程中会自动完成依赖的解析与注入
核心功能:服务注册和服务提供
二、DI在.Net Core中实现
在.Net Core中主要 Microsoft.Extensions.DependencyInjection 中实现DI相关功能,可以在你的项目中单独使用它
核心分为两个组件:IServiceCollection和 IServiceProvider

IServiceCollection:负责服务的注册;主要扩展方法如下:
public static class ServiceCollectionServiceExtensions
{
    public static IServiceCollection AddScoped(this IServiceCollection services, Type serviceType, Type implementationType);
    public static IServiceCollection AddSingleton(this IServiceCollection services, Type serviceType, Type implementationType);
    public static IServiceCollection AddTransient(this IServiceCollection services, Type serviceType, Type implementationType);
    ……
}
ServiceCollectionServiceExtensions扩展类中包含了这三个方法的多种重载方法,那么这三个方法分别什么含义呢?
IServiceProvider:负责服务的获取;主要方法:
public interface IServiceProvider
{
    //获取服务
    object GetService(Type serviceType);
}
在IServiceCollection中我们看到了主要到三个方法这些方法的意义是什么呢?
生命周期:
.NET Core DI 为我们提供的实例生命周其包括三种:
三、Asp.Net Core 中应用
以上一篇审计日志源码作为示例:
- 添加日志仓储接口和实现:
//仓储接口 public interface IRepository<T> { T Save(T entity); } //审计日志仓储实现 public class AuditLogRepository : IRepository<AuditInfo> { AuditLogDBContent _auditLogDB; public AuditLogRepository(AuditLogDBContent auditLogDB) { _auditLogDB = auditLogDB; } public AuditInfo Save(AuditInfo entity) { var retEntity = _auditLogDB.AuditInfos.Add(entity); _auditLogDB.SaveChanges(); return retEntity.Entity; } } - 实现定义服务接口和实现
//审计日志服务接口 public interface IAuditLogService { Task SaveAsync(AuditInfo auditInfo); } //审计日志服务实现 public class AuditLogService : IAuditLogService { IRepository<AuditInfo> _repository; //依赖注入:IRepository<AuditInfo> public AuditLogService(IRepository<AuditInfo> repository) { _repository = repository; } public async Task SaveAsync(AuditInfo auditInfo) { _repository.Save(auditInfo); } } - 在Startup中注入定义的相关服务:
public void ConfigureServices(IServiceCollection services)
    {
        //审计日志存储数据库
        services.AddDbContext<AuditLogDBContent>(options =>
        {
            string conn = Configuration.GetConnectionString("LogDB");
            options.UseSqlite(conn, options =>
            {
                options.MigrationsAssembly("AuditLogDemo");
            });
        });

        //依赖注入:审计日志仓储和审计日志服务
        services.AddScoped<IRepository<AuditInfo>, AuditLogRepository>();
        services.AddScoped<IAuditLogService, AuditLogService>();


        services.AddControllers(options =>
        {
            options.Filters.Add(typeof(AuditLogActionFilter));
        });
    }
可以看出当前注入服务不多,相对简单还好,但项目中仓储和服务数量肯定比示例数量多,不可能每个都像这样手工注入。
那么有什么好的解决办法呢?接着往下看
四、批量注入实现方式
- 自己实现批量注入
public static class DIHelper
{
    /// <summary>
    /// 注入服务
    /// </summary>
    /// <param name="services"></param>
    /// <param name="interfaceAssembly"></param>
    /// <param name="implementAssembly"></param>
    public static void AddScoped(this IServiceCollection services, Assembly interfaceAssembly, Assembly implementAssembly)
    {
        var interfaces = interfaceAssembly.GetTypes().Where(t => t.IsInterface);
        var implements = implementAssembly.GetTypes();
        foreach (var item in interfaces)
        {
            var type = implements.FirstOrDefault(x => item.IsAssignableFrom(x));
            if (type != null)
            {
                services.AddScoped(item, type);
            }
        }
    }

    /// <summary>
    /// 注入服务
    /// </summary>
    /// <param name="services"></param>
    /// <param name="interfaceAssembly"></param>
    /// <param name="implementAssembly"></param>
    public static void AddSingleton(this IServiceCollection services, Assembly interfaceAssembly, Assembly implementAssembly)
    {
        var interfaces = interfaceAssembly.GetTypes().Where(t => t.IsInterface);
        var implements = implementAssembly.GetTypes();
        foreach (var item in interfaces)
        {
            var type = implements.FirstOrDefault(x => item.IsAssignableFrom(x));
            if (type != null)
            {
                services.AddSingleton(item, type);
            }
        }
    }

    /// <summary>
    /// 注入服务
    /// </summary>
    /// <param name="services"></param>
    /// <param name="interfaceAssembly"></param>
    /// <param name="implementAssembly"></param>
    public static void AddTransient(this IServiceCollection services, Assembly interfaceAssembly, Assembly implementAssembly)
    {
        var interfaces = interfaceAssembly.GetTypes().Where(t => t.IsInterface);
        var implements = implementAssembly.GetTypes();
        foreach (var item in interfaces)
        {
            var type = implements.FirstOrDefault(x => item.IsAssignableFrom(x));
            if (type != null)
            {
                services.AddTransient(item, type);
            }
        }
    }
}
使用方式:
services.AddScoped(Assembly.Load("xxxx.IService"), Assembly.Load("xxxx.Service"));
services.AddScoped(Assembly.Load("xxxx.IService"), Assembly.Load("xxxx.Service"));
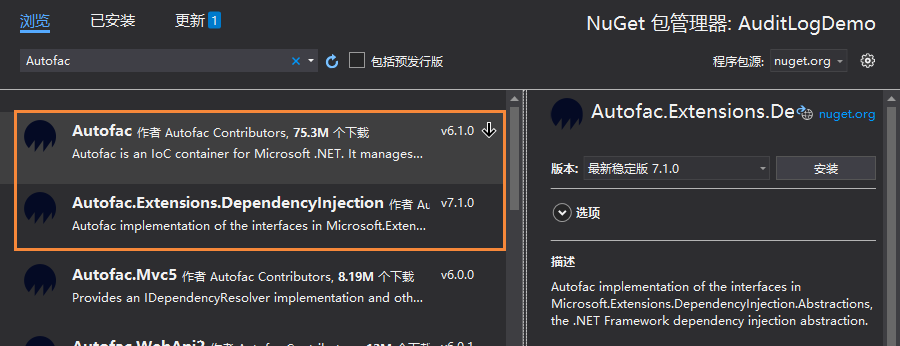
- Autofac实现批量注入
添加Nuget包:

1、添加Autofac模型实现:
/// <summary>
/// 注册Autofac模块
/// </summary>
public class AutofacModuleRegister : Autofac.Module
{
    /// <summary>
    /// 重写Autofac管道Load方法,在这里注册注入
    /// </summary>
    protected override void Load(ContainerBuilder builder)
    {
        builder.RegisterAssemblyTypes(GetAssemblyByName("AuditLog.EF"))
            .Where(a => a.Name.EndsWith("Repository"))
            .AsImplementedInterfaces();

        builder.RegisterAssemblyTypes(GetAssemblyByName("AuditLog.Application"))
            .Where(a => a.Name.EndsWith("Service"))
            .AsImplementedInterfaces();

        //注册MVC控制器(注册所有到控制器,控制器注入,就是需要在控制器的构造函数中接收对象)
        builder.RegisterAssemblyTypes(GetAssemblyByName("AuditLogDemo"))
            .Where(a => a.Name.EndsWith("Controller"))
            .AsImplementedInterfaces();
    }

    /// <summary>
    /// 根据程序集名称获取程序集
    /// </summary>
    /// <param name="assemblyName">程序集名称</param>
    public static Assembly GetAssemblyByName(string assemblyName)
    {
        return Assembly.Load(assemblyName);
    }
}
2、使用Autofac来实现依赖注入
public class Program
{
    public static void Main(string[] args)
    {
        CreateHostBuilder(args).Build().Run();
    }

    public static IHostBuilder CreateHostBuilder(string[] args) =>
        Host.CreateDefaultBuilder(args)
                        .UseServiceProviderFactory(new
            {
                webBuilder.UseStartup<Startup>();
            });
}
3、调整Statup文件:
public class Startup
{
    public Startup(IConfiguration configuration)
    {
        Configuration = configuration;
    }
    /// <summary>
    /// autofac容器
    /// </summary>
    public ILifetimeScope AutofacContainer { get; private set; }

    public IConfiguration Configuration { get; }

    // This method gets called by the runtime. Use this method to add services to the container.
    public void ConfigureServices(IServiceCollection services)
    {
        //审计日志存储
        services.AddDbContext<AuditLogDBContent>(options =>
        {
            string conn = Configuration.GetConnectionString("LogDB");
            options.UseSqlite(conn, options =>
            {
                options.MigrationsAssembly("AuditLogDemo");
            });
        });

        //依赖注入
        //Scoped:一个请求创建一个
        //services.AddScoped<IRepository<AuditInfo>, AuditLogRepository>();
        ////每次创建一个
        //services.AddTransient<IAuditLogService, AuditLogService>();

        services.AddControllers(options =>
        {
            options.Filters.Add(typeof(AuditLogActionFilter));
        });

    }

    /// <summary>
    /// 配置容器:在ConfigureServices后执行
    /// </summary>
    /// <param name="builder"></param>
    public void ConfigureContainer(ContainerBuilder builder)
    {
        // 直接用Autofac注册我们自定义的
        builder.RegisterModule(new AutofacModuleRegister());
    }

  // This method gets called by the runtime. Use this method to configure the HTTP request pipeline.
    public void Configure(IApplicationBuilder app, IWebHostEnvironment env)
    {
        if (env.IsDevelopment())
        {
            app.UseDeveloperExceptionPage();
        }
        //autofac 新增 可选
         app.ApplicationServices.GetAutofacRoot();

        app.UseRouting();

        app.UseAuthorization();

        app.UseEndpoints(endpoints =>
        {
            endpoints.MapControllers();
        });

    }
}
到此Autofac批量实现注入服务完成。
