一、首先执行以下脚本
more installoracle.sh
#!/bin/bash
# Oracle 10g
# Oracle 10.2.0.1.0
# System CentOS6.8
# created by zclinux@126.com
# at 2017-9-14 11:35
#software checking...
echo "configure the yum repository......"
yum -y install binutils compat-libstdc++-33 \
compat-libstdc++-33.i686 elfutils-libelf \
elfutils-libelf-devel gcc gcc-c++ glibc glibc.i686 \
glibc-common glibc-devel glibc-devel.i686 glibc-headers ksh \
libaio libaio.i686 libaio-devel\
libaio-devel.i686 libgcc \
libgcc.i686 libstdc++ libstdc++.i686 \
libstdc++-devel make sysstat &>/dev/null
if [ $? = 0 ]
then echo "the yum is successful"
else echo " the yum is faild"
fi
echo "-----------------------------------------------------------"
echo "yum the libXp"
yum install libXp -y &>/dev/null
yum -y install libXp.i686 &>/dev/null
if [ $? = 0 ]
then echo "the libXp.i686 is successful"
else echo " the libXp.i686 is faild"
fi
echo "-----------------------------------------------------------"
echo "yum the libXtst.i686 "
yum -y install libXtst.i686 --setopt=protected_multilib=false zlib &>/dev/null
if [ $? = 0 ]
then echo "the libXtst.i686 is successful"
else echo " the libXtst.i686 is faild"
fi
echo "-----------------------------------------------------------"
echo "yum the libXt.i686 "
yum -y install libXt.i686 &>/dev/null
if [ $? = 0 ]
then echo "the libXt.i686 is successful"
else echo " the libXt.i686 is faild"
fi
#create oracle groups & users
echo "-----------------------------------------------------------"
if grep -q oinstall /etc/group > /dev/null
then
echo "The oinstall group exist."
else
/usr/sbin/groupadd -g 1100 oinstall
echo "The oinstll group is created successful"
fi
if grep -q dba /etc/group > /dev/null
then
echo "The dba group exist."
else
/usr/sbin/groupadd -g 1200 dba
echo "The dba group is created successful"
fi
if grep -q oracle /etc/passwd > /dev/null
then
userdel -r oracle
useradd -u 777 -g oinstall -G dba oracle
echo oracle | passwd oracle --stdin
echo "The user oracle is created successful"
echo "The oracle's password is [ oracle ] "
else
/usr/sbin/useradd -u 777 -g oinstall -G dba oracle
echo oracle | passwd oracle --stdin
echo "The user oracle is created successful"
echo "The oracle's password is [ oracle ] "
fi
if [ ! -d /u01/app/oracle ]
then
mkdir -p /u01/app/oracle
chown -R oracle.oinstall /u01/app
echo "make the file /u01/app/oracle"
else
chown -R oracle.oinstall /u01/app
echo "the file is exist !"
fi
#configure oracle user profile
echo "export TMP=/tmp" >> ~oracle/.bash_profile
echo 'export TMPDIR=$TMP' >> ~oracle/.bash_profile
echo 'export ORACLE_BASE=/u01/app/oracle' >> ~oracle/.bash_profile
echo 'export ORACLE_HOME=$ORACLE_BASE/product/10.2.0/dbhome_1' >> ~oracle/.bash_profile
echo 'export ORACLE_SID=prod' >> ~oracle/.bash_profile
echo 'export ORACLE_TERM=xterm' >> ~oracle/.bash_profile
echo 'export PATH=/usr/sbin:$PATH' >> ~oracle/.bash_profile
echo 'export PATH=$ORACLE_HOME/bin:$PATH' >> ~oracle/.bash_profile
echo 'export LD_LIBRARY_PATH=$ORACLE_HOME/lib:/lib:/usr/lib' >> ~oracle/.bash_profile
echo 'export CLASSPATH=$ORACLE_HOME/jre:$ORACLE_HOME/jlib:$ORACLE_HOME/rdbms/jlib' >> ~oracle/.bash_profile
#install oracle shell scripts
#auther: Matrix
#oracle 10g installation
if [ $? -eq 0 ];then
echo "Software is ready for install oracle!"
fi
#configure the red-release
echo "-----------------------------------------------------------"
echo 'redhat-4' > /etc/redhat-release
echo "/etc/redhat-release is changed"
#configure system kernel parameter
echo "-----------------------------------------------------------"
if grep -q 'kernel\.shmall' /etc/sysctl.conf
then
sed -i.bak '/kernel\.shmall/c kernel.shmall = 2097152' /etc/sysctl.conf
else
echo "kernel.shmall = 2097152 " >> /etc/sysctl.conf
fi
if grep -q 'kernel\.shmmax' /etc/sysctl.conf
then
sed -i '/shmmax/c kernel.shmmax = 2147483648' /etc/sysctl.conf
else
echo "kernel.shmmax = 2147483648" >> /etc/sysctl.conf
fi
if grep -q 'kernel\.shmmni' /etc/sysctl.conf
then
sed -i '/shmmni/c kernel.shmmni = 4096' /etc/sysctl.conf
else
echo "kernel.shmmni = 4096" >> /etc/sysctl.conf
fi
if grep -q 'kernel\.sem' /etc/sysctl.conf
then
sed -i '/kernel\.sem/c kernel.sem = 250 32000 100 128' /etc/sysctl.conf
else
echo "kernel.sem = 250 32000 100 128" >> /etc/sysctl.conf
fi
if grep -q 'fs\.file' /etc/sysctl.conf
then
sed -i '/fs\.file/c fs.file-max = 6815744' /etc/sysctl.conf
else
echo "fs.file-max = 6815744" >> /etc/sysctl.conf
fi
if grep -q 'ip_local_port_range' /etc/sysctl.conf
then
sed -i '/port_range/c net.ipv4.ip_local_port_range = 1024 65500' /etc/sysctl.conf
else
echo "net.ipv4.ip_local_port_range = 1024 65500" >> /etc/sysctl.conf
fi
if grep -q 'rmem_default' /etc/sysctl.conf
then
sed -i '/rmem_default/c net.core.rmem_default = 4194304' /etc/sysctl.conf
else
echo "net.core.rmem_default = 4194304" >> /etc/sysctl.conf
fi
if grep -q 'rmem_max' /etc/sysctl.conf
then
sed -i '/rmem_max/c net.core.rmem_max = 4194304' /etc/sysctl.conf
else
echo "net.core.rmem_max = 4194304" >> /etc/sysctl.conf
fi
if grep -q 'wmem_default' /etc/sysctl.conf
then
sed -i '/wmem_default/c net.core.wmem_default = 262144' /etc/sysctl.conf
else
echo "net.core.wmem_default = 262144" >> /etc/sysctl.conf
fi
if grep -q 'wmem_max' /etc/sysctl.conf
then
sed -i '/wmem_max/c net.core.wmen_max = 262144' /etc/sysctl.conf
else
echo "net.core.wmem_max = 262144" >> /etc/sysctl.conf
fi
sysctl -p
#configure system source limit
sed -i.bak '$d' /etc/security/limits.conf
echo "oracle soft nproc 2047" >> /etc/security/limits.conf
echo "oracle hard nproc 16384" >> /etc/security/limits.conf
echo "oracle soft nofile 1024" >> /etc/security/limits.conf
echo "oracle hard nofile 65536" >> /etc/security/limits.conf
echo "#End of file" >> /etc/security/limits.conf
#solve the ORA-27125 problem
echo 1200 >/proc/sys/vm/hugetlb_shm_group
echo 'echo 1200 >/proc/sys/vm/hugetlb_shm_group' >> /etc/rc.local
#changed the /etc/hosts
IP=$(ifconfig |sed -n '2p'|awk -F " " '{print $2}'|awk -F ":" '{print $2}')
NAME=$(hostname)
echo $IP $NAME >> /etc/hosts
echo "The /etc/hosts is chenged"
#configure the login
echo 'session required pam_limits.so' >> /etc/pam.d/login
echo 'session required /lib/security/pam_limits.so' >> /etc/pam.d/login
echo "-------------------------------------------------------------------"
#successful
echo "EVERY THINGS IS SUCCESSFUL ! "
#Prompt
echo "THEN YOU CAN USE THE [ gunzip xxxx.gz ] and [ cpio -idmv < xxxx.cpio ] "
echo " the next step by the DESKTOP!"
二、上传Oracle10g安装包,对/home/oracle/database 授权777
三、属主 属组 chown -R oracle:oinstall /u01/app/oracle
四、root用户下执行xhost +
五、执行./runInstaller开始安装
(注意:我这里用的图形化安装工具是vnc,如果没有,yum安装一下即可; yum install -y tigervnc-server 执行vncserver 输入密码两次即可 )
六、开始图形化界面的安装:
1.选择高级安装

2.确认inventory目录的路径和相关用户组

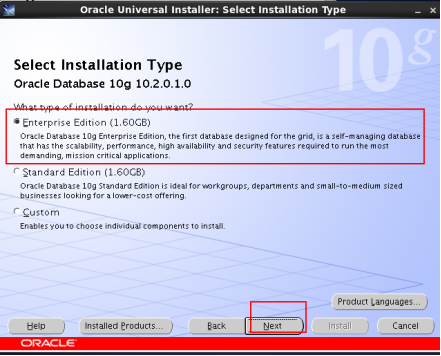
3.选择安装企业版
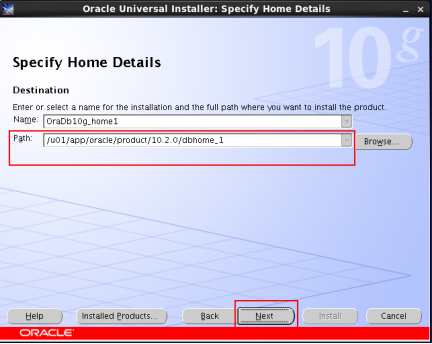
4.确认Oracle家目录的位置
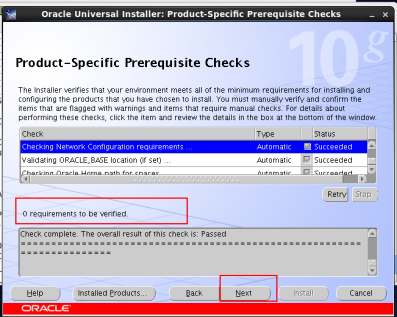
5.安装前自检查
6.仅安装数据库软件
后面执行dbca和netca来创建数据库和监听

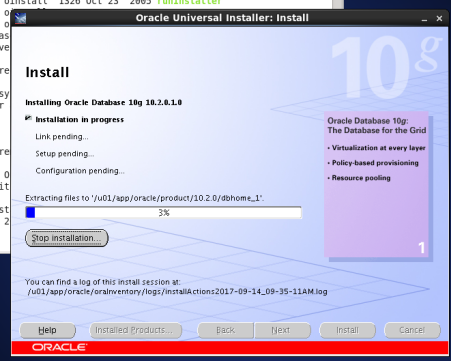
7.安装Oracle软件

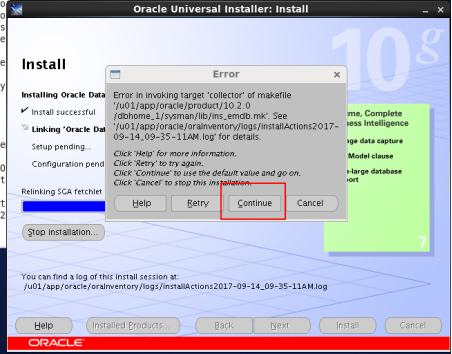
8.安装中回报一个error,这个是10g的一个bug,忽略continue就可以
9.安装到最后会弹出一个窗口,运行两个脚本
Root权限下执行
这两个脚本分先后顺序,先执行1,在执行2,全部执行完成后再点击ok


10.安装Oracle成功,退出即可


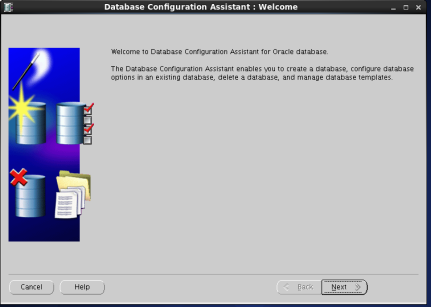
DBCA创建数据库
在oracle用户下执行dbca
1.欢迎页面
2.创建一个数据库

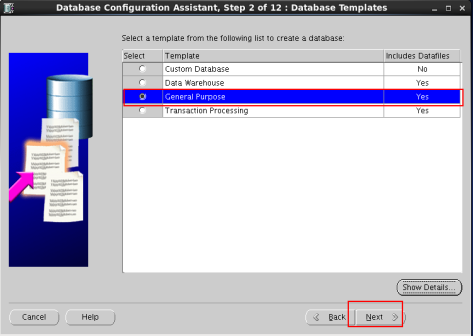
3.选择默认的template即可
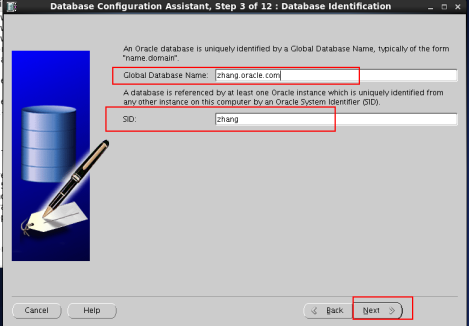
4.填写相关的完整数据库名称和sid的名称
这个要和你的/etc/hosts和hostname要一致,否则报错
5.安装EM企业管理器
这个安装或者不安装都可以

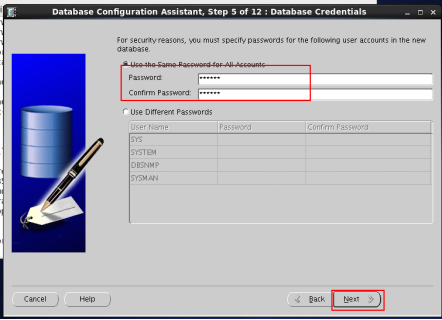
6.给相关用户设定密码
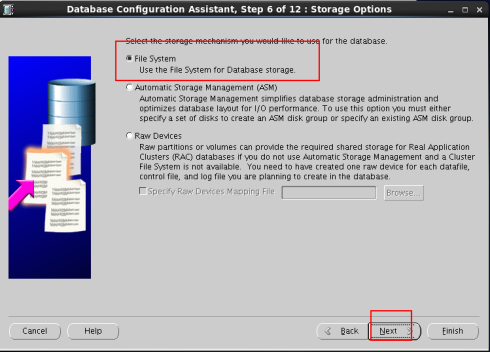
7.选择数据存储的方式
8.选择template的创建方式

9.设置闪回恢复区的大小和路径和是否开启归档

10.是否安装样例

11.选择字符集

12.安装数据库


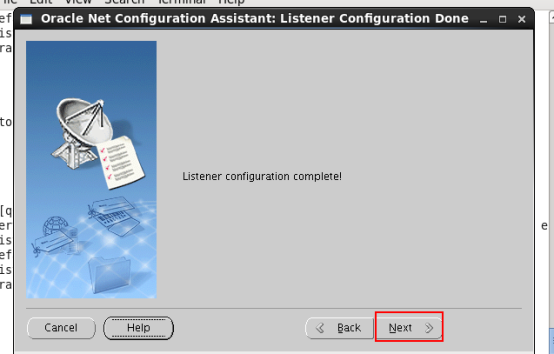
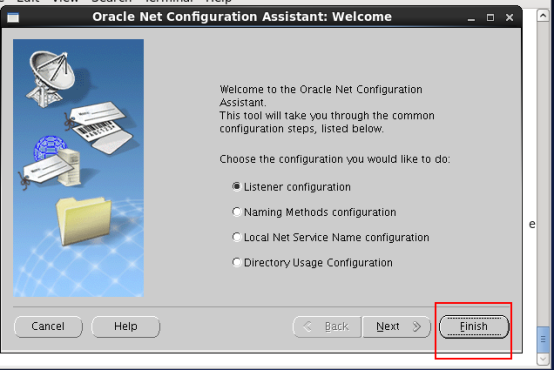
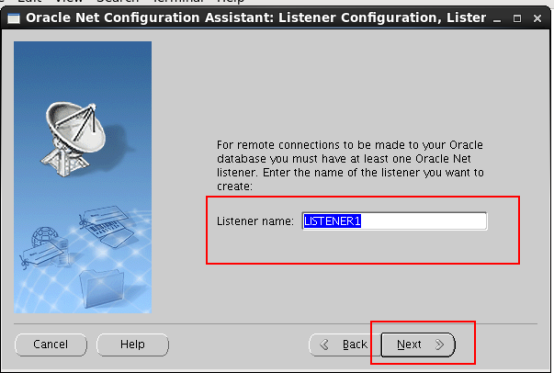
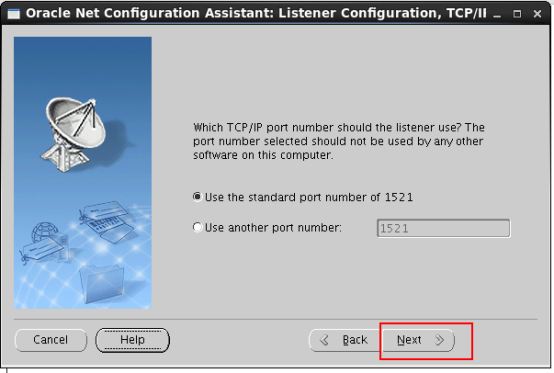
NETCA创建监听和本地服务名
在oracle用户下执行netca图形化界面安装
1.选择监听配置

2.选择添加监听

3.设置监听名称
4.设置监听协议

5.选择设置监听端口
6.是否再次创建监听
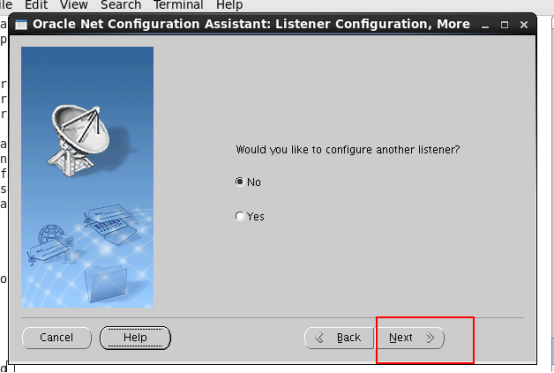
7.完成监听安装