一、地图导航界面分为四个模块,首部的导航栏,地图上的遮盖物,尺寸和放大缩小模块

- 首部的导航栏NavBar使用自己封装的组件
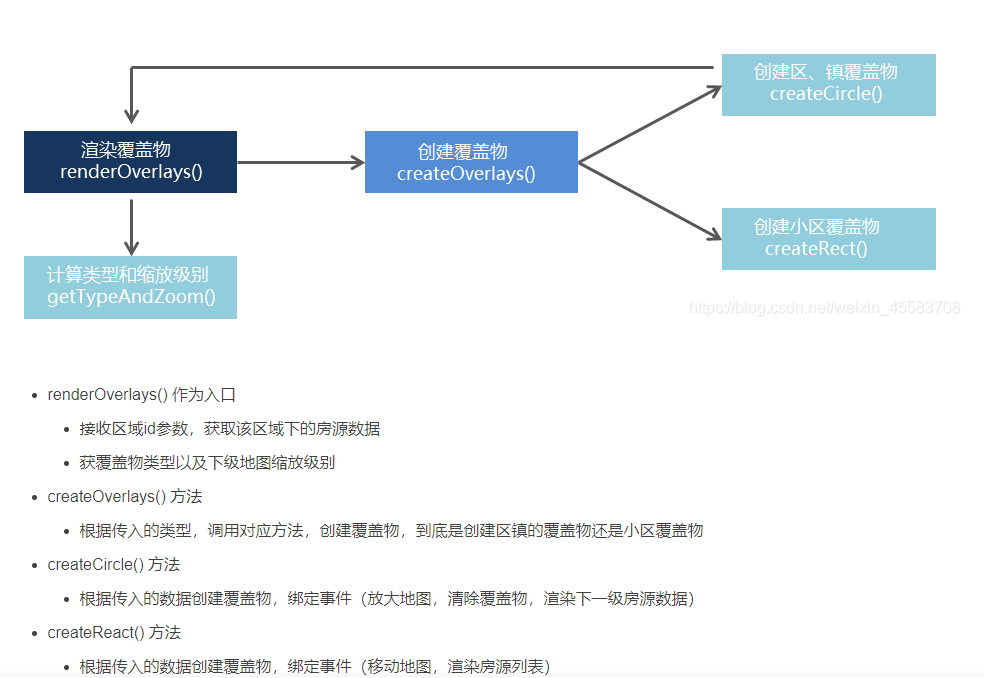
- 地图渲染
// 一加载界面就初始化地图 initMap = async () => { // 由于使用了百度地图API,则有一个BMap对象,将该对象挂载到实例上 this.BMap = window.BMap; // 创建地图实例 this.map = new this.BMap.Map("container"); // 获取定位城市 const { value, label } = await getCurrCity(); // 处理重置 this.cityId = value; // 创建地址解析器实例 let myGeo = new this.BMap.Geocoder(); // 将地址解析结果显示在地图上,并调整地图视野 myGeo.getPoint(null, async (point) => { if (point) { // 初始化地图,设置中心点坐标和地图级别 this.initPoint = point; this.map.centerAndZoom(point, 11); // 添加控件,放大缩小控件和标尺 this.map.addControl(new this.BMap.NavigationControl()); this.map.addControl(new this.BMap.ScaleControl()); // 渲染覆盖物 this.renderOverlays(value) } }, label); this.map.addEventListener('movestart', () => { if (this.state.isShowList) { this.setState({ isShowList: false }) } }) } - 创建覆盖物
-
获取数据
// 请求接口,获取房源数据 let res = await axios.get(`http://localhost:8080/area/map?id=${value}`) // 遍历房源信息,创建对应的覆盖物 res.data.body.map(item => { // 给每一条数据添加覆盖物 // 得到返回的经纬度信息 let { coord: { longitude, latitude }, label: areaName, count, value } = item // 创建覆盖物 let label = new window.BMap.Label('', { position: new window.BMap.Point(longitude, latitude), offset: new window.BMap.Size(-35, -35) }) // 设置覆盖物内容 label.setContent(`<div class="${styles.bubble}"> <p class="${styles.name}">${areaName}</p> <p>${count}套</p> </div>`) // 设置样式 label.setStyle(labelStyle) // 添加点击事件 label.addEventListener('click', function () { // 当点击了覆盖物,要以当前点击的覆盖物为中心来放大地图 map.centerAndZoom(this.K.position, 13); // 解决清除覆盖物的时候,百度地图js报错问题 setTimeout(function () { map.clearOverlays() }, 0) }) // 给label添加唯一标识 label.id = value // 添加到地图上 map.addOverlay(label) }) -
渲染覆盖物
// 根据区域渲染覆盖物 renderOverlays = async (id) => { // Toast.loading('加载中...', 0); // 初始化区覆盖物 let { status, data } = await getMapHouses(id); // Toast.hide(); // =========获取覆盖物类型和下一层缩放级别======== const { type, nextLevel } = this.getTypeAndZoom(); if (status === 200) { data.forEach((item) => { this.createOverlays(type, item, nextLevel) }) } } - 创建覆盖物
// 创建覆盖物 createOverlays = (type, item, nextLevel) => { const { coord: { longitude, latitude }, label: areaName, count, value } = item; // 转换地理位置坐标 const ipoint = new this.BMap.Point(longitude, latitude); if (type === 'rect') { this.createRect(ipoint, areaName, count, value) } else { this.createCircle(ipoint, areaName, count, value, nextLevel) } } -
按级别创建覆盖物
 // 处理小区情况
  createRect = (ipoint, areaName, count, value) => {
    // 绘制覆盖物
    const opts = {
      position: ipoint,    // 指定文本标注所在的地理位置
      offset: new this.BMap.Size(-50, -28)    //设置文本偏移量
    }
    const label = new this.BMap.Label(null, opts);  // 创建文本标注对象
    label.setContent(`
      <div class="${styles.rect}">
        <span class="${styles.housename}">${areaName}</span>
        <span class="${styles.housenum}">${count}</span>
        <i class="${styles.arrow}"></i>
      </div>
     `
    )
    // 去除默认样式
    label.setStyle({
      border: 'none'
    });
    // 添加点击事件
    label.addEventListener('click', (e) => {
      console.log('点击小区', value);
      // this.map.centerAndZoom(ipoint, 15)
      // this.map.panTo(ipoint)
      console.log(e);
      this.moveToArea(e);
      this.handlerHouseList(value)
    })
    this.map.addOverlay(label);
  }
 // 处理区和镇的情况
  createCircle = (ipoint, areaName, count, value, nextLevel) => {
    // 绘制覆盖物
    const opts = {
      position: ipoint,    // 指定文本标注所在的地理位置
      offset: new this.BMap.Size(0, 0)    //设置文本偏移量
    }
    const label = new this.BMap.Label(null, opts);  // 创建文本标注对象
    // 给label添加唯一ID
    // label.id = value;
    label.setContent(
      `
              <div class="${styles.bubble}">
              <p class="${styles.bubbleName}">${areaName}</p>
              <p>${count}</p>
              </div>
              `
    )
    // 去除默认样式
    label.setStyle({
      border: 'none'
    });
    // 添加点击事件
    label.addEventListener('click', () => {
      // 设置显示下一区域的位置和缩放级别
      this.map.centerAndZoom(ipoint, nextLevel);
      this.renderOverlays(value);
      // 清除第一层覆盖物
      // map.clearOverlays();
      setTimeout(() => this.map.clearOverlays());
    })
    this.map.addOverlay(label);
  }
4.展示该区域内的房屋列表
使用地图的 panBy() 方法,移动地图到中间位置
垂直位移:(window.innerHeight(屏幕高度)-330(房源列表高度)/2) - target.clientY(目标覆盖层的位置)
水平位移:window.innerWidth(屏幕宽度)/2 - target.clientX
移动地图的时候(监听movestart事件),隐藏房源列表
点击遮盖物的时候展示房源列表,由于展示房源列表的组件在条件找房页面也会使用,则将其封装成一个组件HouseItem并将获取的数据以参数传入
// 渲染小区下房屋列表
  renderHouseList = () => {
    return (
      <div
        className={[
          styles.houseList,
          this.state.isShowList ? styles.show : ''
        ].join(' ')}
      >
        <div className={styles.titleWrap}>
          <h1 className={styles.listTitle}>房屋列表</h1>
          <a className={styles.titleMore} href="/home/house">
            更多房源
    </a>
        </div>

        <div className={styles.houseItems}>
          {/* 房屋结构 */}
          {
            this.state.list.map(item => (
              <HouseItem
                onClick={() => this.props.history.push(`/detail/${item.houseCode}`)}
                key={item.houseCode}
                src={BASE_URL + item.houseImg}
                title={item.title}
                desc={item.desc}
                tags={item.tags}
                price={item.price}
              />
            ))
          }
        </div>
      </div>
    )
  }